Breathtaking and Pristine Wilderness
Nahanni National Park Reserve is located in the south western part of the Northwest Territories in Canada and is nothing short of magnificent. The beauty will blow your mind
There is such a big variety of scenery on display in the park, so if you want to experience as much as possible your schedule will be jam-packed.
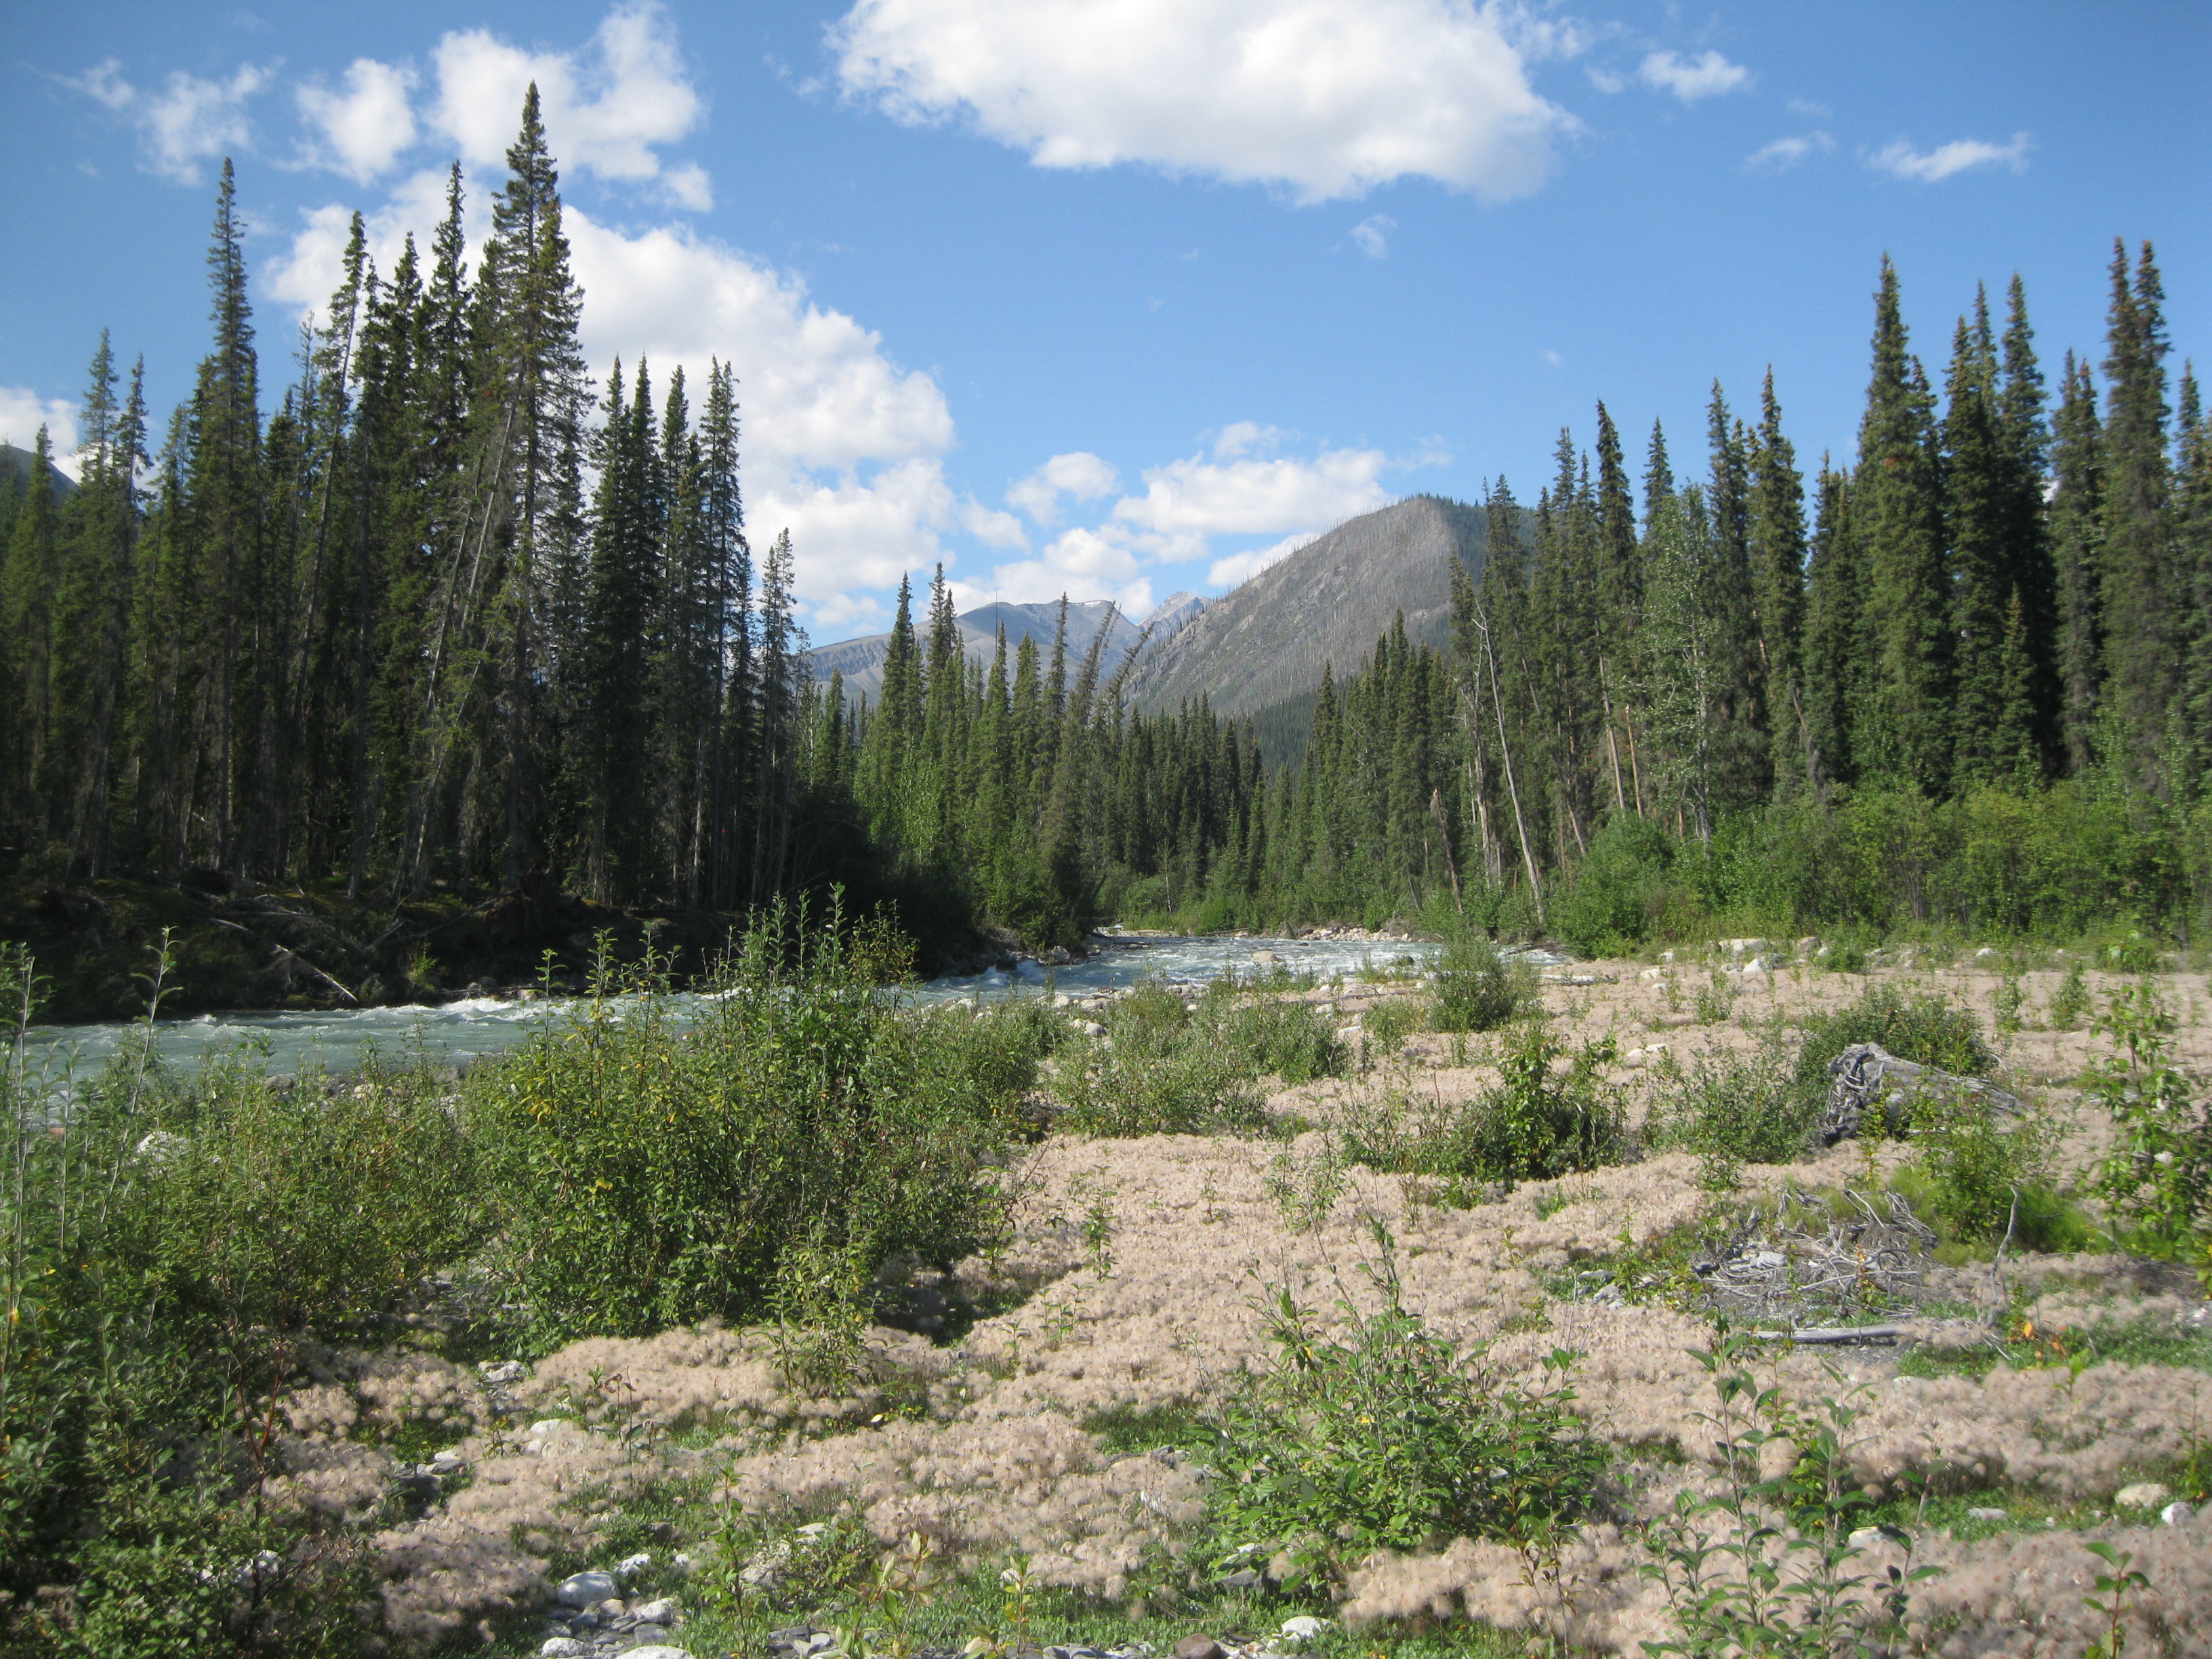
The South Nahanni River flows through the park where canoeing and hiking are the two most popular activities. A visit is only appropriate if you are an active traveller and are in good shape. You will be in for an amazing ride.
Geology: The Formation of the Spectacular Landscape
The landforms in Nahanni National Park Reserve are more varied than in any other national park in Canada. This is due to the combination of sedimentary folding and igneous intrusion mountains, the carving and depositional effects of glaciation. Also the lack of glaciation in certain parts which led to landforms having more time to develop and limestone corrupted with karst and cave topography.
About 200-500 million years ago, the area was all flat without any mountains, covered by a shallow tropical sea. As surrounding continents eroded, sand, silt and mud were carried down streams and rivers into the shallow sea where it settled at the bottom. The sediment built up, layer upon layer, to about 6 km (3.75 miles) deep. The weight and the pressure turned the sediments into rock which is the sedimentary rock we see today.
There were periods during this time were the flow of sediments stopped which allowed for reefs and marine life to flourish. Shells and marine skeletons were cemented together to create limestone. Fossilised snails dating back about 300 million years are found in the park.
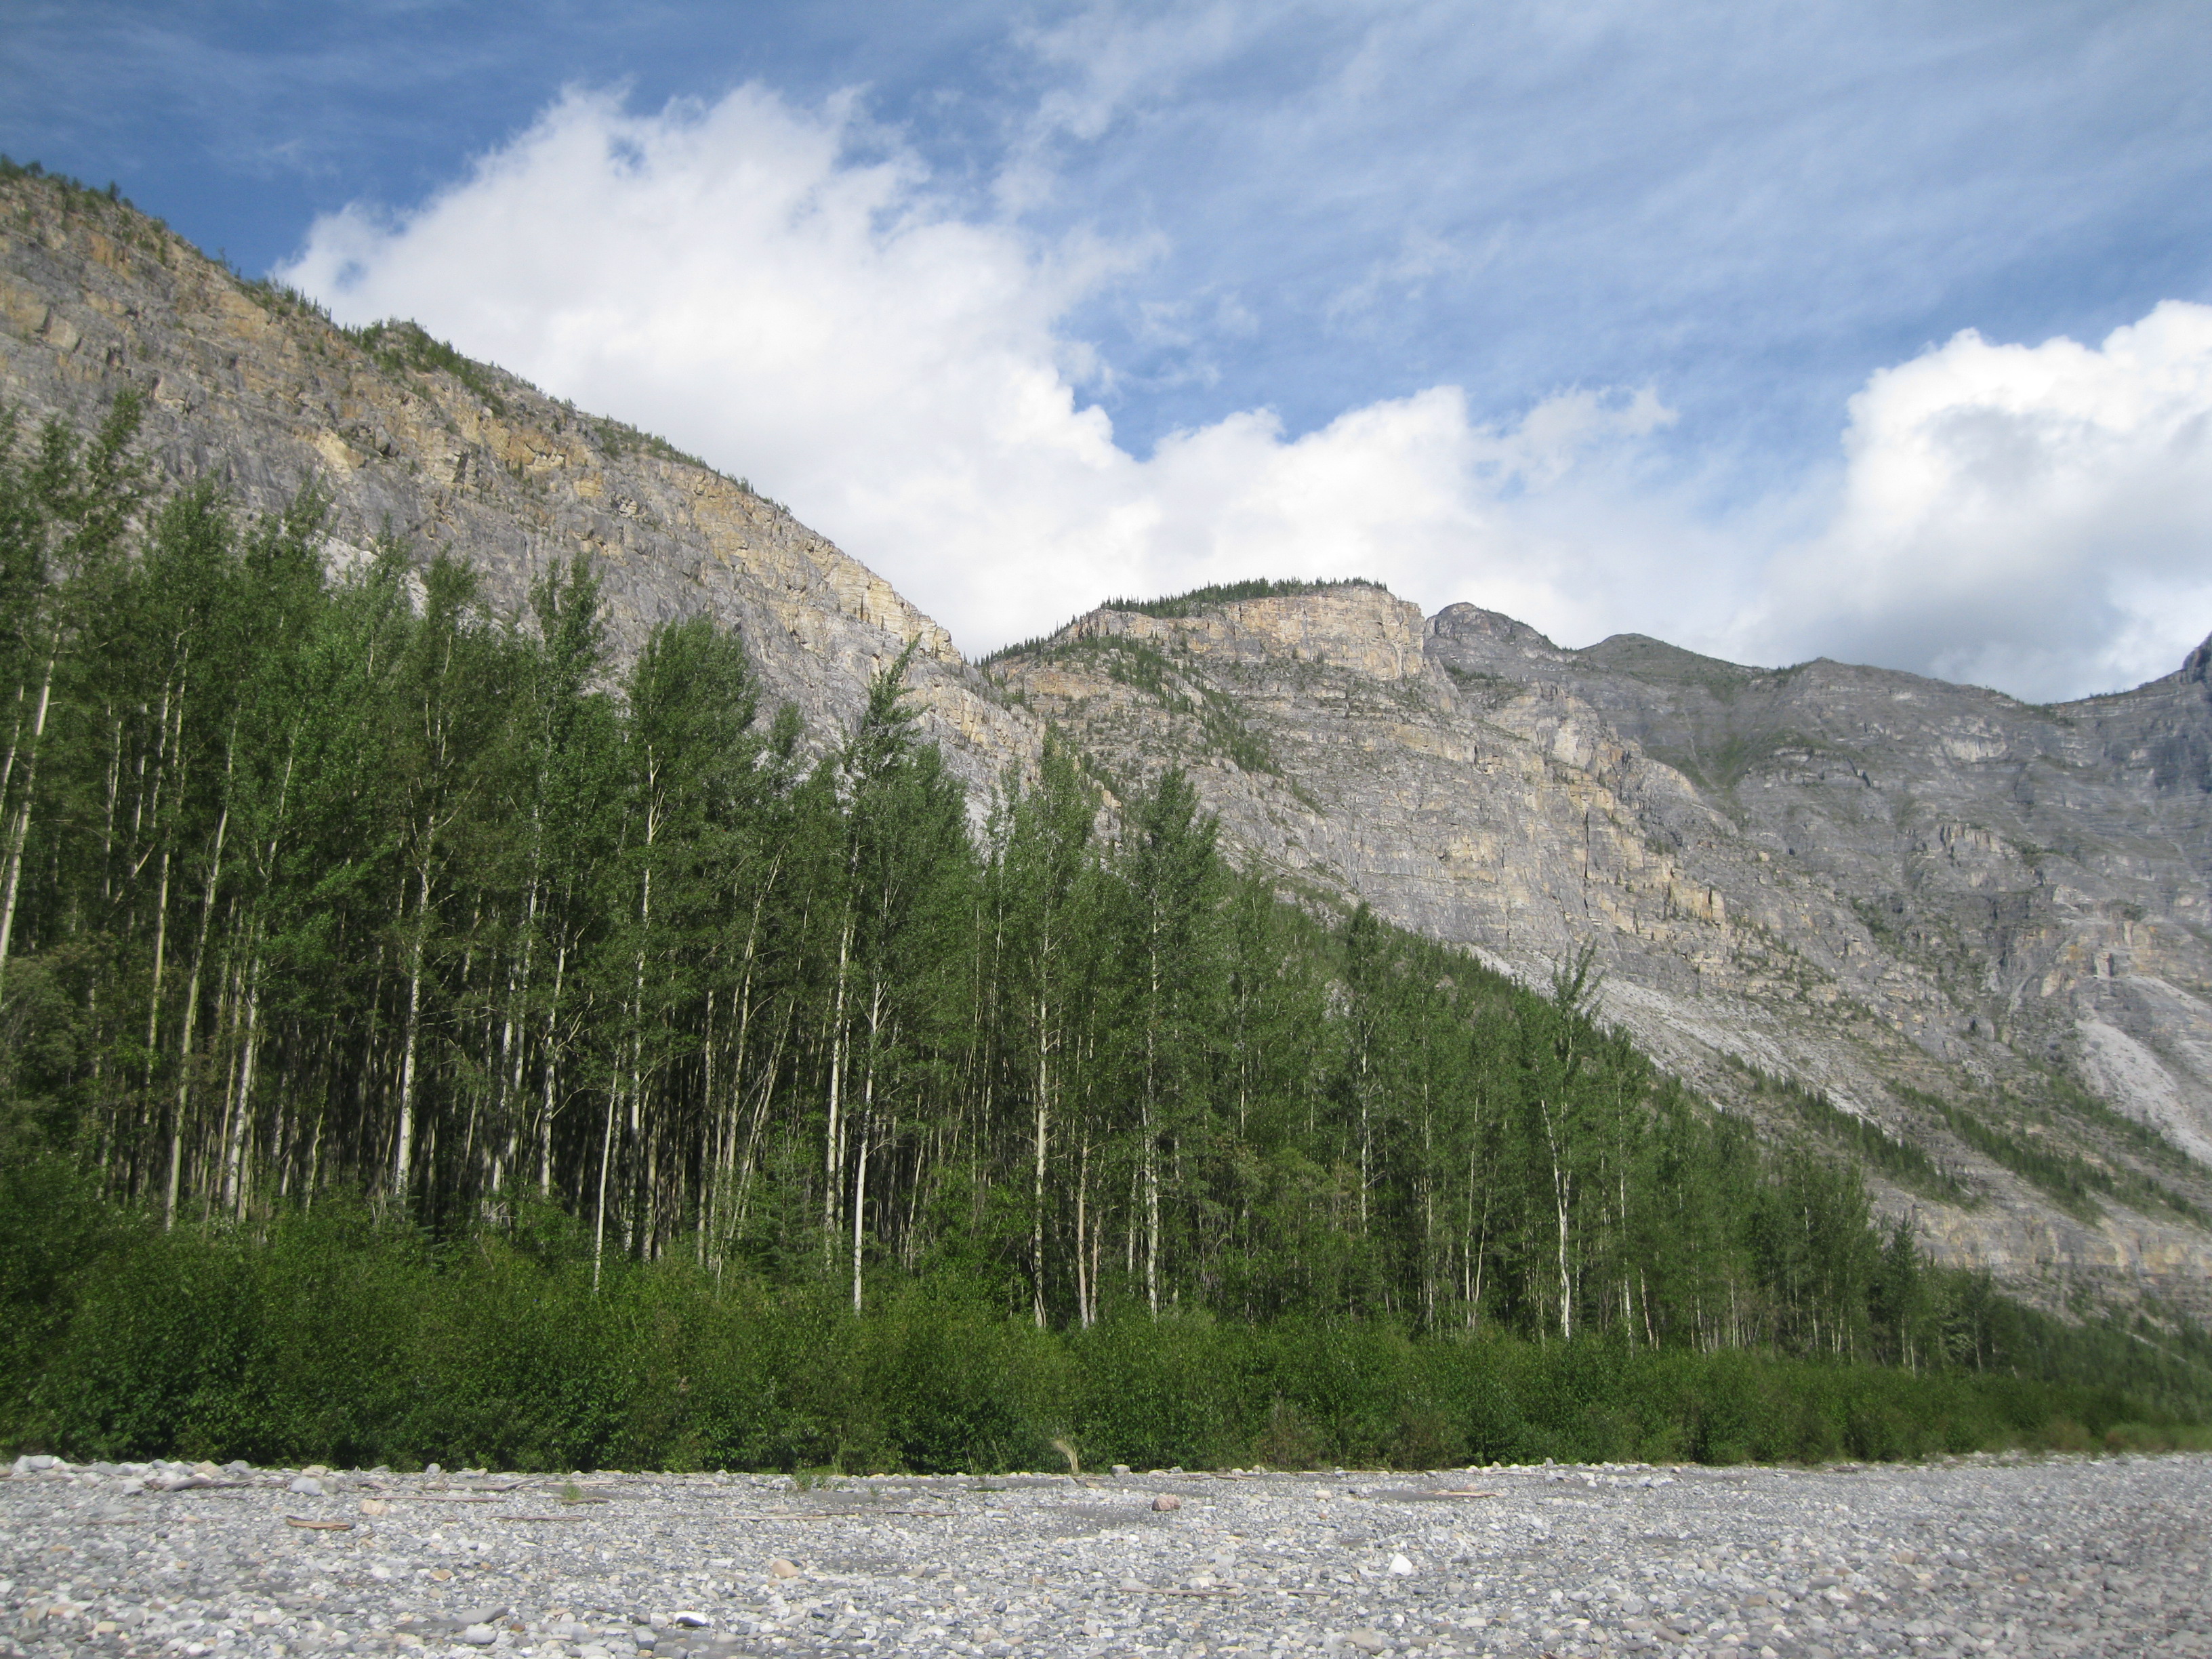
Around 100-200 million years ago, continental drift moved the sedimentary rock plate north from its tropical beginning colliding with the North American continental plate. This caused the rock layers to bend, fold and break, pushing up ridge after ridge. The long linear ranges like the Headless and Funeral Ranges are the perfect example of this event.
The plate collision culminated in volcanic activity 100 million years ago. Molten rock was forced into but not entirely through the folding and faulting sedimentary rock. These igneous towers of heated rock added a new dimension to the overlying rock by further breaking it in a radial pattern.
Over time 3,000 metres (9,843 ft) of rock was eroded away to expose the steep granite towers of the Ragged Range. At this time the peaks of the Cirque of the Unclimables, among others, would dominate the view from Rabbitkettle.
Over the past 2 million years glaciers and ice sheets have covered, carved and formed 90% of the landscape of North America. The most recent, the Wisconsin Ice Age, which occurred 10,000-85,000 years ago, only reached the eastern and western parts of the Nahanni National Park Reserve resulting in a young and recently carved scenery.
In the Ragged Range, snow and ice fields remain on the mountains. Pockets of ice lie stagnant in bowl-shaped cirques which they have carved, all remnants of Wisconsin Ice Age. The ragged range is a perfect example of this event with cirques, aretes, horn peaks and alpine valleys
The ice-free area between the Ragged Range and the Splits was a precipitation desert during the Wisconsin Ice Age. It was cold but there were no glaciers which had a massive impact on the formation of the landscape. This absence of glaciation is one of the most significant characteristics of the park.
Evidence of this old landscape is found by the South Nahanni River which flows through an ancient, glacially carved U-shaped valley in the upper section of the park. The valley is more than 100,000 years old and is untouch by the Wisconsin Ice Age.
The Geology of the South Nahanni River
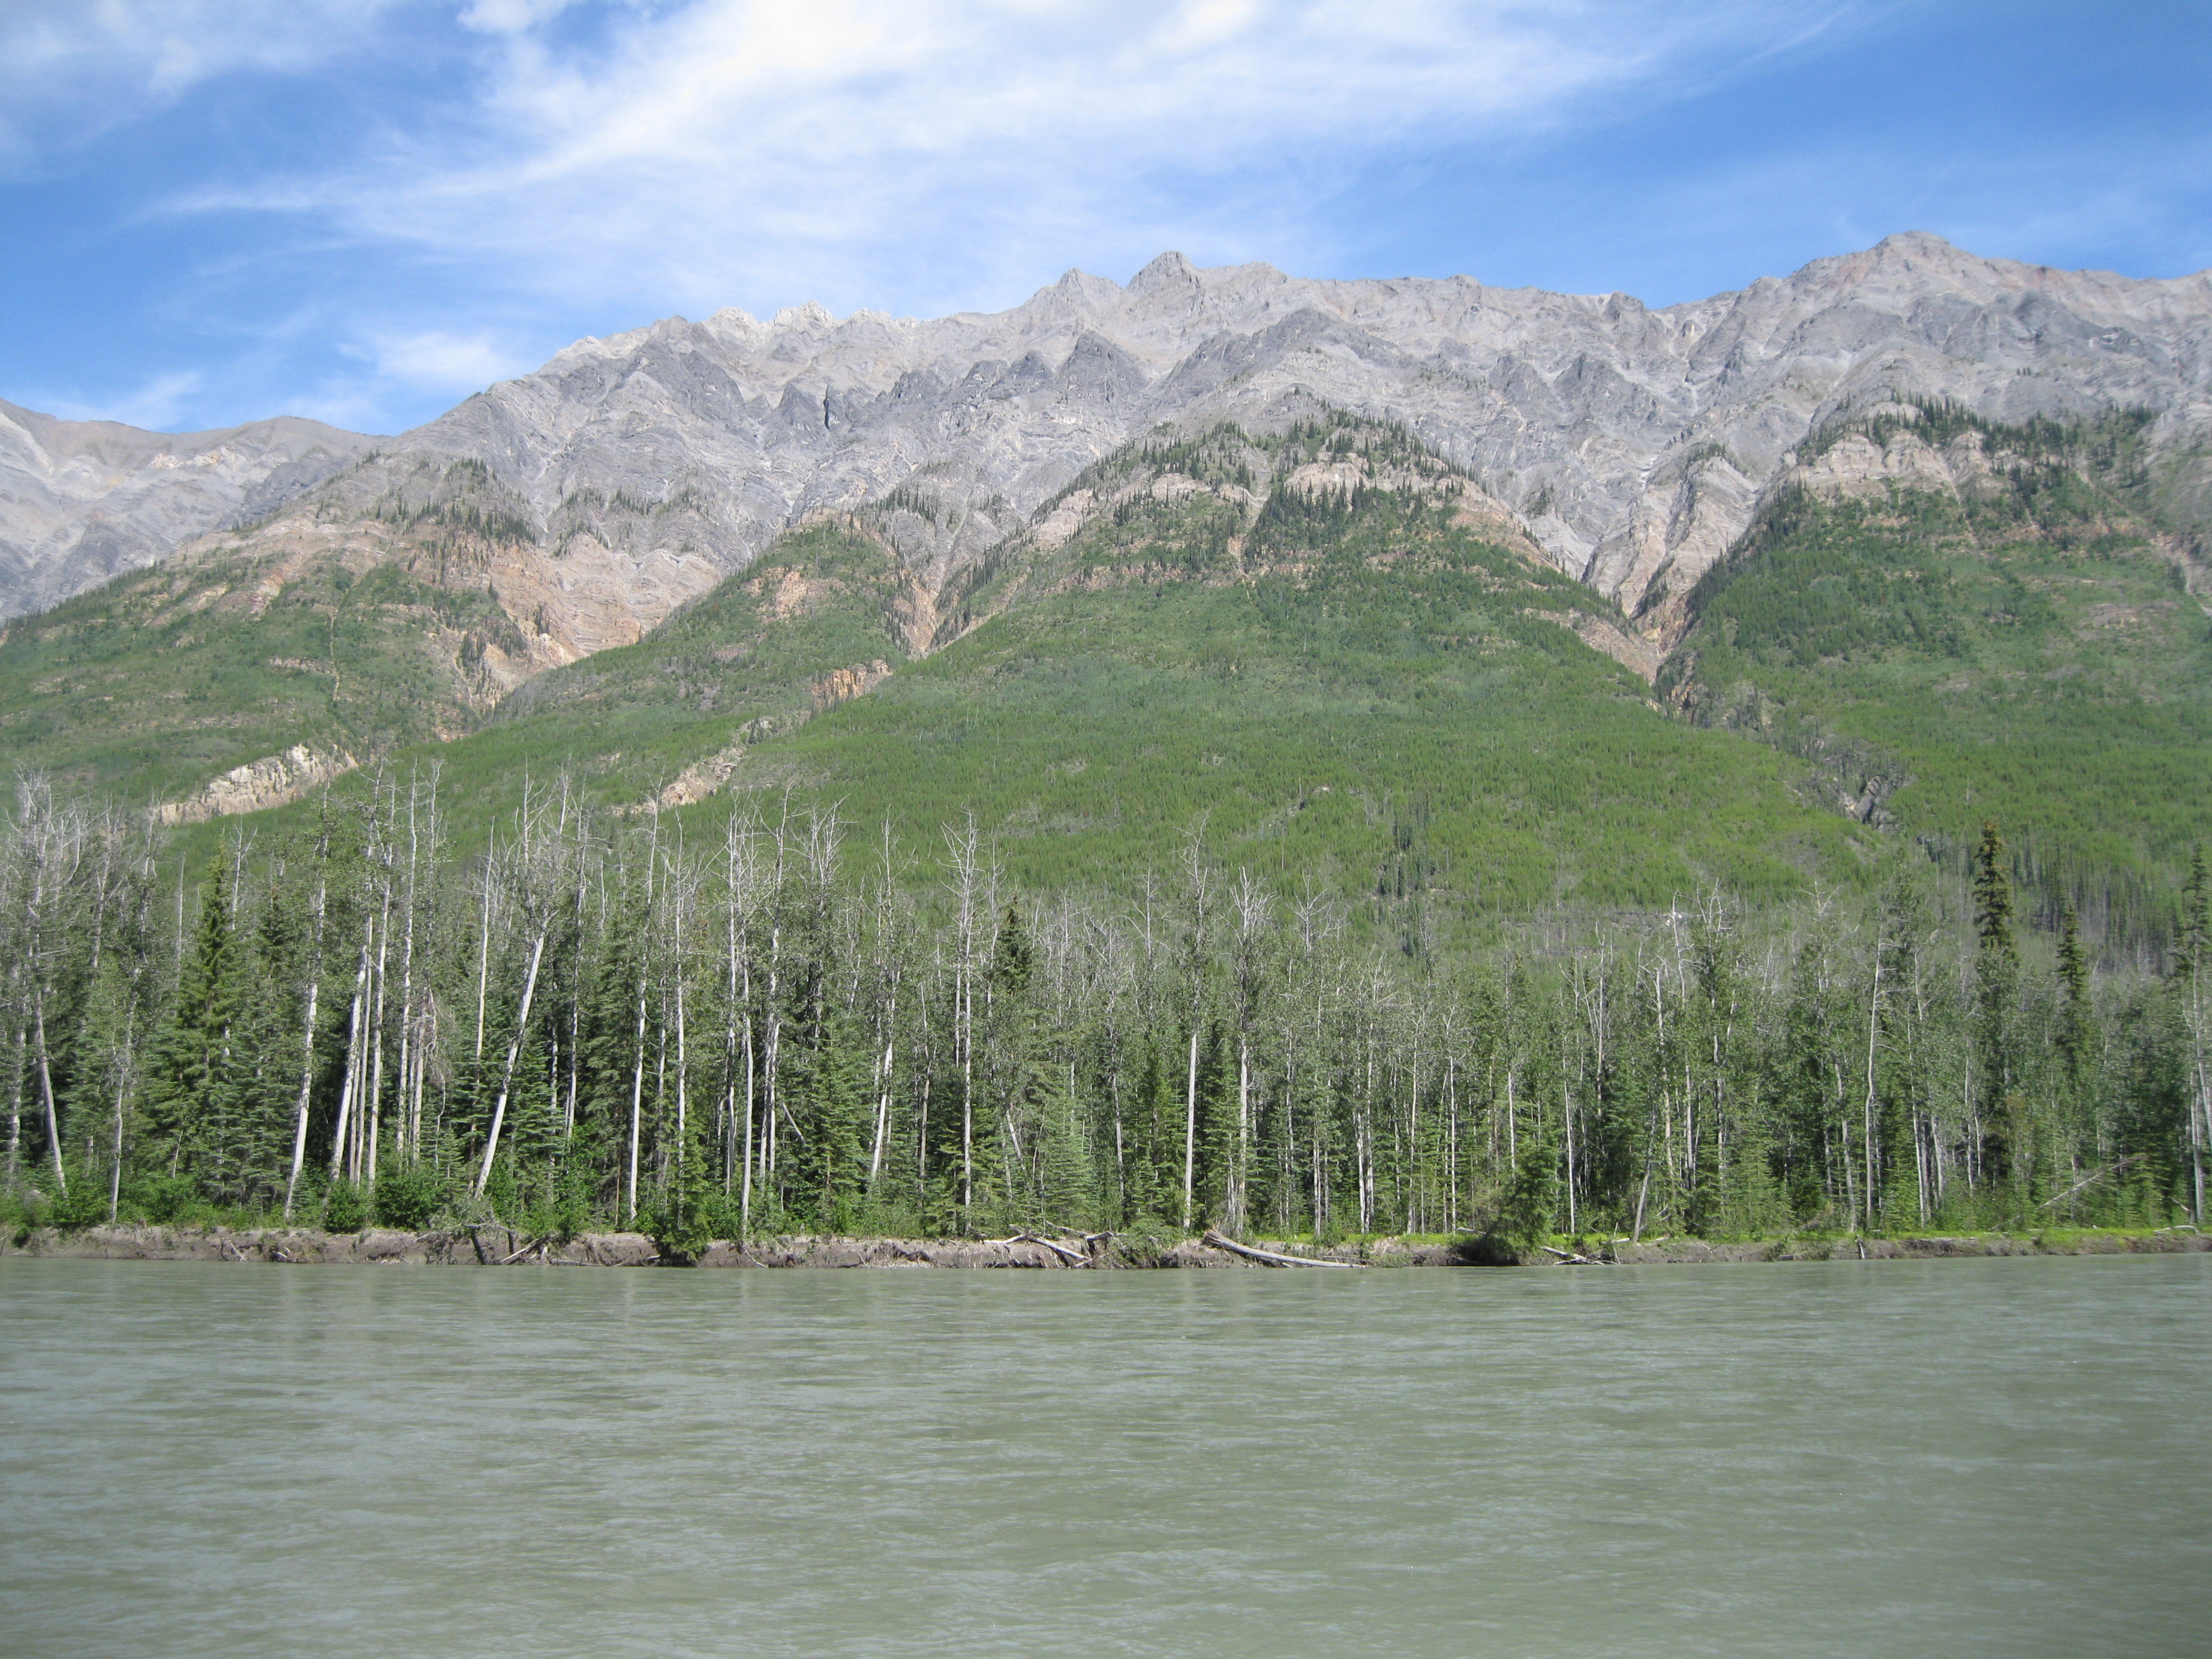
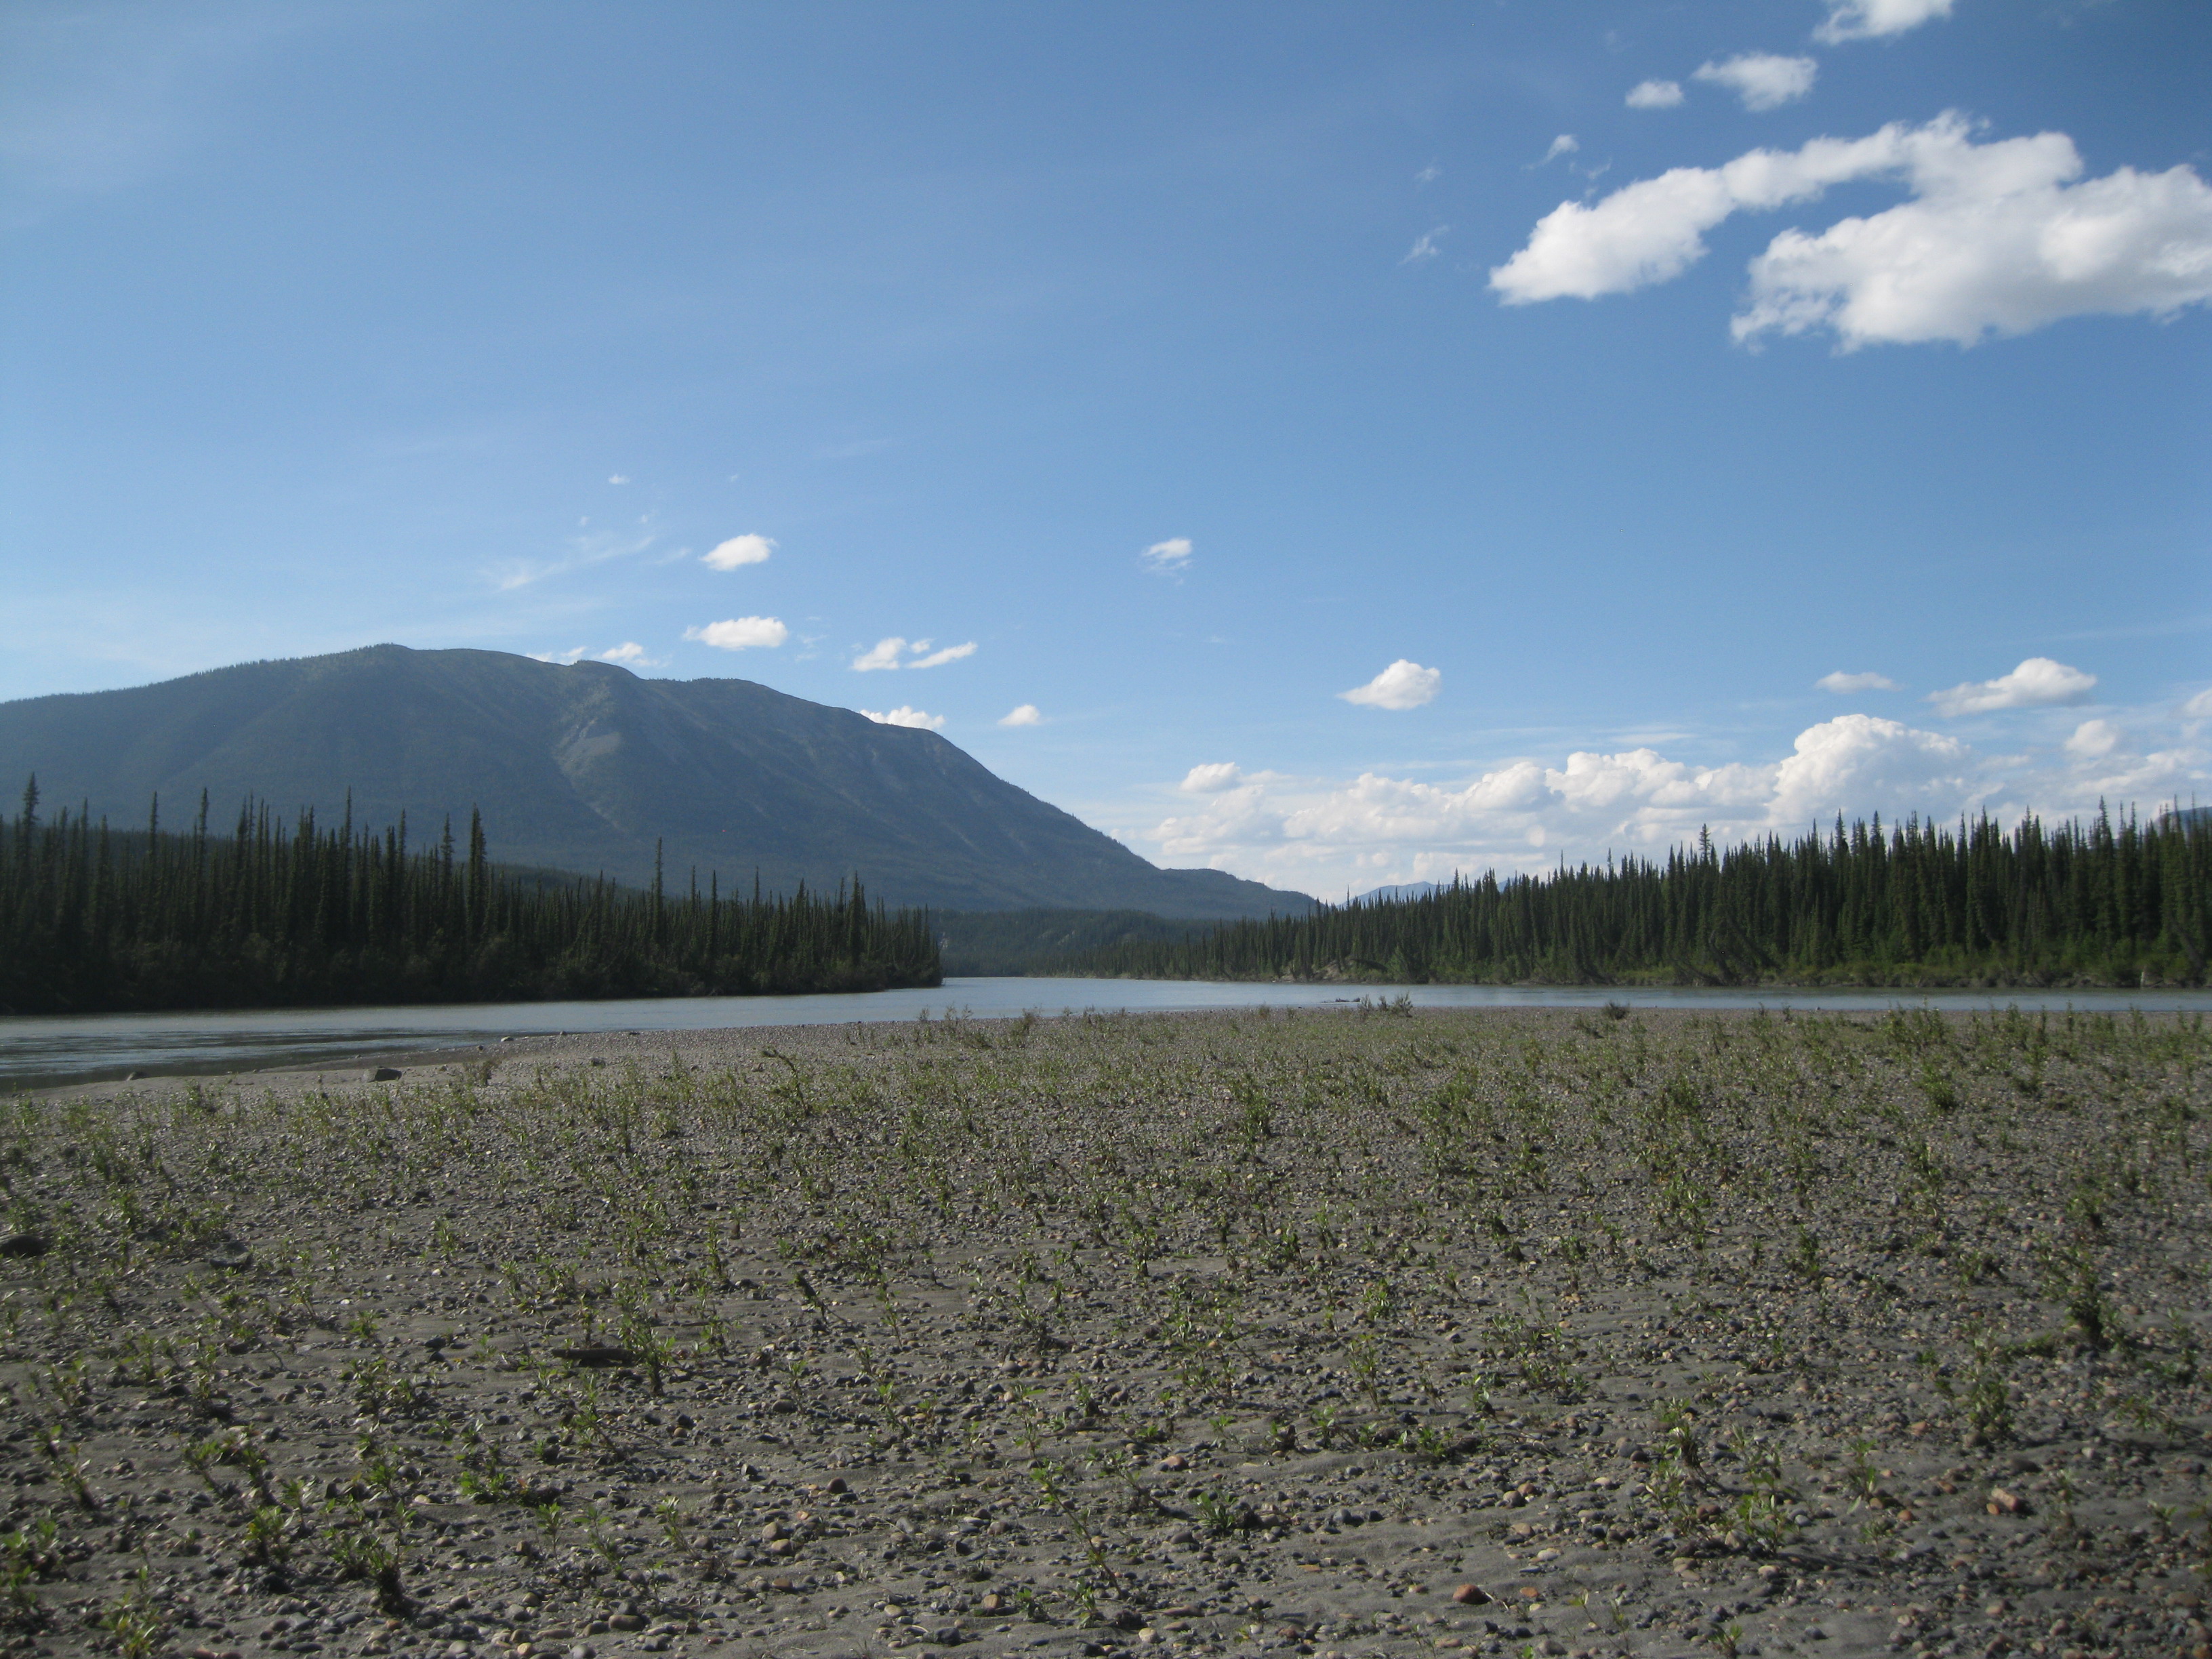
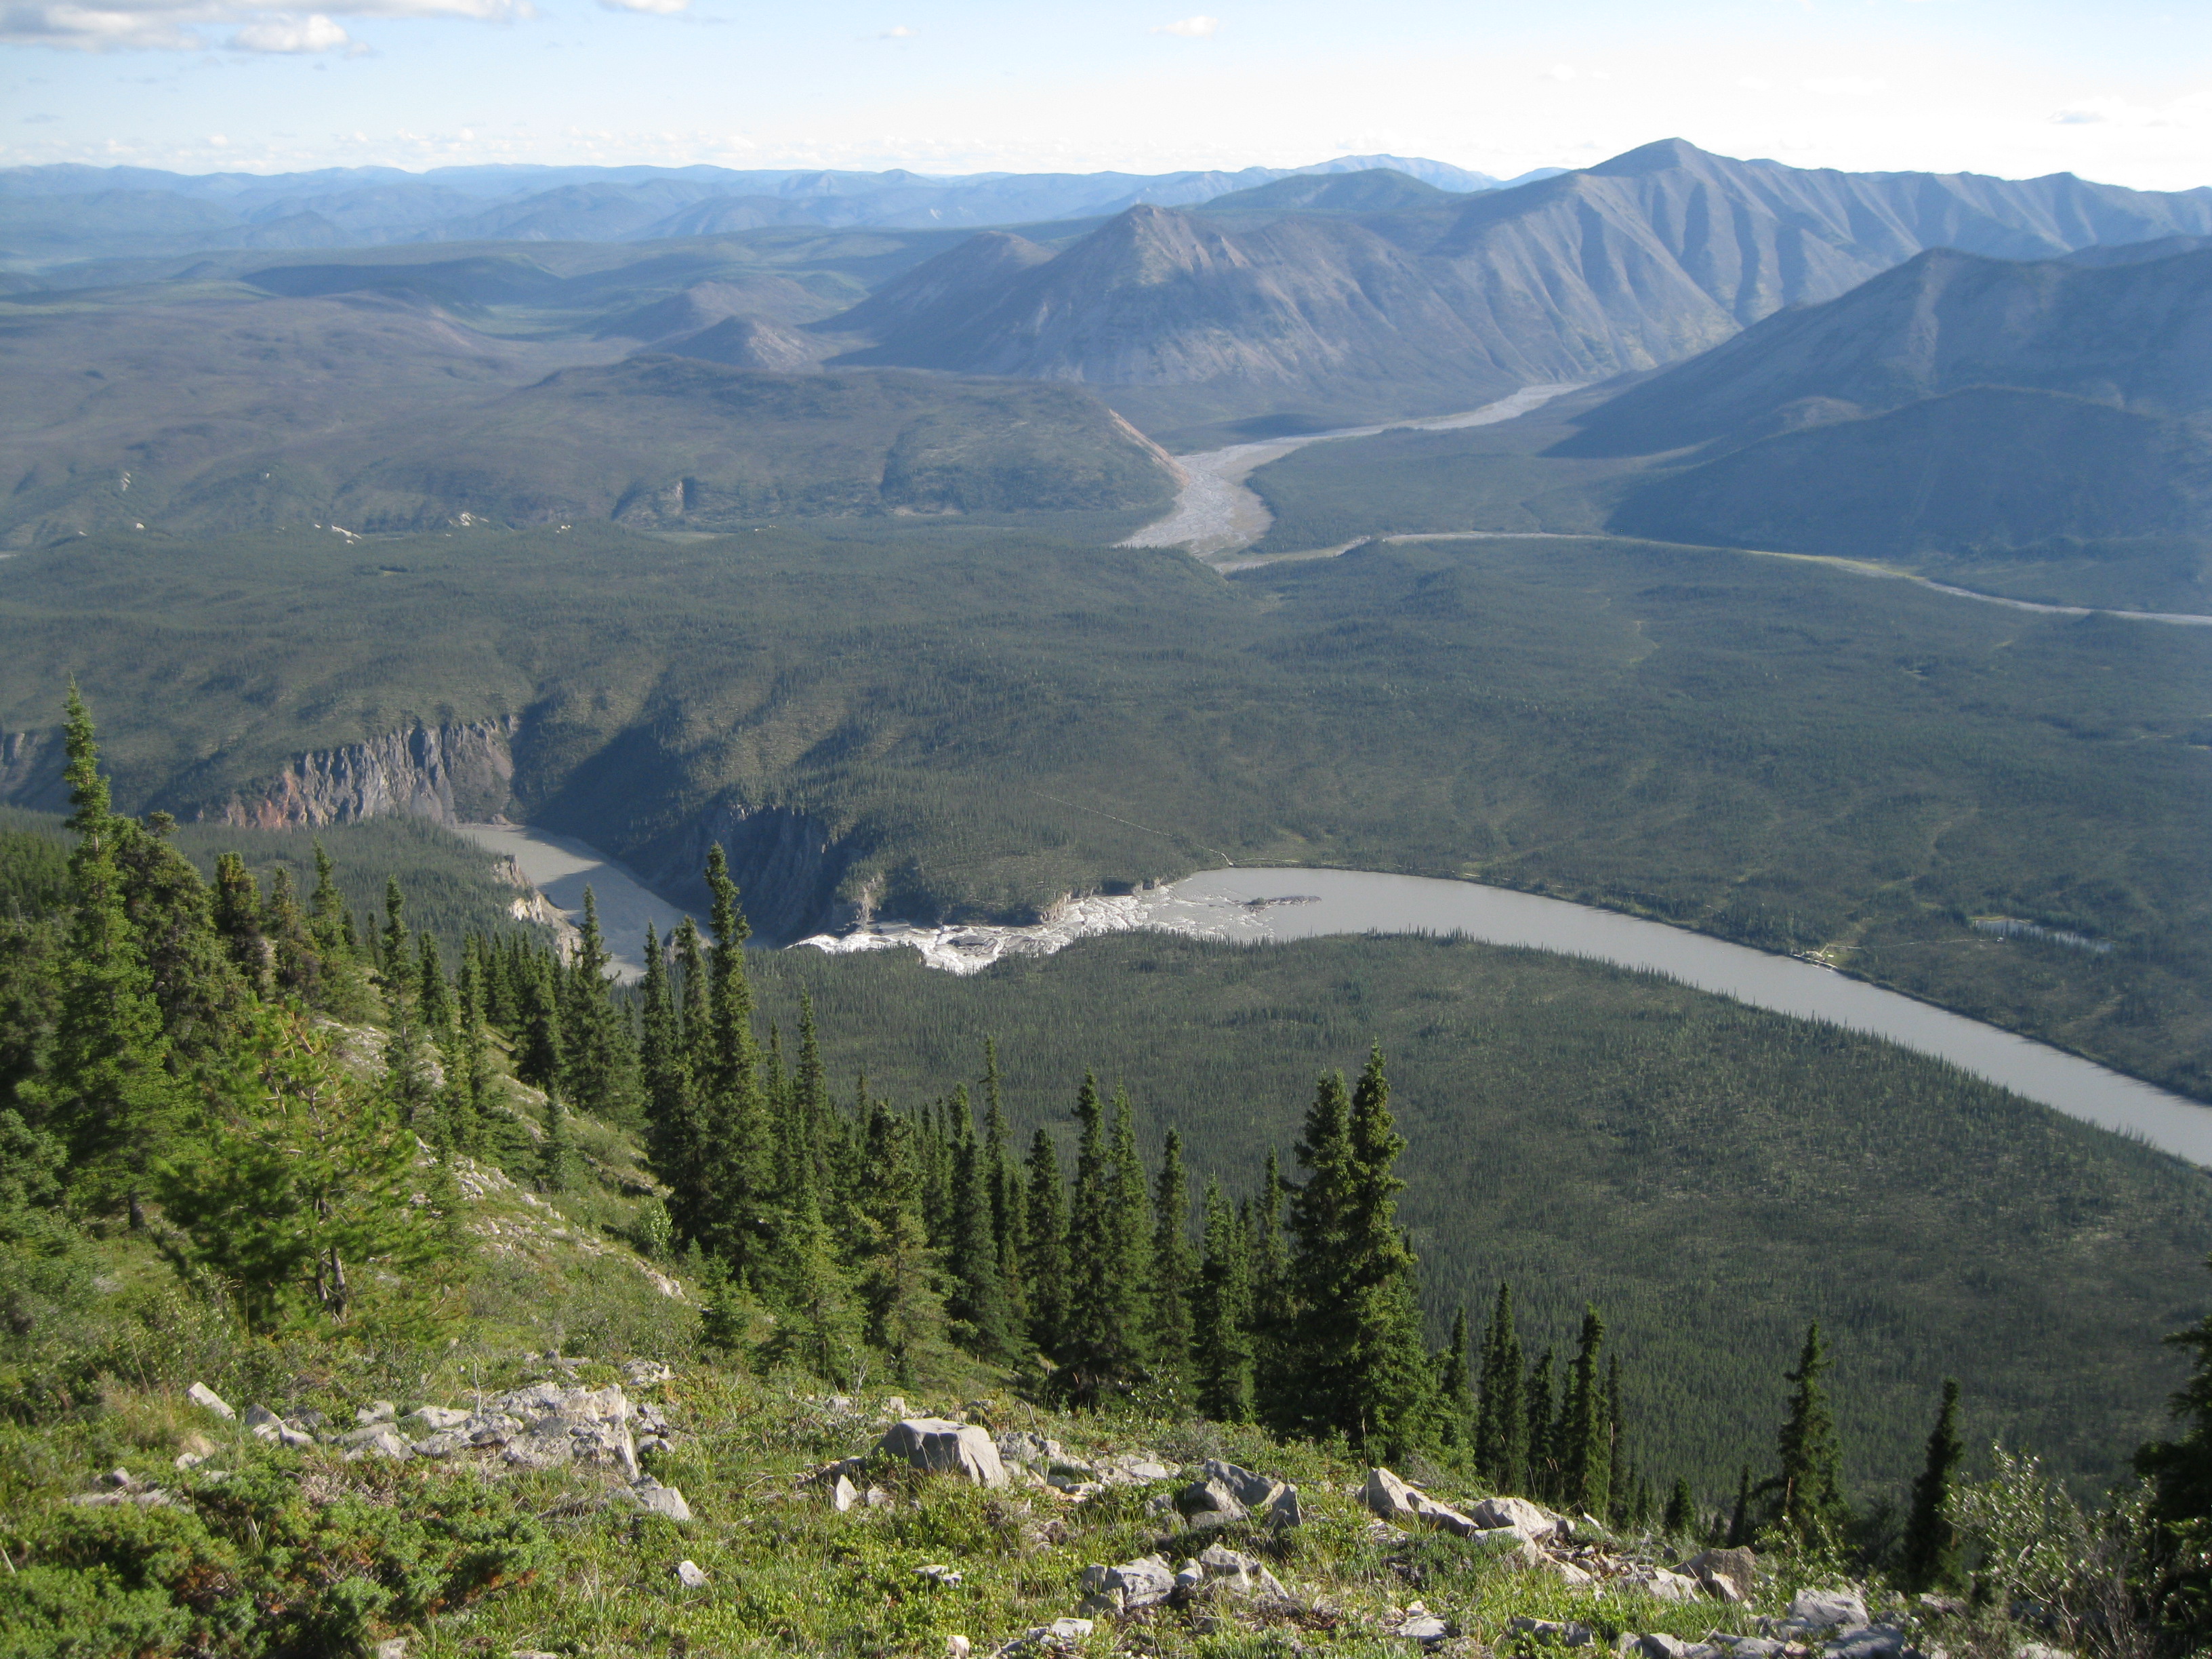
The South Nahanni River is one of Canada’s most stunning wilderness rivers. It has its origin in the MacKenzie Mountains and flows southeast to meet the Liard River. It starts with a clear, boulder strewn steam high in the mountains and turns into a large silt laden river that roams through four spectacular canyons.
The antecedent rivers of the MacKenzie Mountains are the only examples of its kinds in Canada. An antecedent river means that the river followed the same direction before the mountains were pushed up. Unlike most rivers which are diverted by the mountains. For this to occur the mountains have to be pushed up at a slow rate, the rock soft enough and the river powerful enough to maintain its course.
If the preceding river meanders, such as the South Nahanni River, so will the canyon, like the First, Second and Third Canyons. Not the Fourth Canyon which was carved out by Virginia Falls.
The Wildlife and Plant Life
The variety of vegetation is rich and diverse. There are more than 700 species of vascular plants and more than 300 species of bryophytes (such as mosses) and lichen. Common trees found are spruce and pine.

The wide range of habitat supports a diverse variety of wildlife. There are more than 51 species of mammals such as moose, wood bison, wolf, marmots, mountain goats, Dall sheep and black bears. More than 180 bird and 16 species of fish have been recorded and three amphibians have been seen.
History: The Creation of Nahanni National Park Reserve
Nahanni National Park Reserve was created in 1976 to protect a portion of the natural region of the MacKenzie Mountains. In 2009 the park was expanded from 4,766 km2 (1,840 square miles) to 30,050 km2 (11,602 square miles) which led to a protection of most of the watershed including large alpine plateau, karst features, wildlife habitat, the largest glaciers and the highest mountains in the Northwest Territories.
The park is located on the land of the Dencho First Nations which they manage in cooperation with Parks Canada.
History: The Dene People
The Dene people have travelled through the mountains and valleys for thousands of years following the direction of the animals. One group of Dene occupied the MacKenzie and Liard River areas.
A different group of Dene lived in the in MacKenzie Mountains who were referred to as the Nahannies, later modified to Nahanni, by the Europeans. Roughly translated it means “people who live in the valley on the other side of the mountain range”. They were known for making clothing from sheep and goat fur in the winter. Descendants of these people live in nearby communities and mountains.
In the late 1800s the Mountain Dene would travel down the South Nahanni River during Spring in moosehide boats to trade the winter take of furs and visit relatives in the MacKenzie region. The Dene constructed moosehide boats suitable for mountain river conditions up to 20 metres (65.6 ft) long. They were created only with the material of the land, from six to ten un-tanned moosehides, sewn together and stretched over a spruce pole frame.
These boats would carry entire families, dogs and furs down the river during high water. As they arrived at Fort Simpson or Fort Liard, the boats would be dismantled and the hides were traded along with the furs. Following a visit with relatives, the Dene would return to the mountains with only what they could carry and load on dogs.
History: The Fur Traders and the Prospectors
The first Europeans came in the early 1800s as fur traders. After the Yukon Gold Rush of 1898 rumours spread of gold in the Nahanni, attracting prospectors into the MacKenzie Mountains. Tales of hidden gold, murder and headless men became legends associated with the Nahanni.
The Scottish explorer Alexander MacKenzie explored what is now known as the MacKenzie River and built trade posts at Fort Simpson and Fort Liard. MacKenzie was known for his overland crossing of present day Canada, which was the first east to west crossing of North America, preceded by the Lewis and Clark Expedition 12 year later.
John McLeod, another Scottish explorer, would serve as manager at the two trade posts. As the Dene would leave their nomadic lifestyle behind and move into permanent settlement close to the forts and would establish a cooperation with the fur traders as described earlier.
Some explorers used the Nahanni as a path to the gold fields in the Yukon or tried to make their fortune on the Flat or South Nahanni Rivers. No significant gold was found but the headless bodies of prospectors Willie and Frank McLeod were found around 1908 and the legend arose of the Lost Mine where the brothers were supposed to have struck gold.
Camping and Equipment
There are no restrictions with regard to camping, so camp can be setup anywhere which makes it very easy and convenient.

If you are exploring the park by both canoeing and hiking, you will be in the wilderness far away from any facilities. Therefore make sure you bring the right equipment for a full on backpacking trip. Since you are only going backpacking for a part of the trip you can bring more luggage than on a regular long backpacking trip as you can store it in your canoe. When you do the hiking portion, the canoes will be stored away in the woods in which the clothes and equipment you don’t need can be safely stored.
For the canoeing portion make sure you bring a wetsuit, wet boots or neoprene socks you can wear in a pair of old sneakers. The wetsuit is important for when you go through the major white water rapids and the wet boots or neoprene socks should be worn at all times when you are paddling to avoid getting cold. No matter how hard you try to keep your feet dry, they will get wet.

A life jacket and a helmet are also essential. If you have joined an organised tour this will most likely be taking care of for you such as paddles and canoes as well.
The Art of Canoeing
The most challenging part operating a canoe is paddling in the stern which is the rear of the boat. Here you will be steering and if you are unexperienced it takes a while to master the skills. The bow is the front of the boat where your main task is to paddle and back draw when necessary. It is important that the person in the stern communicates to the person in the bow on how to paddle when appropriate.
Both should concentrate on reading the water, but the person in the bow has a better lookout and therefore it’s essential that he lets his partner in the back know of any challenges ahead such as obstructions, features or eddies approaching.
It is very important that you are being partnered up correctly when you head out on the river. If you are inexperienced it is recommended that you take on the bow and a more experience canoeist takes on the responsibility in the stern. The partnership functions best if you have equal paddling power in the front as you have in the rear. If it isn’t balanced one of the parties will be doing most of the work and there will be a lot of additional steering and adjusting which will not only wear down on your strength but it will also cause frustration.
The chemistry between the two paddlers is so important as well and can make or break the partnership. If you listen to each other and have mutual respect it makes all the difference.
Classification of the Rapids
The American version of the International Scale of River Difficulty is used to rate the rapids on the South Nahanni River. Factors such as physical isolation, cold water temperature and the distance to help in the case of an emergency affect the ratings. The major rapids are classified between class I and class III.

Class I rapids are through fast moving water with riffles and small waves. There are few obstructions which are all obvious and easy to avoid. Class II rapids are straightforward with wide, clear channels that are evident without scouting. Some manoeuvring may be necessary. Rocks and medium-sized waves are easily avoided by trained paddlers.
Class III rapids are moderate and irregular waves which may be difficult to avoid. Demanding manoeuvers in fast currents can occur and good boat control is often required in tight passages and around ledges. Large waves may appear but are easily avoided. Strong eddies and powerful currents can be found. Scouting is recommended for an inexperienced group.
Getting to the Park
Nahanni National Park Reserve is very remote. The travel time is probably around half a day in the best case scenario. It depends on the journey to the area. The most common route is to fly into Yellowknife and then Fort Simpson, which is the closest major settlement to the park.
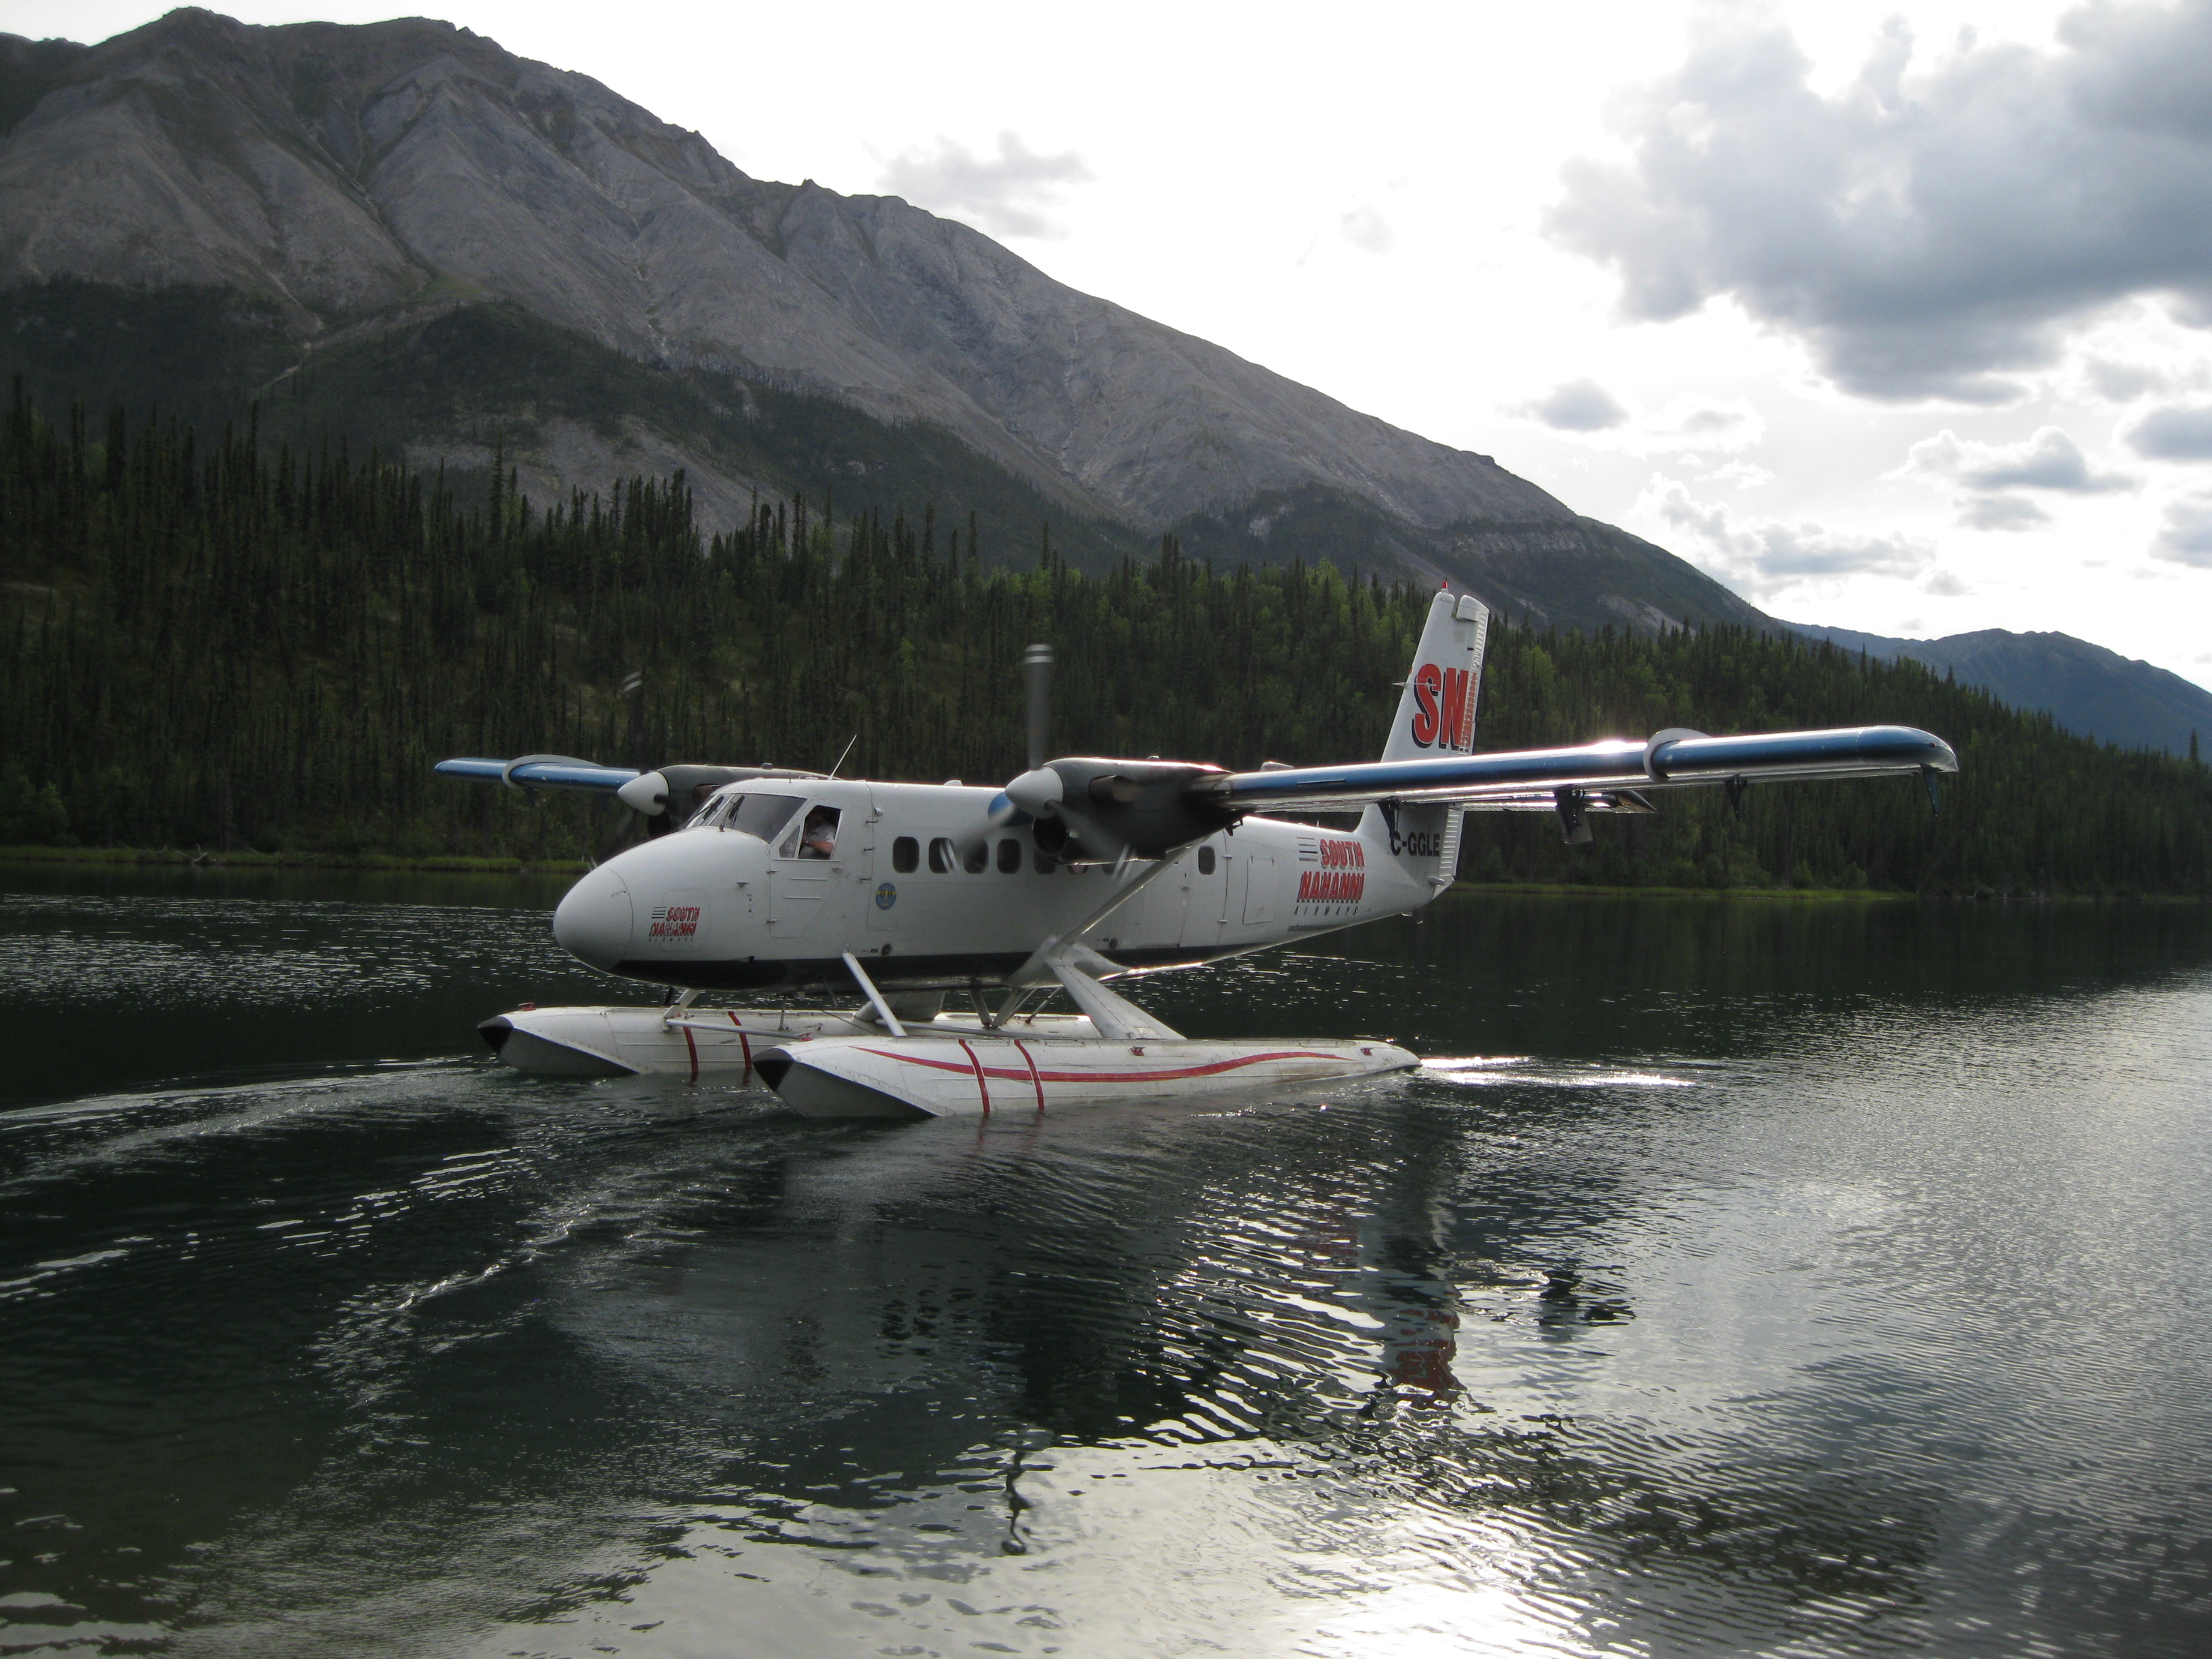
The park is mainly accessible by aircraft, therefore you have to charter a flight from Fort Simpson which will take you to the park. If you are with an organised group this will probably be booked for you. In the case of exploring the park by canoeing and hiking, the best option would be to go with a twin otter. This aircraft can carry six passengers on one side and the canoes and equipment on the other side of the plane. If you are in a bigger group you will have to split the trip up into several flights.
Travelling with the twin otter into the park will take about 1½ hours and it is an absolutely magical flight with a scenery of glorious mountains peaks, lakes and glaciers. You will be in absolute awe all the way. The journey will take you across the eastern to the very western part of the park, exposing the stunning of park all the way.

The flight terminates at Honeymoon Lake where the adventure inside the park starts. This is the recommended option where you get to explore the park all the way from the western to the very eastern part of the park. Visiting Nahanni National Park Reserve is a once in a lifetime adventure so you may as well do as much as possible and experience the full adventure. Some people fly further into the park down the river and do shorter trips.
Only about 500 people paddle through the South Nahanni River a year so there’s a lot of space to stretch out and enjoy this fabulous unspoilt park.
Honeymoon Lake
This twin otter lands on Honeymoon Lake which is a part of the Island Lakes, located close to the western boundary of the park. You can camp right on the shore of the lake in the shelter of the woods with a magnificent view of the flat lake, mountain peaks and the reflection of the surrounding scenery in the lake. The name of the lake is very appropriate due to its sheer beauty. The mountains across the lake are a part of the Bologna Ridge.

On the first day of paddling practise your strokes on Honeymoon Lake before heading onto the South Nahanni River. It depends on level of experience and if you are going with mates or in an organised group. Make sure that your basic skills are up to scratch. You will learn and improve as the days go by on the river.
As you are leaving Honeymoon Lake you are entering a creek that leads towards the South Nahanni River. You will be travelling on this beautiful river all the way to the end of the park.
Moore’s Cabins
As you have paddled down the South Nahanni River for about an hour you will get to the area where the Moore’s Cabin is located. It is based not far from the river in the bushes and cannot be seen from the river. Therefore you have to be familiar with the area and know where you are going to find the cabin. Checking out the cabin is highly recommended as it is such a neat spot and the history associated with the place is quite intriguing.
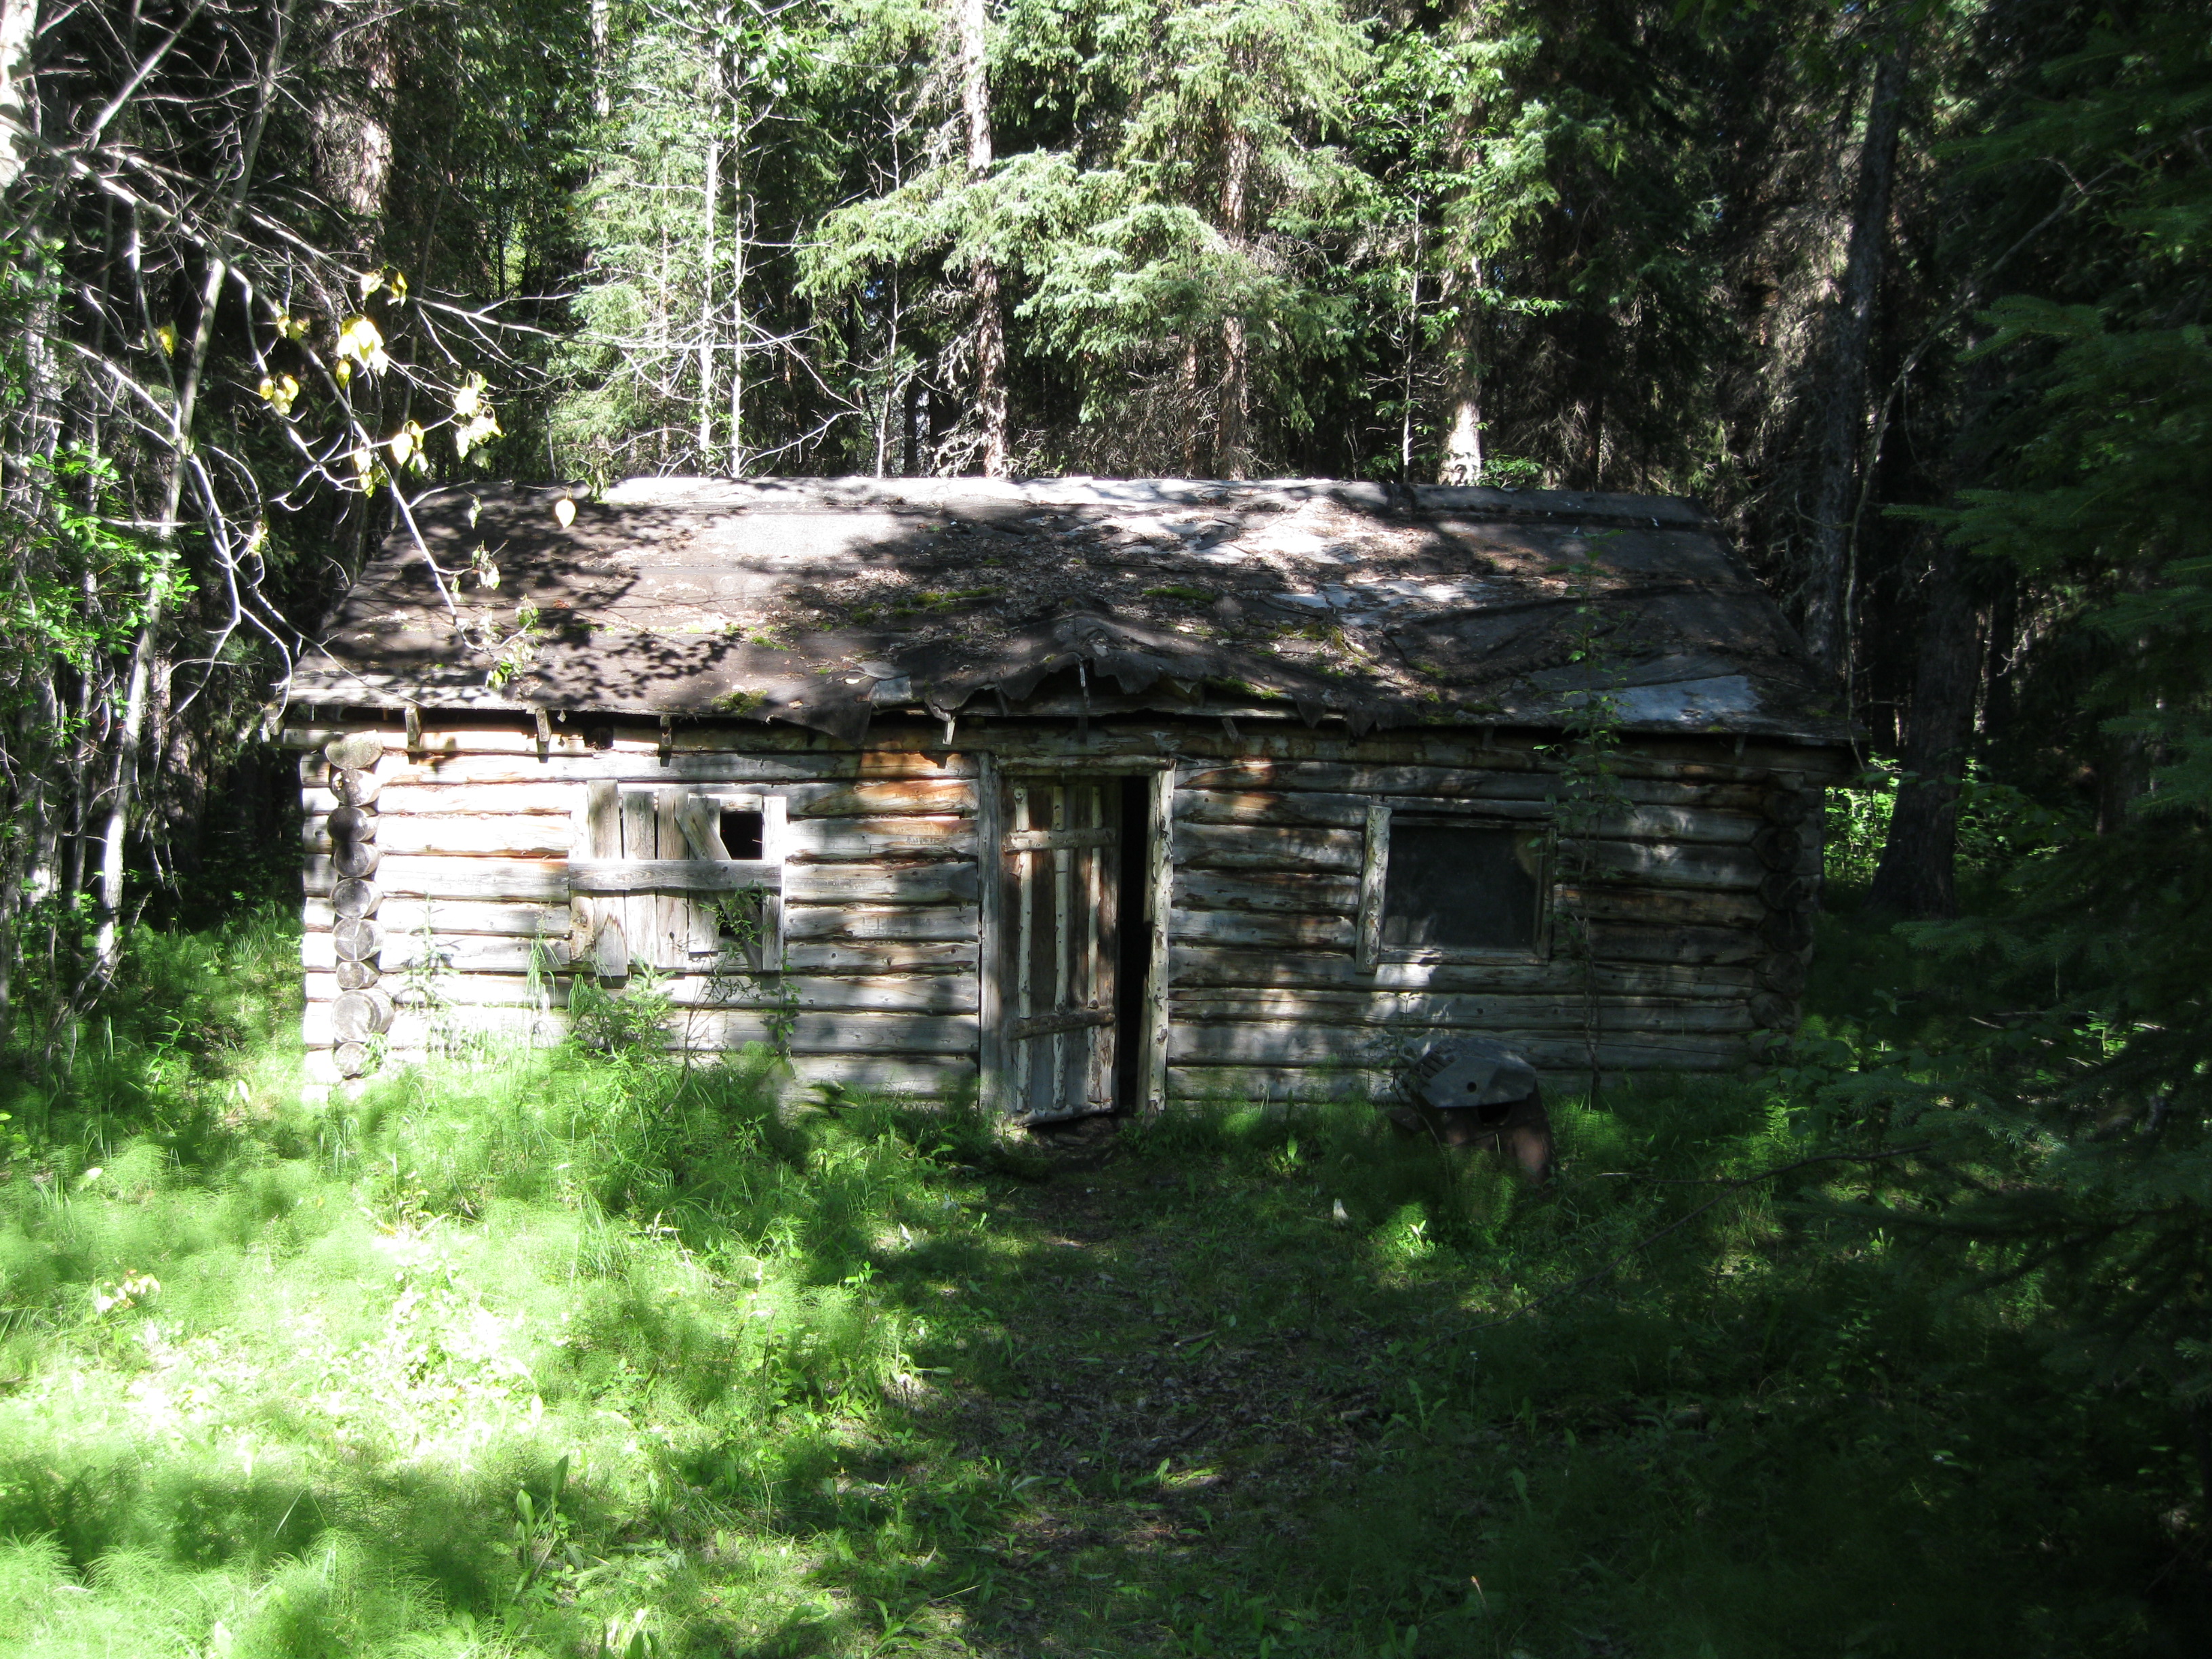
Back in the spring of 1978, John and Joanne Moore built this log cabin as a honeymoon project and lived there for more than a year. It’s a very cosy and pretty log cabin hidden away in the bushes. Imagine the awesome solitude the Moore’s would have experienced in this marvellous wilderness.
Moore’s Hotsprings
A few kilometres from the cabin down the river, the Moores discovered a small stream fed by a series of hot water flow appearing from the bank. This warm water and lush vegetation is a major contrast the glacier fed streams on the opposite side of the South Nahanni River
You can locate the spot by paying attention to the dark sand beach at the base of a steep ridge to the left of the river as the main river turns to the right.
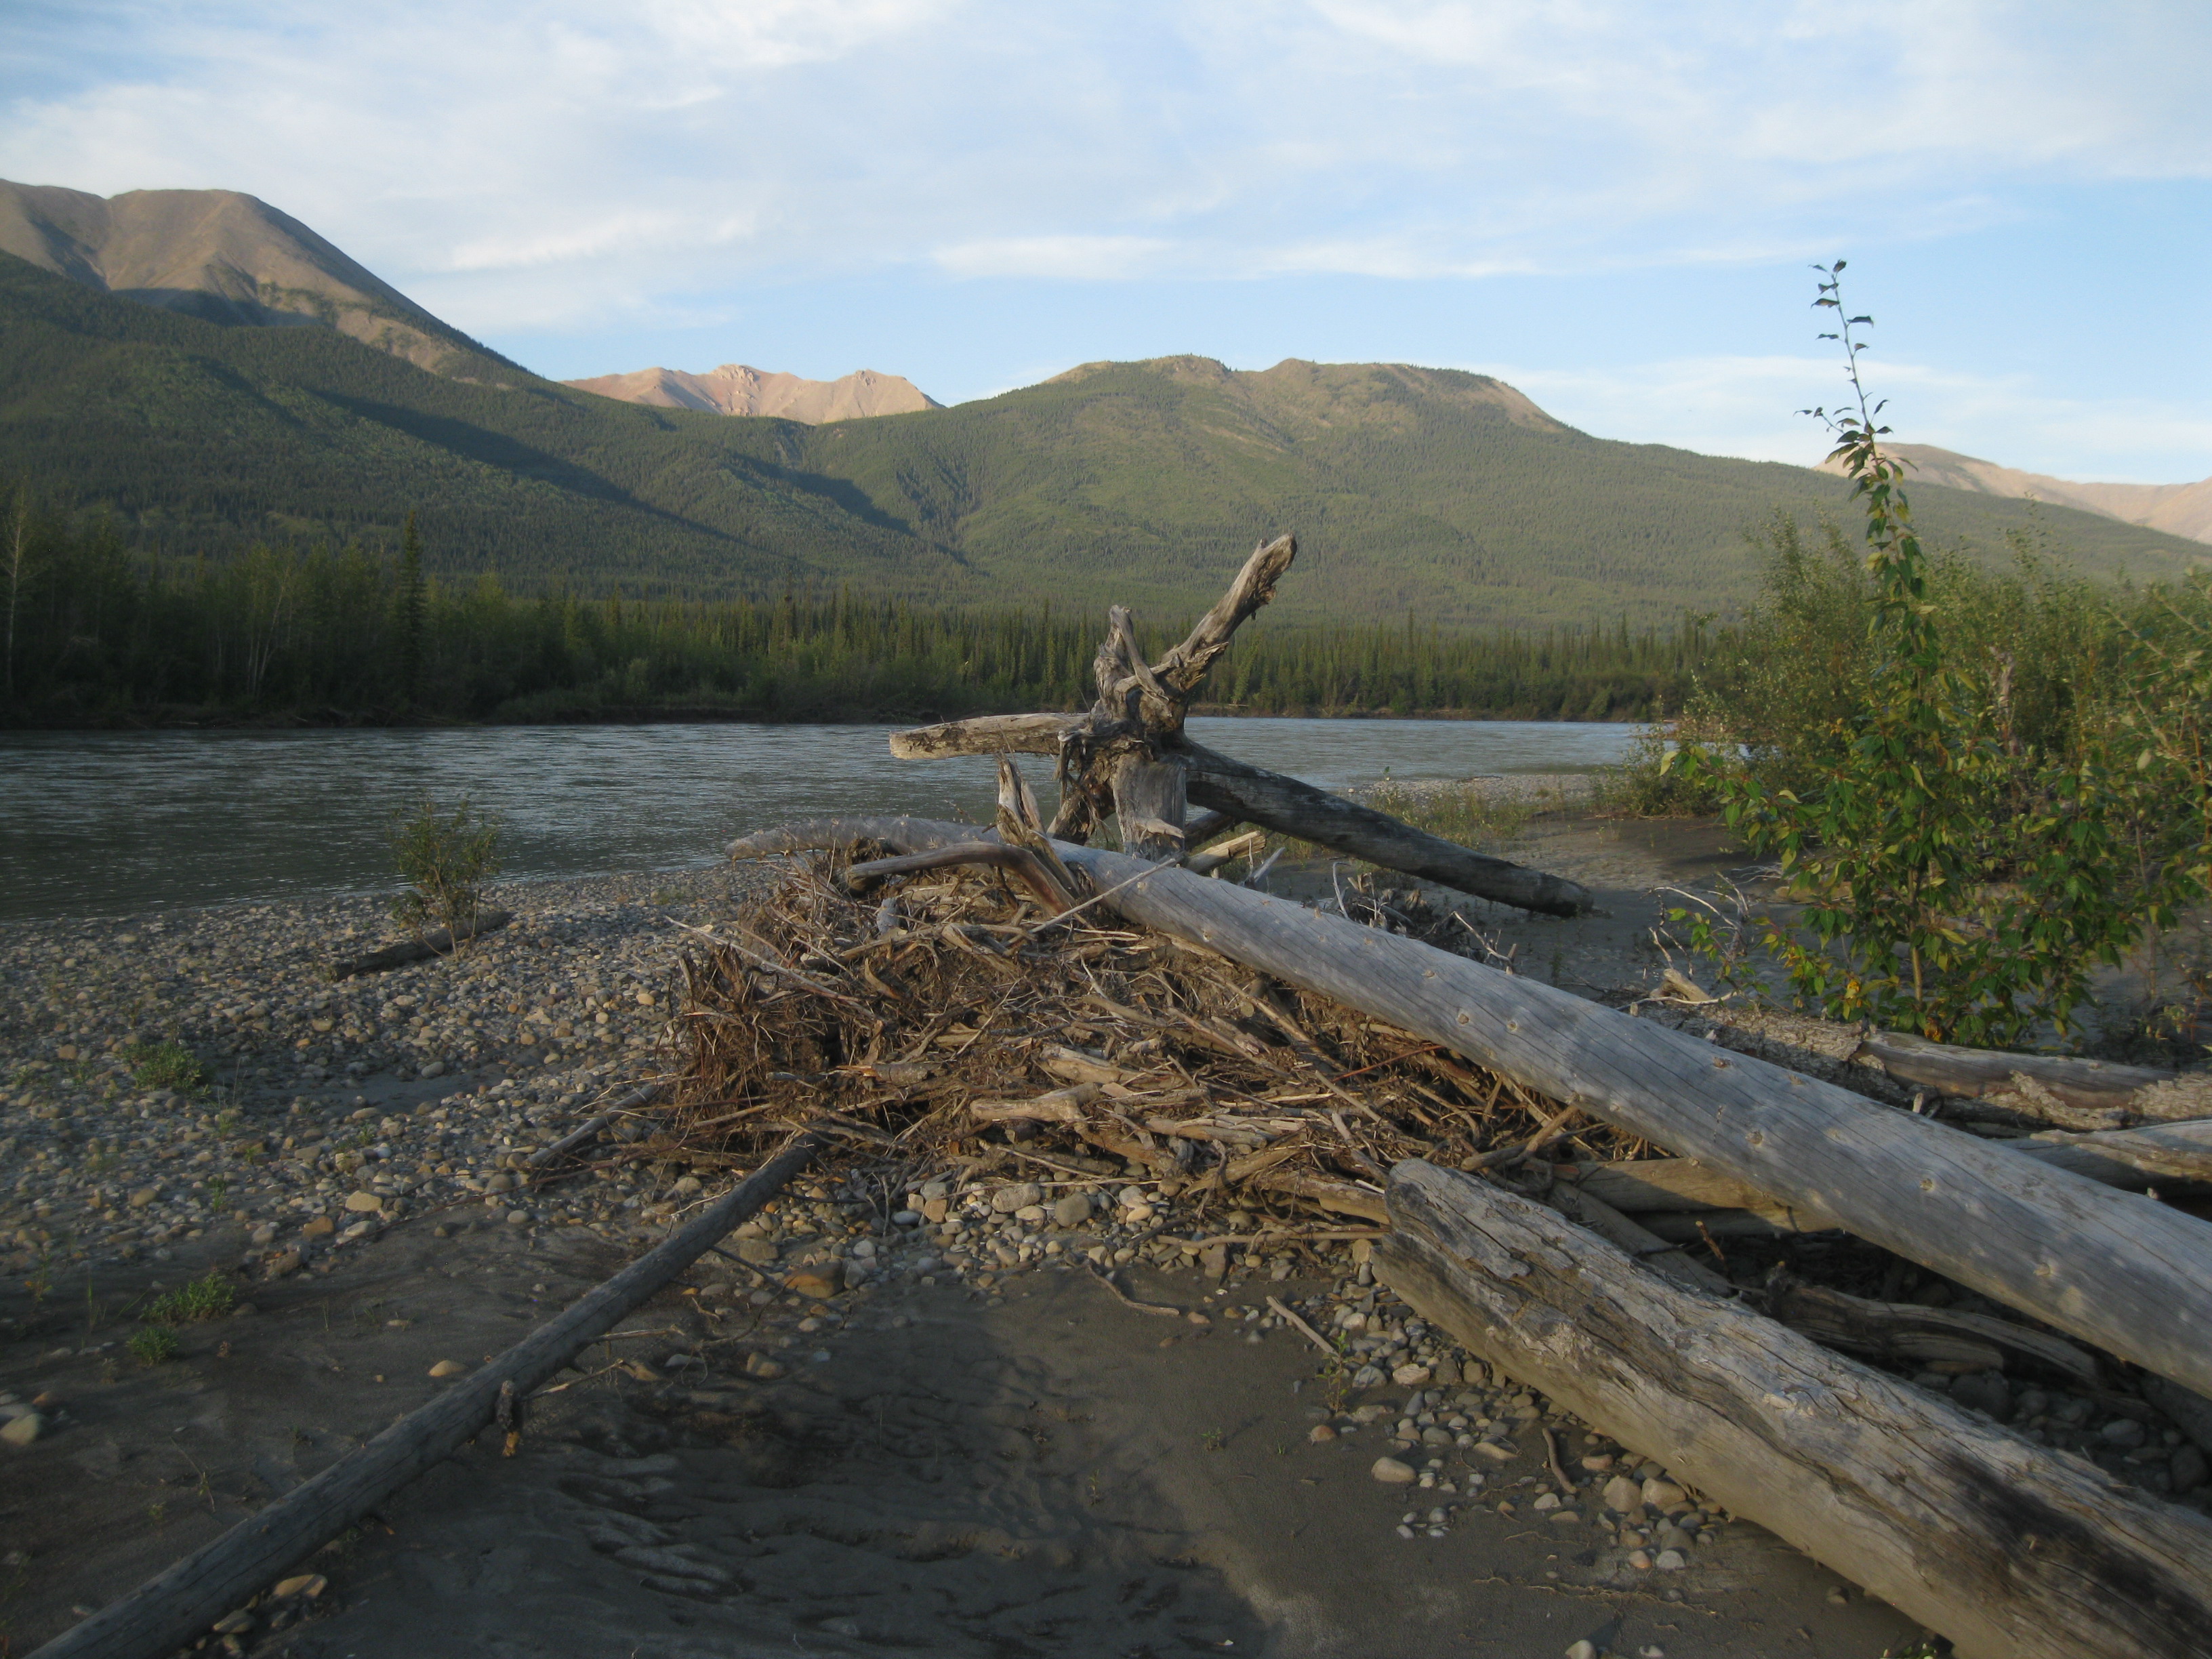
Corner Rapids
As you continue down the river you will be met by amazing mountainous scenery on both sides, so do take your time to enjoy the view. Paddling here is not too challenging until you get to Corner Rapids. It is recommended that you change to you wetsuit and wear a helmet before you approach these rapids.
This section is located around the 150 km mark of the river and can be quite challenging as they are class I/II rapids. If you are unexperienced you may be surprised by complexity of this stretch of water so early on the trip. If you are on an organised trip you should listen carefully to the guide’s instructions on how to approach the rapids lying ahead. There are sharp corners you will have to manoeuver through and eddies you should stay very clear off.
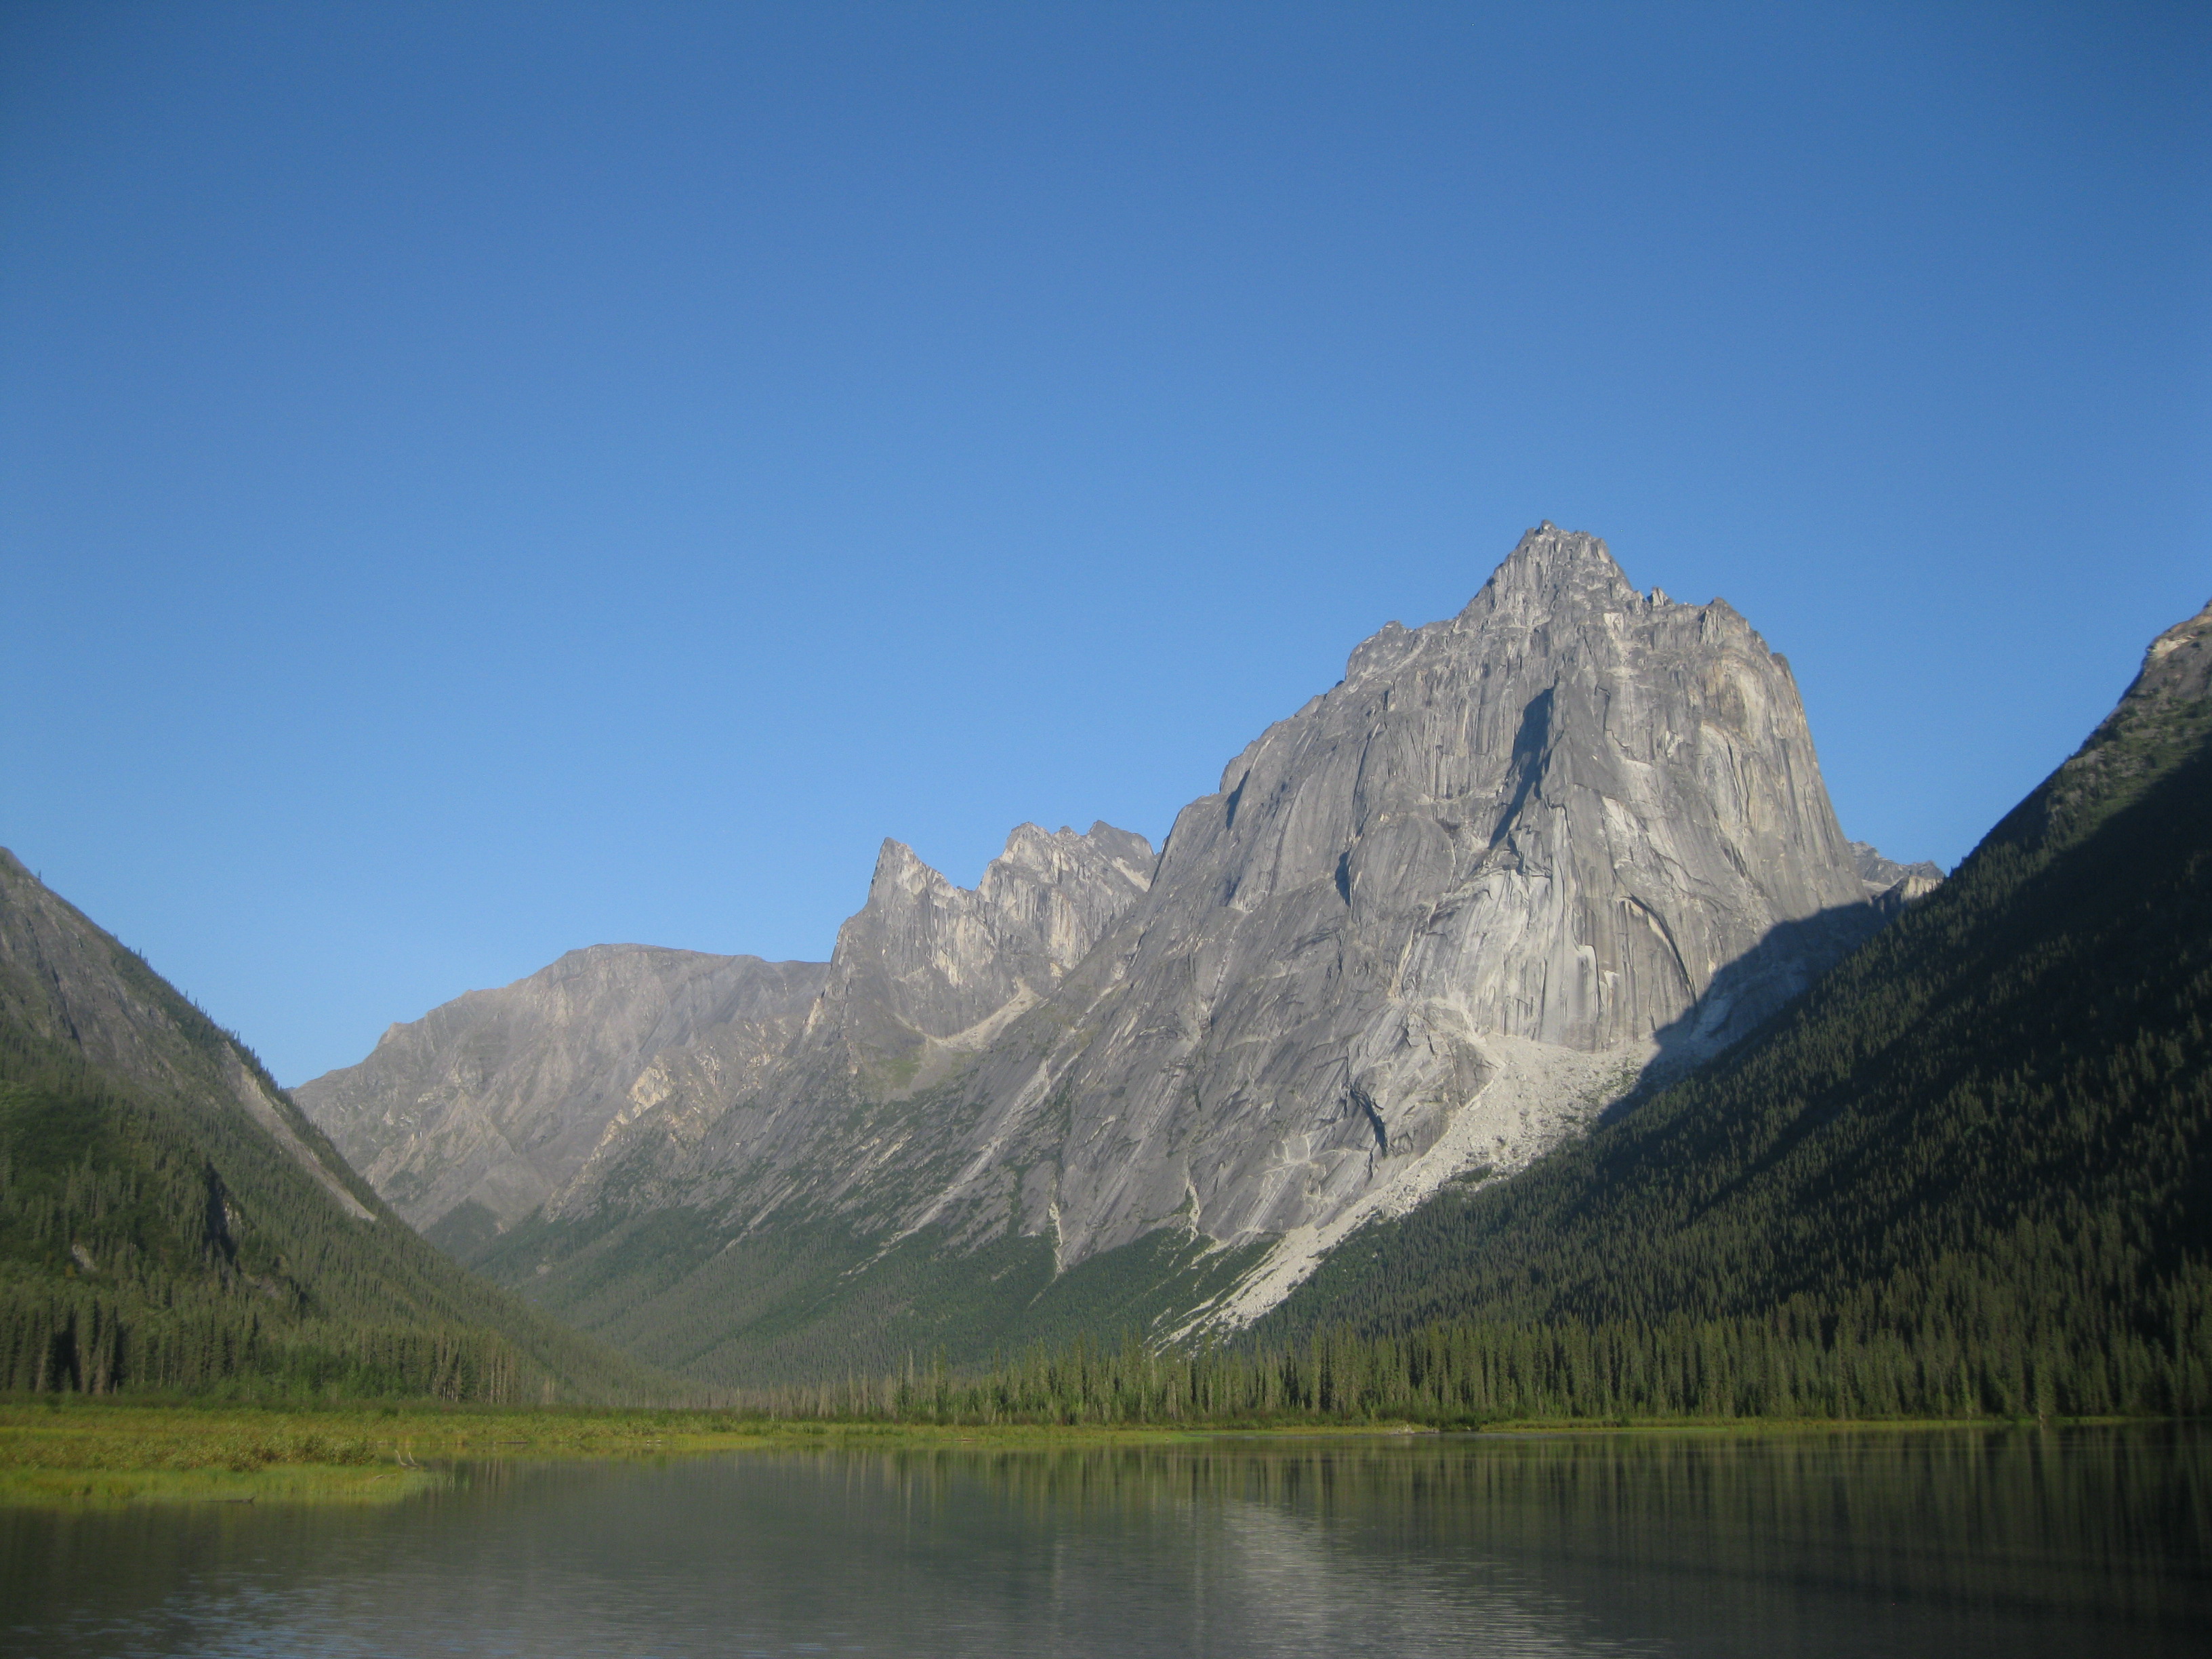
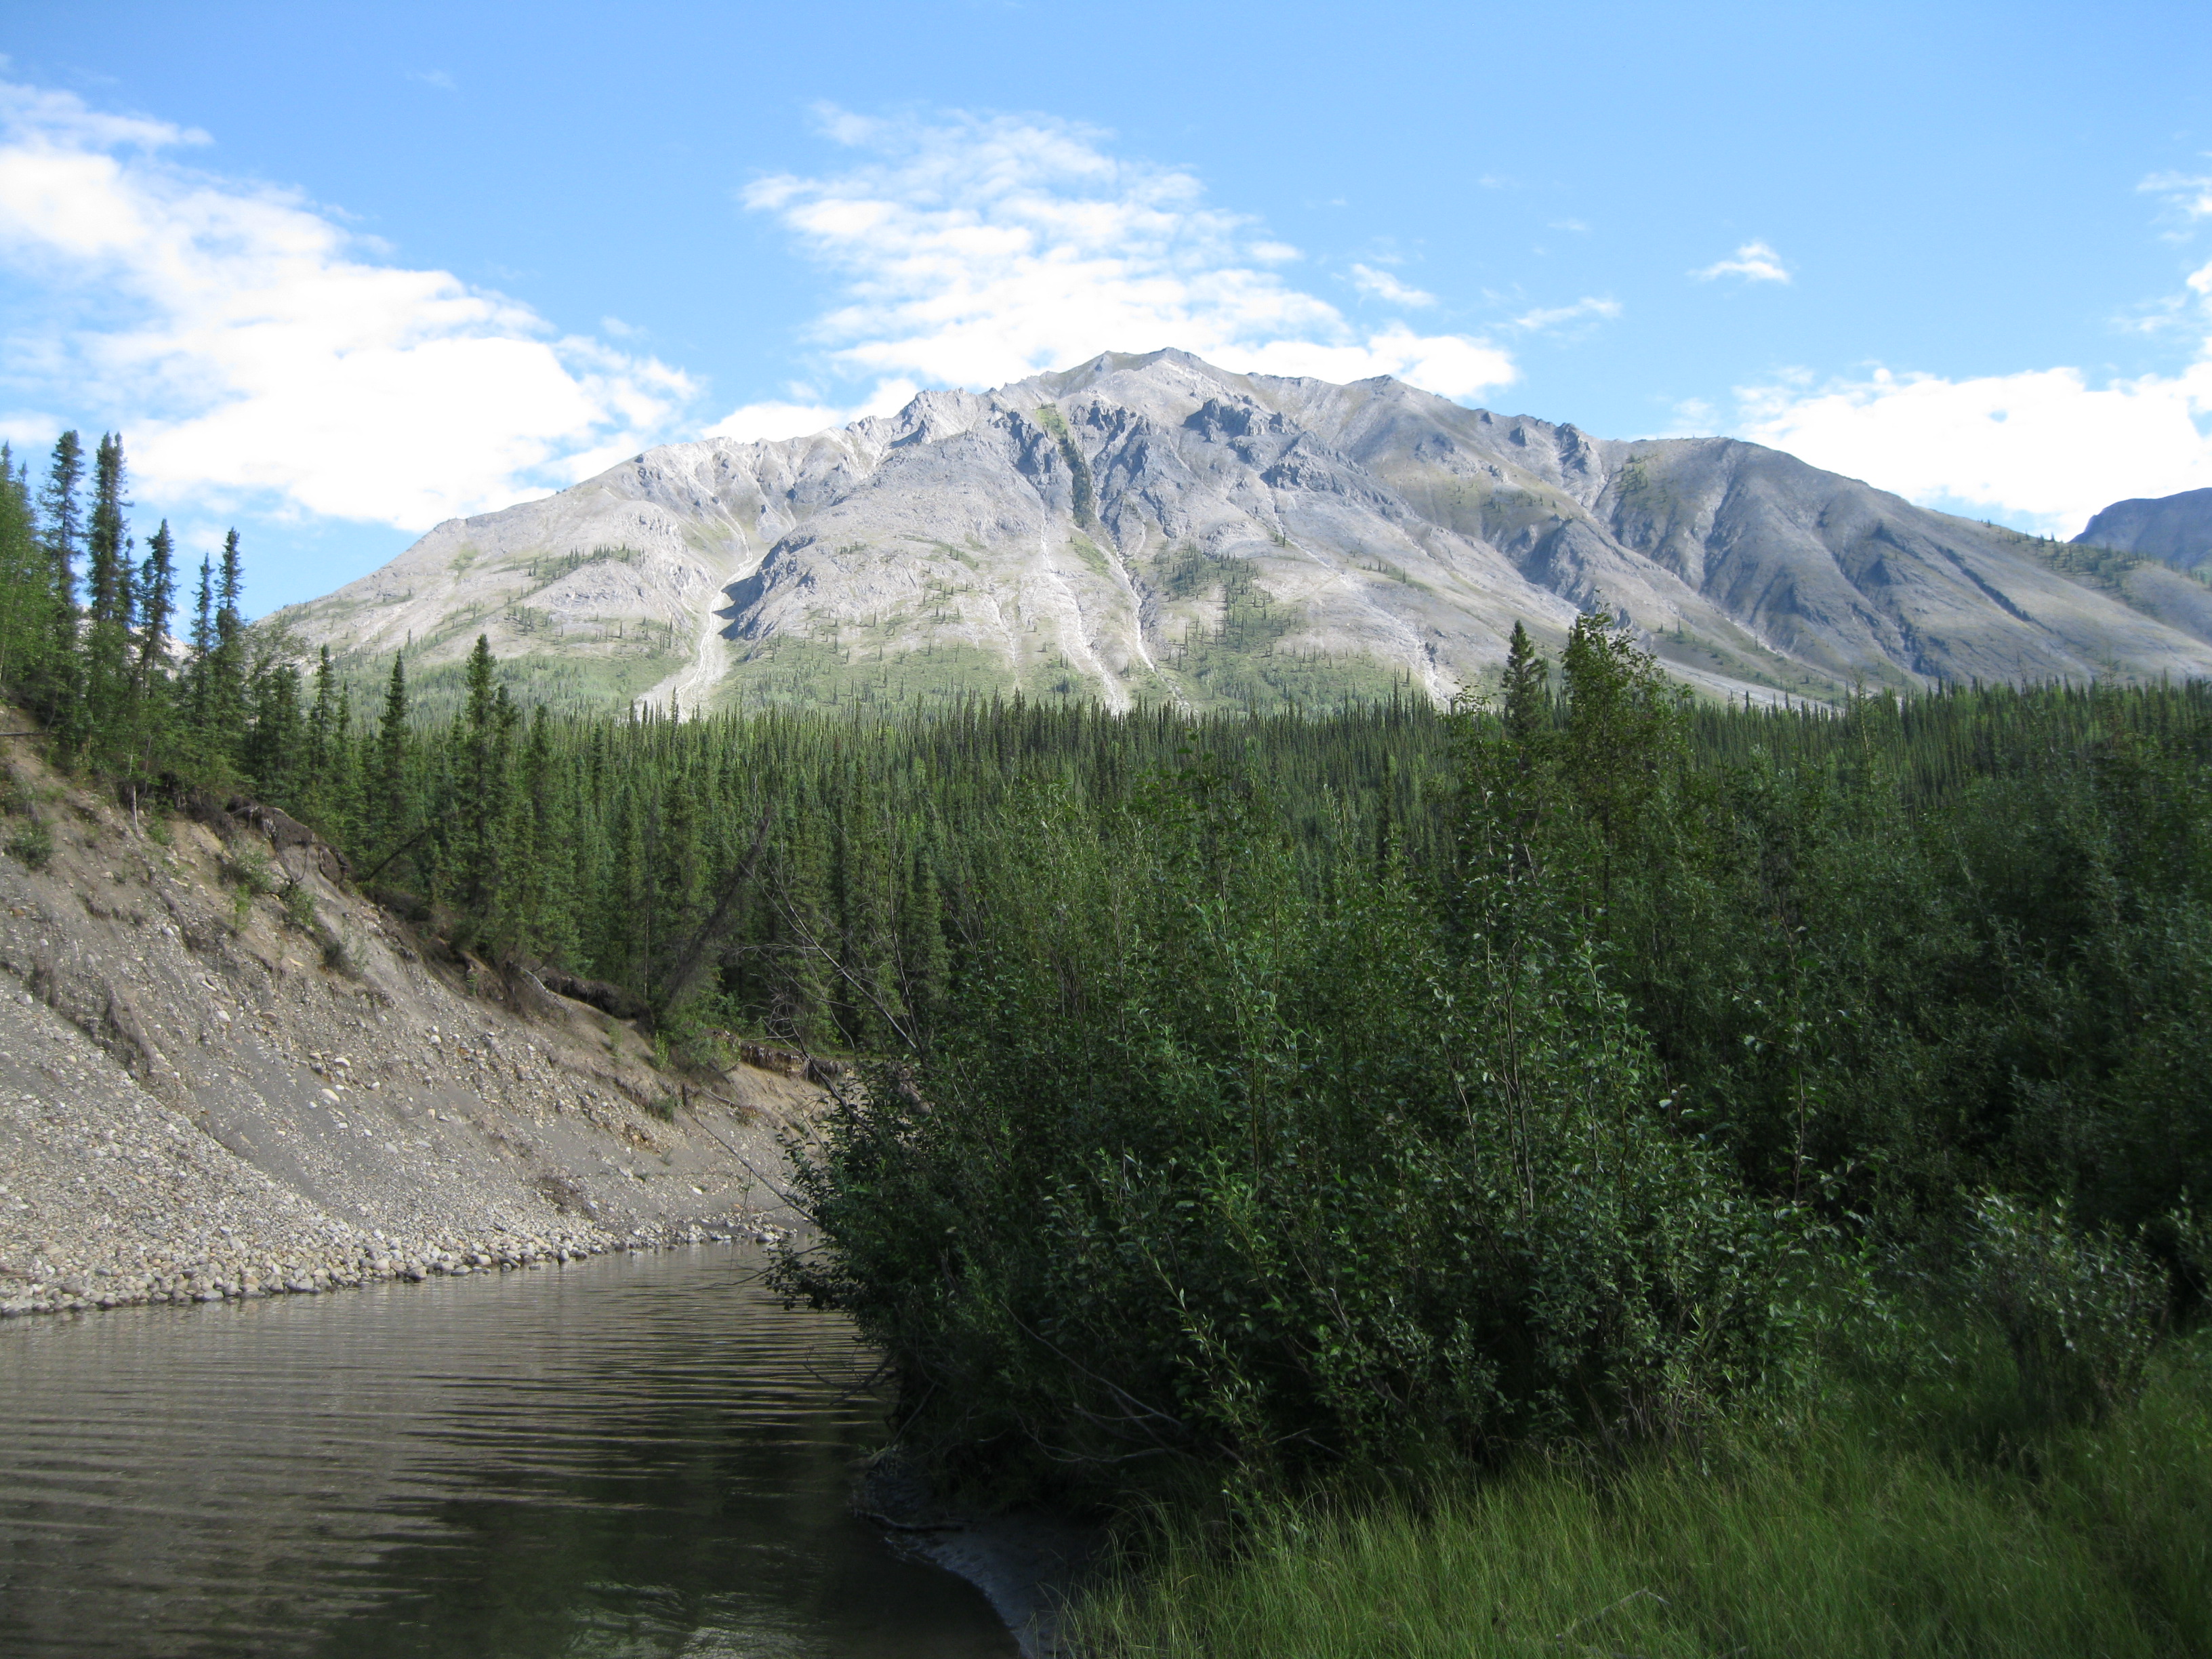
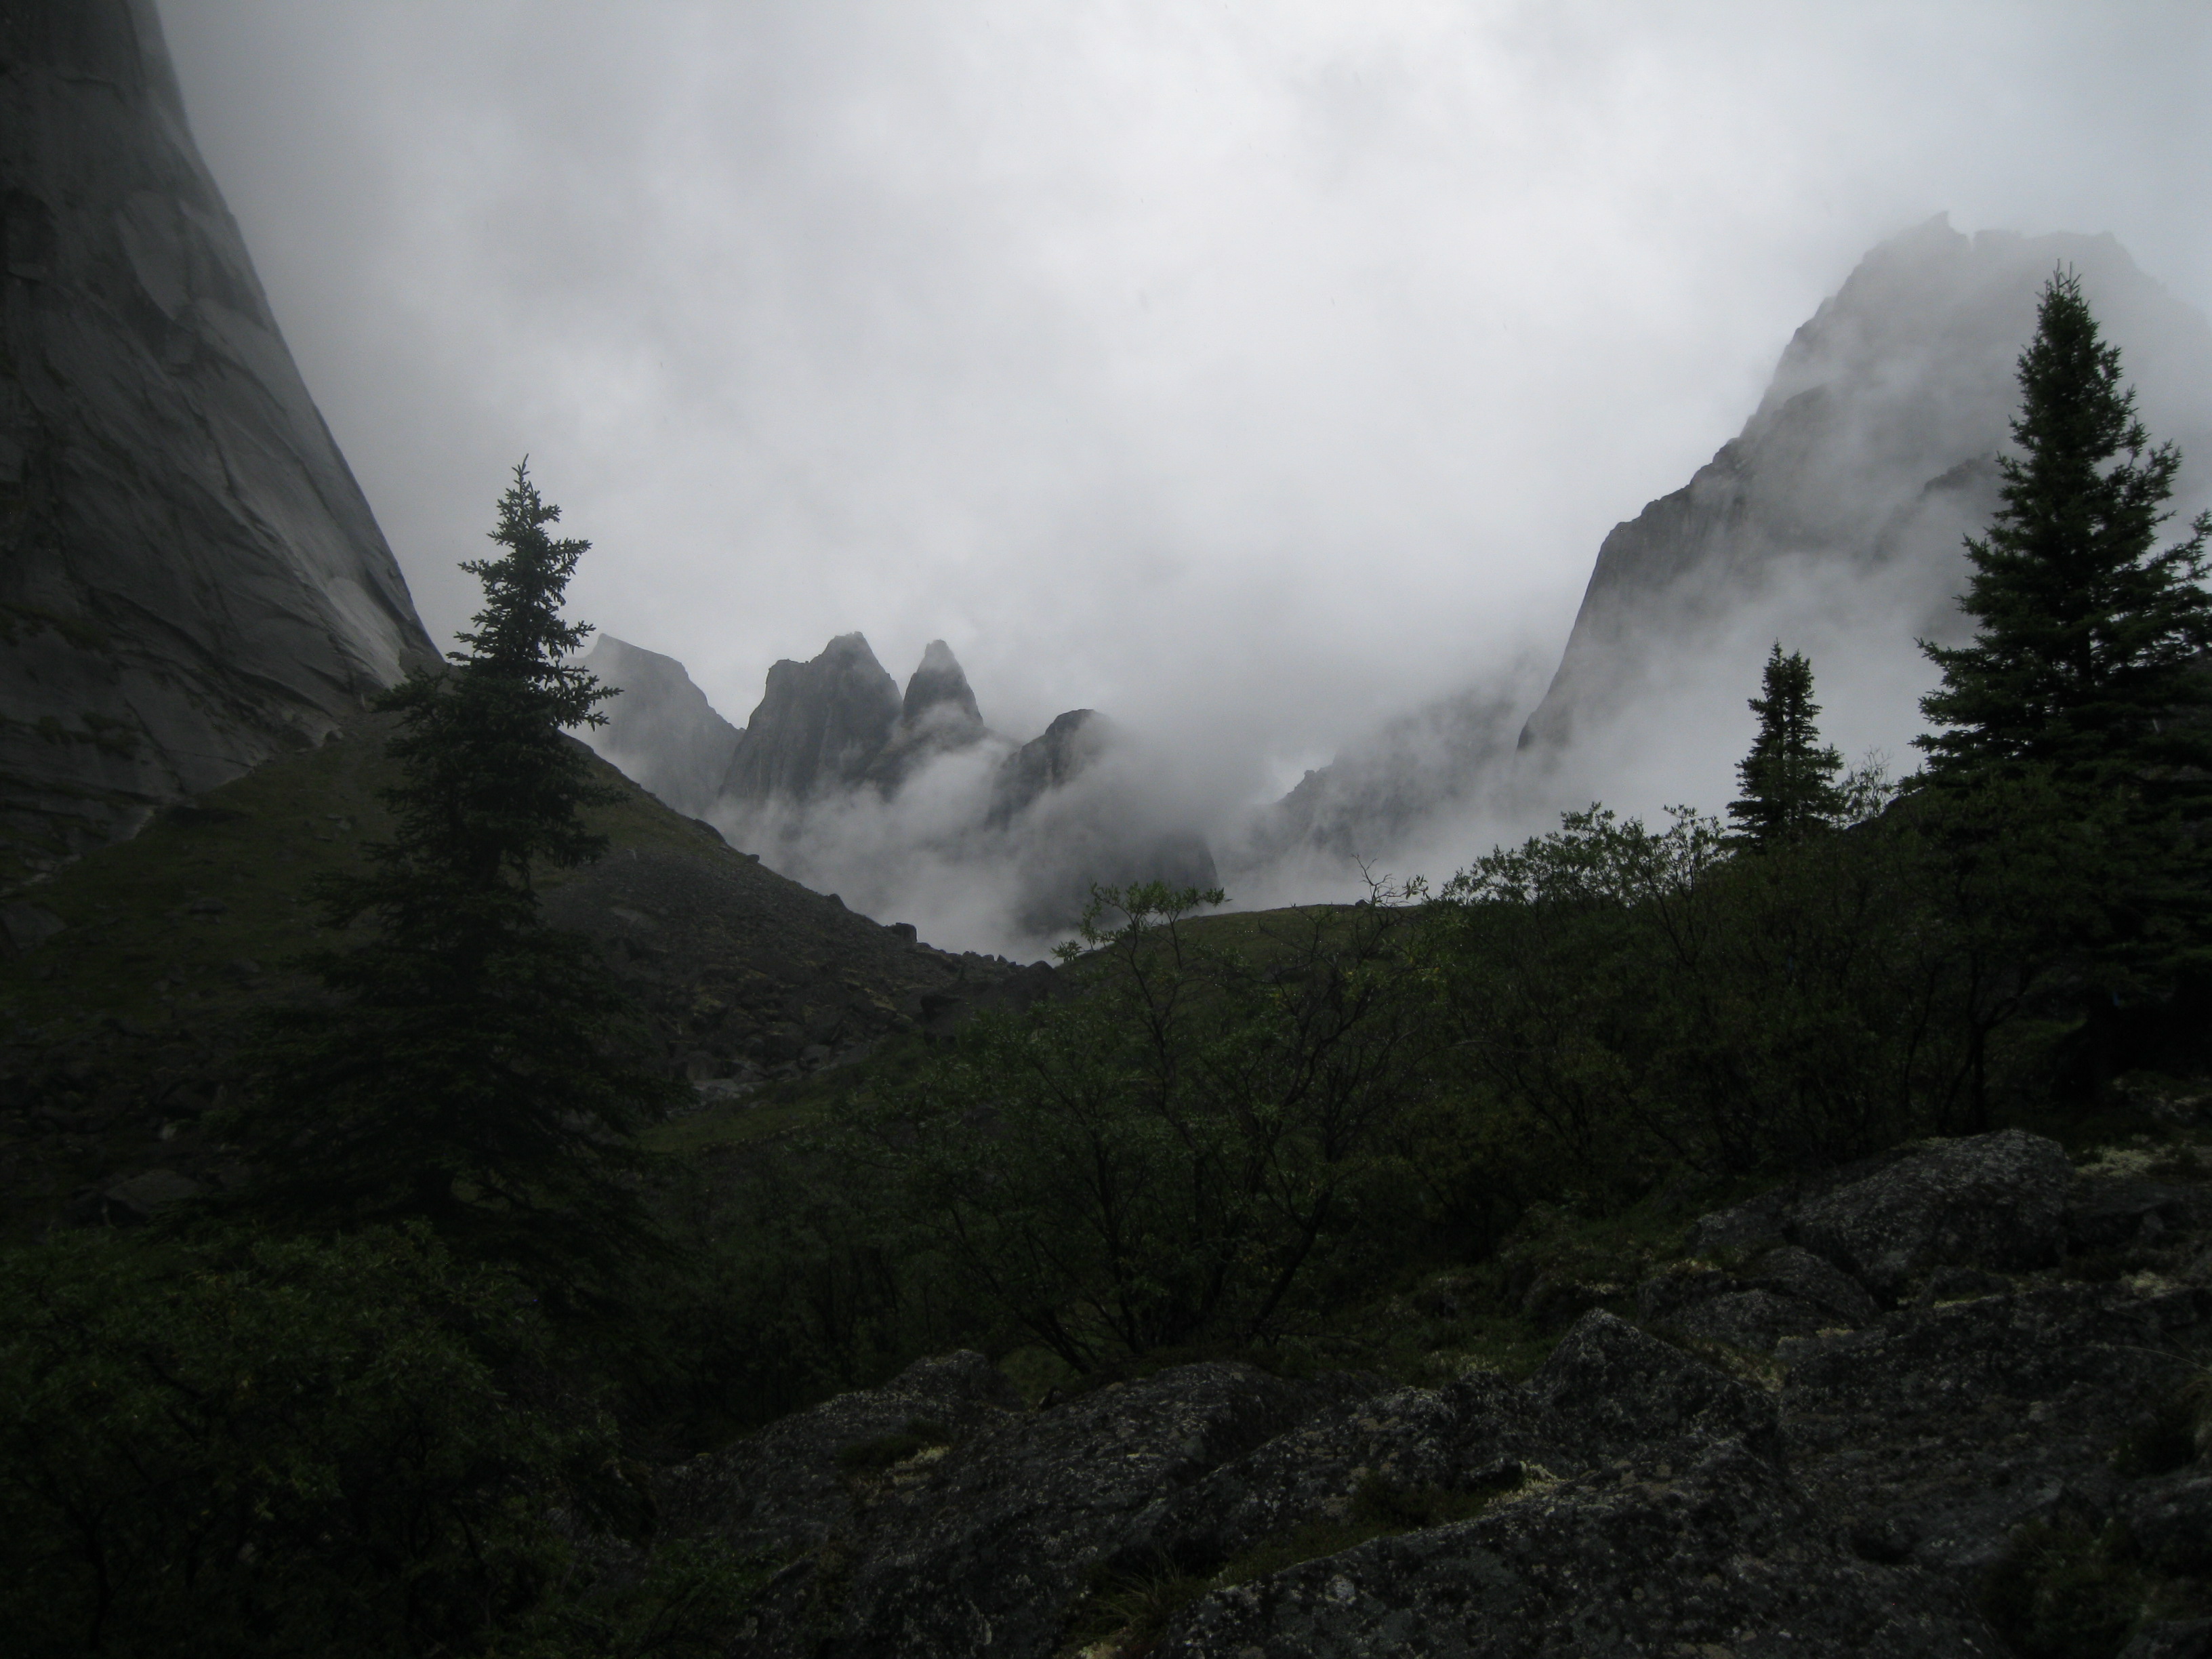
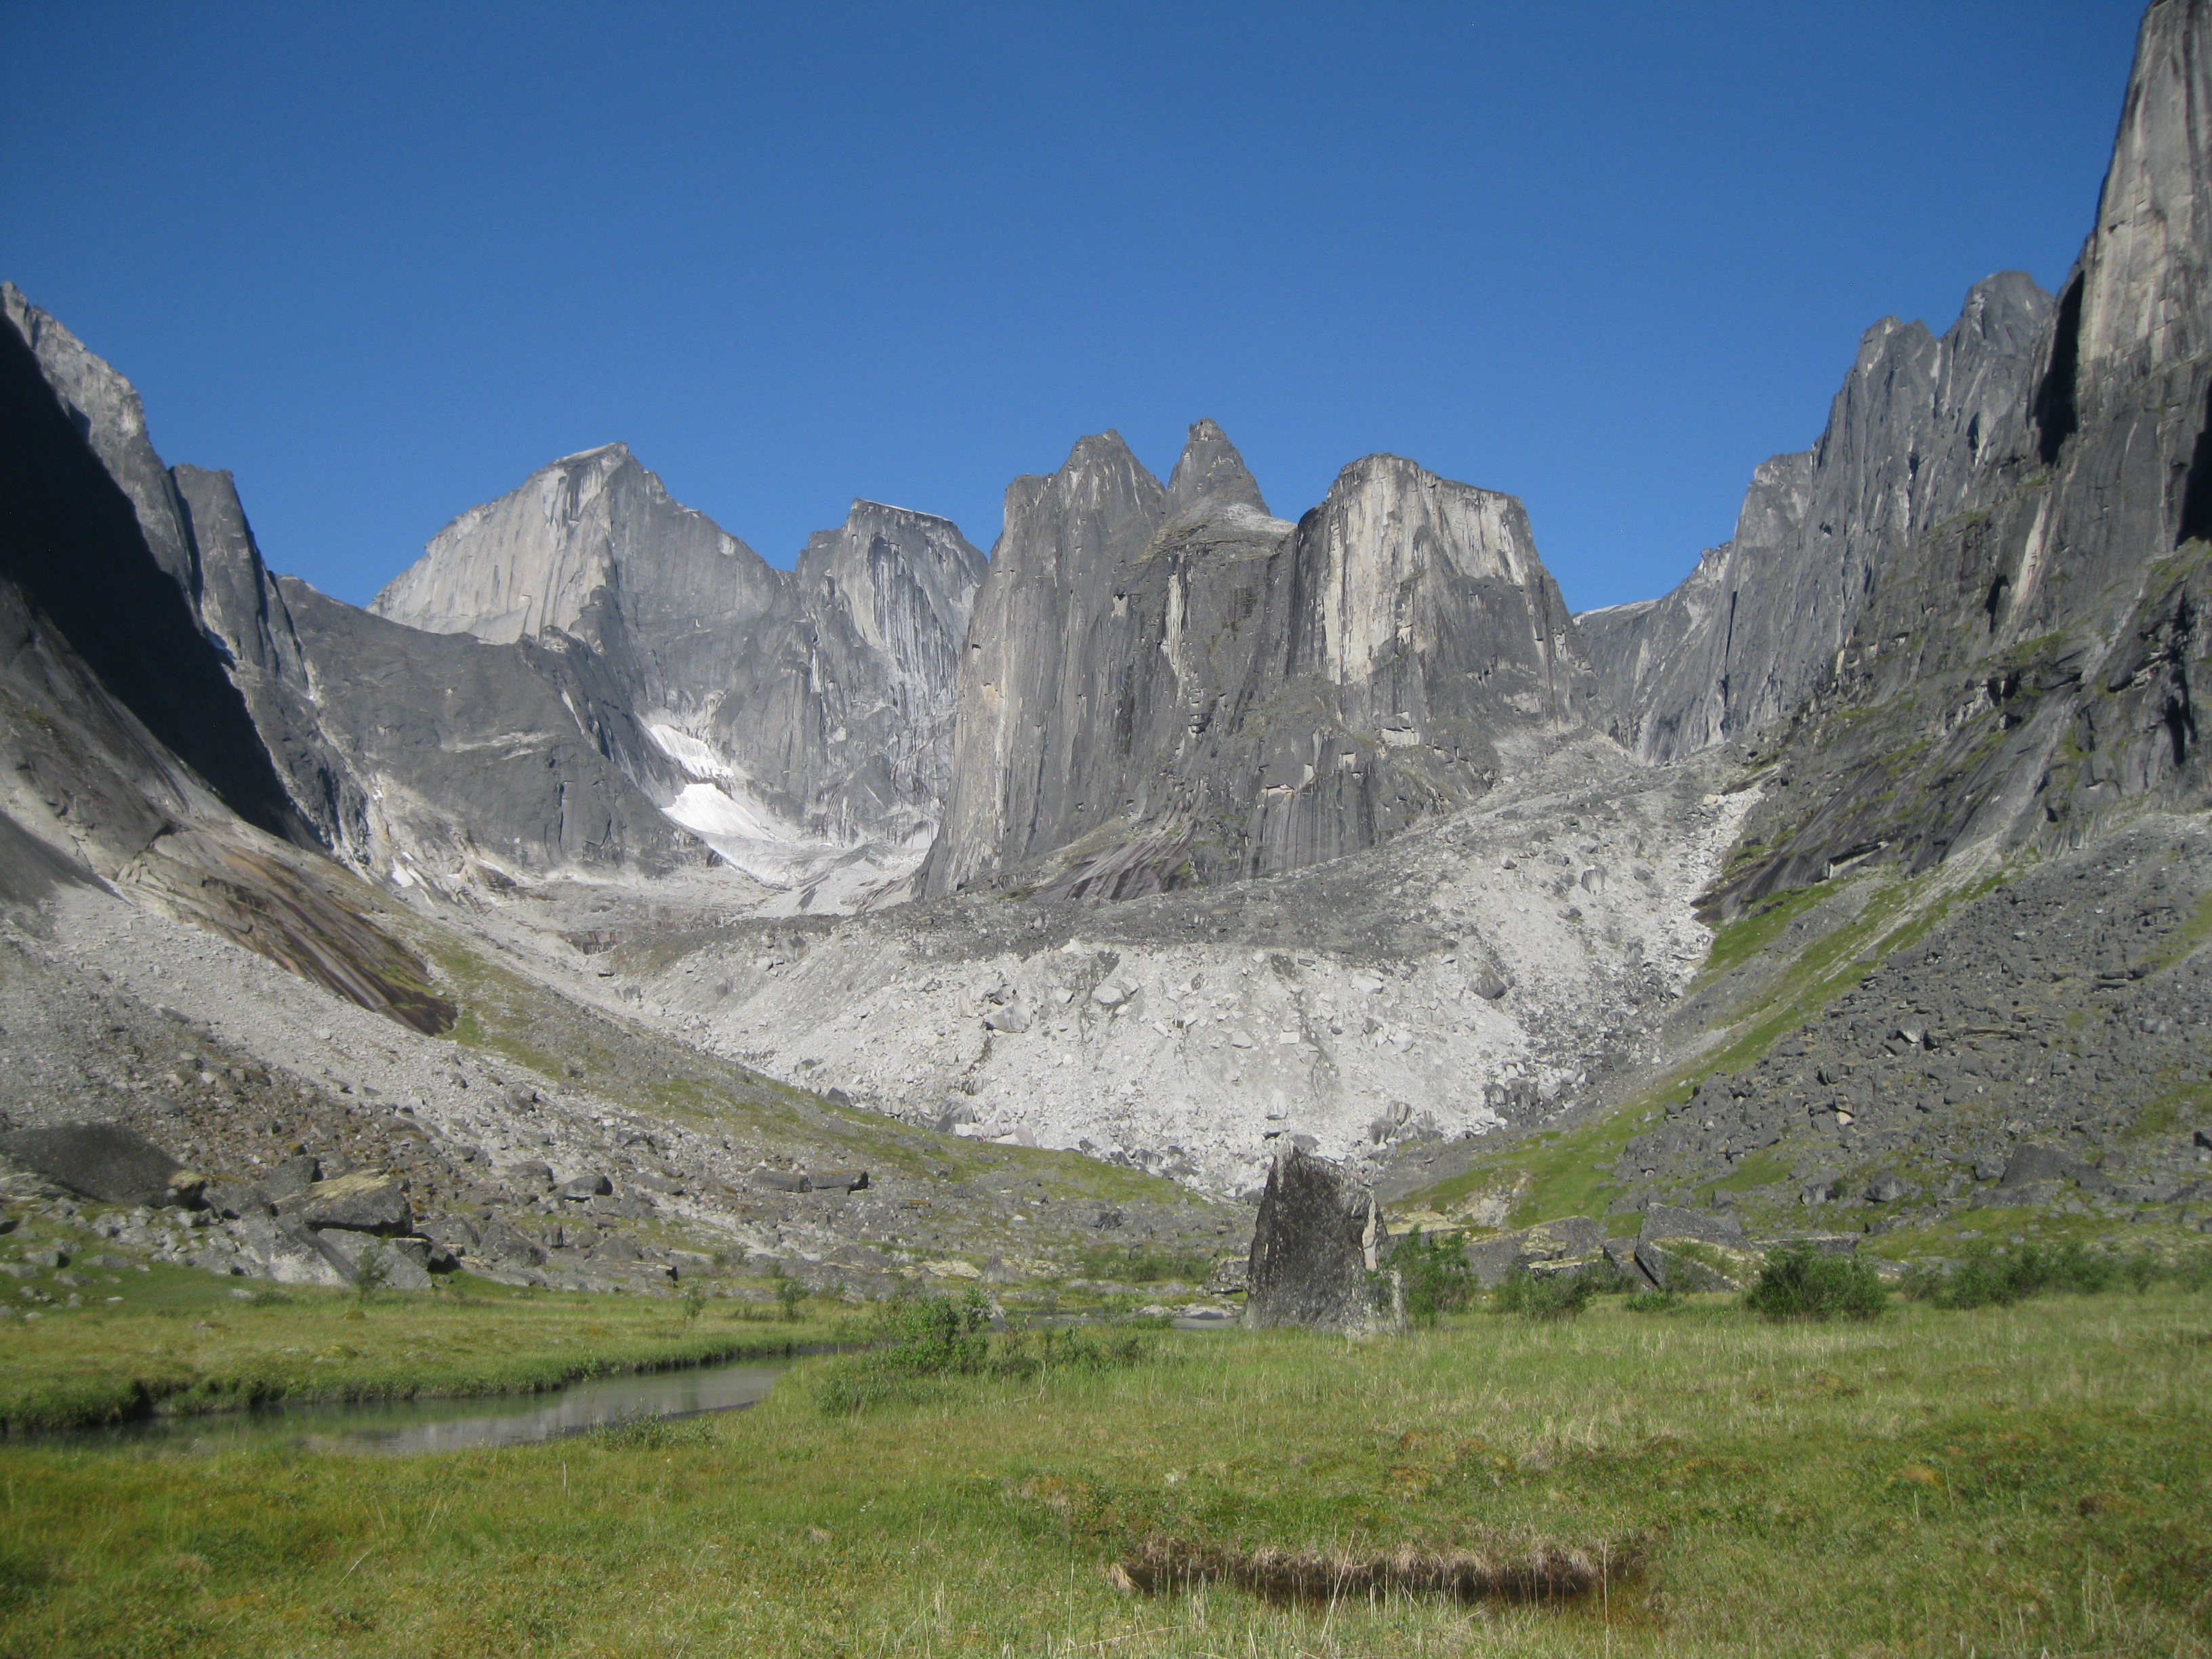
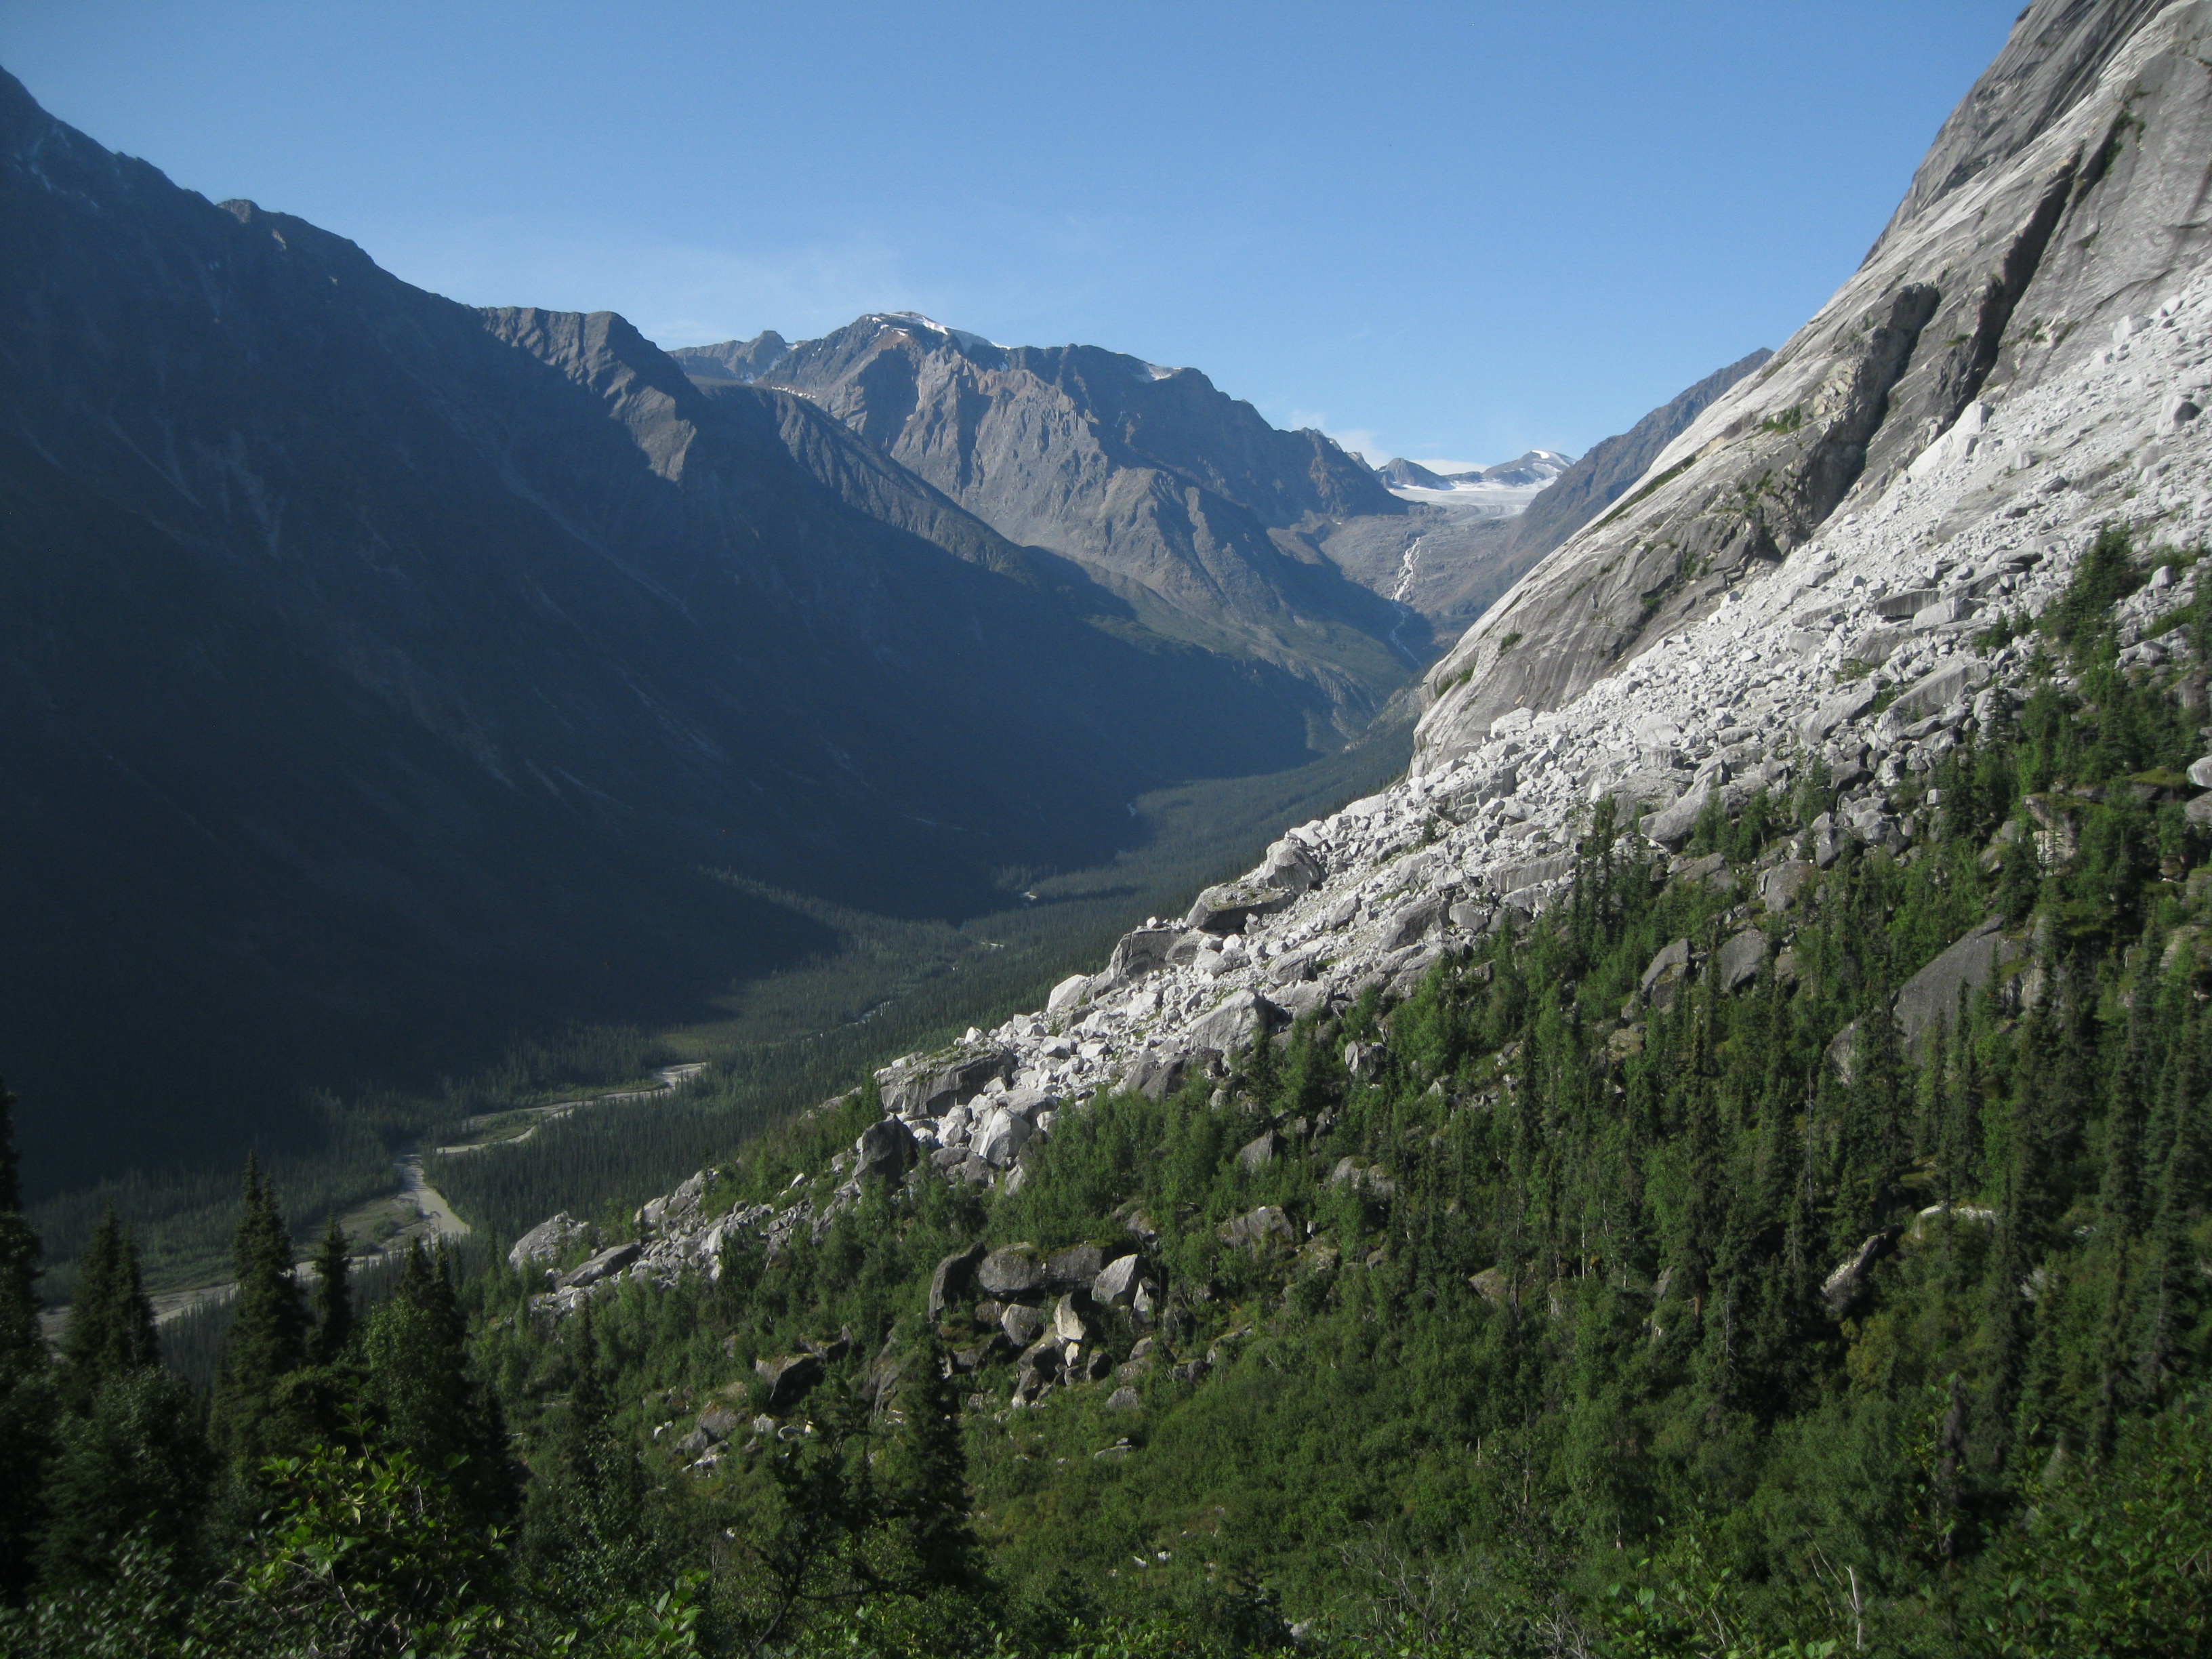
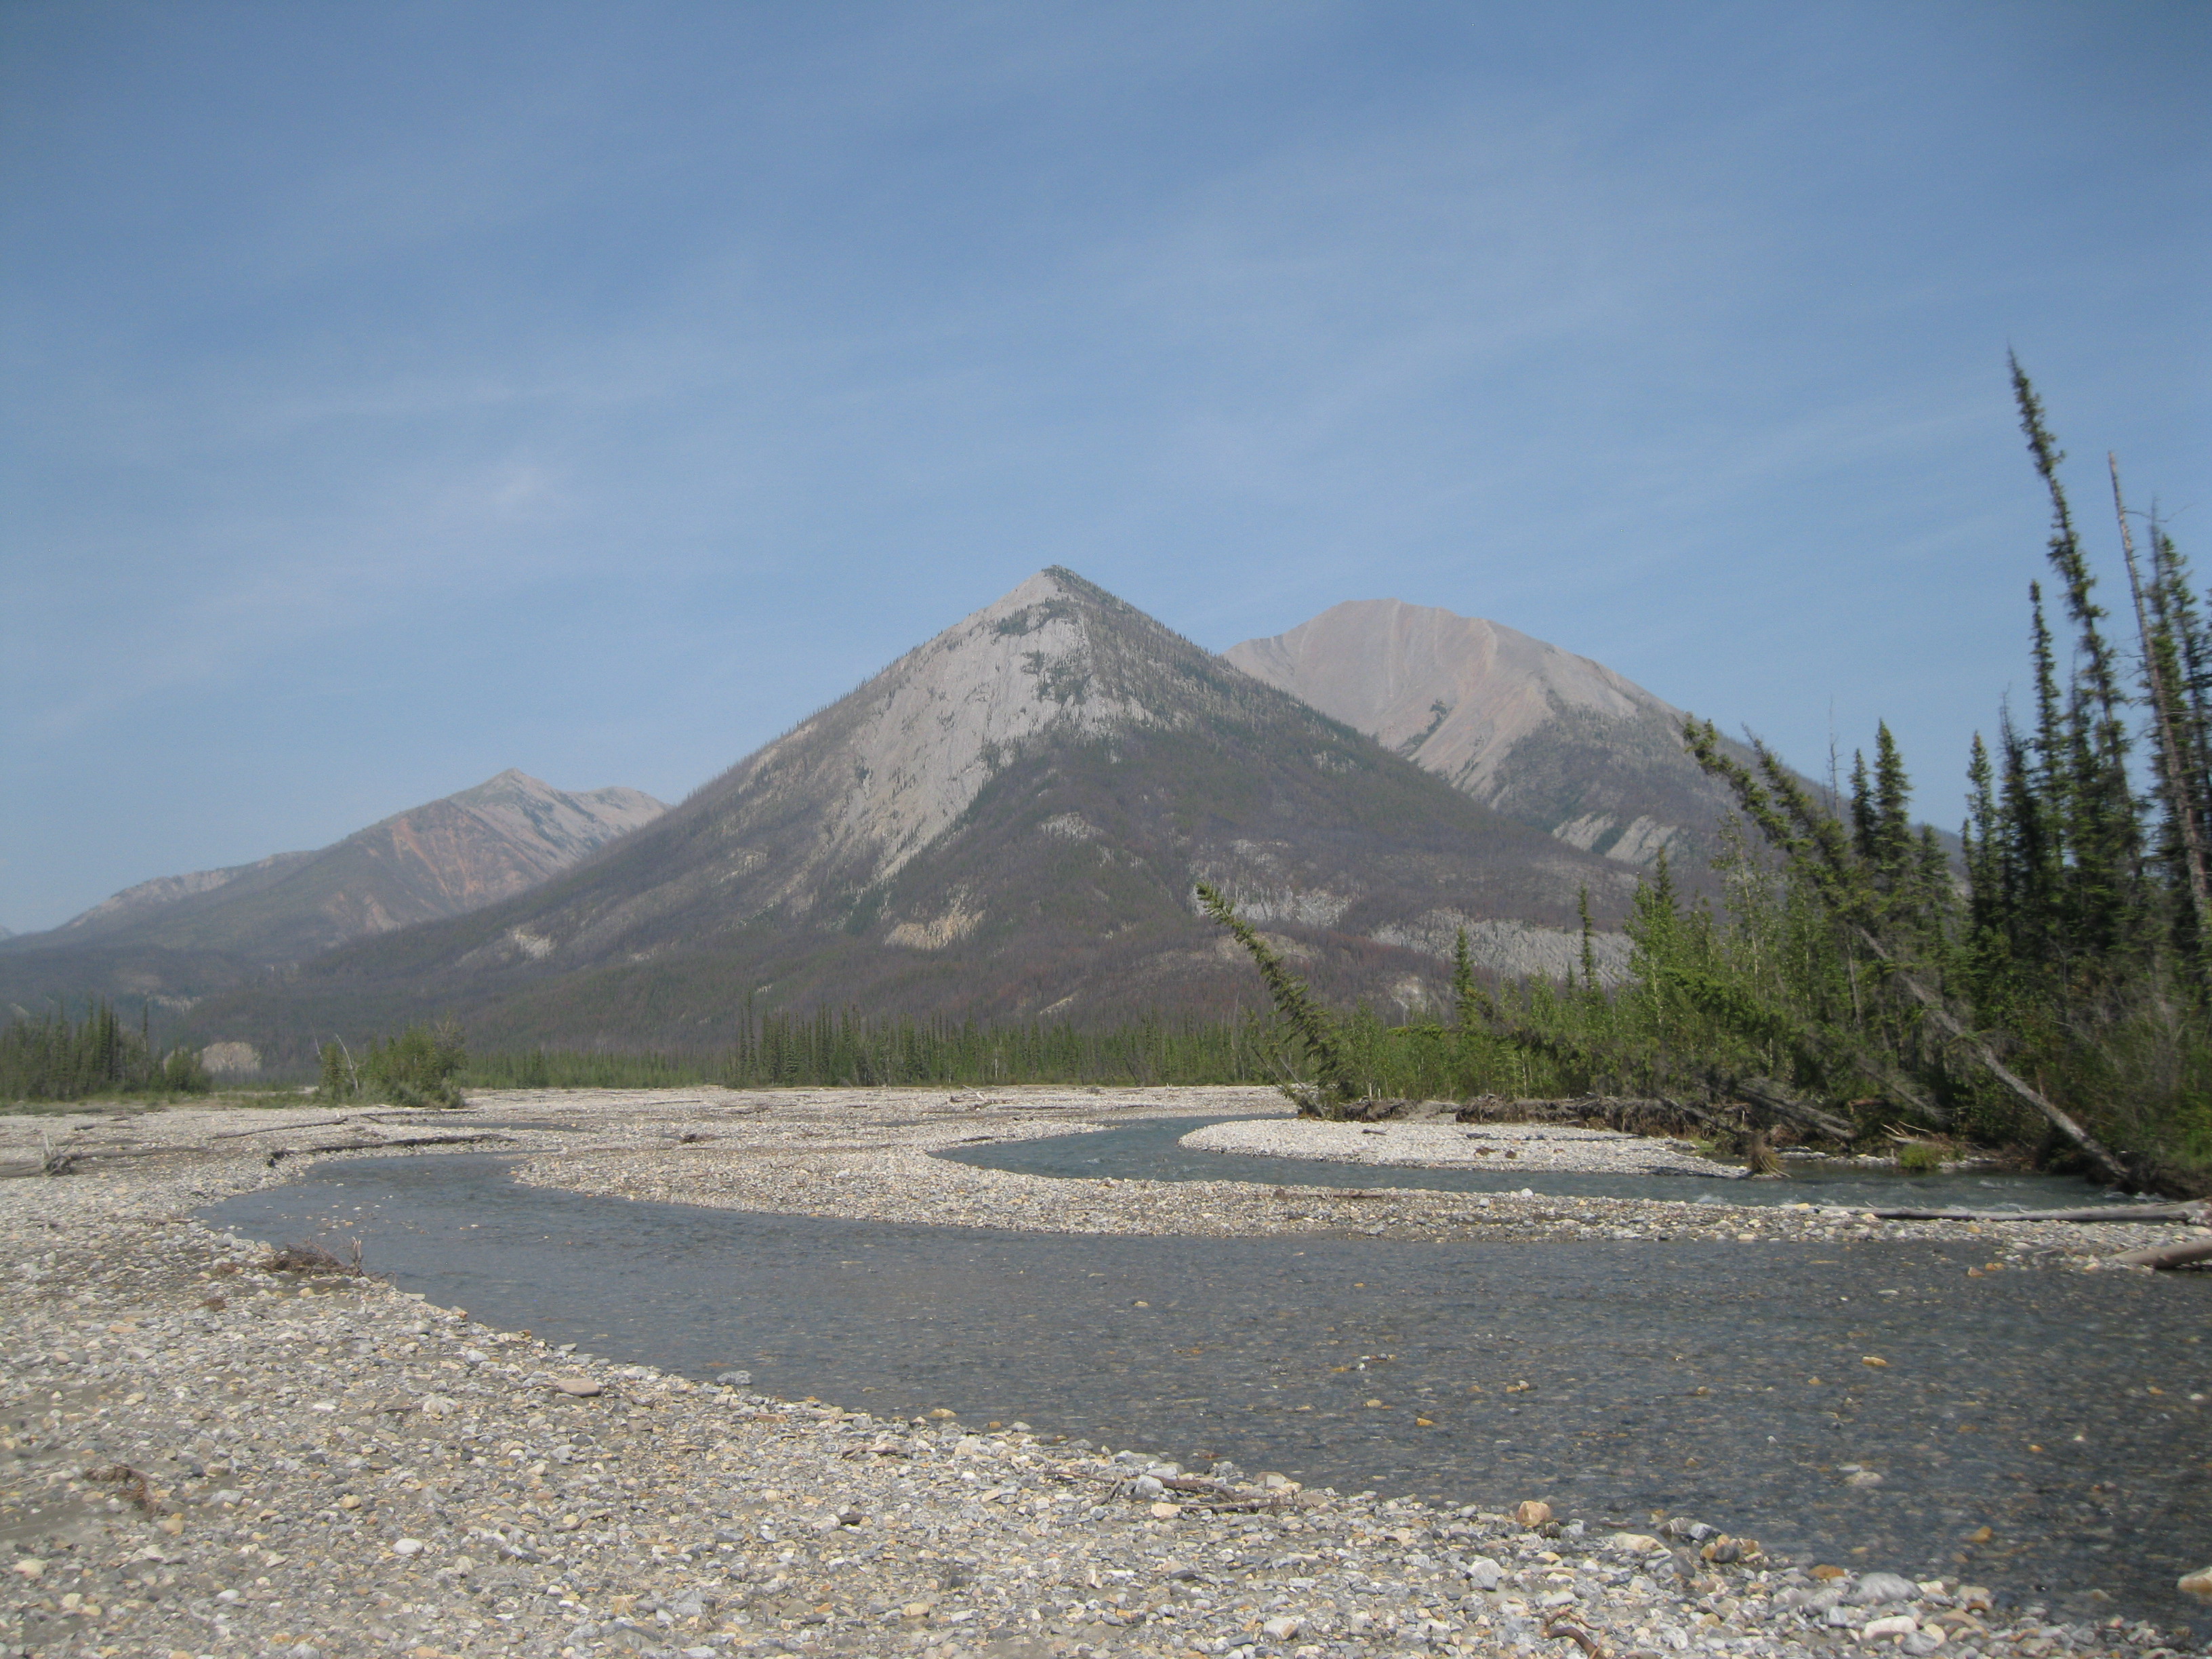
The Vampire Peaks & the Ragged Range
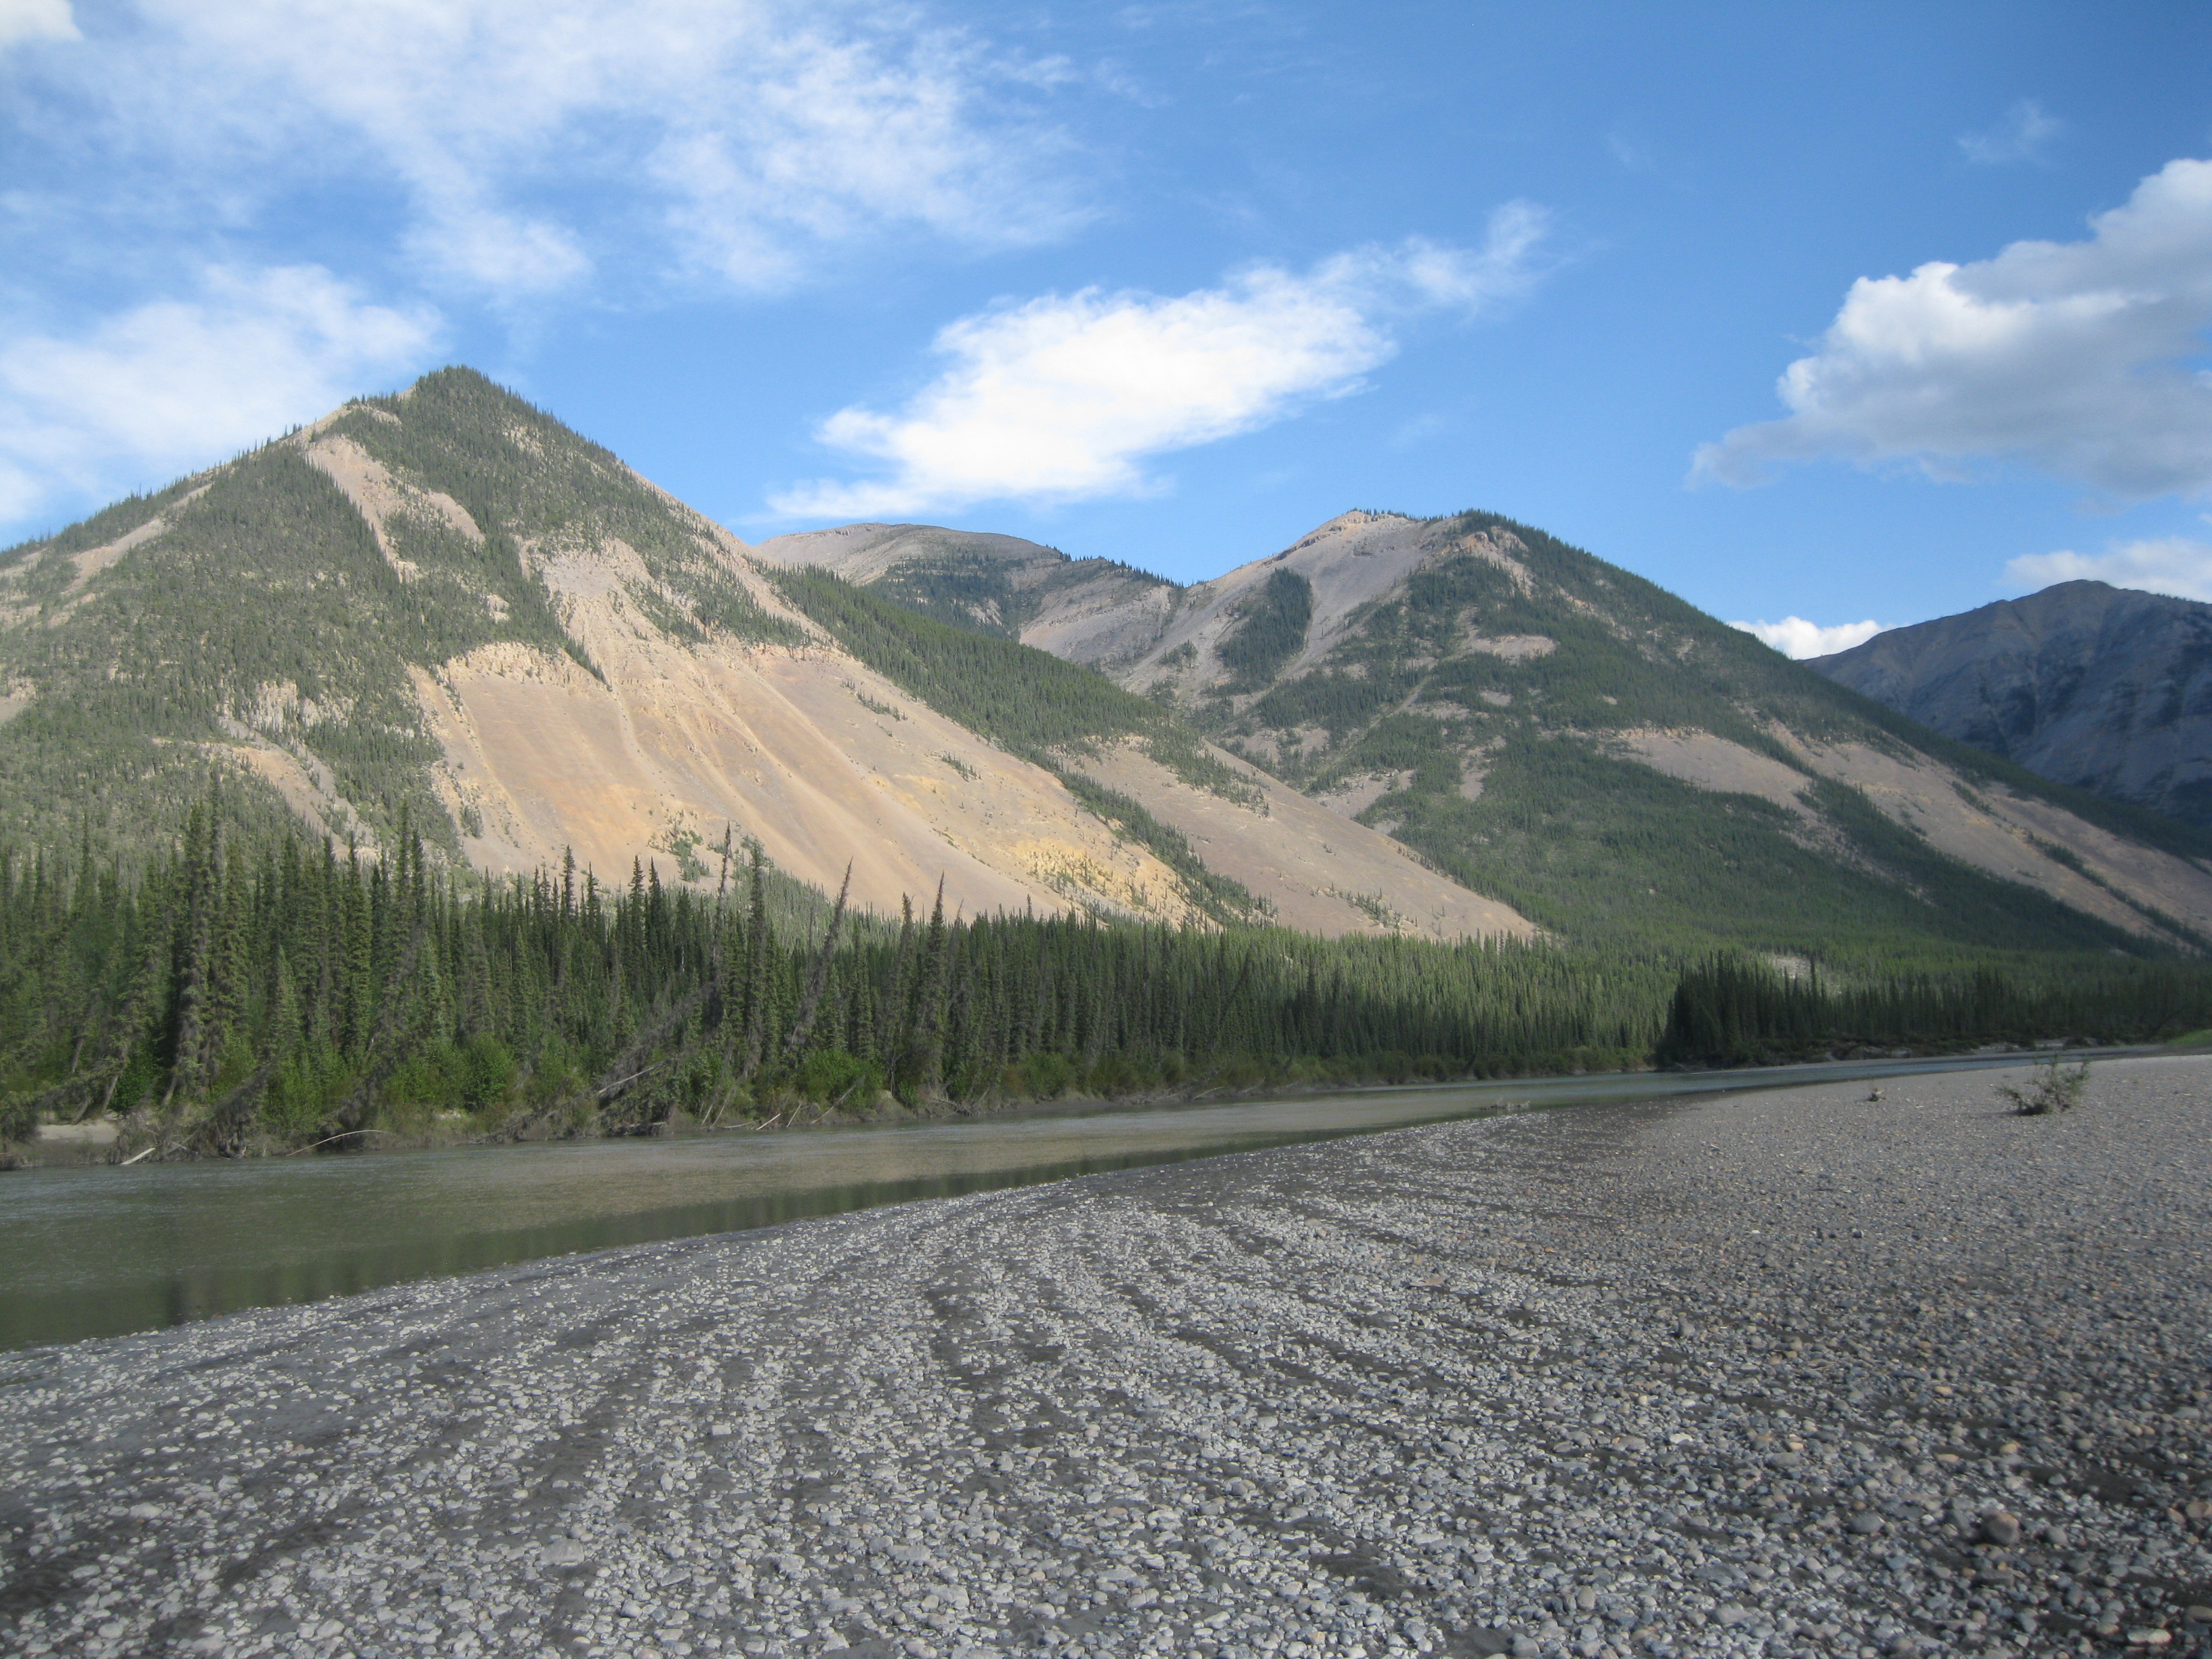
Right after you have made it beyond the Corner Rapids you getting close to a gravel bar perfect for setting camp with an awesome view of the majestic scenery of the Vampire Peaks of the Rugged Range soaring as the backdrop to the wonderful camping spot on the gravel bar.
There are plenty of great opportunities for taking magnificent photos of the range. There is a beautiful creek leading down to the South Nahanni River which is a perfect shot against the peaks. The view of the creek leading down towards the river is an excellent motif as well.
As you stroll around on the gravel bar you will also notice the amazing mountainous landscape across the river in the other direction. The gravel bar is pretty large and there is quite a bit of vegetation and trees which is also perfect fronting a shot against the Vampire Peaks.
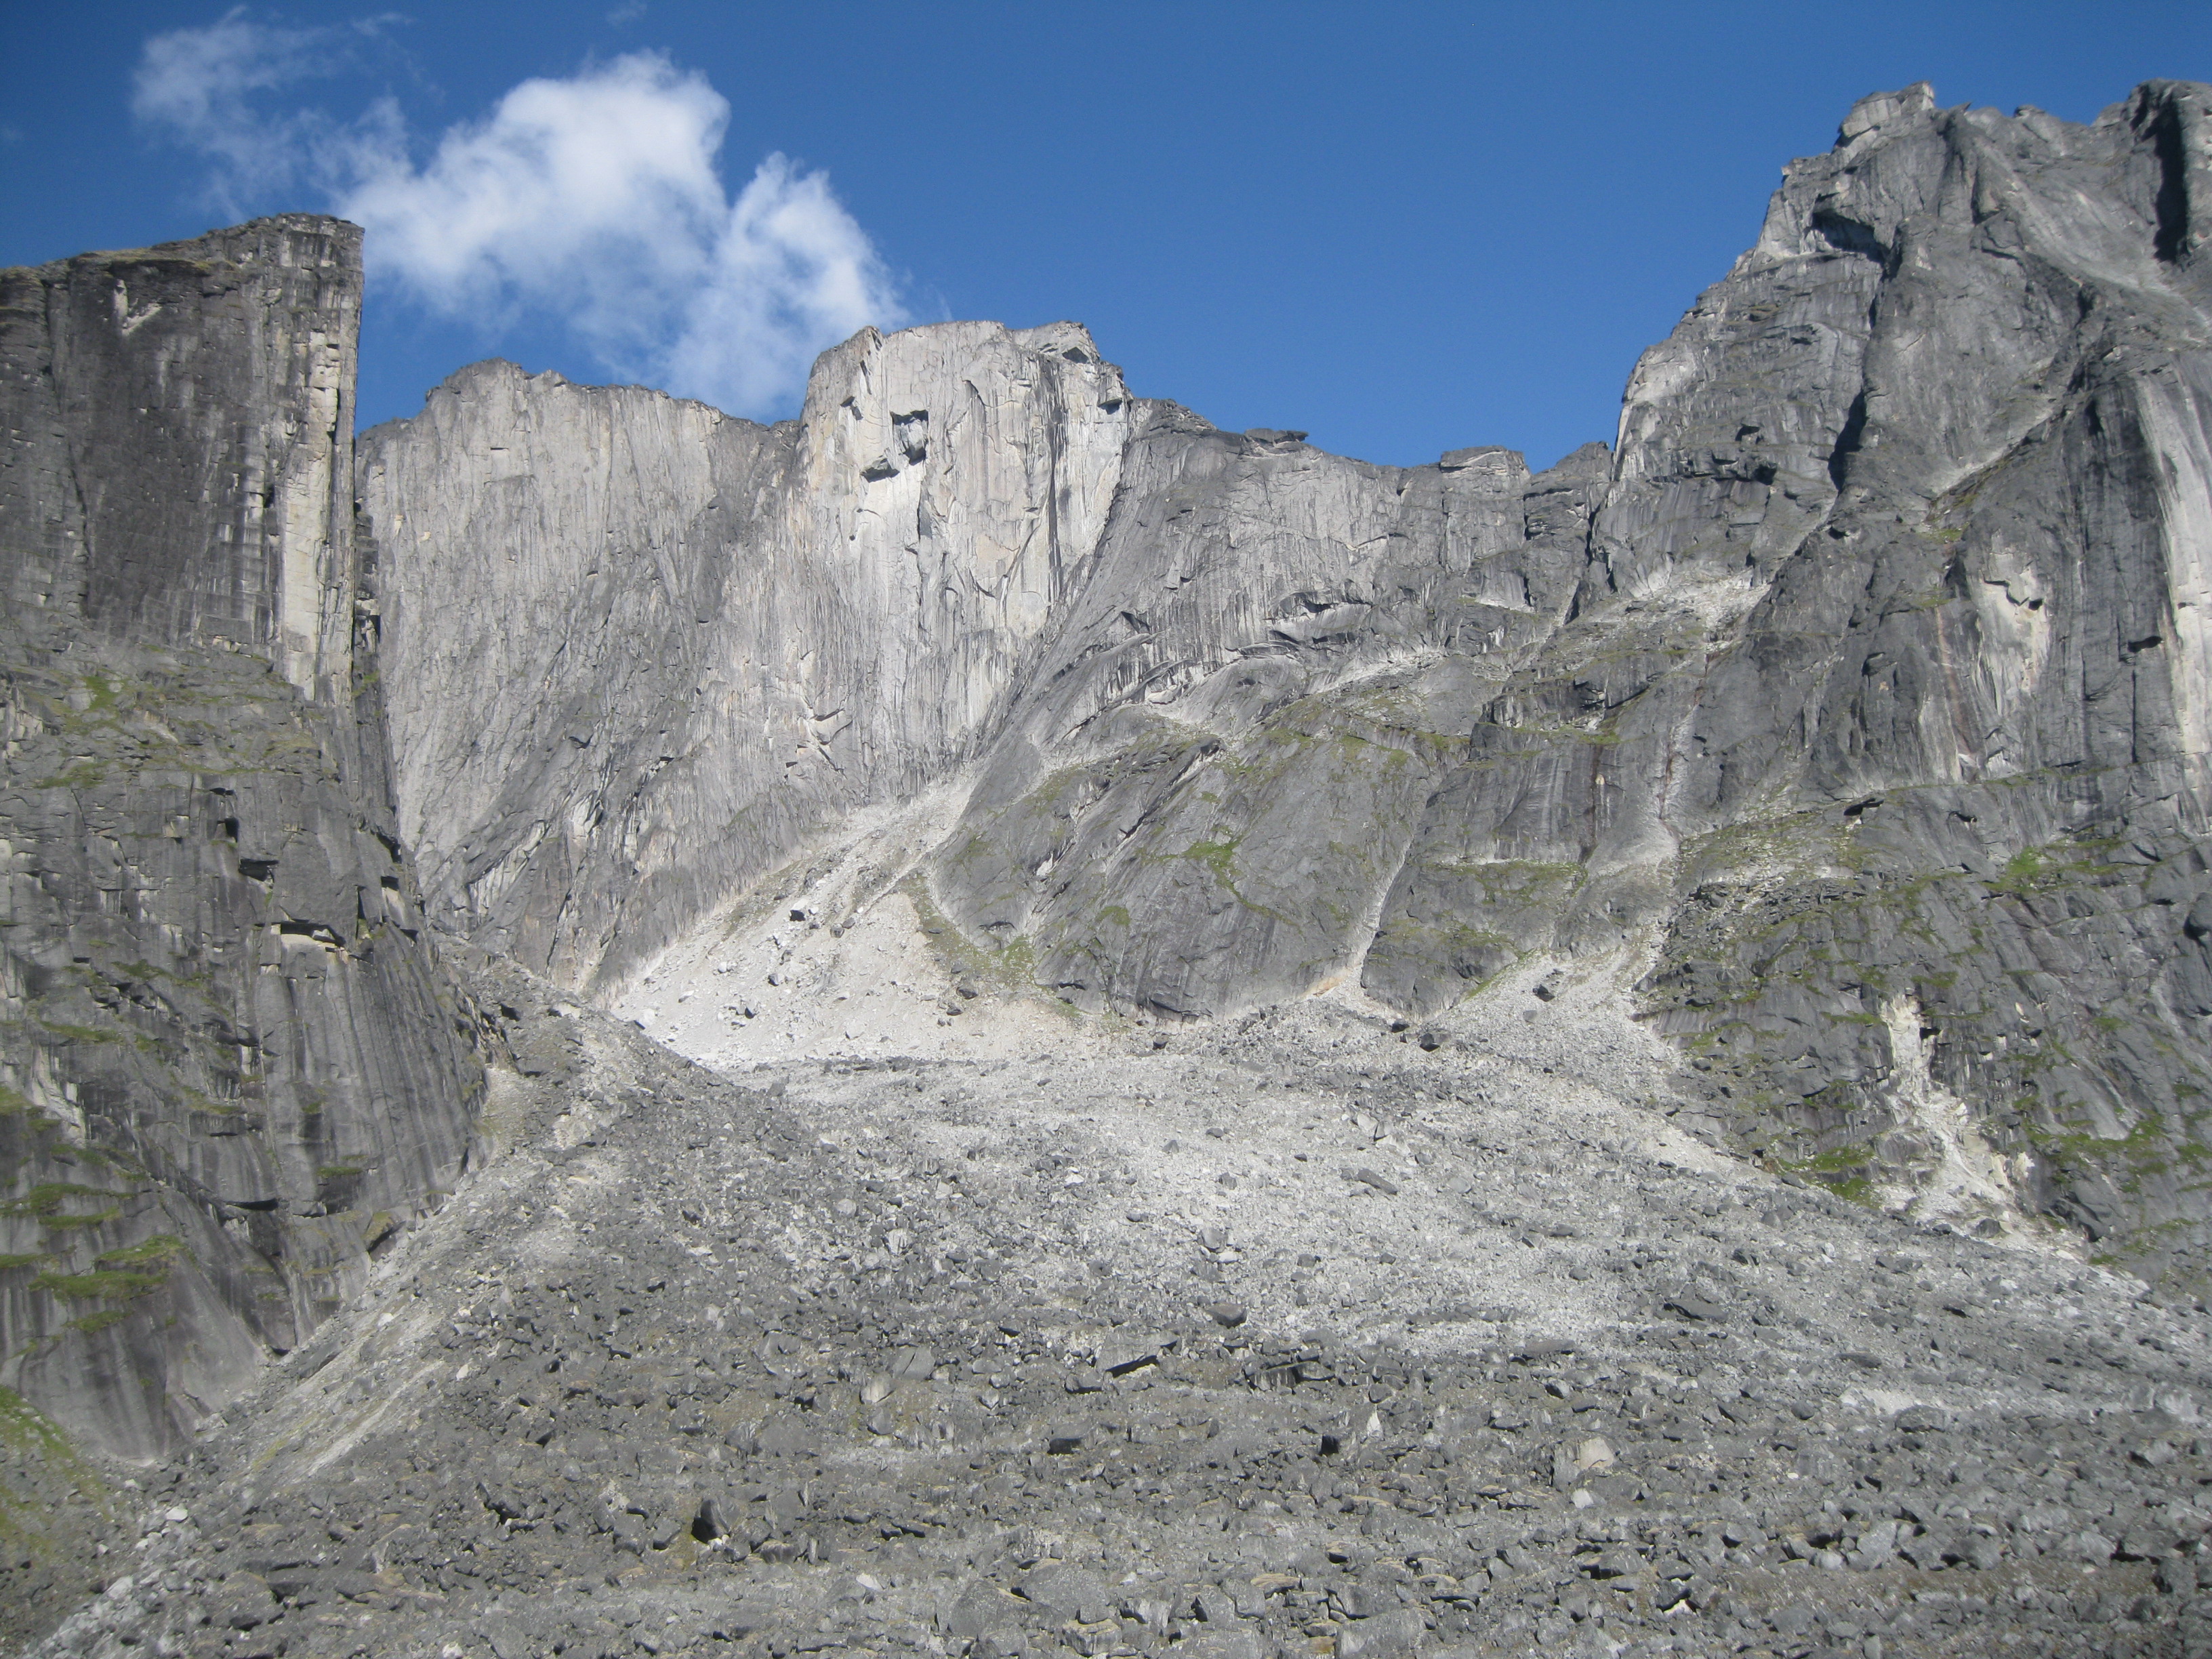
The Rugged Range got the name from its jagged features. These peaks are the highest in the Northwest Territories, consist of granite and are to a large glaciated. The range was formed 110 million years ago when molten igneous rock deep within the earth’s crust was forced to 3,000 metres (9,843 ft) above the earth’s surface. As it cooled off and hardened it pushed sedimentary rock up from below.
Over time the upper layers of this sedimentary rock were eroded away which exposed the hard granite of the Rugged Range. The last period of glaciation, which ended 10,000 years ago, created the formation seen today.
Paddling towards the Snye
The following day, as you continue down the river, you will be met by even more amazing mountainous scenery. The sheer beauty of the surrounding landscape is nothing short of awesome. There are a couple of gravel bars towards Broken Skull River where you can stop and have a breather. Not only are the continuous jagged peaks of the Rugged Range impressive but you will also notice fascinating feature of the many beaver dams all the way downstream. These are some pretty amazing massive structure made by these little creatures. If you are lucky you may just spot a beaver on the edge of a gravel bar somewhere.
From around 150 km down the river just after the Corner Rapids, the Broken Skull River starts running parallel with the South Nahanni River and at around 175 km, the Broken Skull River flows into the South Nahanni River. At this point a massive gravel bar is based which will be a great lunch spot. Turn onto the gravel bar just after you have passed the Broken Skull River. Concentrate on manoeuvring onto the gravel bar as there is an eddy at this point.
The scenery at this point is absolutely amazing. It’s in the middle of the valley next to the river with glorious mountain peaks, of the Rugged Range, as far as the eye can see. Take your time, walk around on the gravel bar and take some great photos of the scenery.
As you continue further down the river you may decide to have a break on yet another gravel bar all depending on your schedule. There are several to choose from that will provide you will great views. When you get to around the 210 km mark you have arrived at the Snye, right at a side channel next to the river, where the hiking trail to Glacier Lake starts.
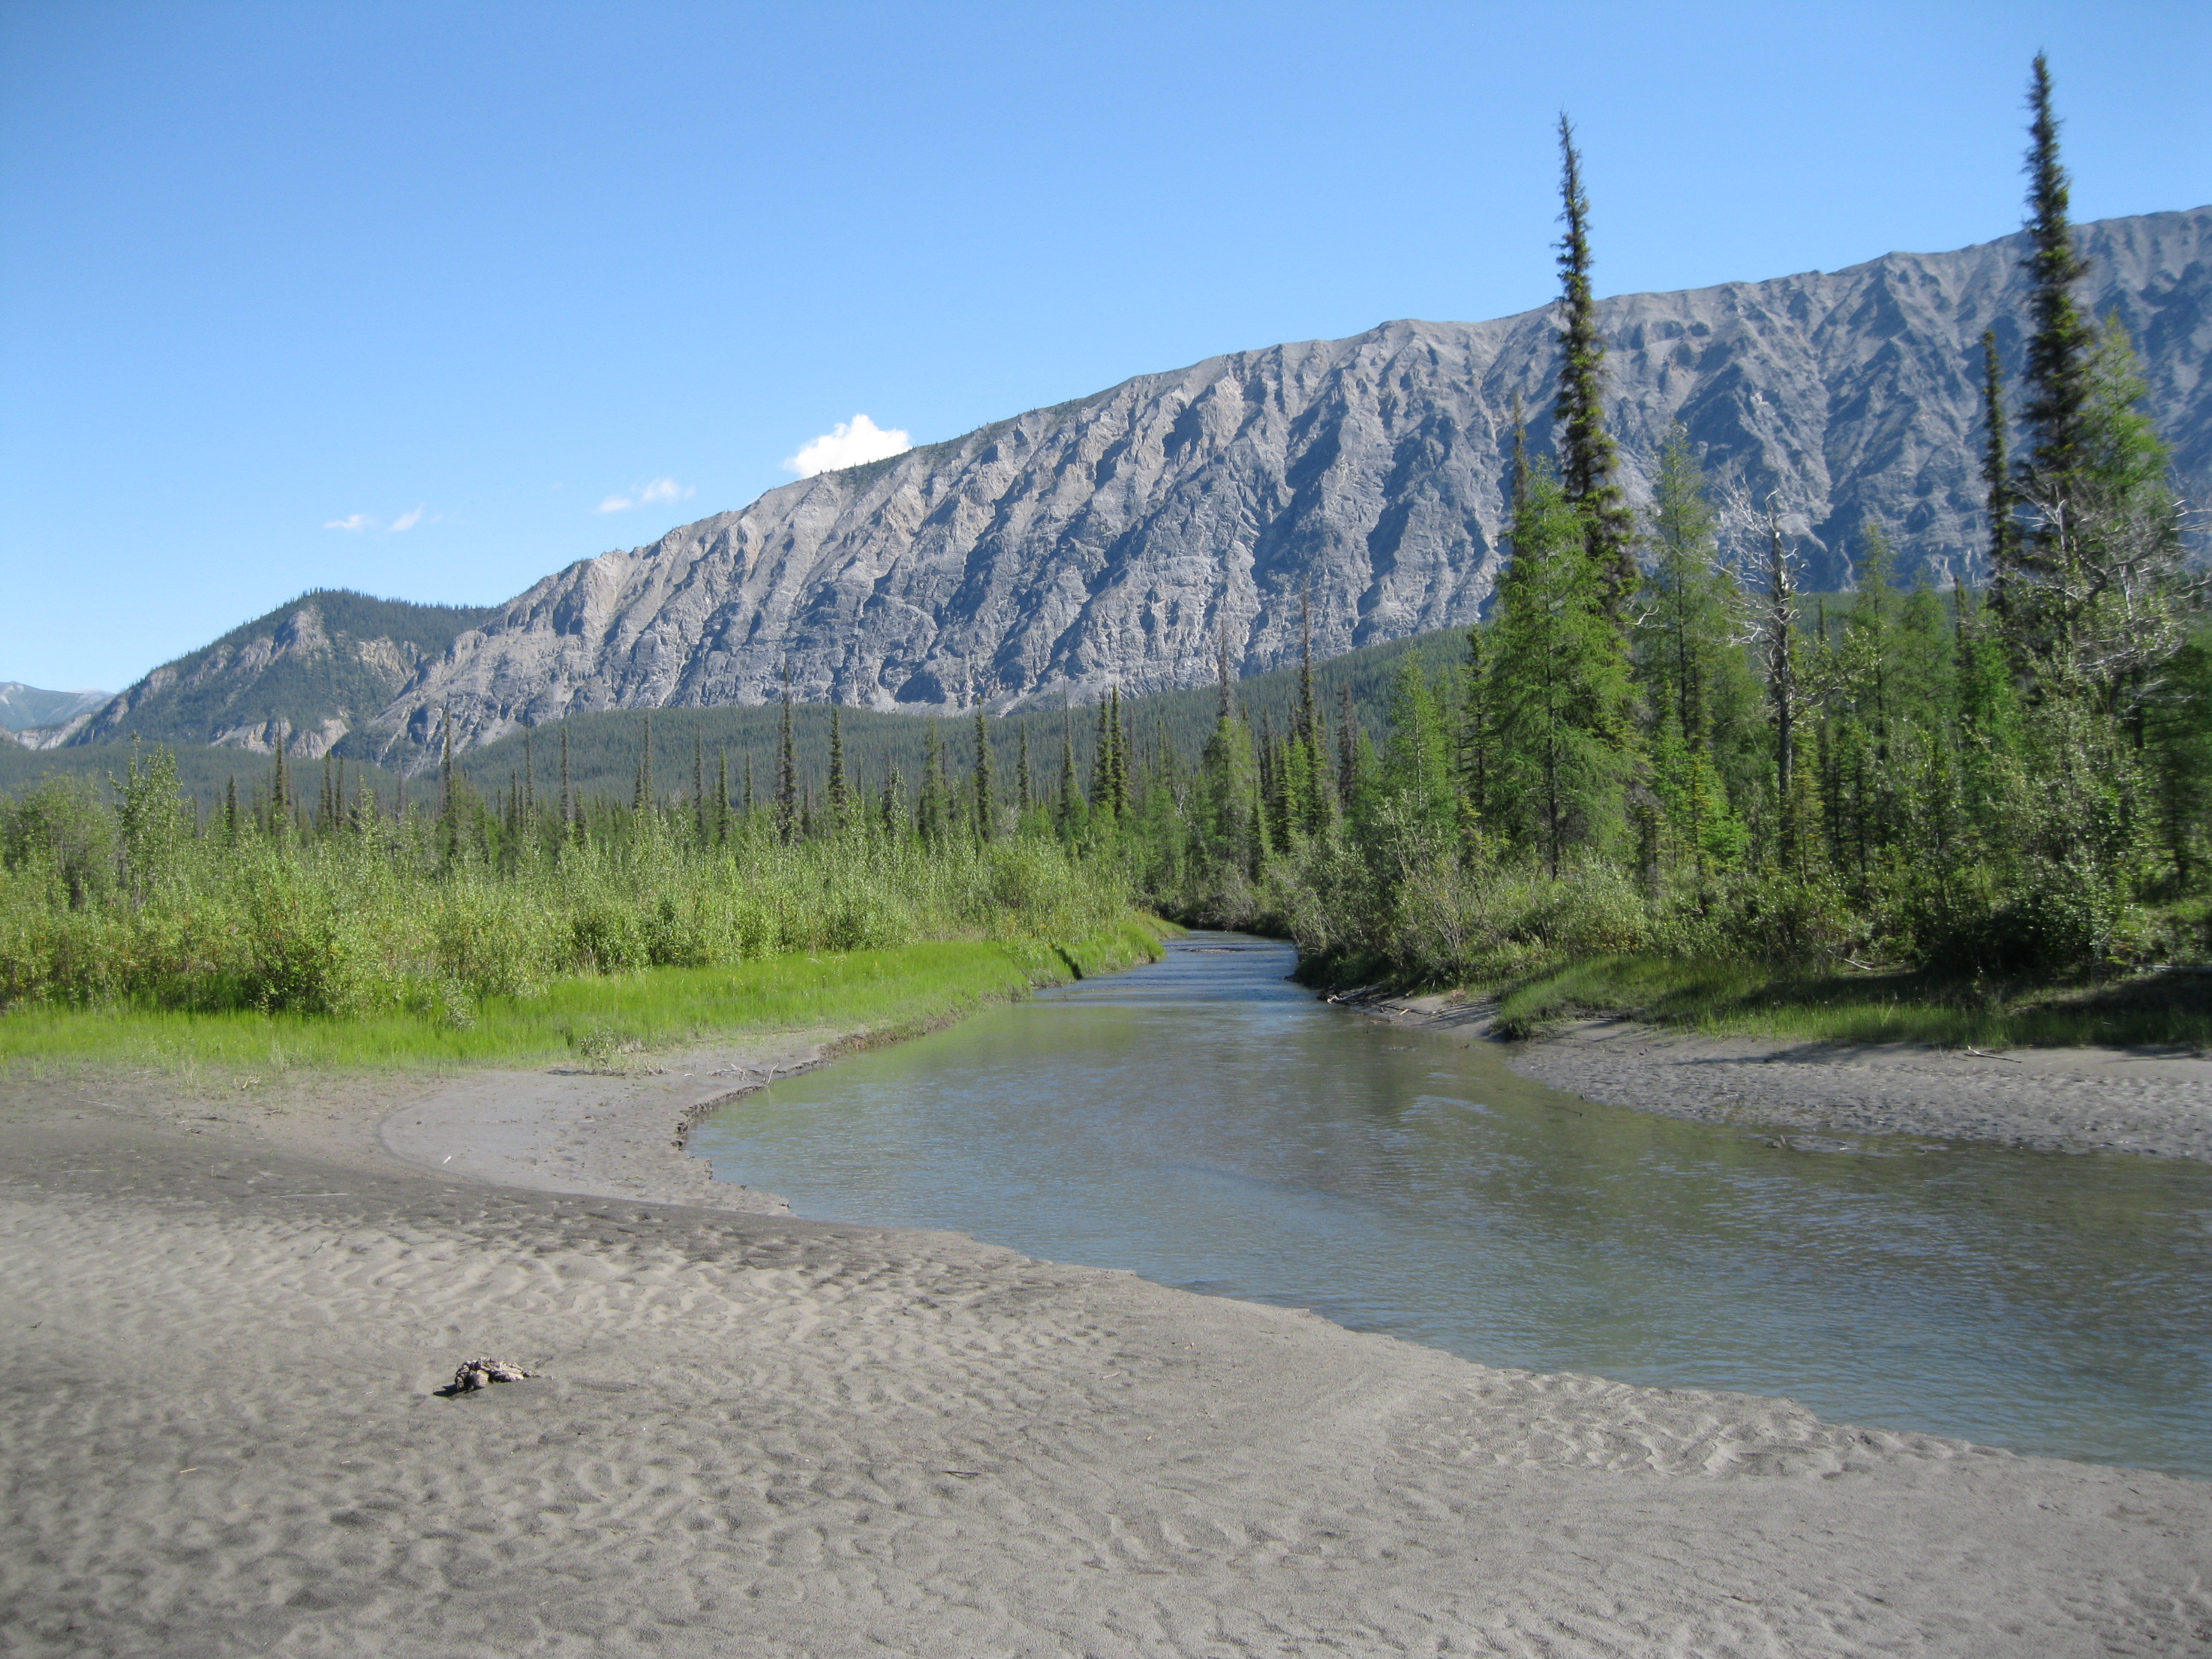
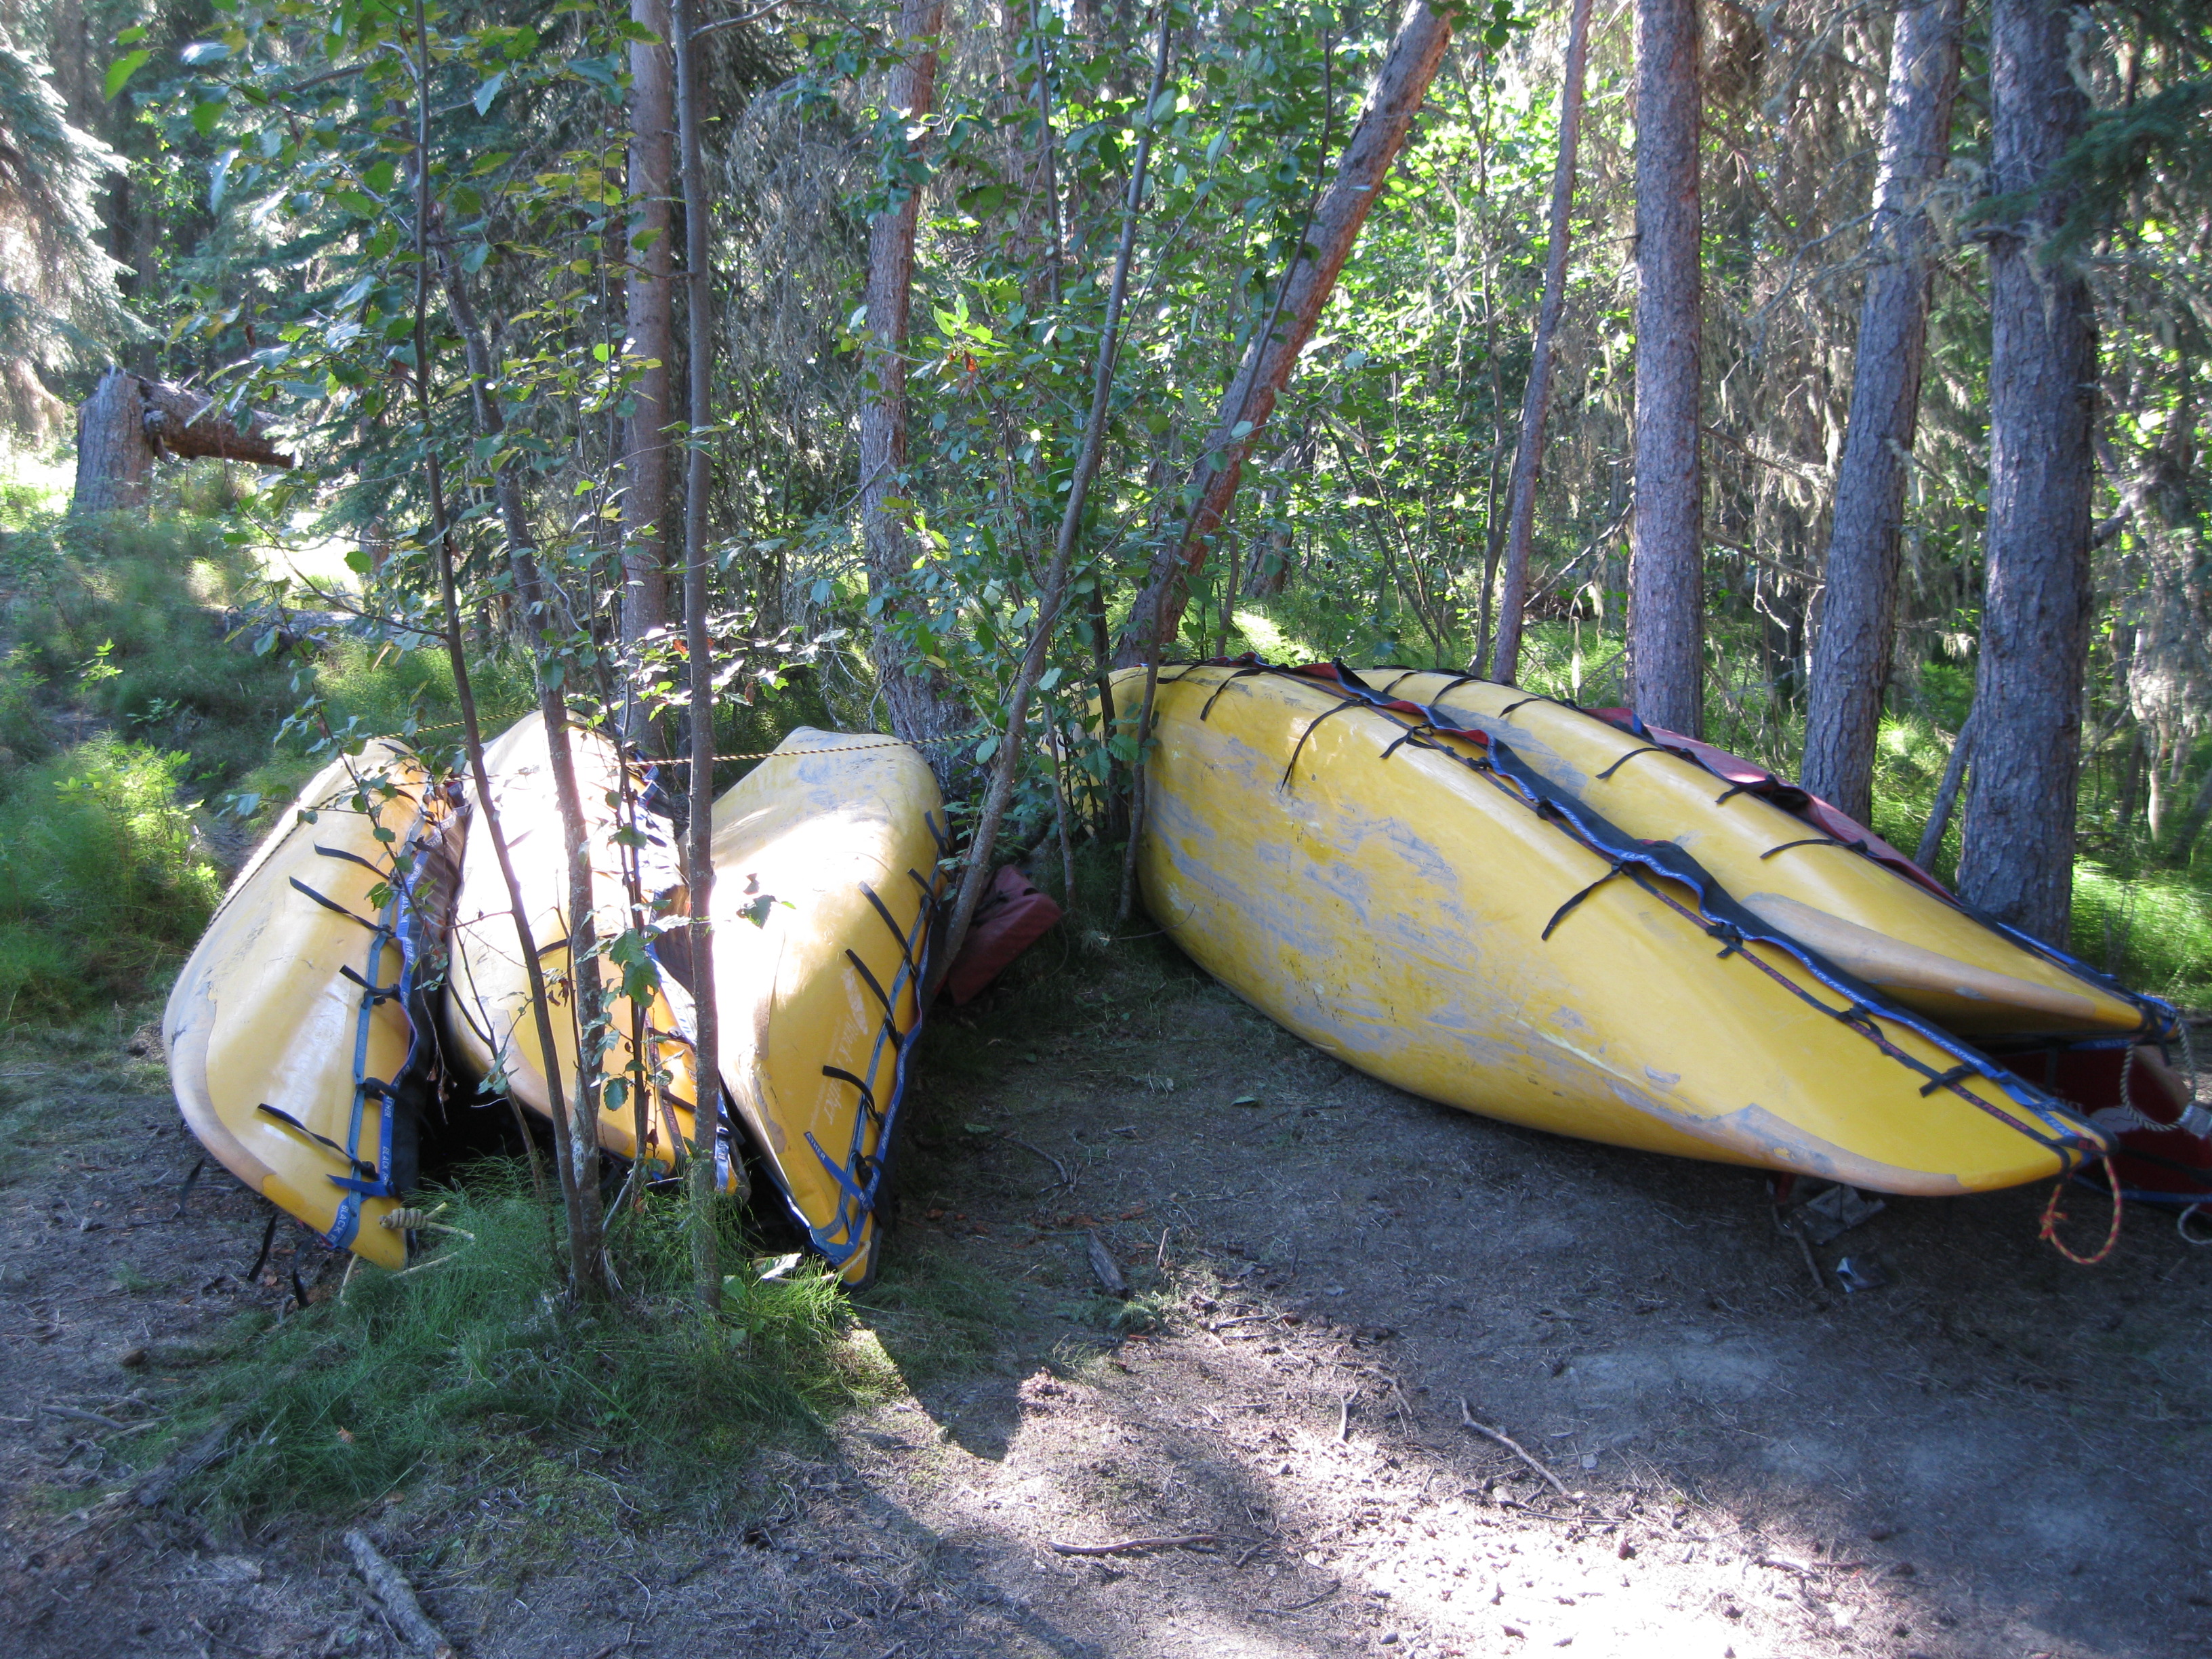
As this is where the trailhead for the hiking to Glacier Lake is located, you should camp here for the night. The following morning the hike towards Glacier Lake commences. To camp at this spot you have to bring you canoes ashore and store them for the period you are going for your hike.
You should definitely spend at least three nights at the Cirque of the Unclimbables if your time allows it as it is such an amazing spot and one of the highlights of the whole park. In total you will be spending six days on this hiking portion of the trip. One day from the trailhead to Glacier Lake, one day from Glacier Lake up to the Cirque of the Unclimbables. Spend two days which equals three nights here. One day climbing down from the Cirque of the Unclimbables back to Glacier Lake and one day from Glacier Lake back to the trailhead at the Snye.
In preparation for the hike to Glacier Lake and the Cirque of the Unclimbables, decide on what you want to bring. You will have to carry everything yourself in a backpack so bring as little as possible. What you don’t need you can leave behind in the canoes. Bring enough layers for shifting weather conditions, but hold back on the underwear and the toiletries. Bear in mind that you have to carry some of the group gear as well, such as food and cooking equipment.
The Hike to Glacier Lake
The hike from the Snye to Glacier Lake is a 9 km (5.6 miles) long. It doesn’t sound like much but the terrain is difficult so it is a pretty big mouthful to be blunt. As long as you are prepared for this you will be fine. Even if you are not, you will get through it in the end. But you have to dig in deep. The terrain is muddy and swampy. You will most definitely get wet feet even if you are wearing waterproof hiking boots. It is highly recommended that you bring hiking poles on the hike to get weight strains of your body and support your balance in general.

As the trail is so muddy and swampy, people before you have walked outside and parallel to the trail to avoid getting wet boots and feet, and you will too. This being done continuously combined with weathering has made the trail very unclear in several sections.
In some areas it seems like there are several trails. It is really confusing as the hiking trail is really faint and then you may see so-called game trails going in a different directions. These game trails are made by animals by repeatedly using the same areas for hunting and grazing.
Therefore if you are in a group, do your outmost to stay close together so no-one gets lost. Bear in mind that you can easily get lost if you are not careful.
The whole trail is through forest terrain where you will have to navigate through obstructions like branches and fallen trees and if it’s during a hot summer period the humidity is very high. This really drains your energy. Therefore remember to drink loads of water and bring plenty of trail mix. Carry at least three litres of water on the hike. The water supply can be refilled upon arrival at the halfway point at Brintnell Creek.
So basically most of the hike is pretty brutal and it will also be through terrain with hardly any interesting scenery. You just have to dig in deep and do the hike. It is a long day of about 7-8 hours of walking. Luckily the elevation gain on the hike is not too bad. There are a couple of places where you will be climbing a little bit but it not too bad.
Initially from the trailhead at the Snye, the trek is fairly well maintained for the first part, but as soon as you get into the swampy areas, which won’t take long, it will start getting sketchy. Make sure you have a fellow traveller within your sight at all times as you can get lost. Carry a whistle for emergencies.
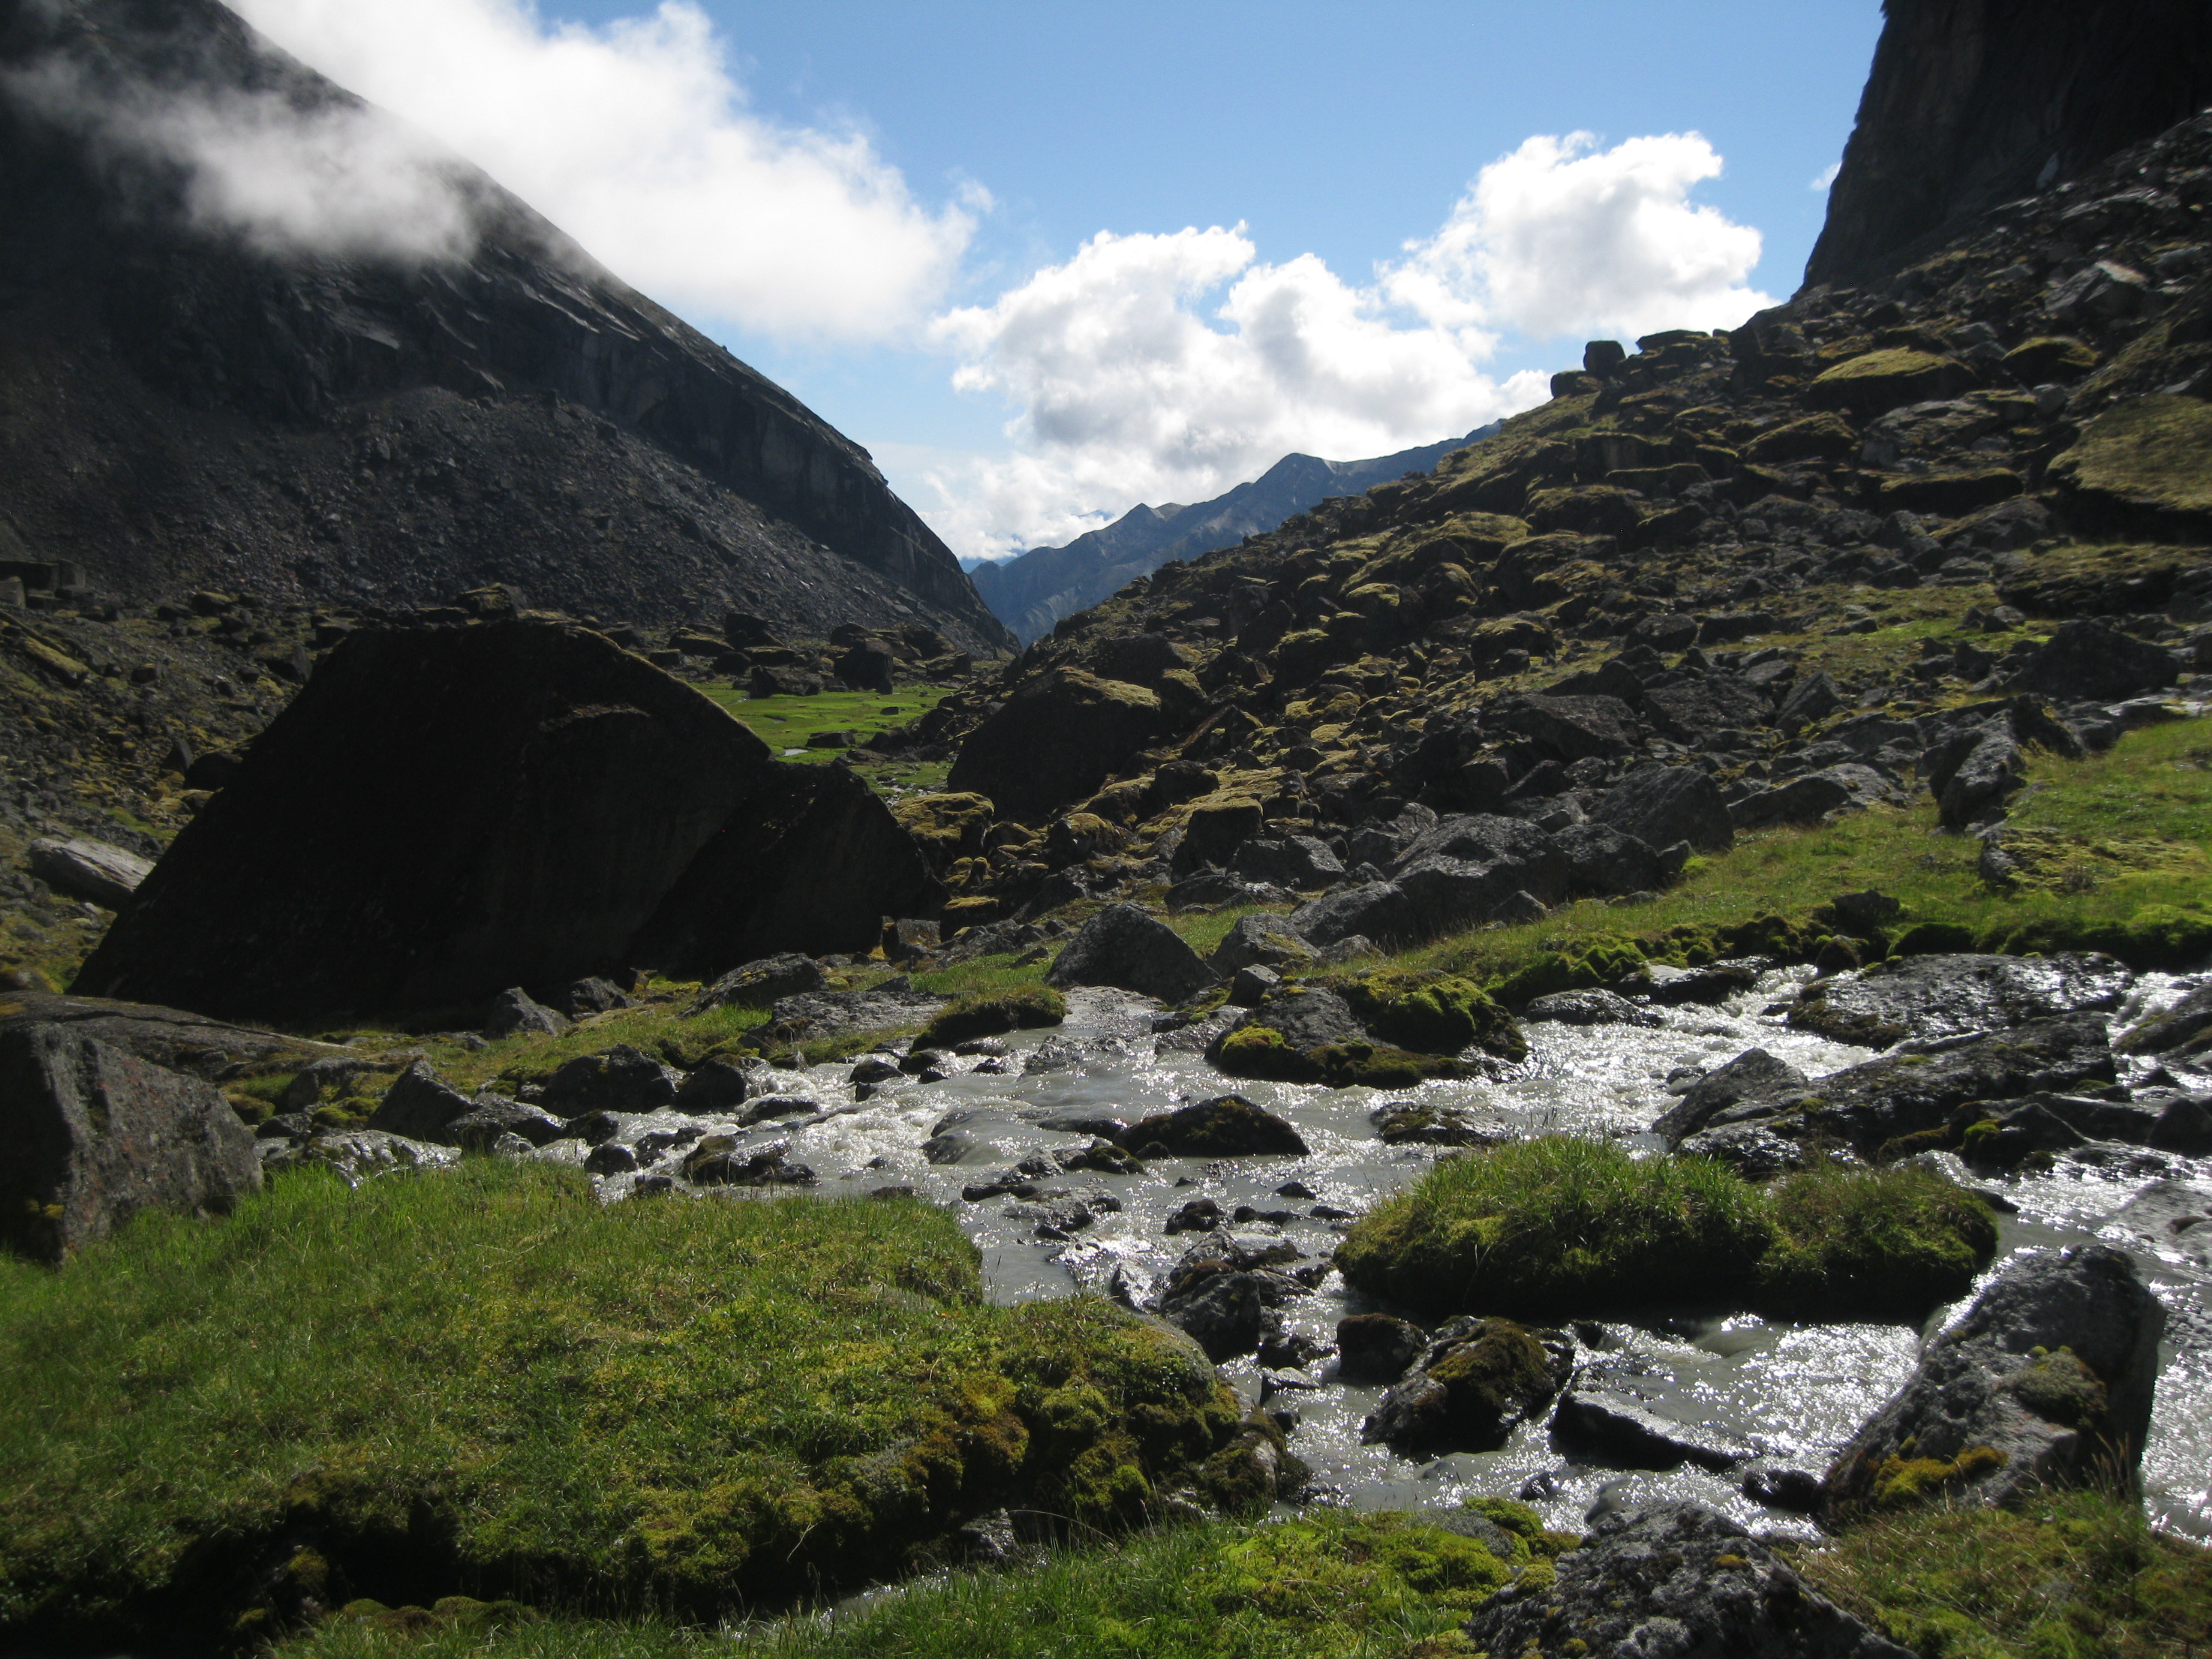
After about 2½ hours into the hike you will get to the beautiful Brintnell Creek which is about half way and the perfect lunch stop. This is a perfect place for a chill and the ideal opportunity to take some photos. This will also be the first place with interesting scenery and different landscape to just forest vegetation.
Fronting the creek is a pretty little meadow with flowers, bushes and stranded stems with the mountain peaks of the Ragged Range as the backdrop. This is a quite the amazing setting. You can get some awesome shots from many different angles. Take your time to have a well-deserved rest, lunch and check out the scenery.
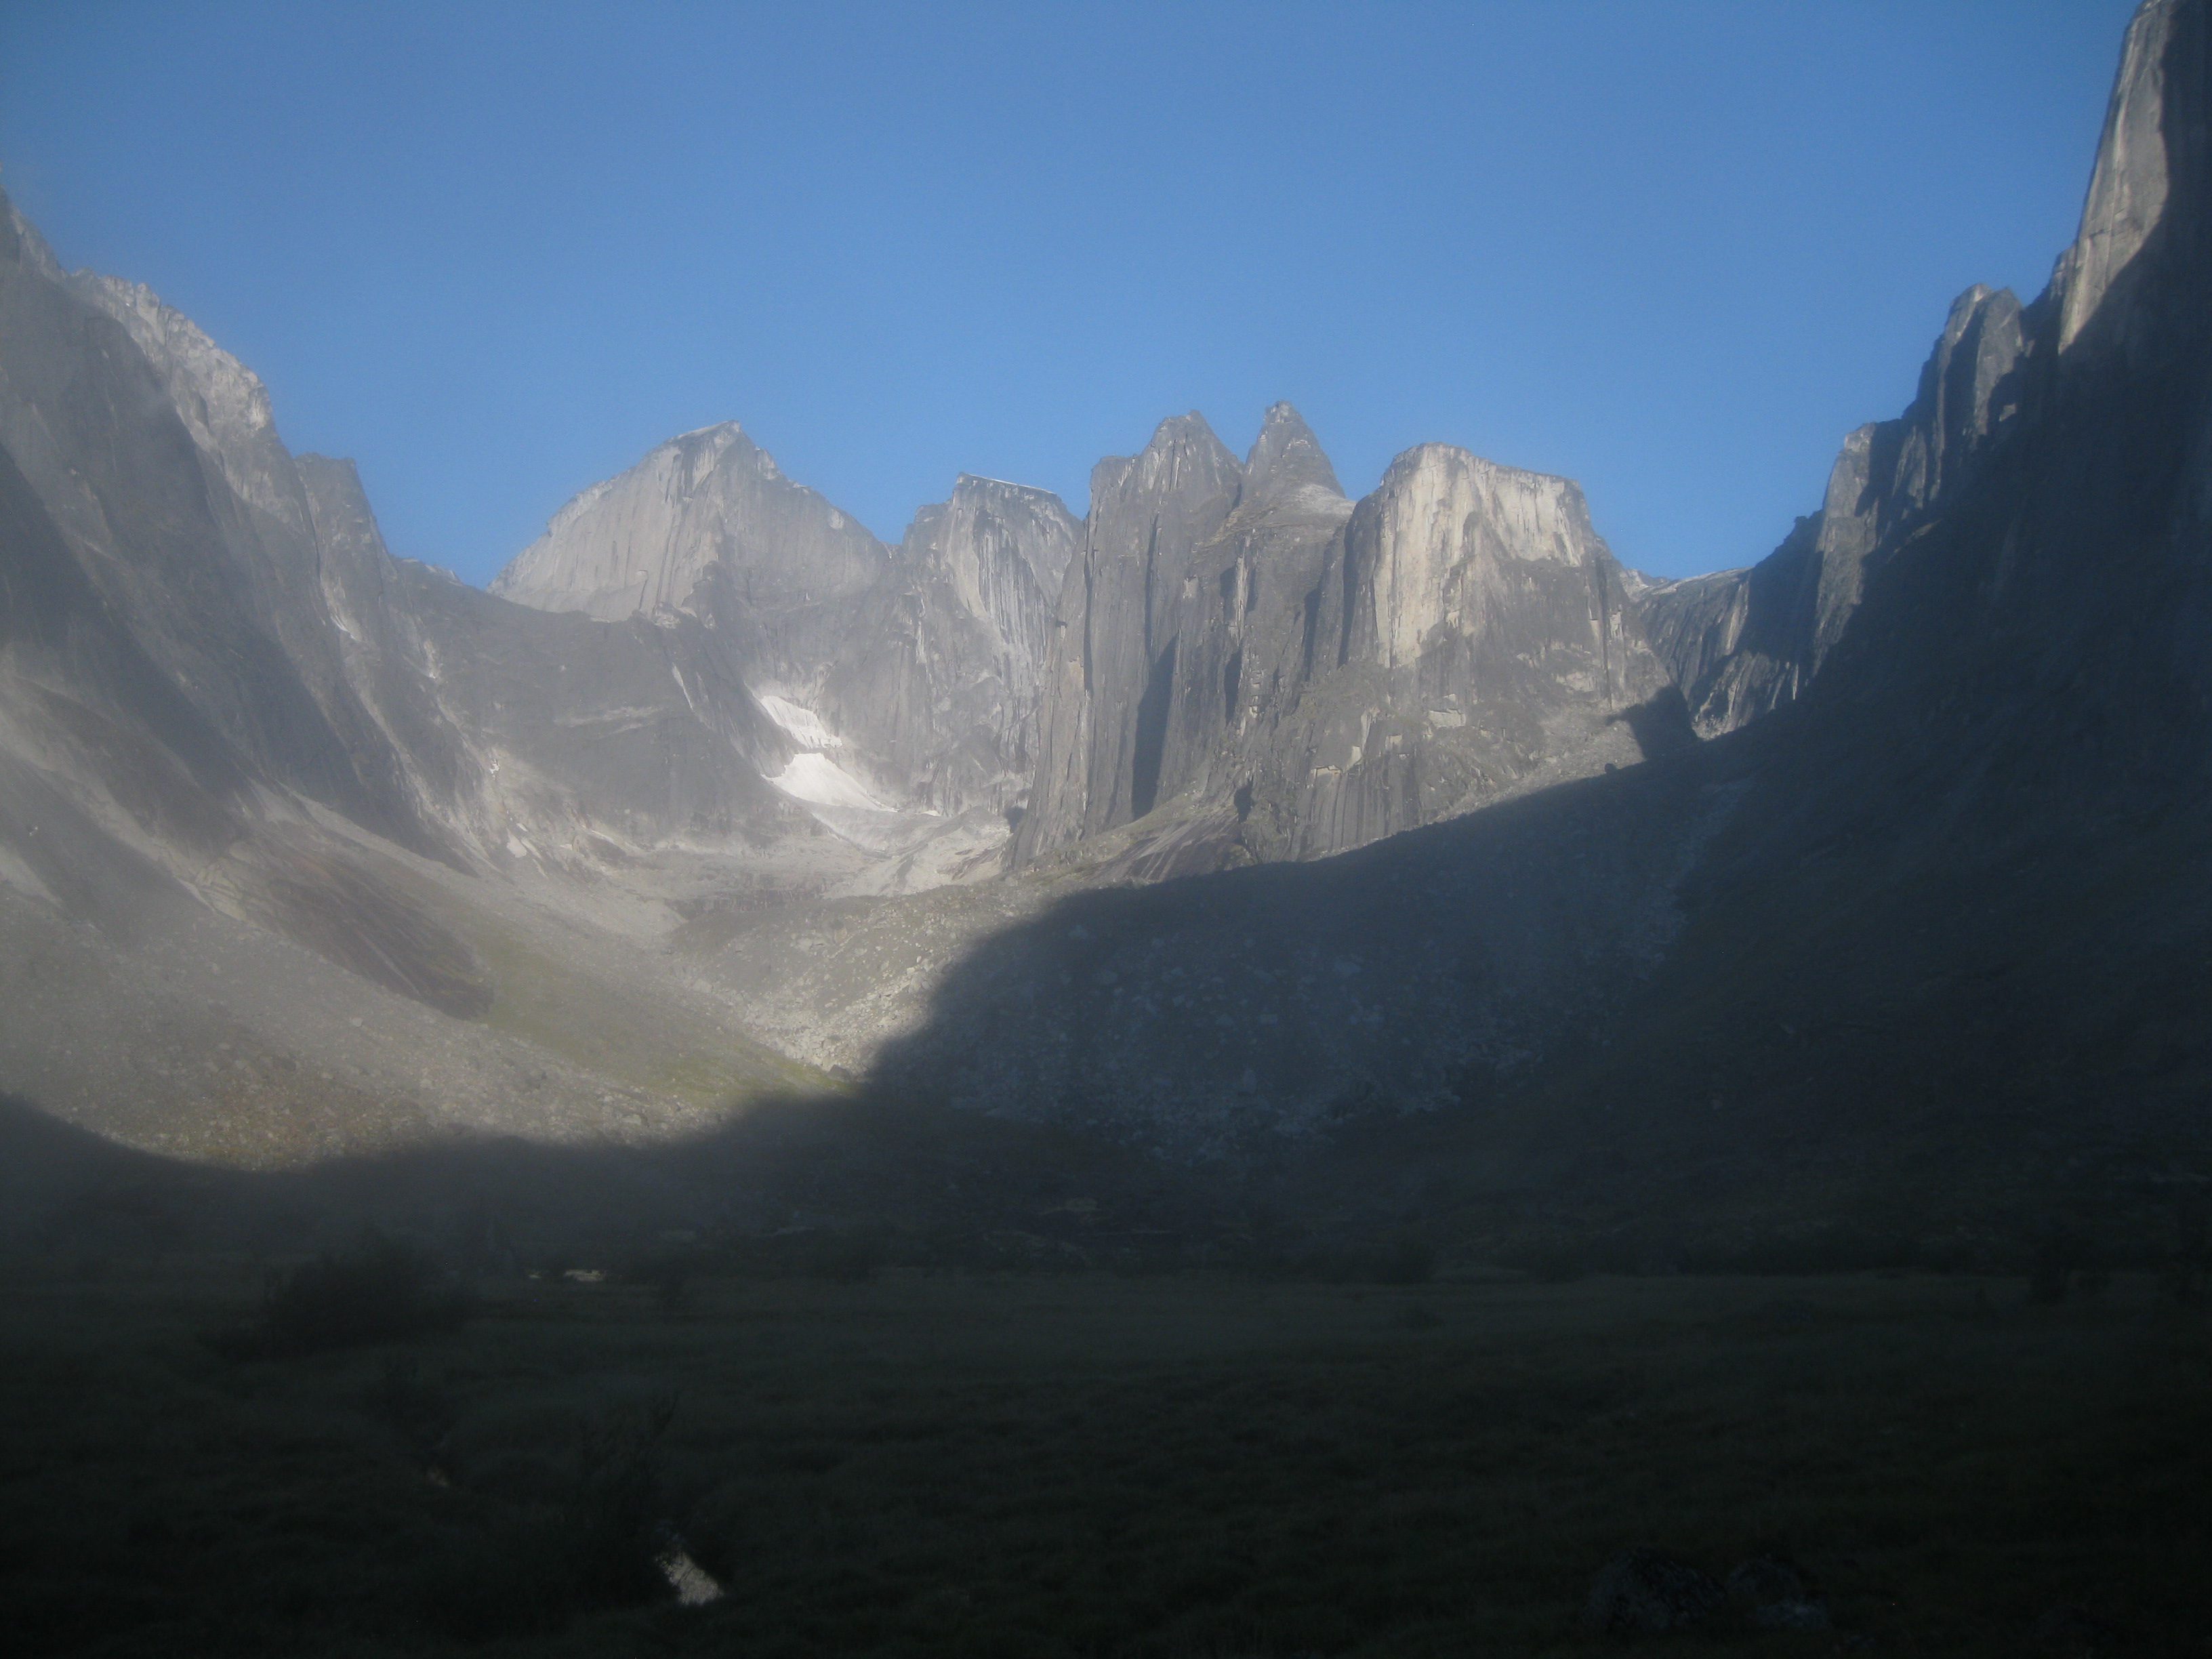
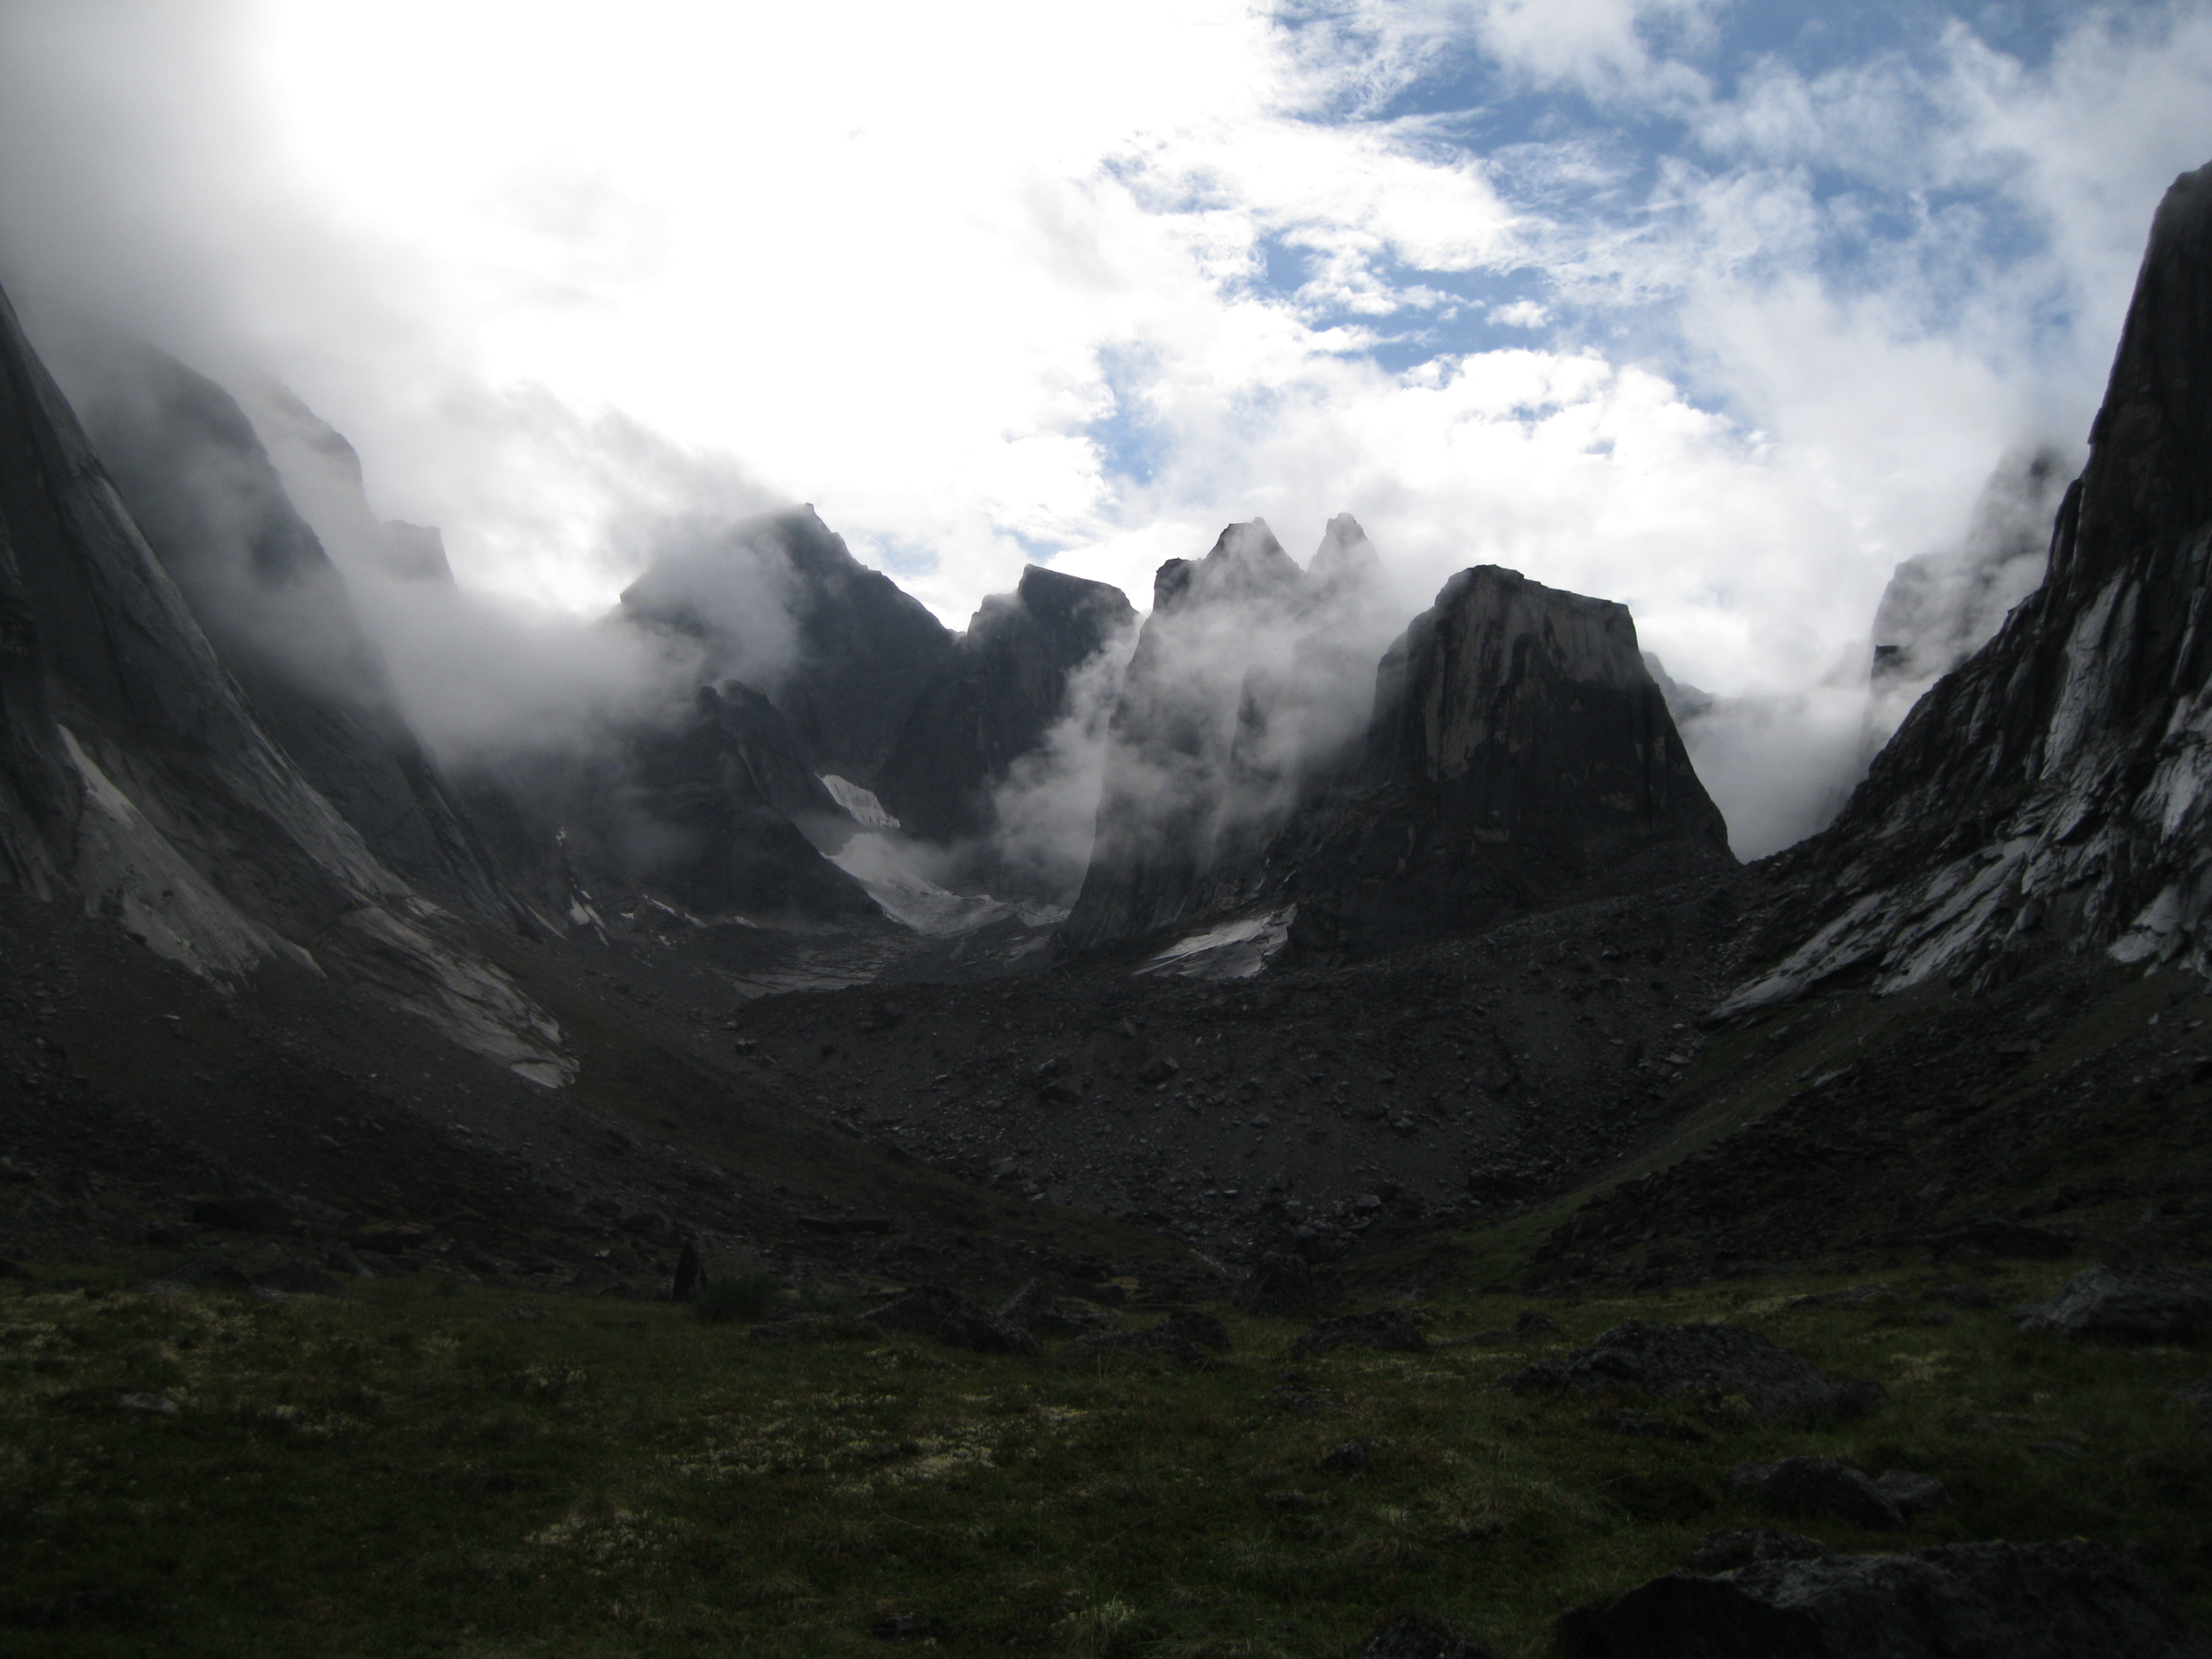
After lunch the hike continues through even more swampy wet vegetation and muddy terrain with no noticeable landscape along the way until you get down to the creek again after approximately two hours. Here you will be met by your first view of the peaks of the Cirque of the Unclimbables with Mount Harrison Smith in the foreground. This is such a great view and the perfect photo opportunity. Now you can finally see what the end goal of the day is, but there’s still a fair way to go.
You are getting closer, so head on in determination towards the destination and you will get there faster. After about 1½ hours you will get to a magnificent view of Brintnell Creek. Here the rough creek has carved itself through a bit of a canyon like scenery around a bend. It’s quite beautiful and one of the highlights of the day. At this point you are very close to Glacier Lake, climb a little hill and you are approached by a fantastic view of Glacier Lake. You will be tired at this point after a long day but it’s all worth it when you arrive and the vantage point.
Upon your arrival at the vantage point there are plenty of opportunities to take some great shots of Glacier Lake from different angles and with yourself in one of the photos as well. You have done a good effort. You are still not quite finished yet, so take you time and have a bit of rest as well.
Continue down the hill towards the lake where there should be some canoes ready to be used to cross the lake down towards the campsite on other side of the lake. This is a bit tough as you have already had a long day hiking through difficult and challenging terrain. It’s getting close though, so bear in mind that arrival time is in about 1½ hours after you have canoed across the lake. Glacier Lake is a flat lake so it is not a challenging paddle but it can be a bit hard after a long day. You may be lucky and spot some wildlife such as black bears on your way.
During your paddle across the lake, the amazing view of the peaks of the Cirque of the Unclimbables are getting closer and closer. So take you time to have a couple of stops along the way to take some shots of the scenery.
Glacier Lake
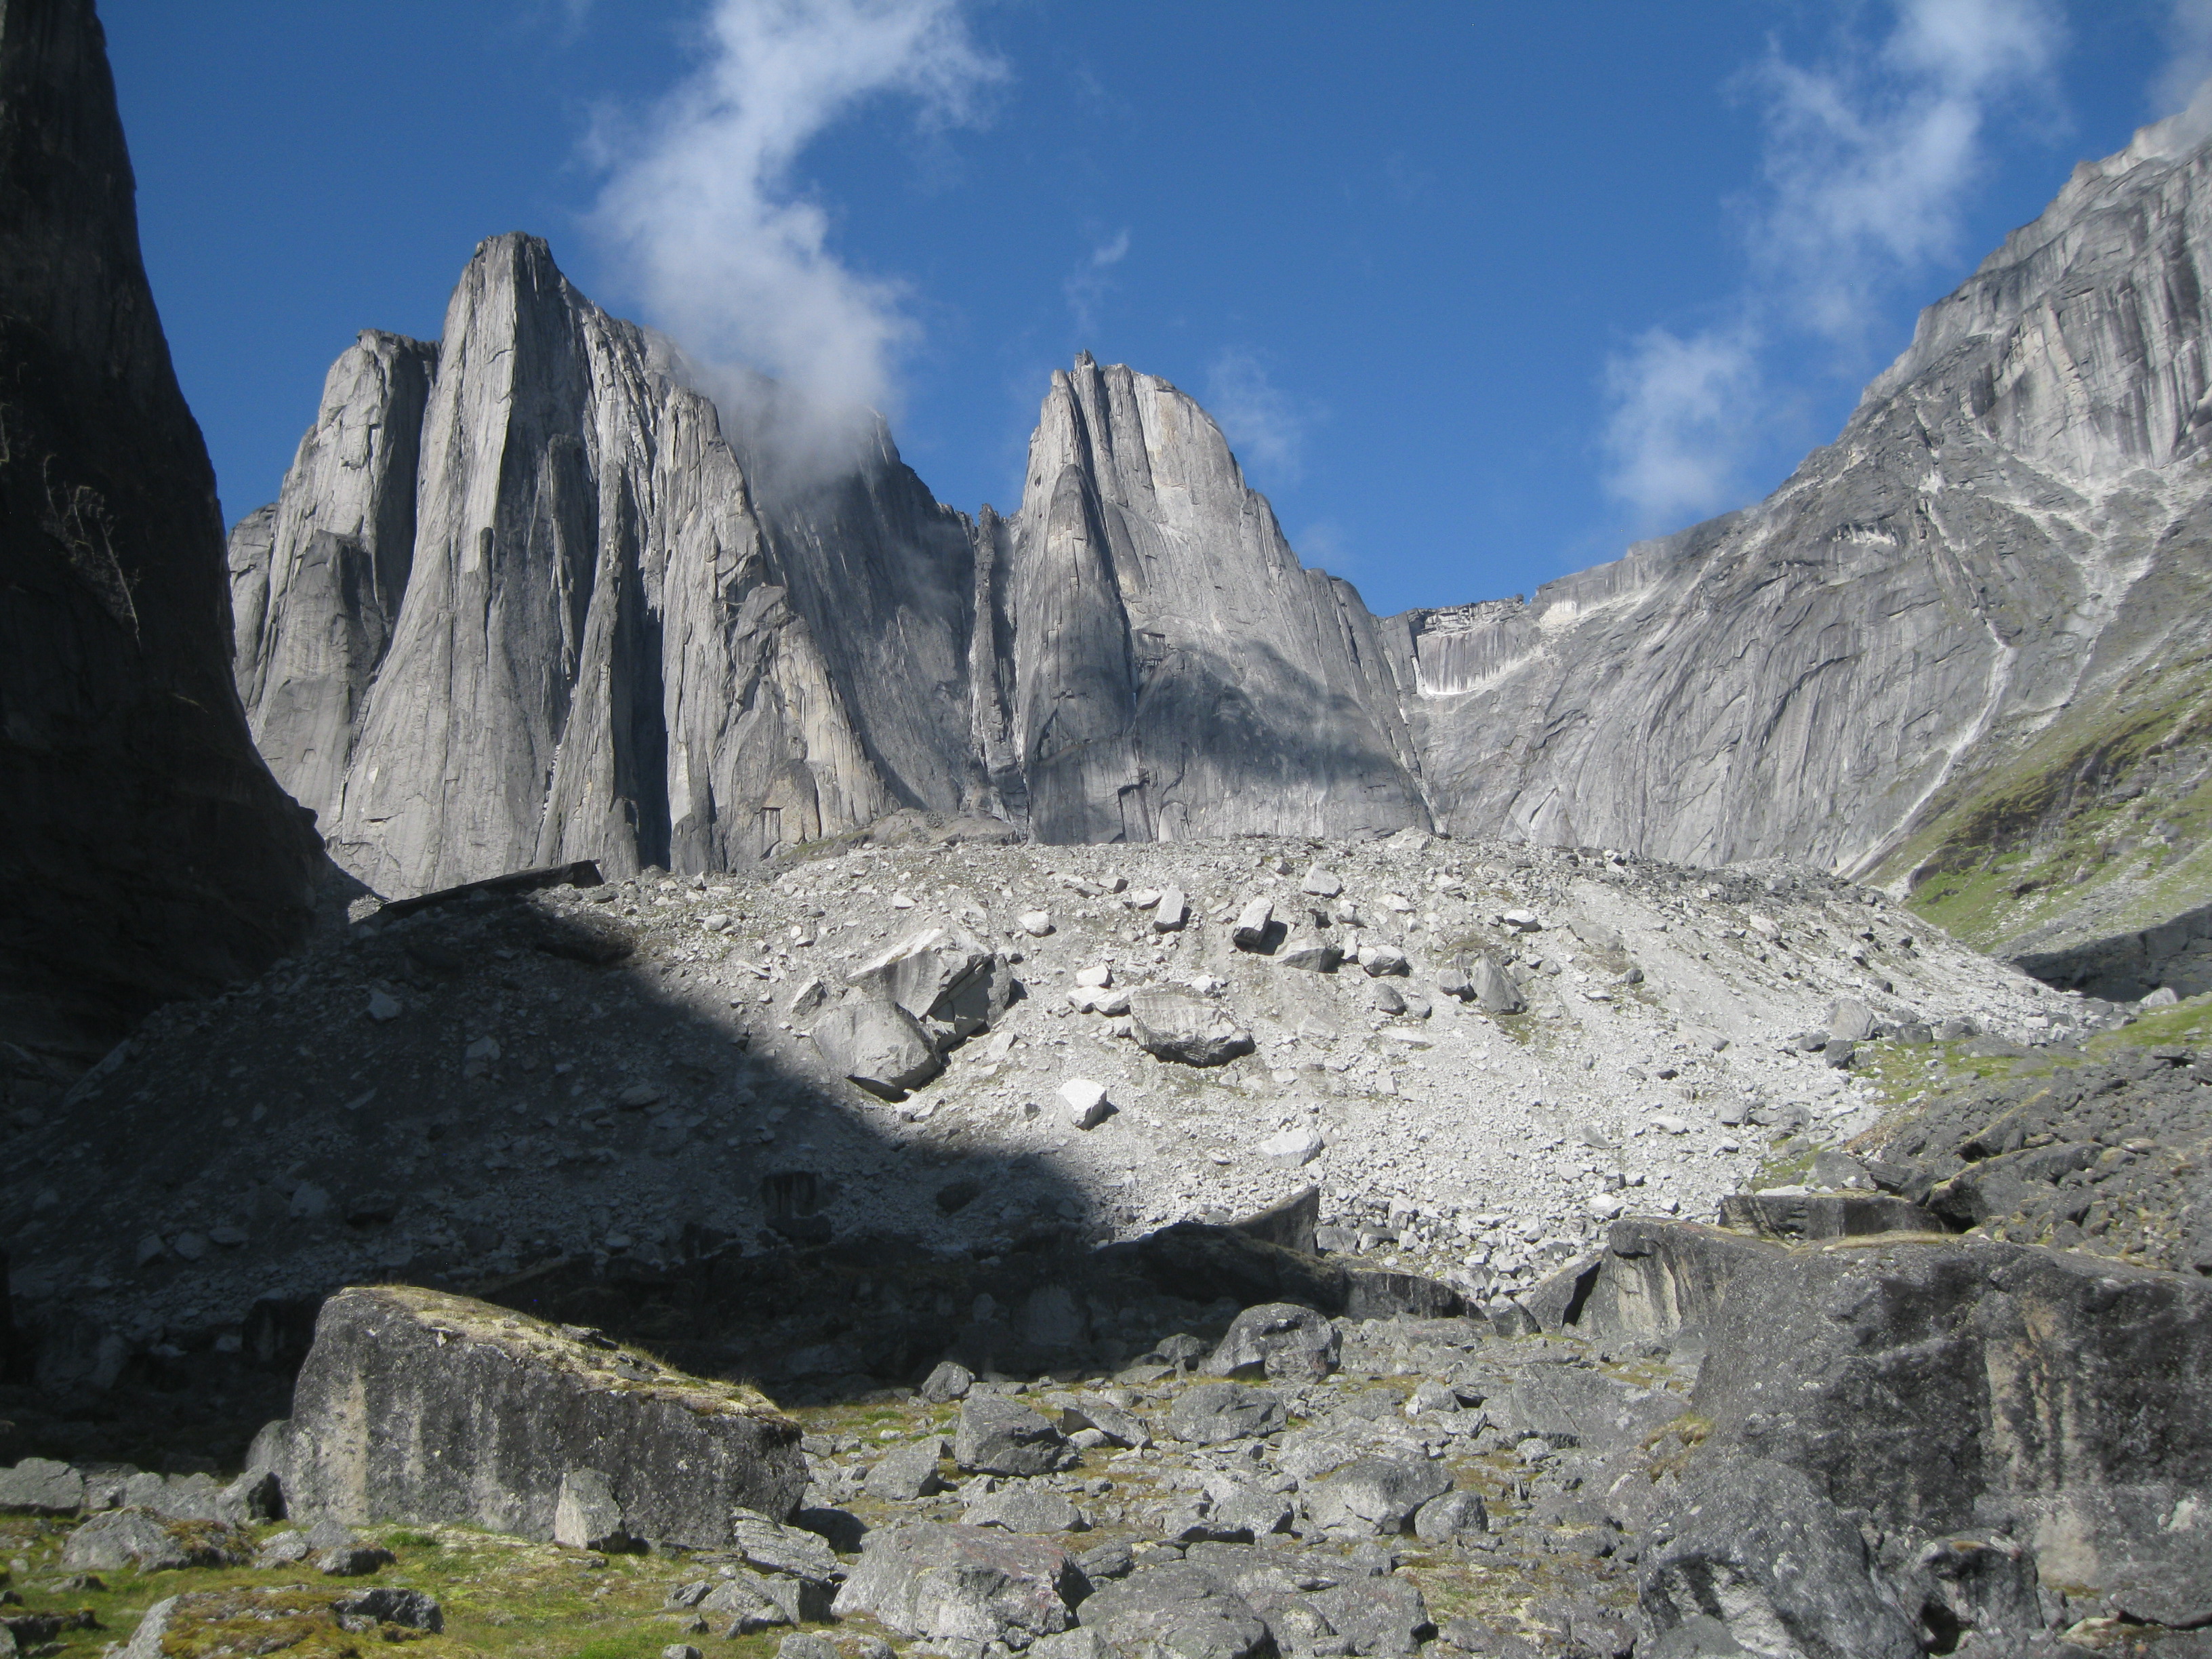
The campsite is based on a gravel bar next to a ranger cabin. Haul the canoes ashore safe of the water. When you finally arrive at the campsite, it will be all worth it. There’s a majestic view of the peaks of the Cirque of the Unclimbables. This is one of the highlights of the whole park. Take it all in and enjoy.
To get the perfect shot, you may have to jump across a couple of small streams to get to the perfect spot with a view without obstructions. These streams may look different from year to year.
Chill out, set up your tent and get ready for dinner. Have a good rest and get ready for the next morning as that will be one big challenging day as well.
At Glacier Lake there is a shed where food can be stored to be used upon return to the lake and for the hike back to the trailhead at the Snye. The backpacks will therefore be a bit lighter when hiking up to Fairy Meadows.

Not too far from the campsite there is a ranger cabin as well. It’s pretty neat to check out and you may just spot a porcupine as they love to feed of the wood at the cabin. Not too far from here drop toilet facilities are located.
The Hike to Fairy Meadows and the Cirque of the Unclimbables
Hiking up to the Cirque of the Unclimbables is a long day and a bit of a challenge. The distance is about 4 km (2.5 miles). It doesn’t sound like much but it is through demanding and tough terrain. If it starts raining during the day it will be even tougher. The hike will probably take you about 7 hours. The trail can be a little bit muddy in sections, but is it nothing like the previous day and the trail is well marked all the way.
Just bear all this in mind and you know what to expect, and you’re good to go. Hiking poles are necessary especially on the steep sections and through boulders. Bring at least 3 litres of water. The water supply can be refilled at a glacial creek when you’re about half way.

First you will have to use the canoes to paddle from the campsite to the trailhead. This will only take about ten minutes across the flat Glacier Lake. Haul the canoes ashore safe of the water so they are ready for you upon your return in a couple of days.
At the beginning of the trail you will get to a point where the path is not quite clear due to fallen tree stems and debris. Therefore make sure you stay together in your group so you make the right turn.
About half an hour onto the trail you will have a great view of an unnamed lake and peaks of the Cirque of the Unclimbables. This is a great photo opportunity. If the water is still you will have a perfect reflection of the peaks in the lake. Quite stunning.
The first couple of kilometres of the hike are through pretty level forest vegetation with branches and fallen tree stems as obstructions which makes it quite challenging.
From this point the hike is through forest vegetation. After a couple of kilometres the trail starts ascending and you will be climbing big time as the path becomes very steep for the most of the remaining hike. This is through forest vegetation and it’s getting tough. You will arrive at a point giving you the first glimpse of Mount Harrison Smith which is an awesome view. This is also a great spot for a little breather as there’s a glacial creek where the water bottles can be refilled without processing the water through a filter.
Continue onwards a bit more and you may find the perfect lunch spot a bit further on. It is recommended to have lunch break a bit more than half way on the trail as the second half of a hike is always harder. As the hike continues after lunch you arrive at a section where the terrain opens up a bit and there’s a magnificent view of Mount Harrison Smith, the Brintnell Creek and Brintnell Creek Glacier. A stunning view and a great spot to take some photos. This is the point where it gets a little less steep and it becomes a terrain of talus and boulders. Here you really have to concentrate on manoeuvring through massive boulders.
You are getting close but this last section of boulders can be pretty challenging after a hard day and it is still pretty steep. But do take your time and do the hike at your own pace to avoid potential injuries. Bear in mind that if it has or does rain, the boulders can be a bit slippery. So be careful. From the point it will probably take you about 1½ hours to get to Fairy Meadows.
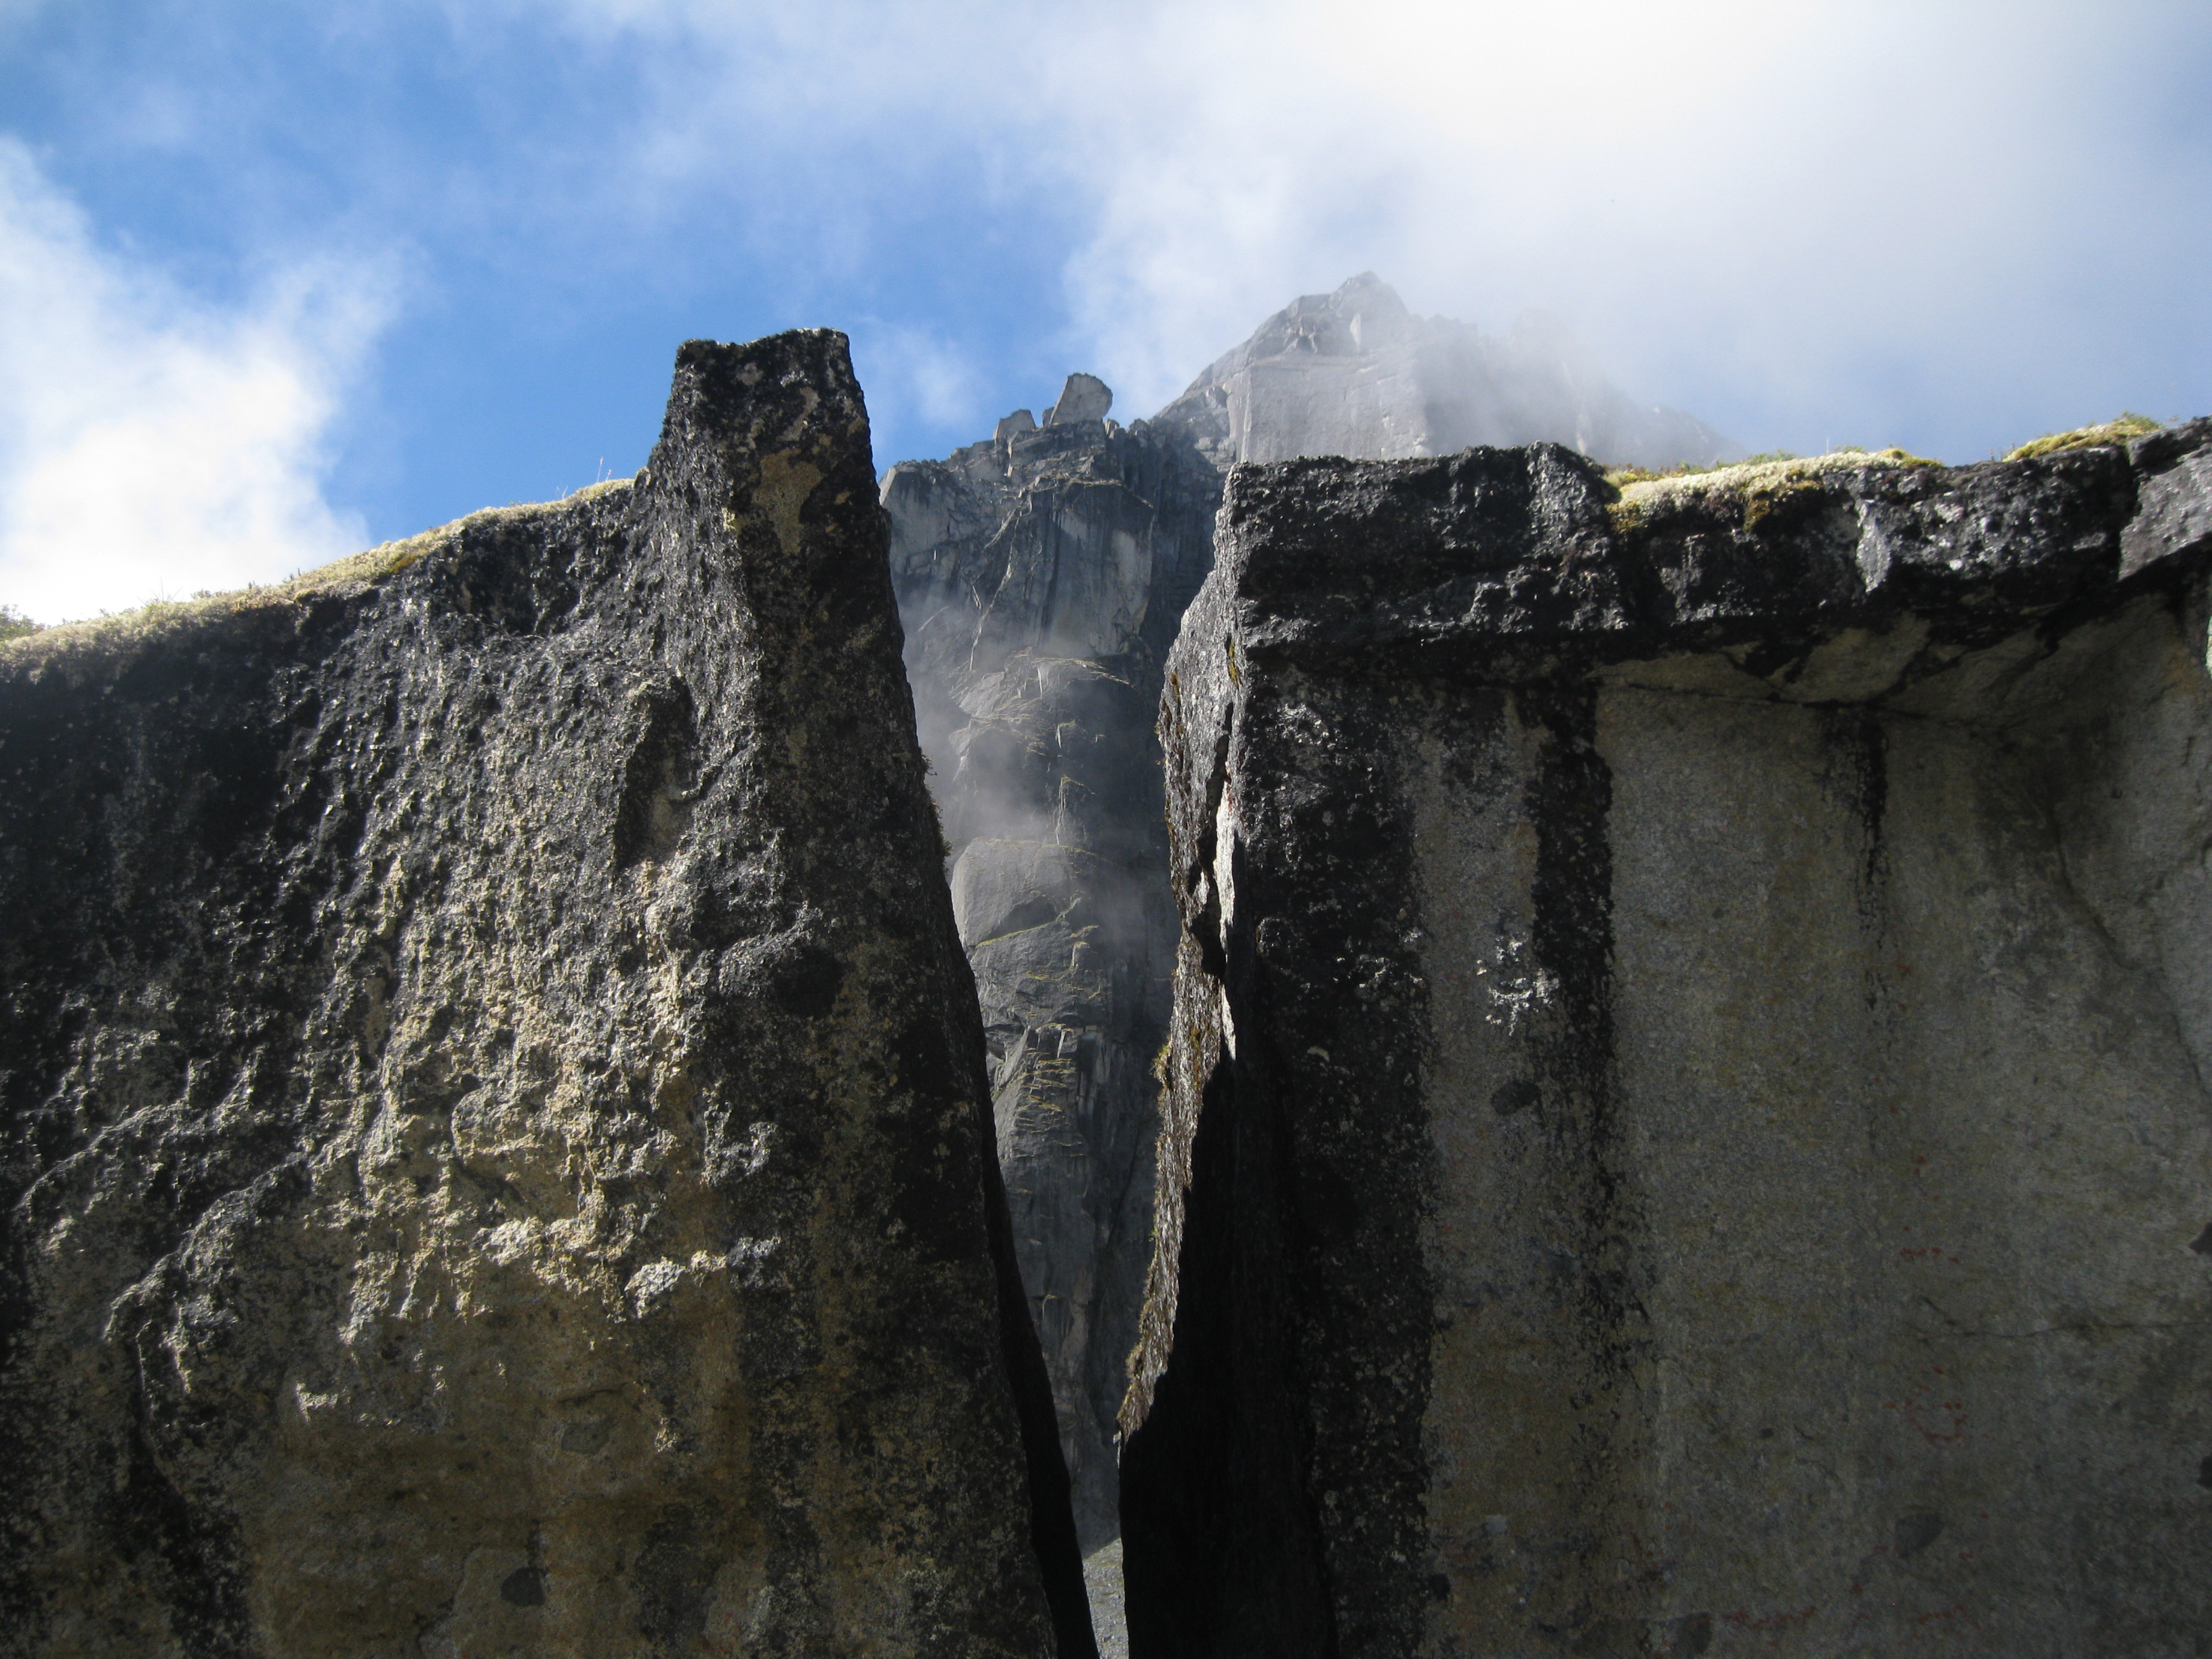
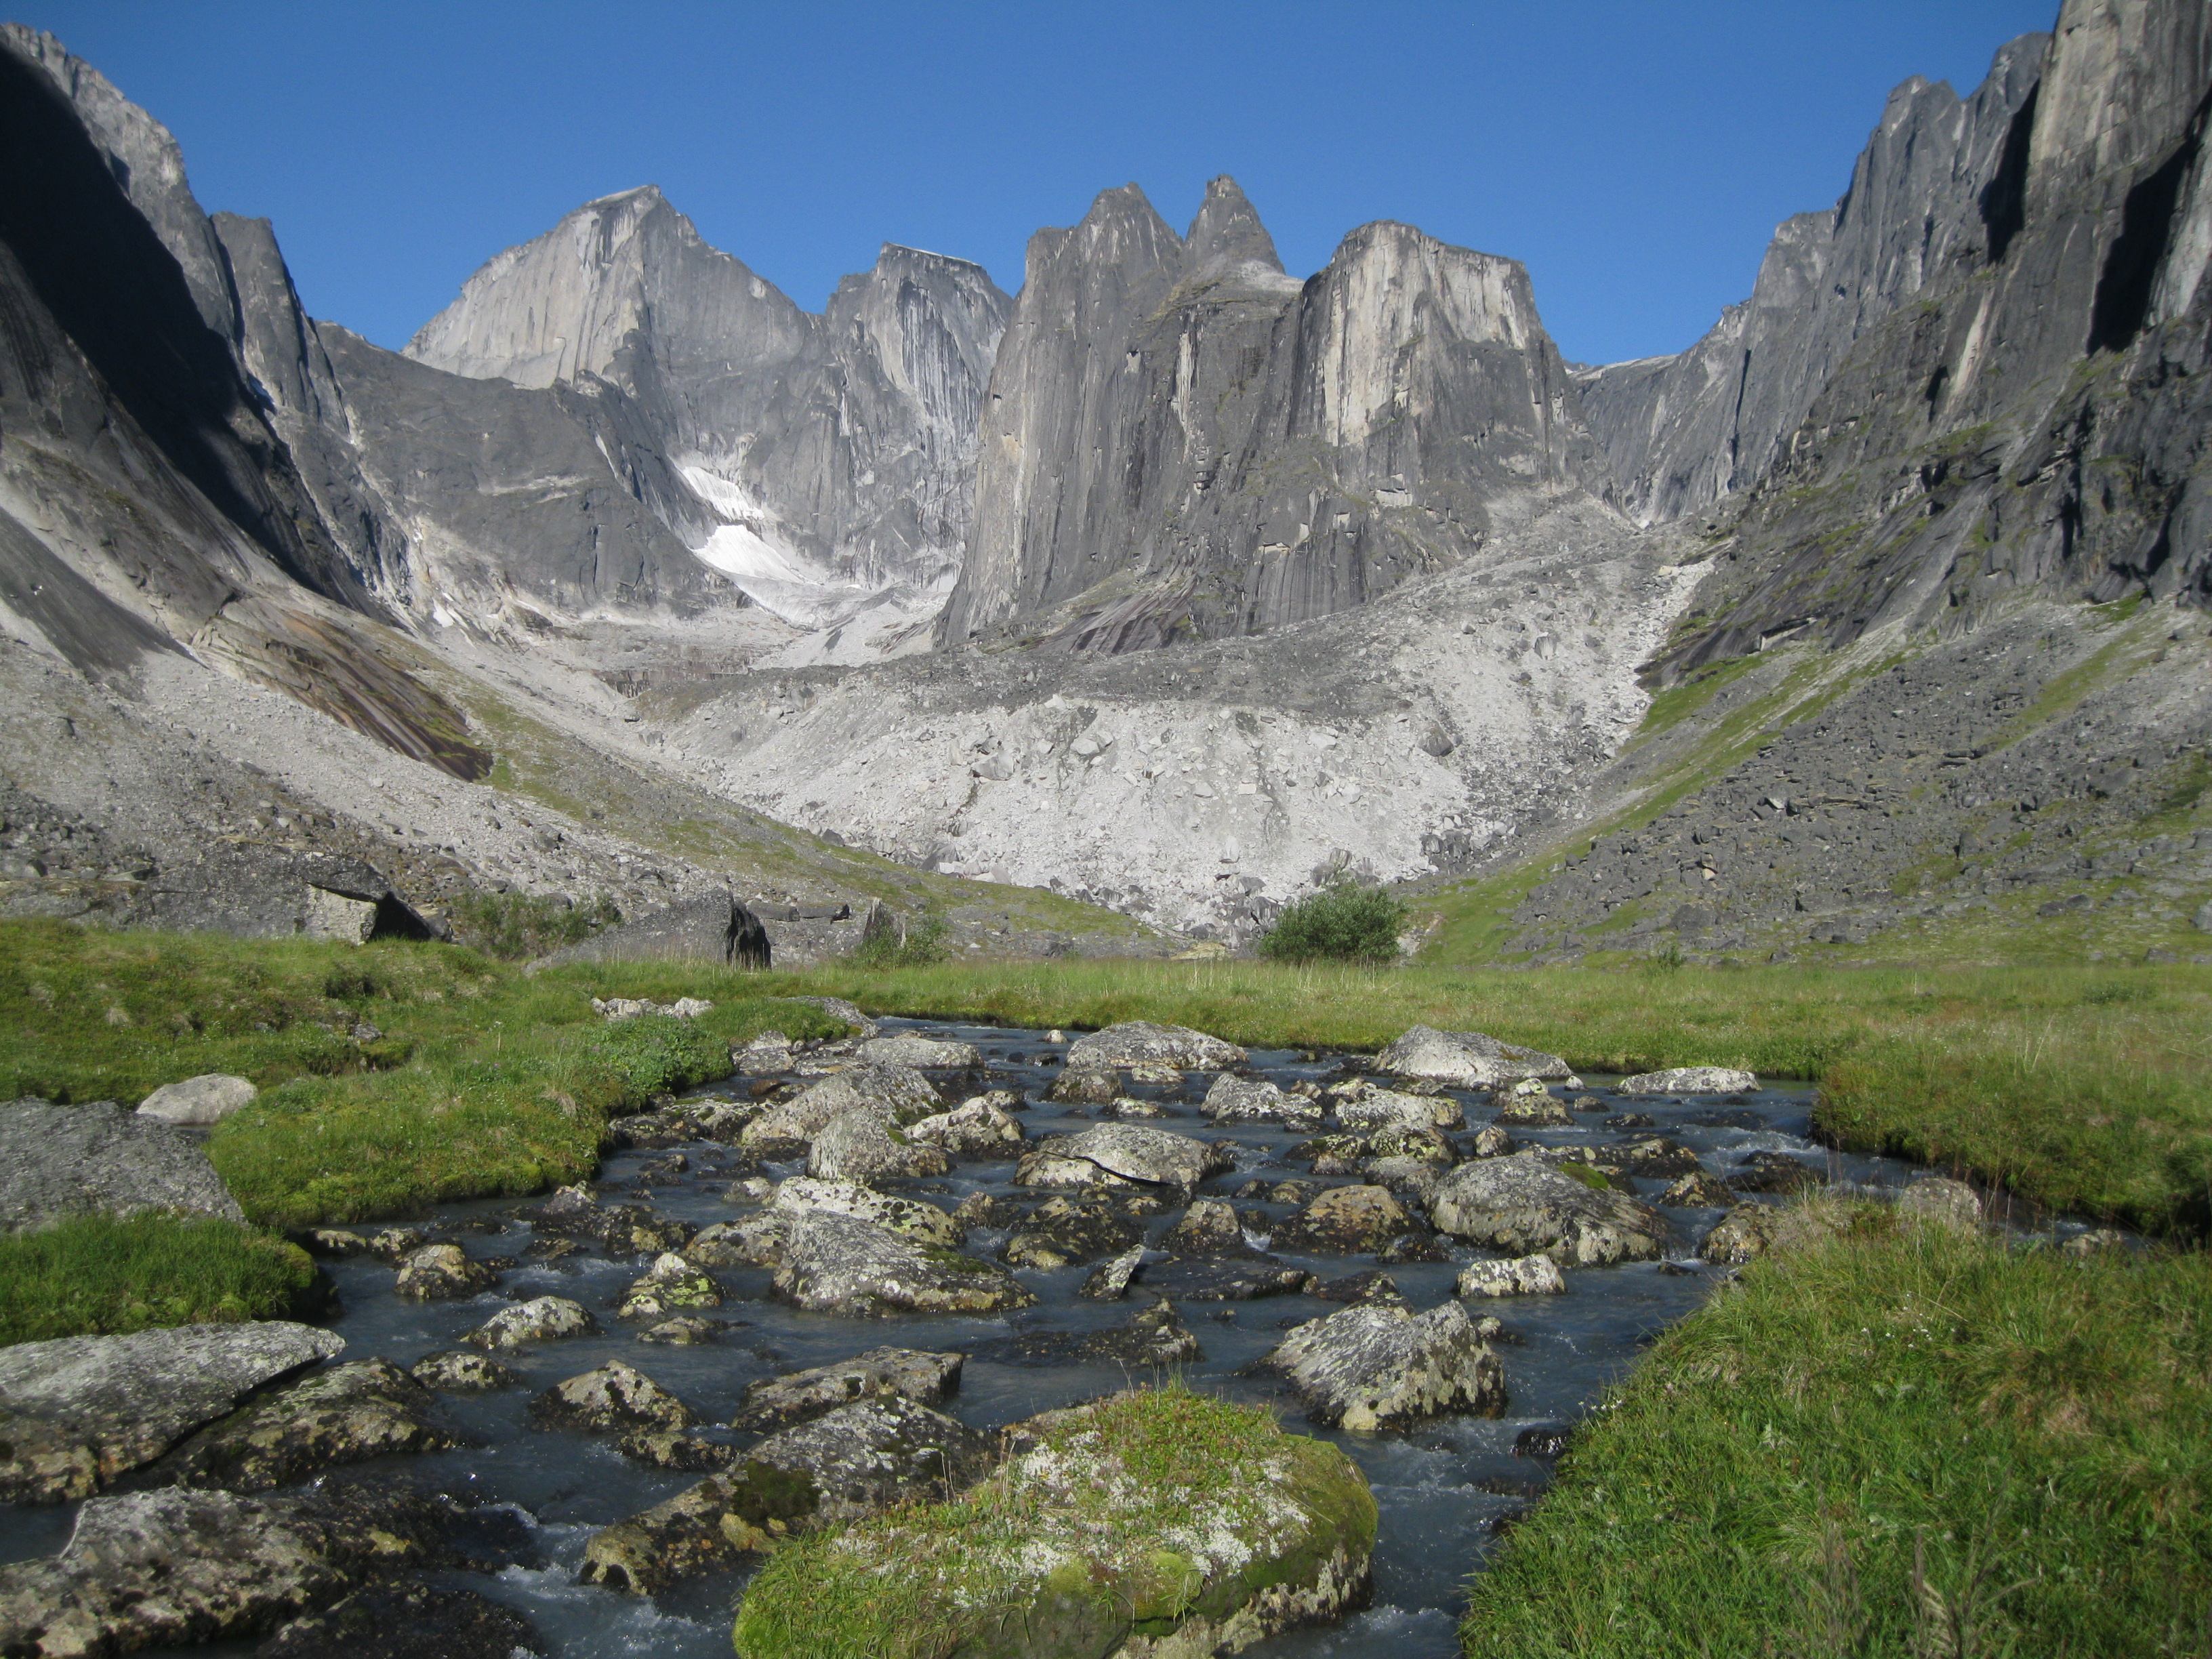
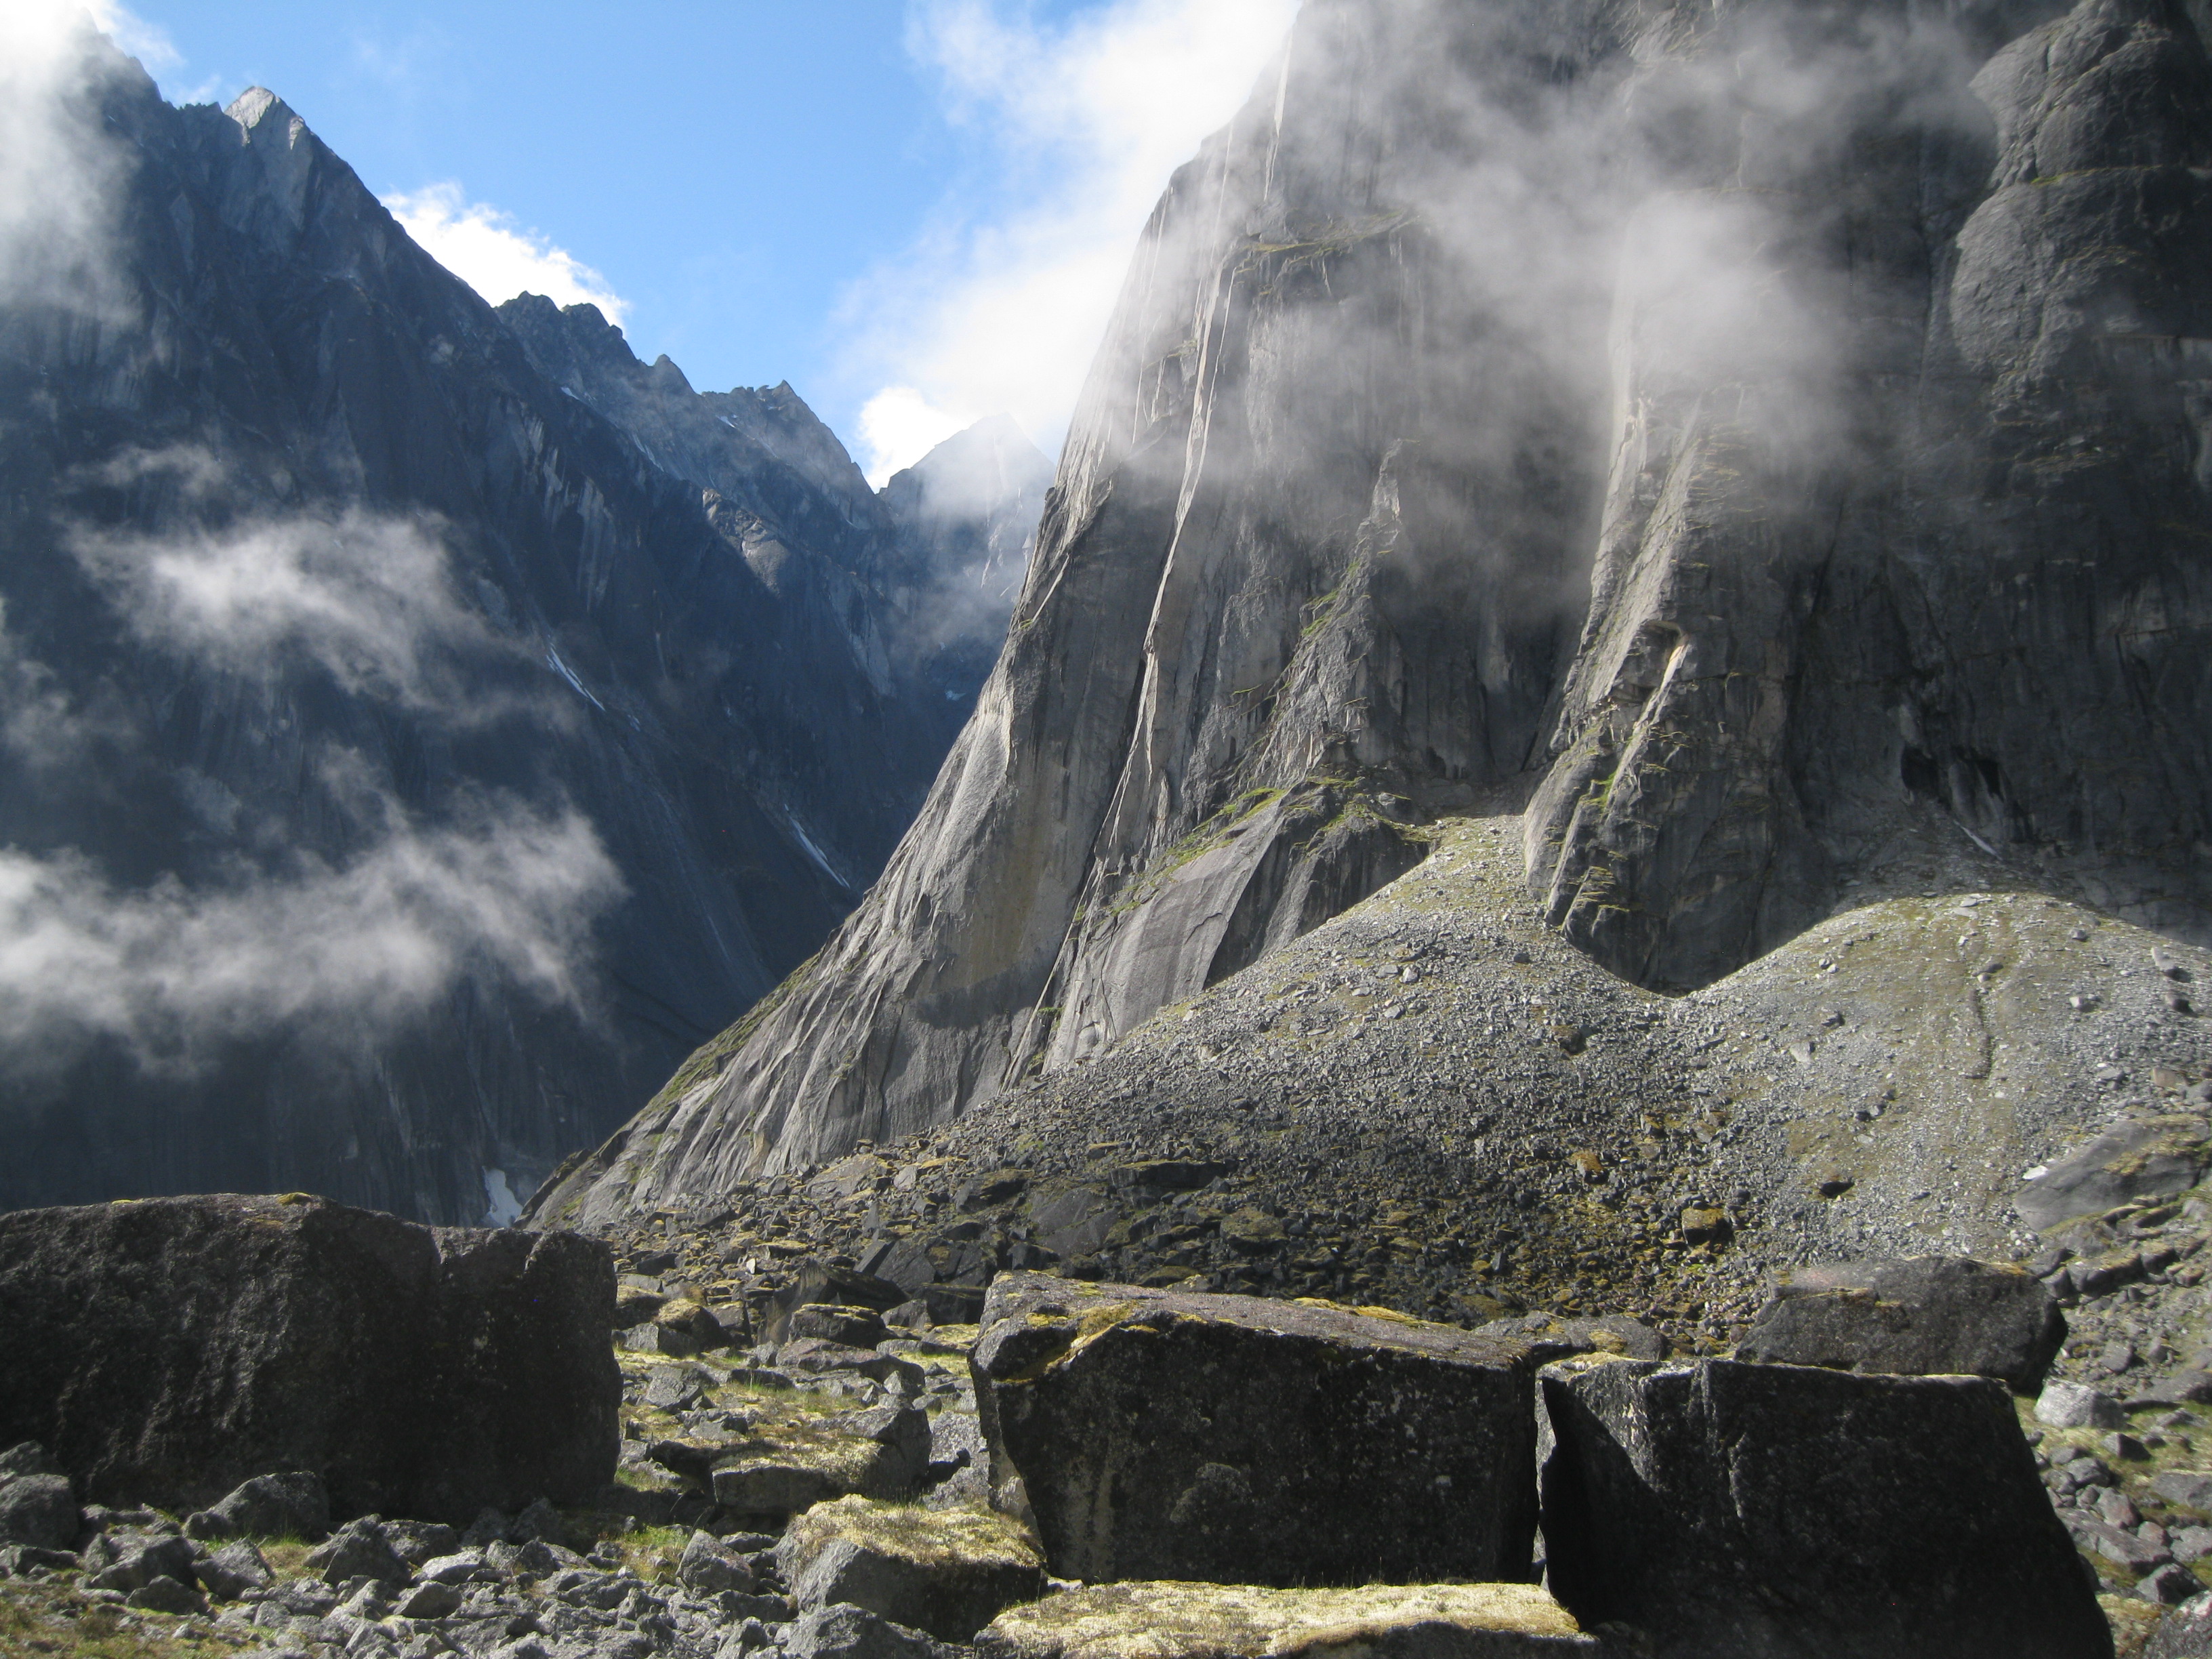
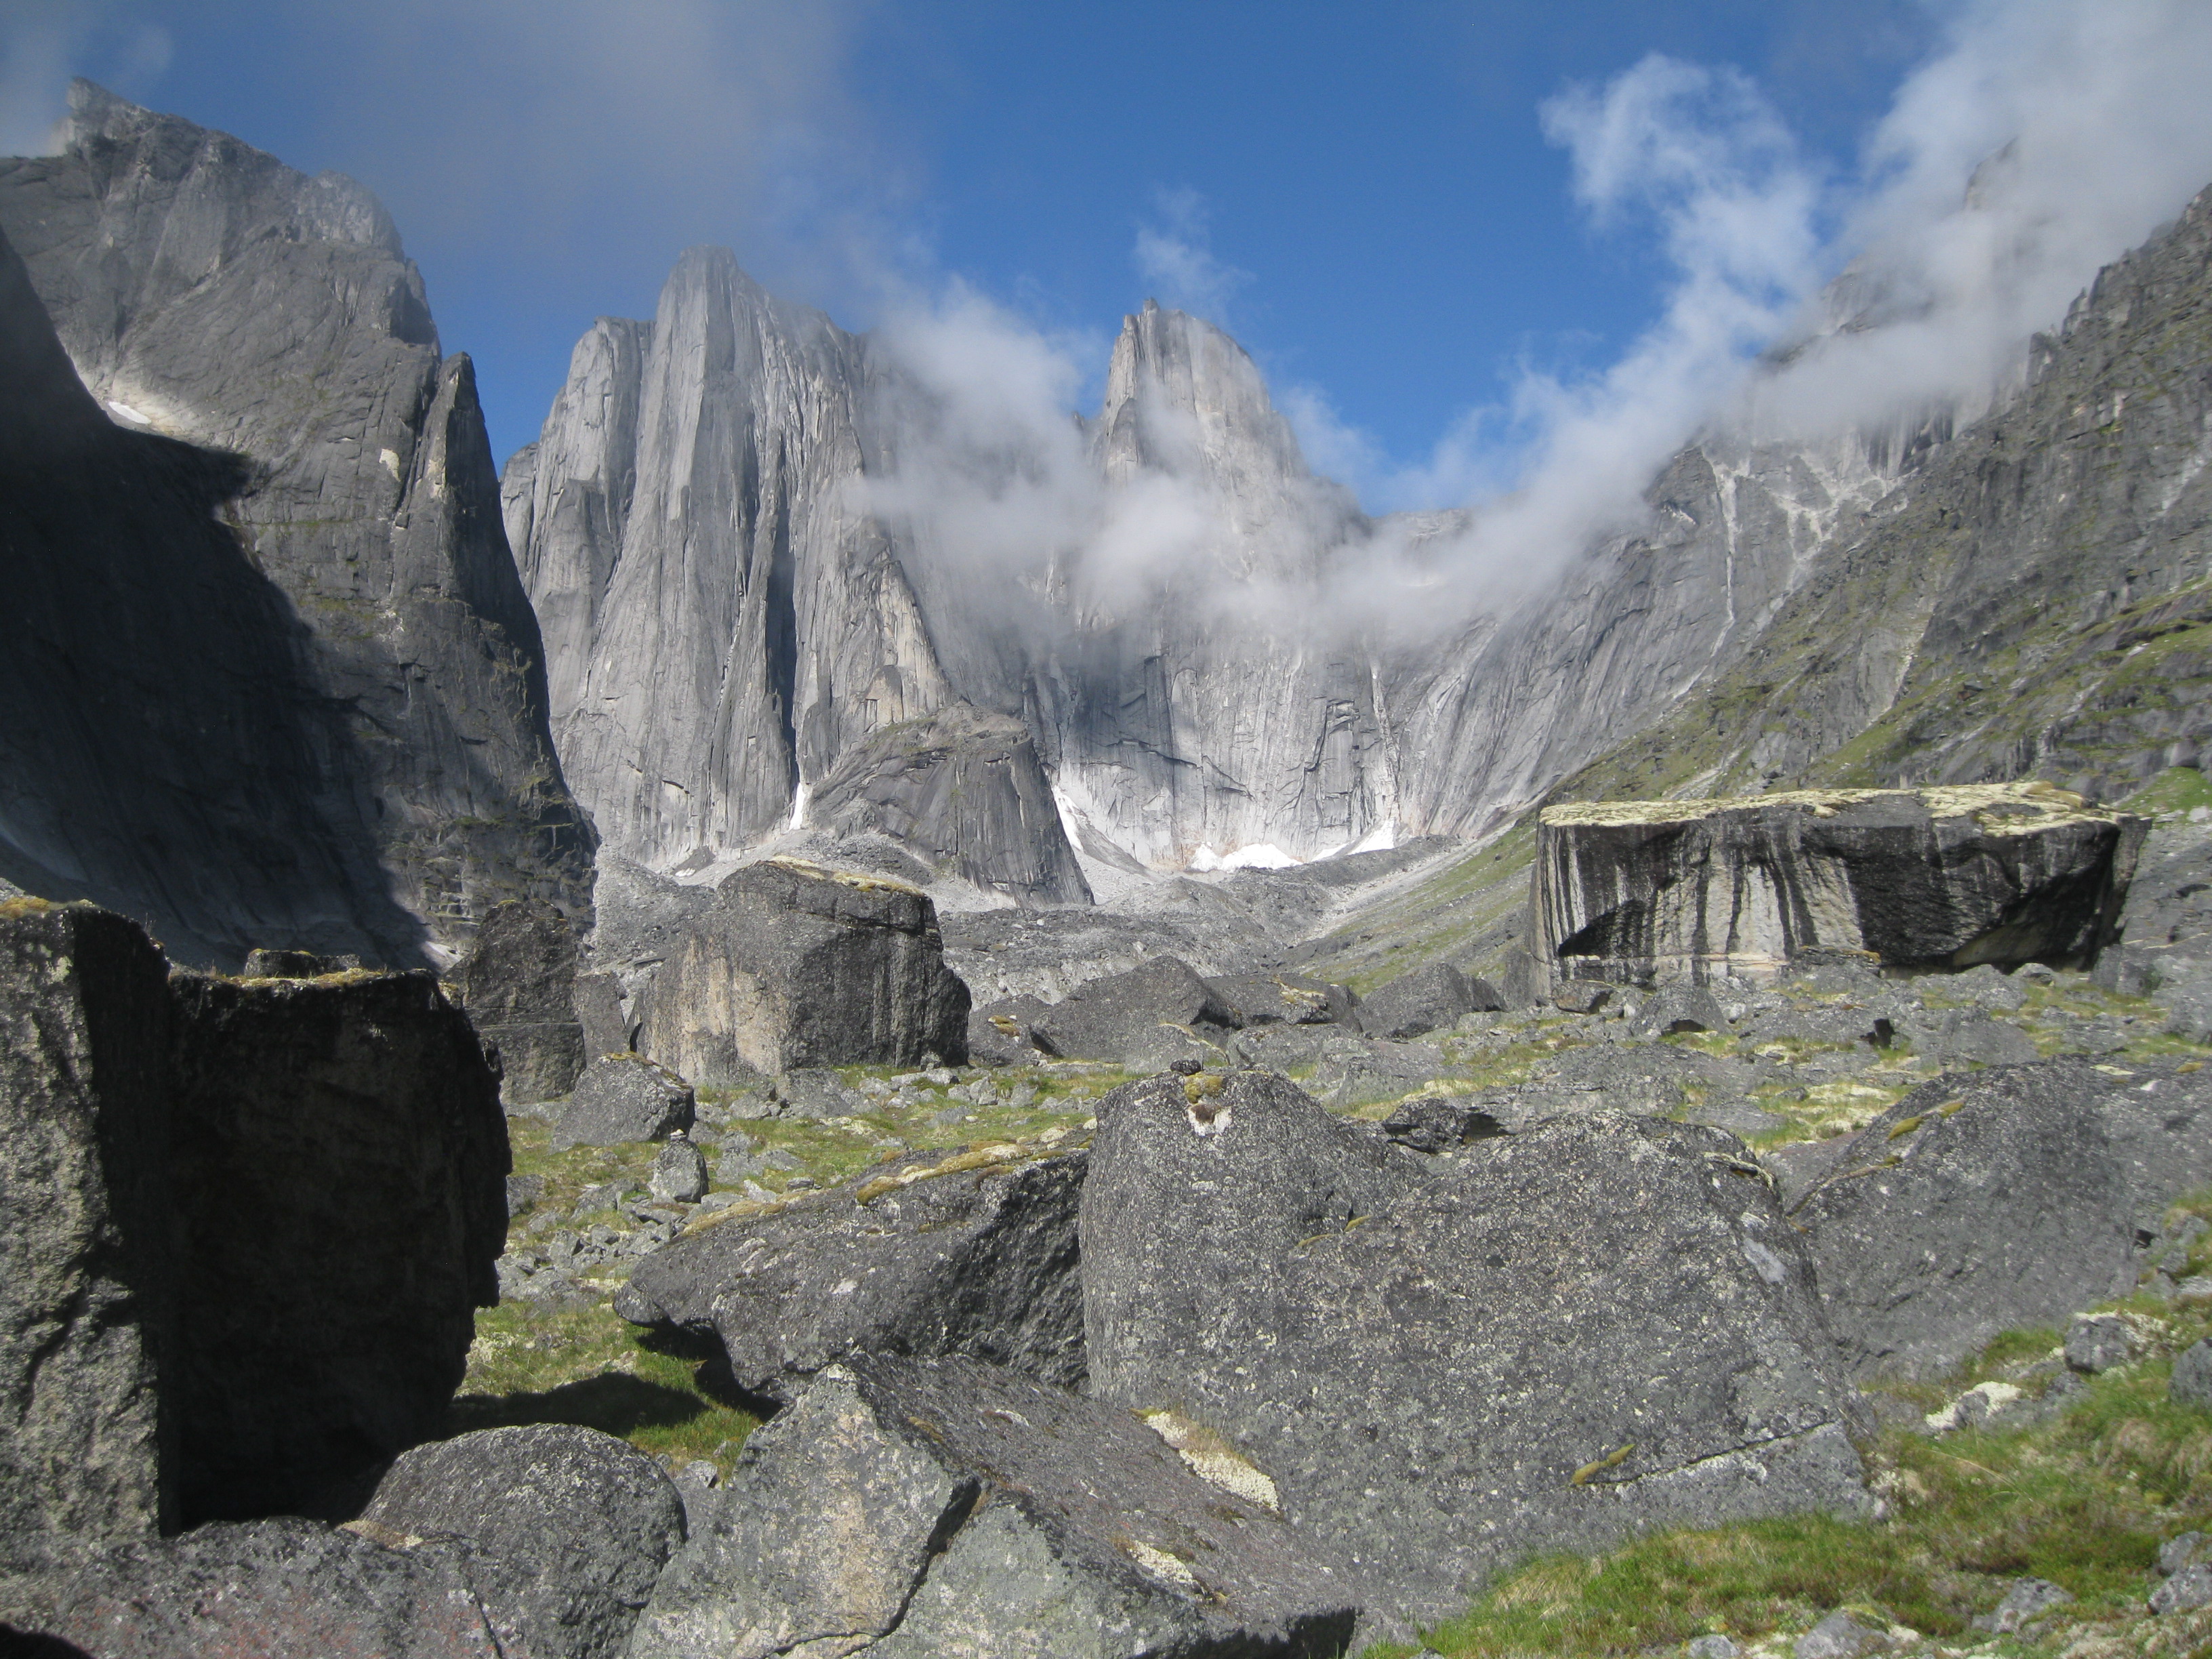
When you finally arrive at Fairy Meadows, you will be blown away by the majestic view of the Cirque of the Unclimbables. Then it is all just worth it. This spot is so beautiful it is hard to describe with words. The perfect culmination to a day of tough hiking out of two days in total. There are several spots where you can set camp, but it is actually perfect right where you are arrive at the entrance to Fairy Meadows. There is a big rock in the area that you can use as a kitchen table for your group. Very appropriate.
The Cirque of the Unclimbables – Fairy Meadows
You should at least spend three nights and two full days at the Cirque of the Unclimbables as this is probably the highlight of the whole Nahanni National Park Reserve. If you can and have time then three full days could be a good option too. If the weather is great it is an absolutely glorious spot. The area is so beautiful and there are plenty of options to go on adventures and explore. Furthermore, after you have spent two pretty brutal days hiking all the way to this magnificent end destination, you want to spend as much time here as your schedule allows.
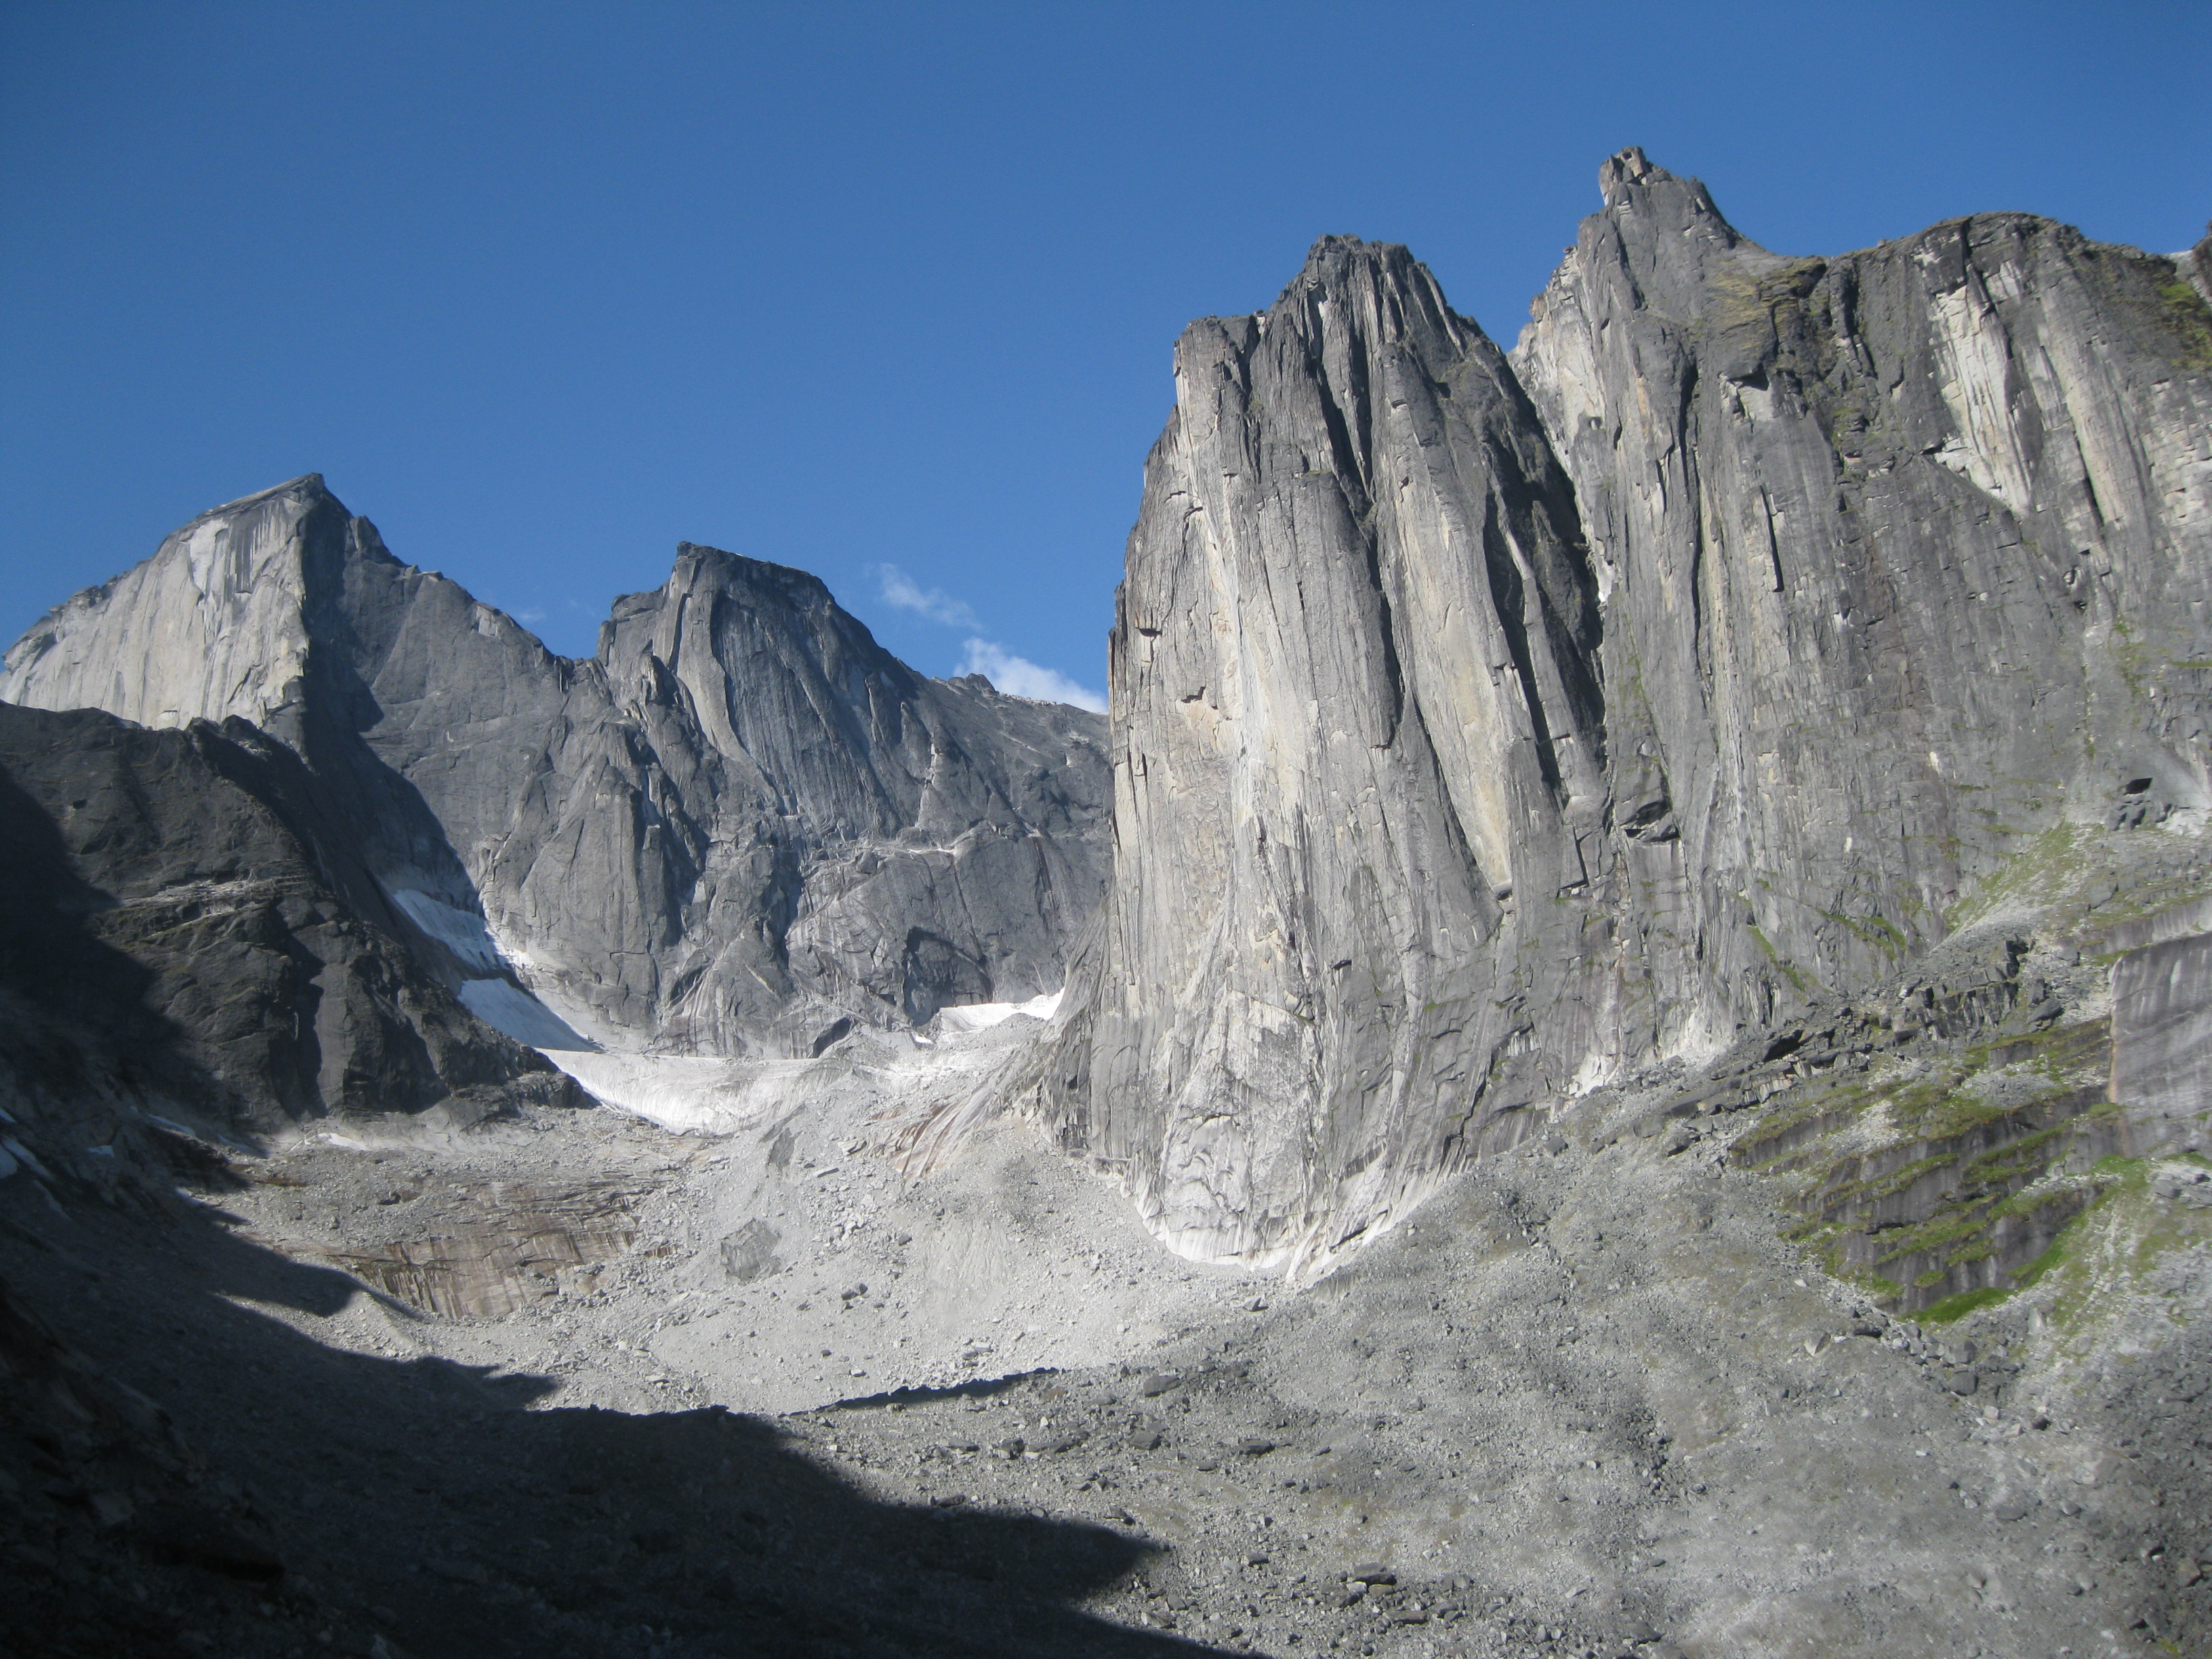
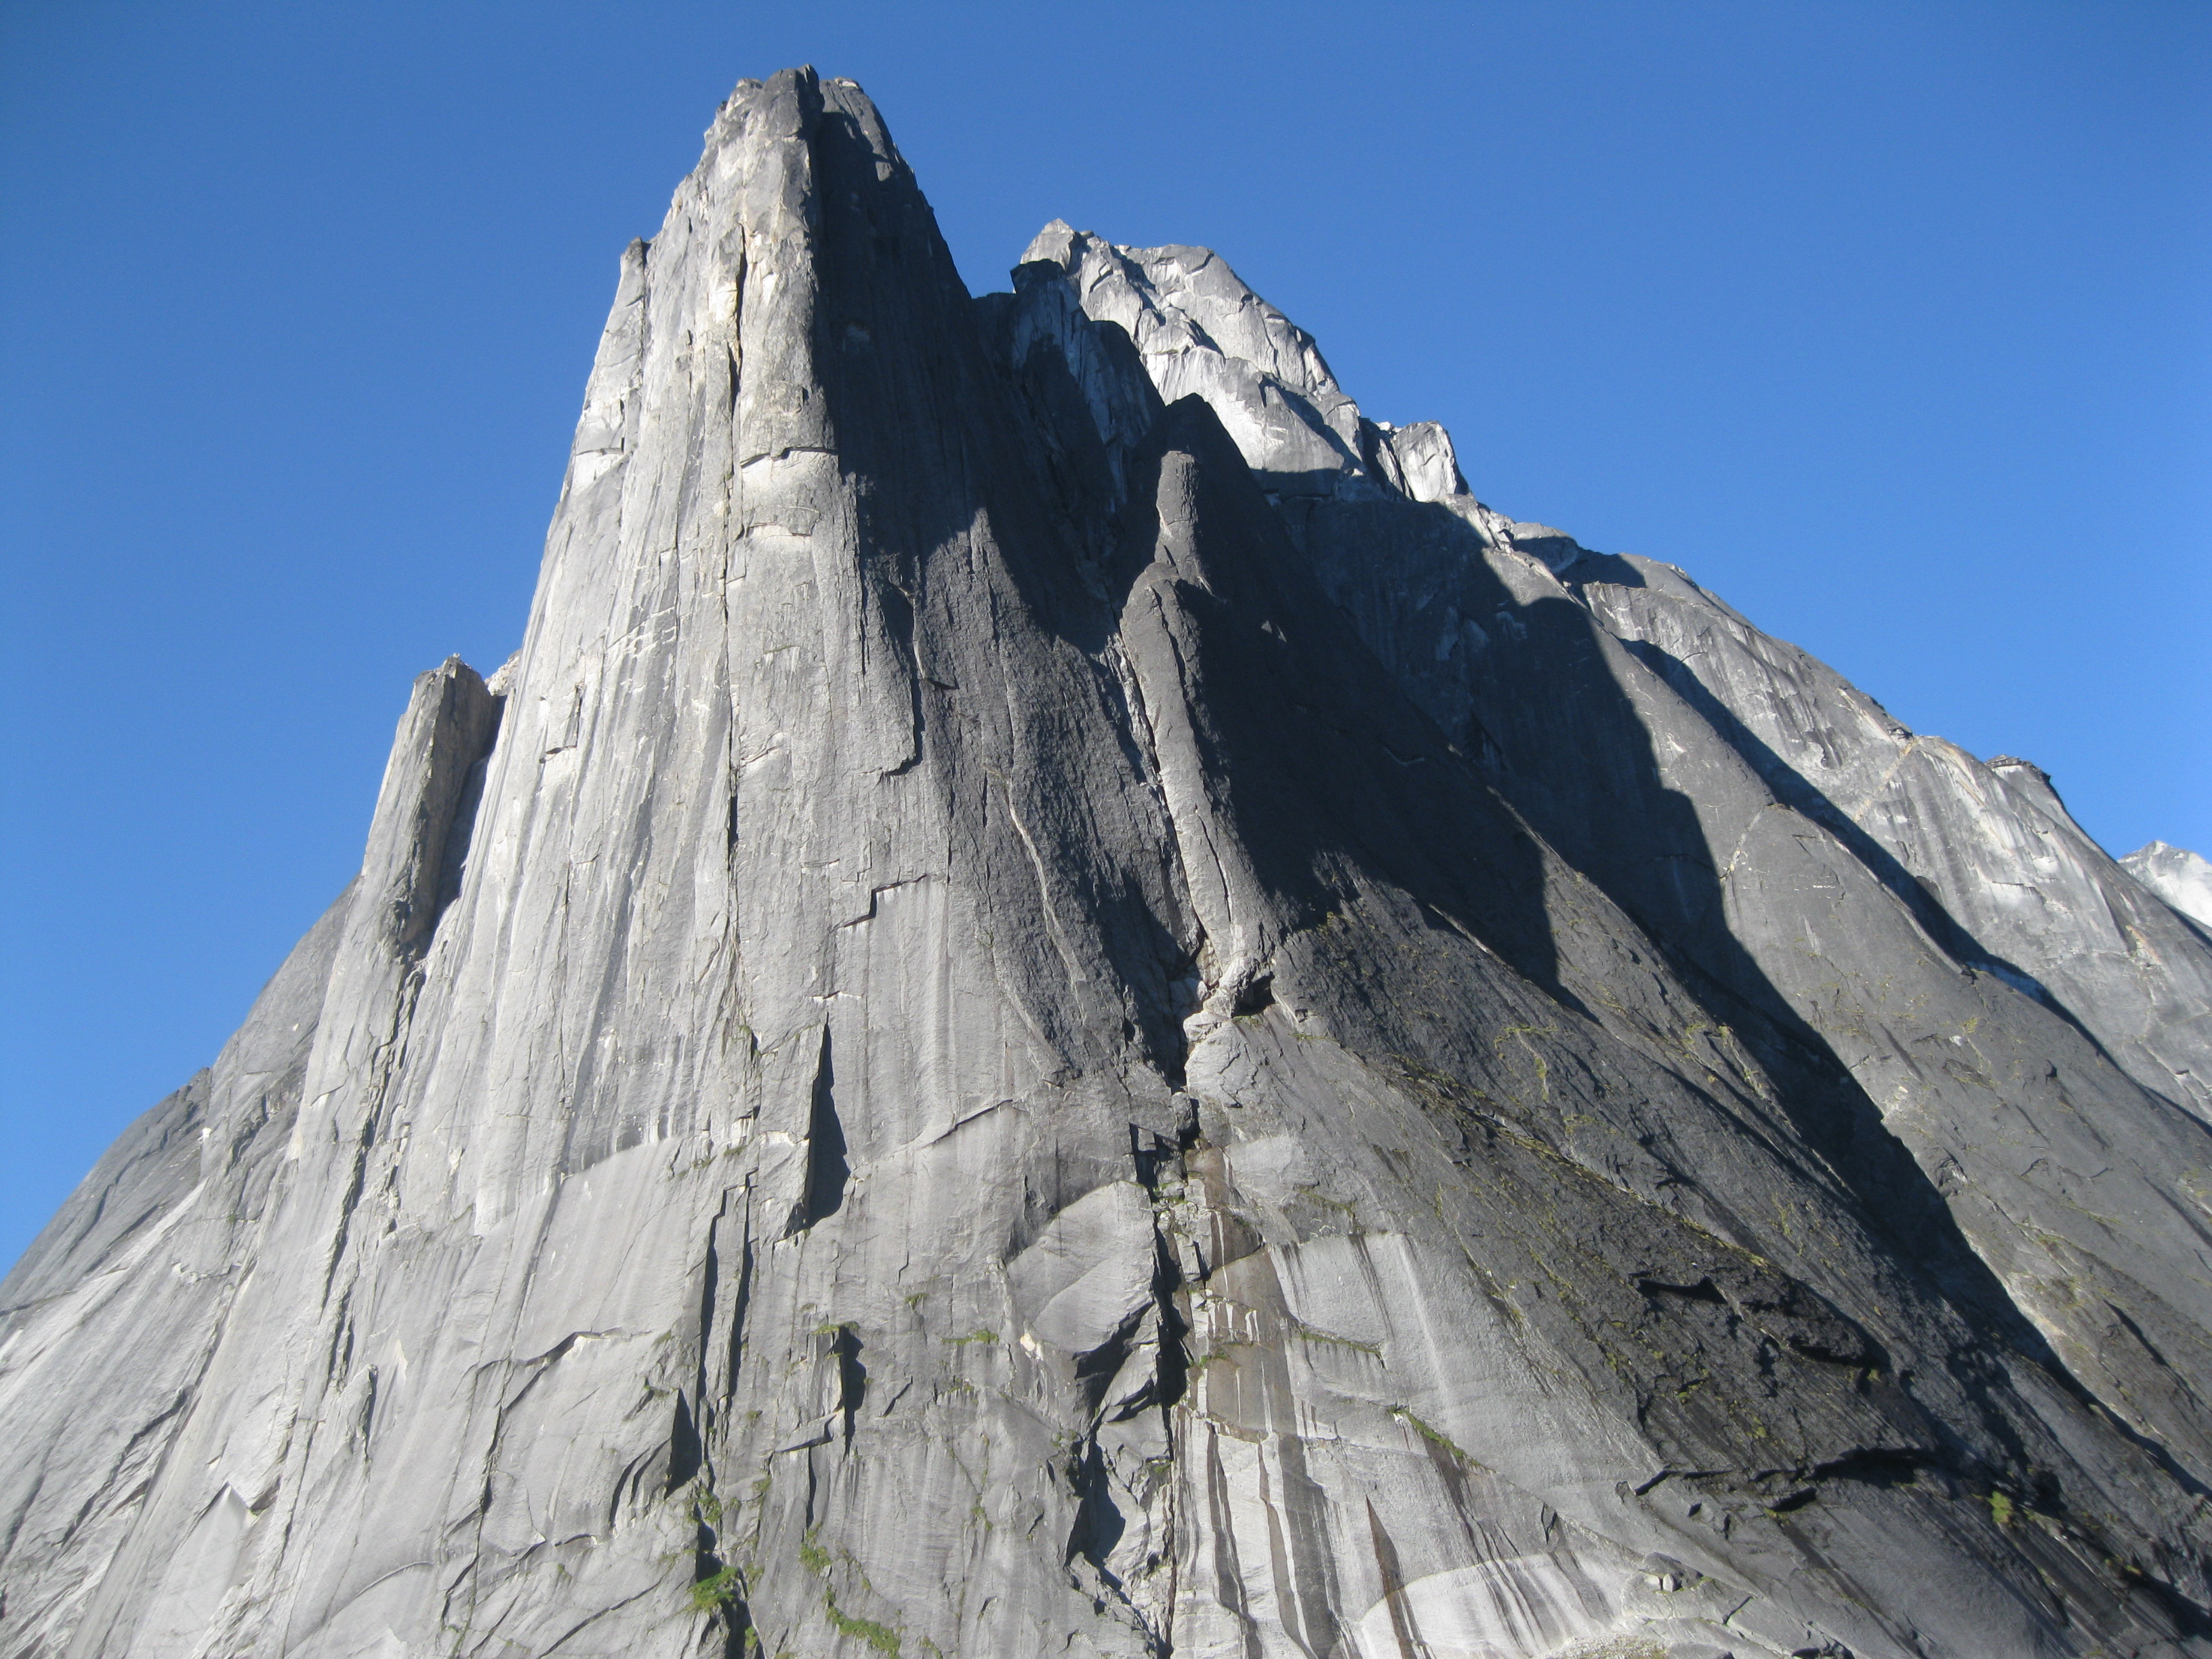
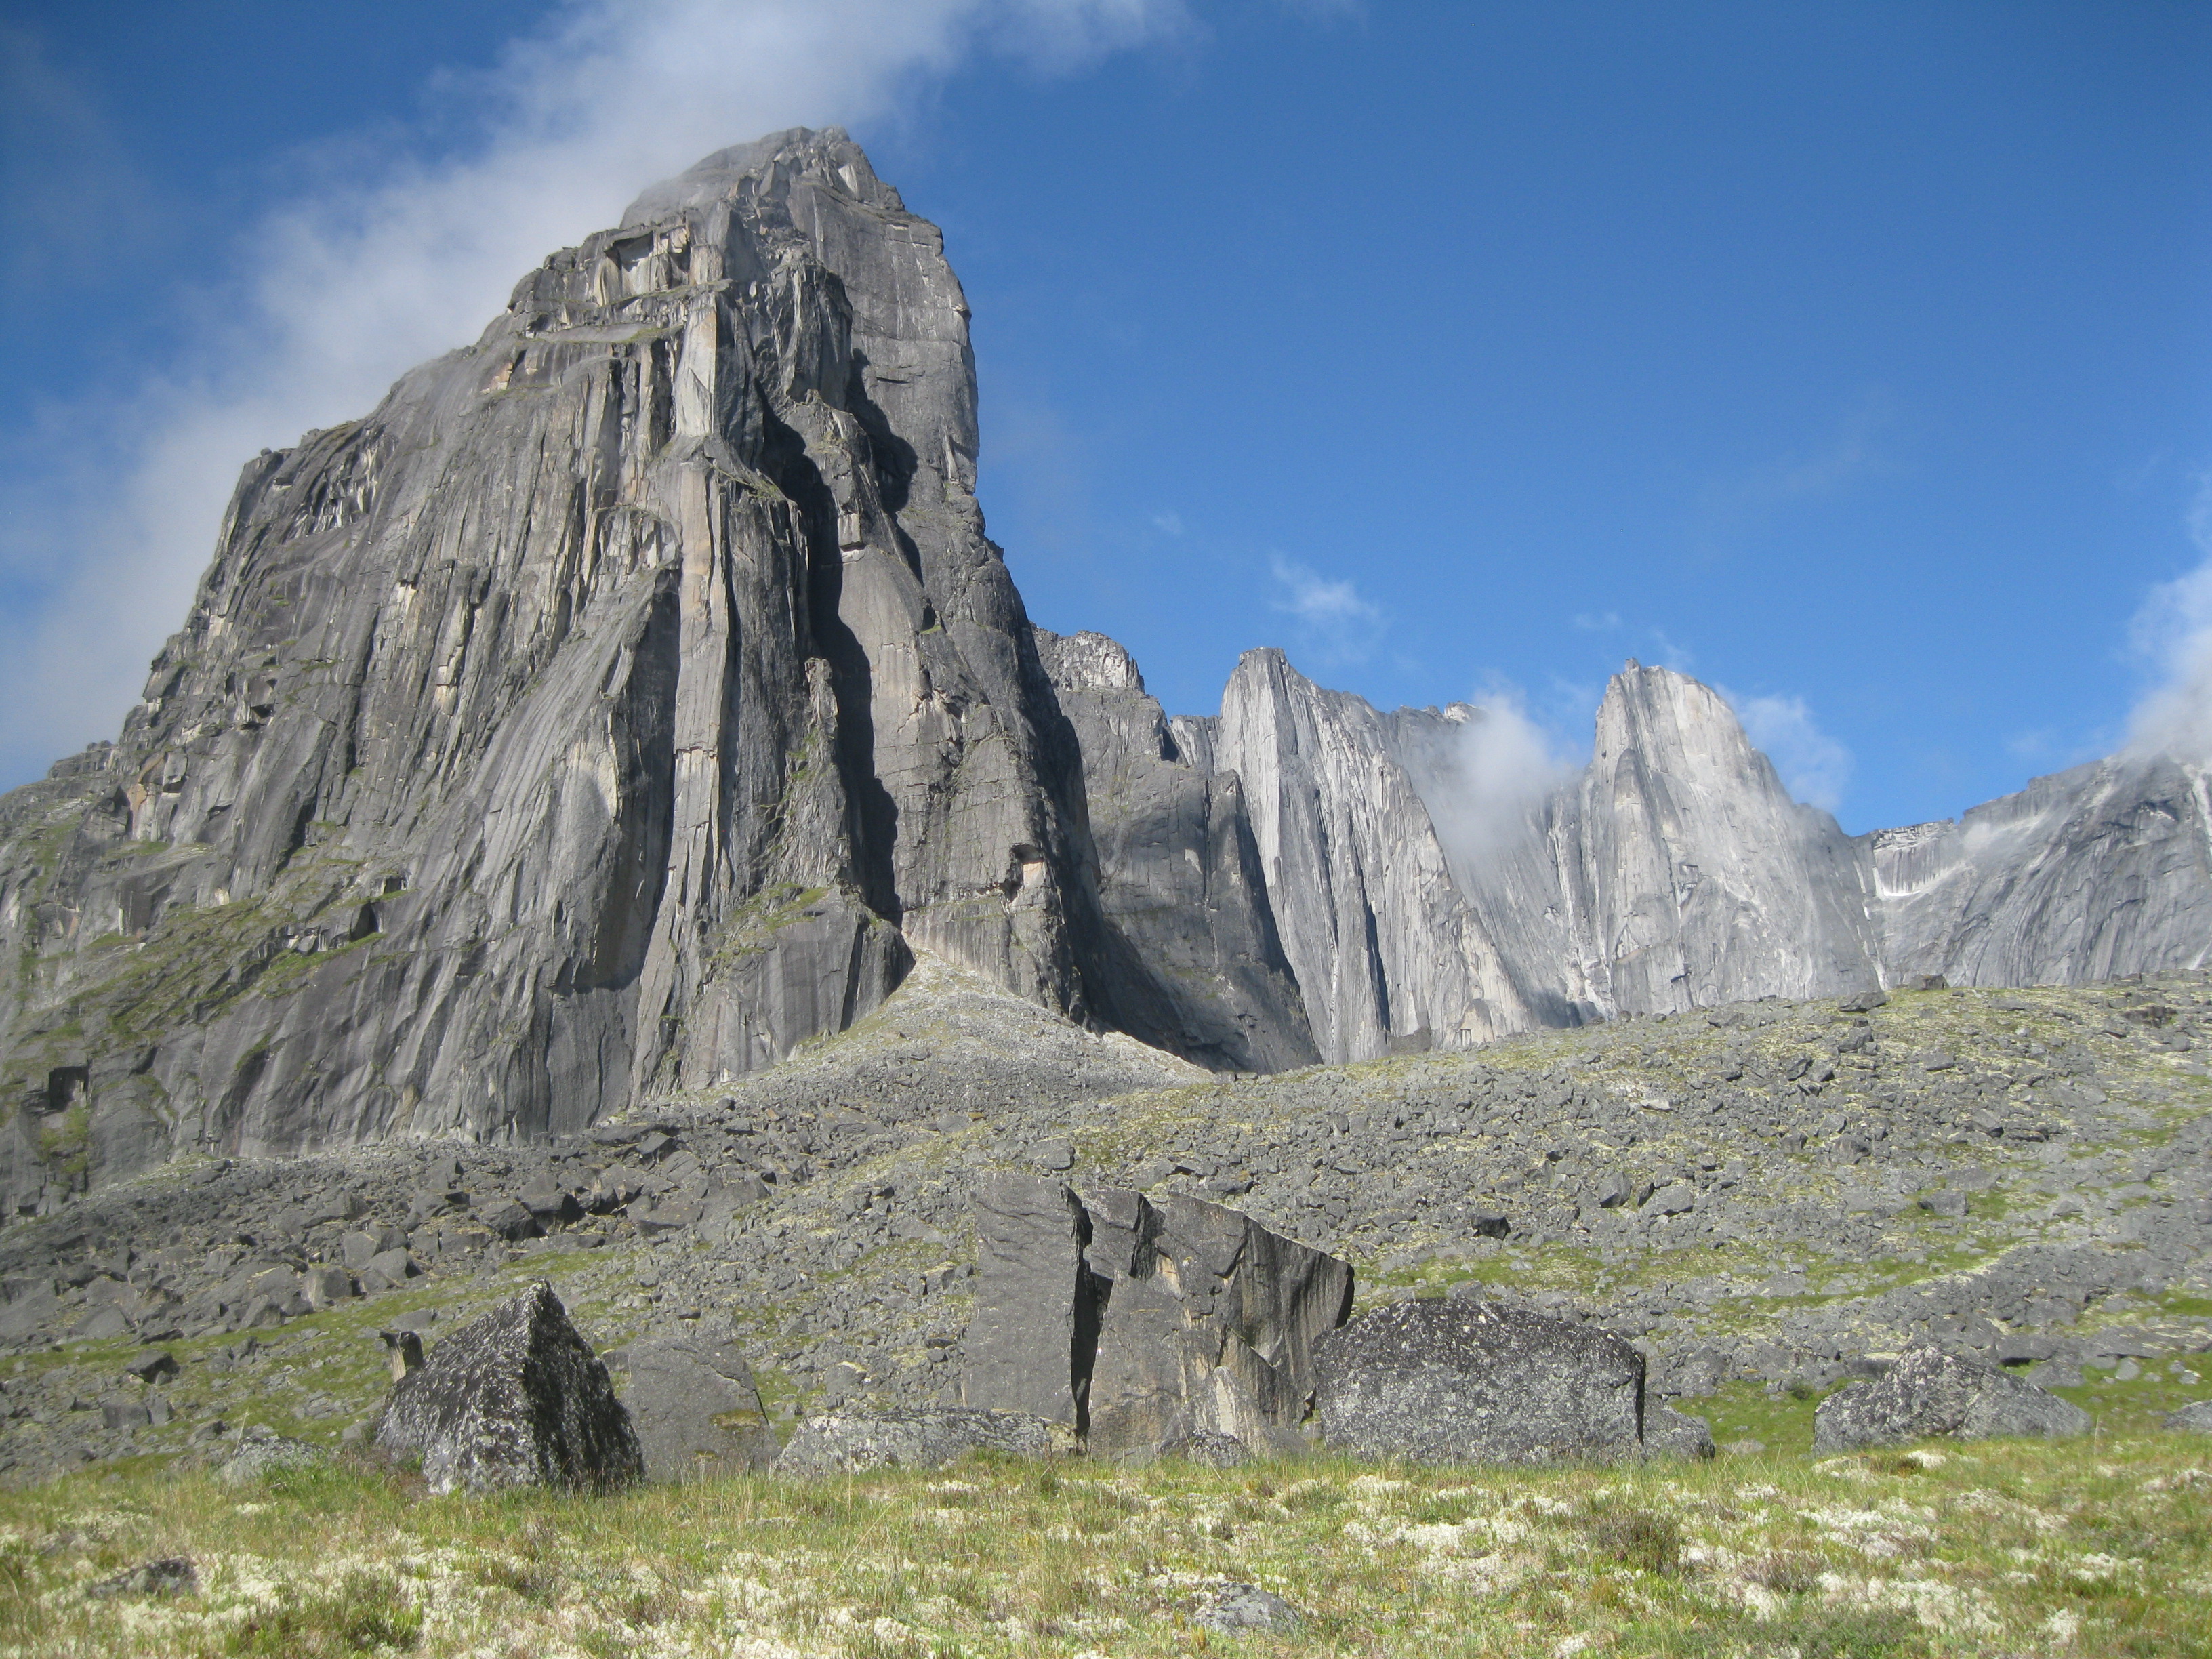
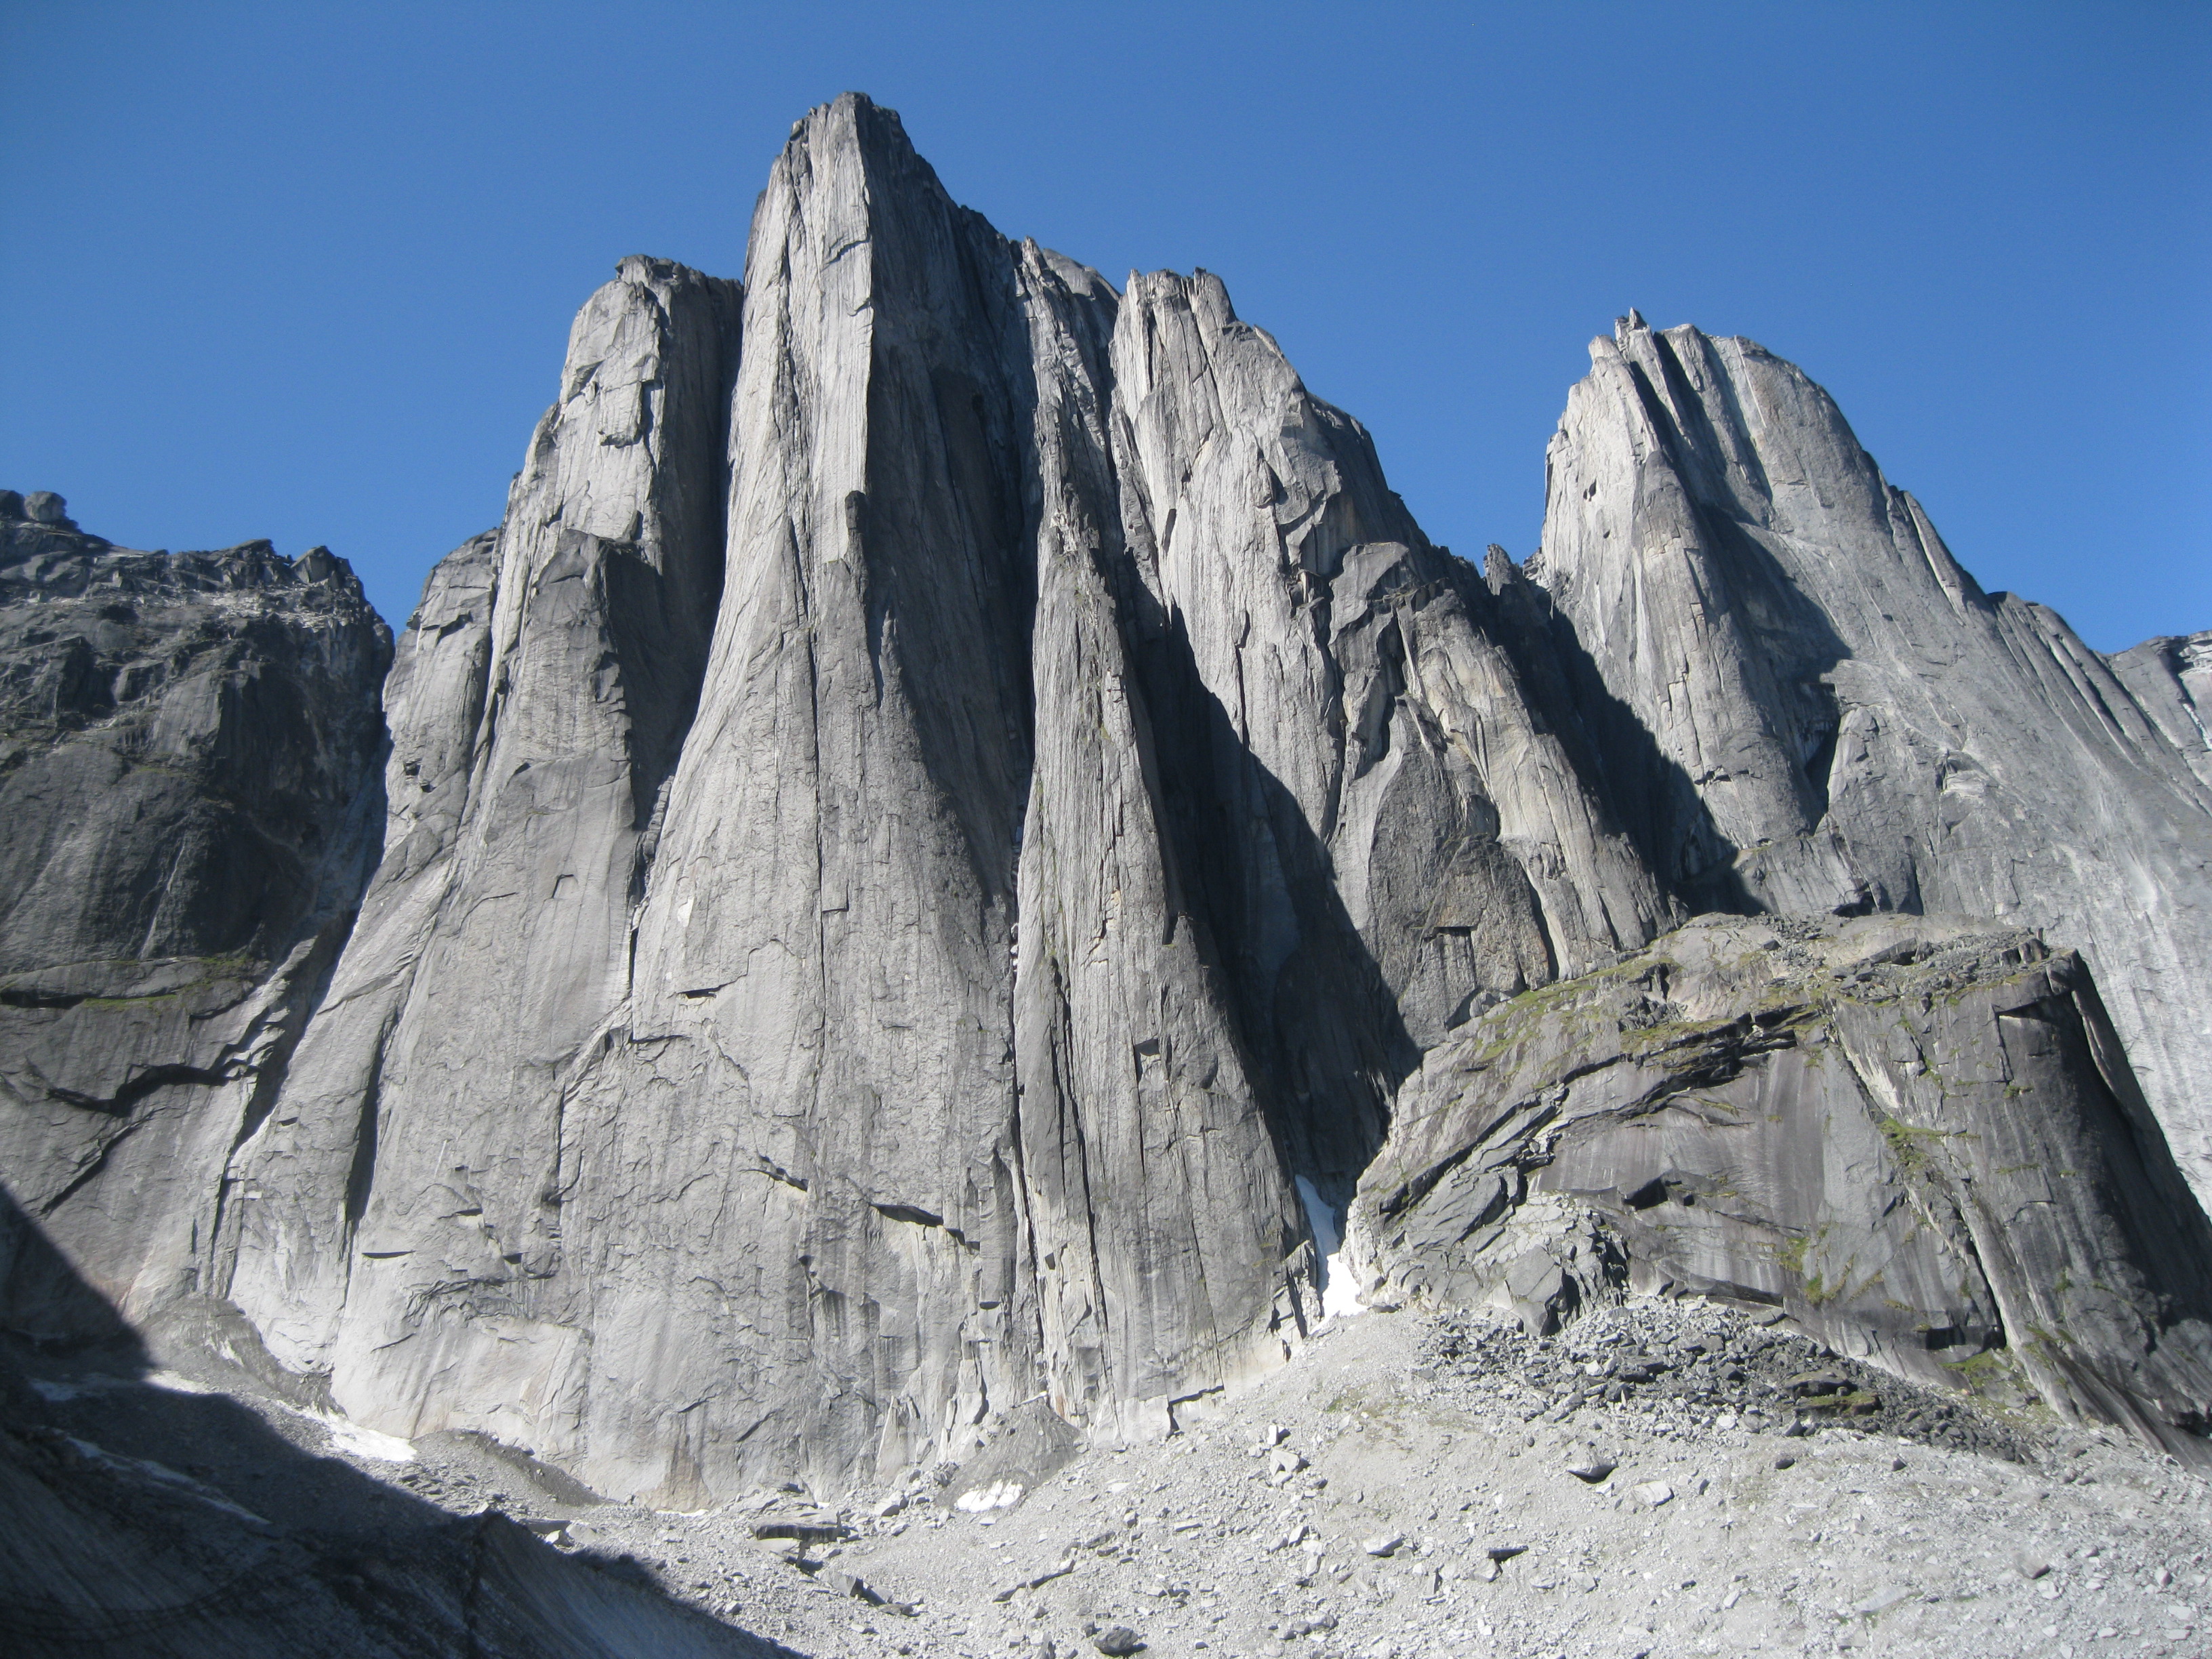
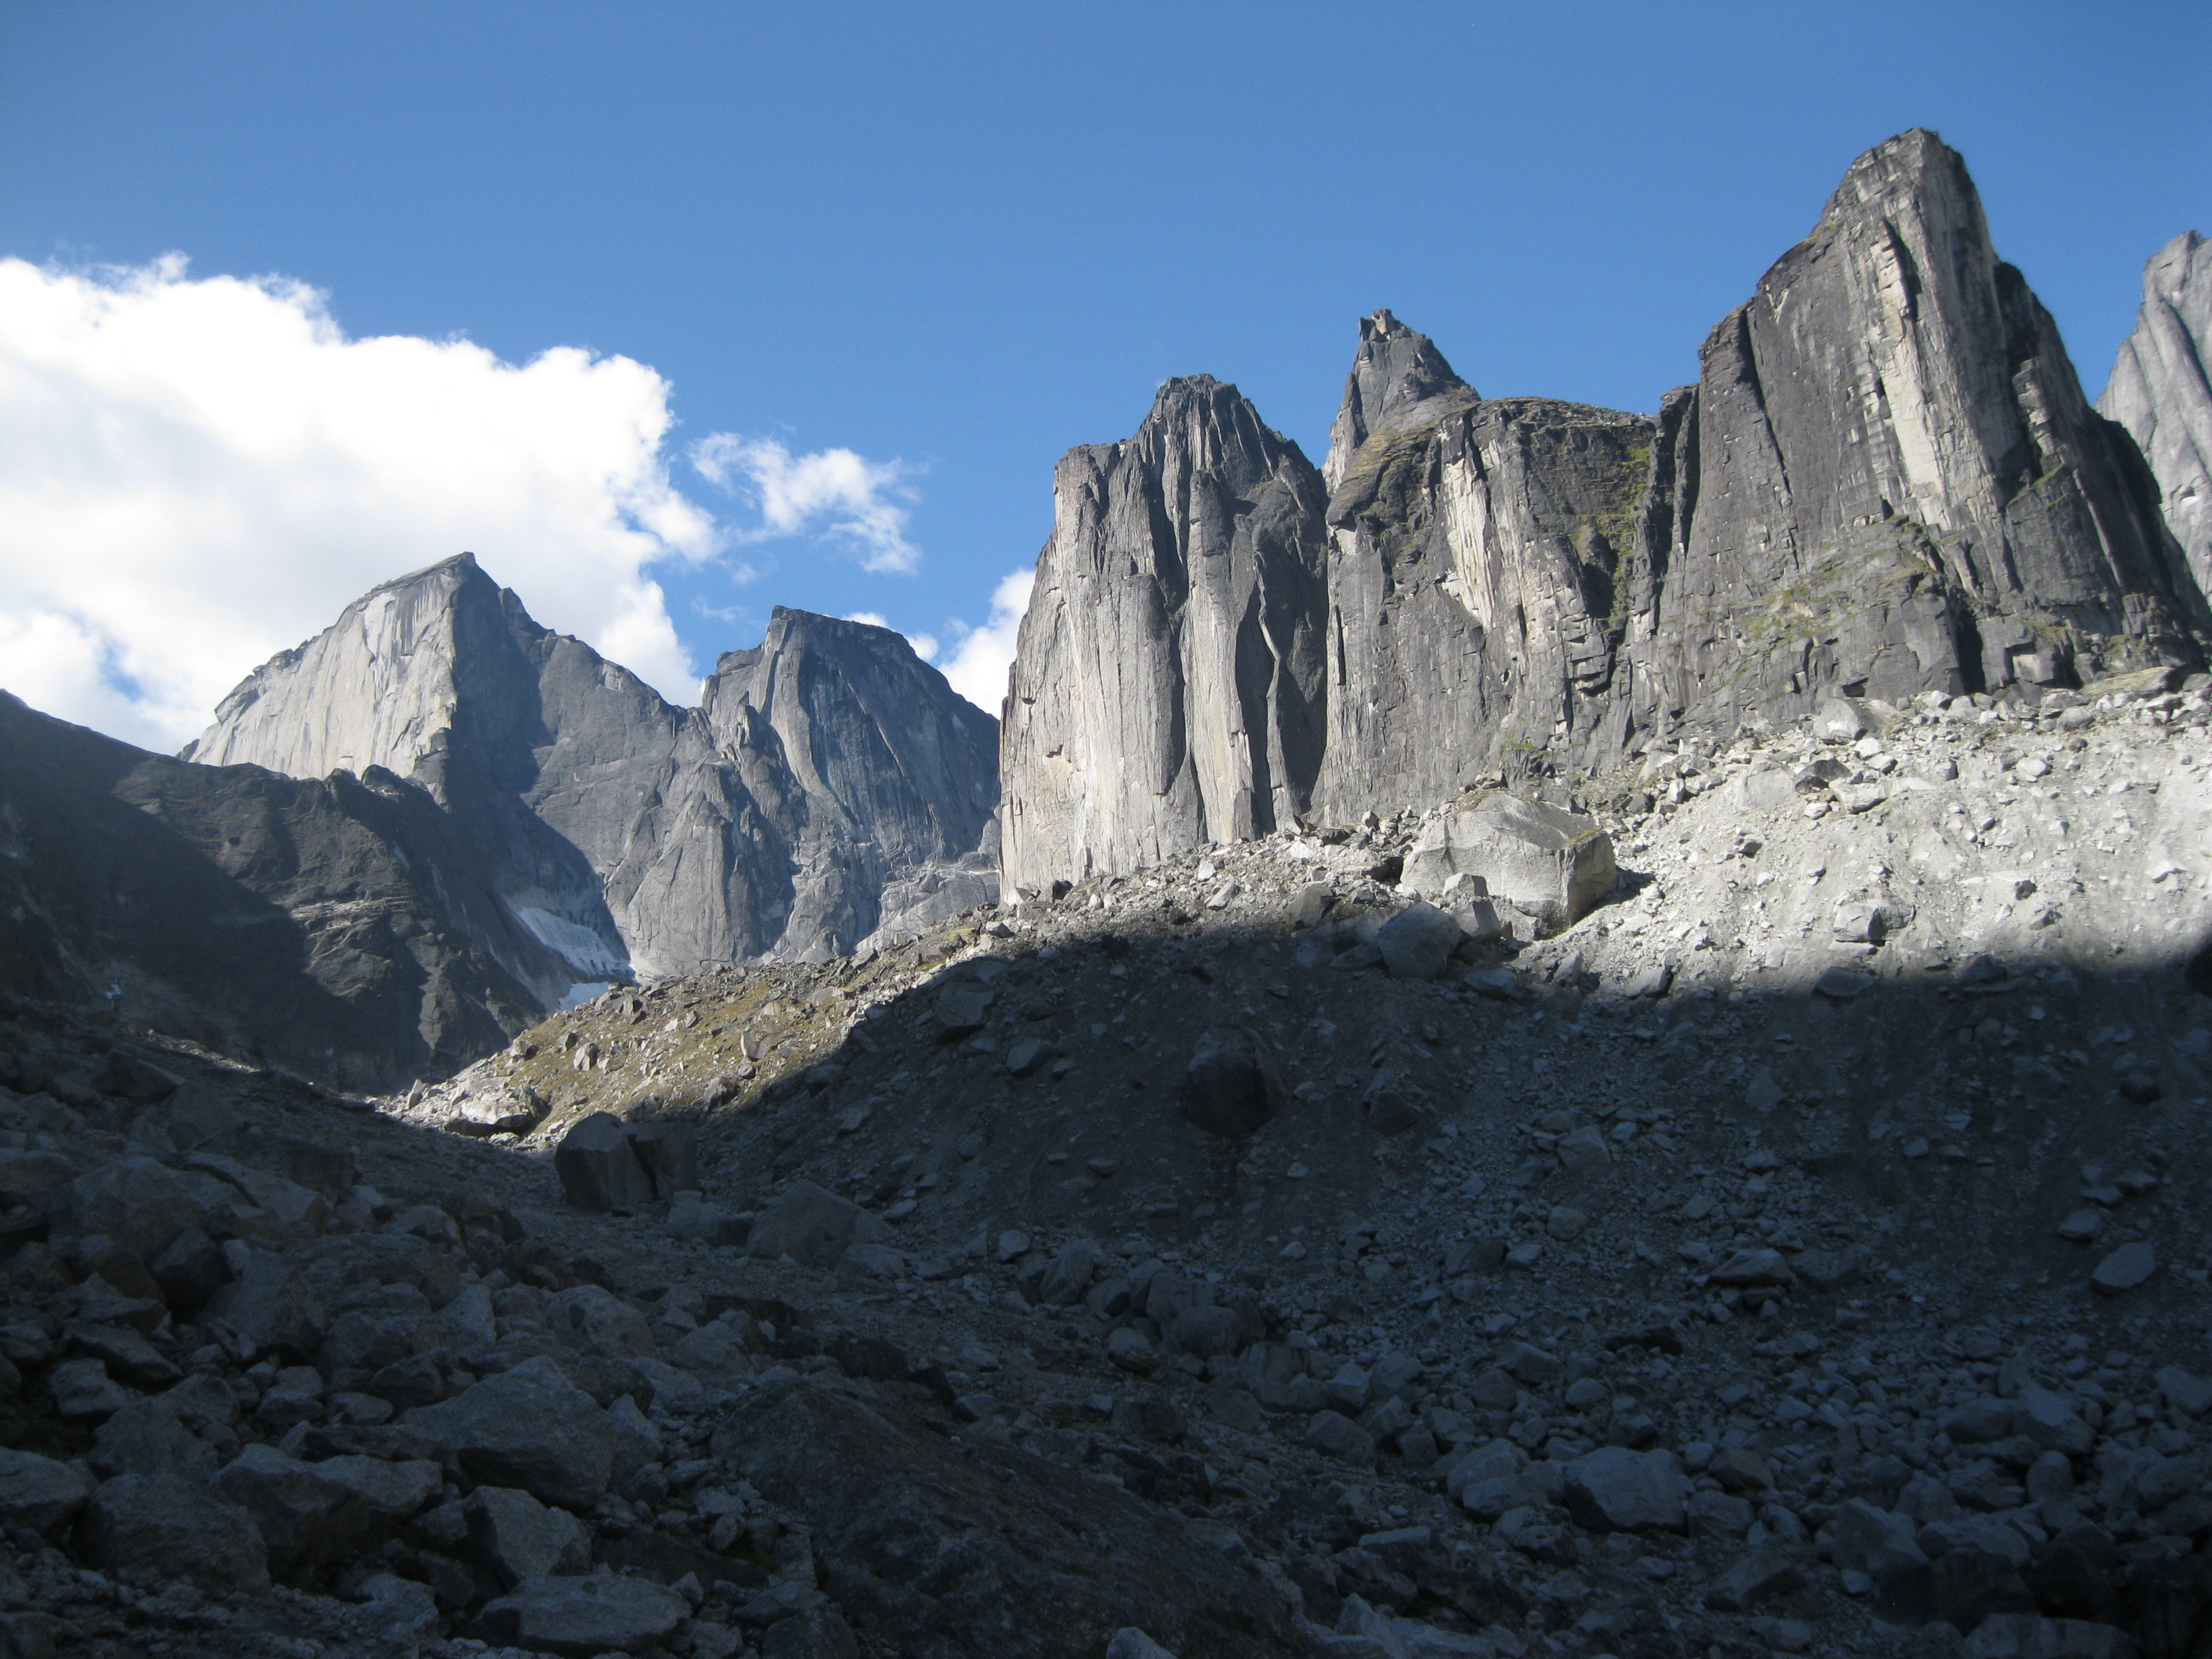
Right at the entrance at Fairy Meadows you have the centrepiece and pinnacle of the Cirque of the Unclimbables which is the massive Mount Harrison Smith. To its right you’ll see a magnificent skyline of impressive peaks with the East Huey Spire to the far right. This is a cirque within the Cirque of the Unclimbables. It’s so stunning and probably the best view of the area. You can take a lot of great photos of the scenery of the peaks from Fairy Meadows. A good shot is of the creek flowing of the cirque at Fairy Meadows towards Mount Harrison Smith and the neighbouring peaks.
Another great shot of the creek is in the opposite direction away from the Cirque of the Unclimbables towards the valley. If the weather is clear you may just see Glacier Lake in the distance.

You can spend a lot of time exploring Fairy Meadows. The area around the creek is so nice and beautiful. It’s also such a cool place where you can just to walk around or sit to have a chill in the solitude. So peaceful sitting there checking out the scenery of the massive peaks, the creek and just listening to the soothing sound of the running streams, which are found hidden all around the meadow.
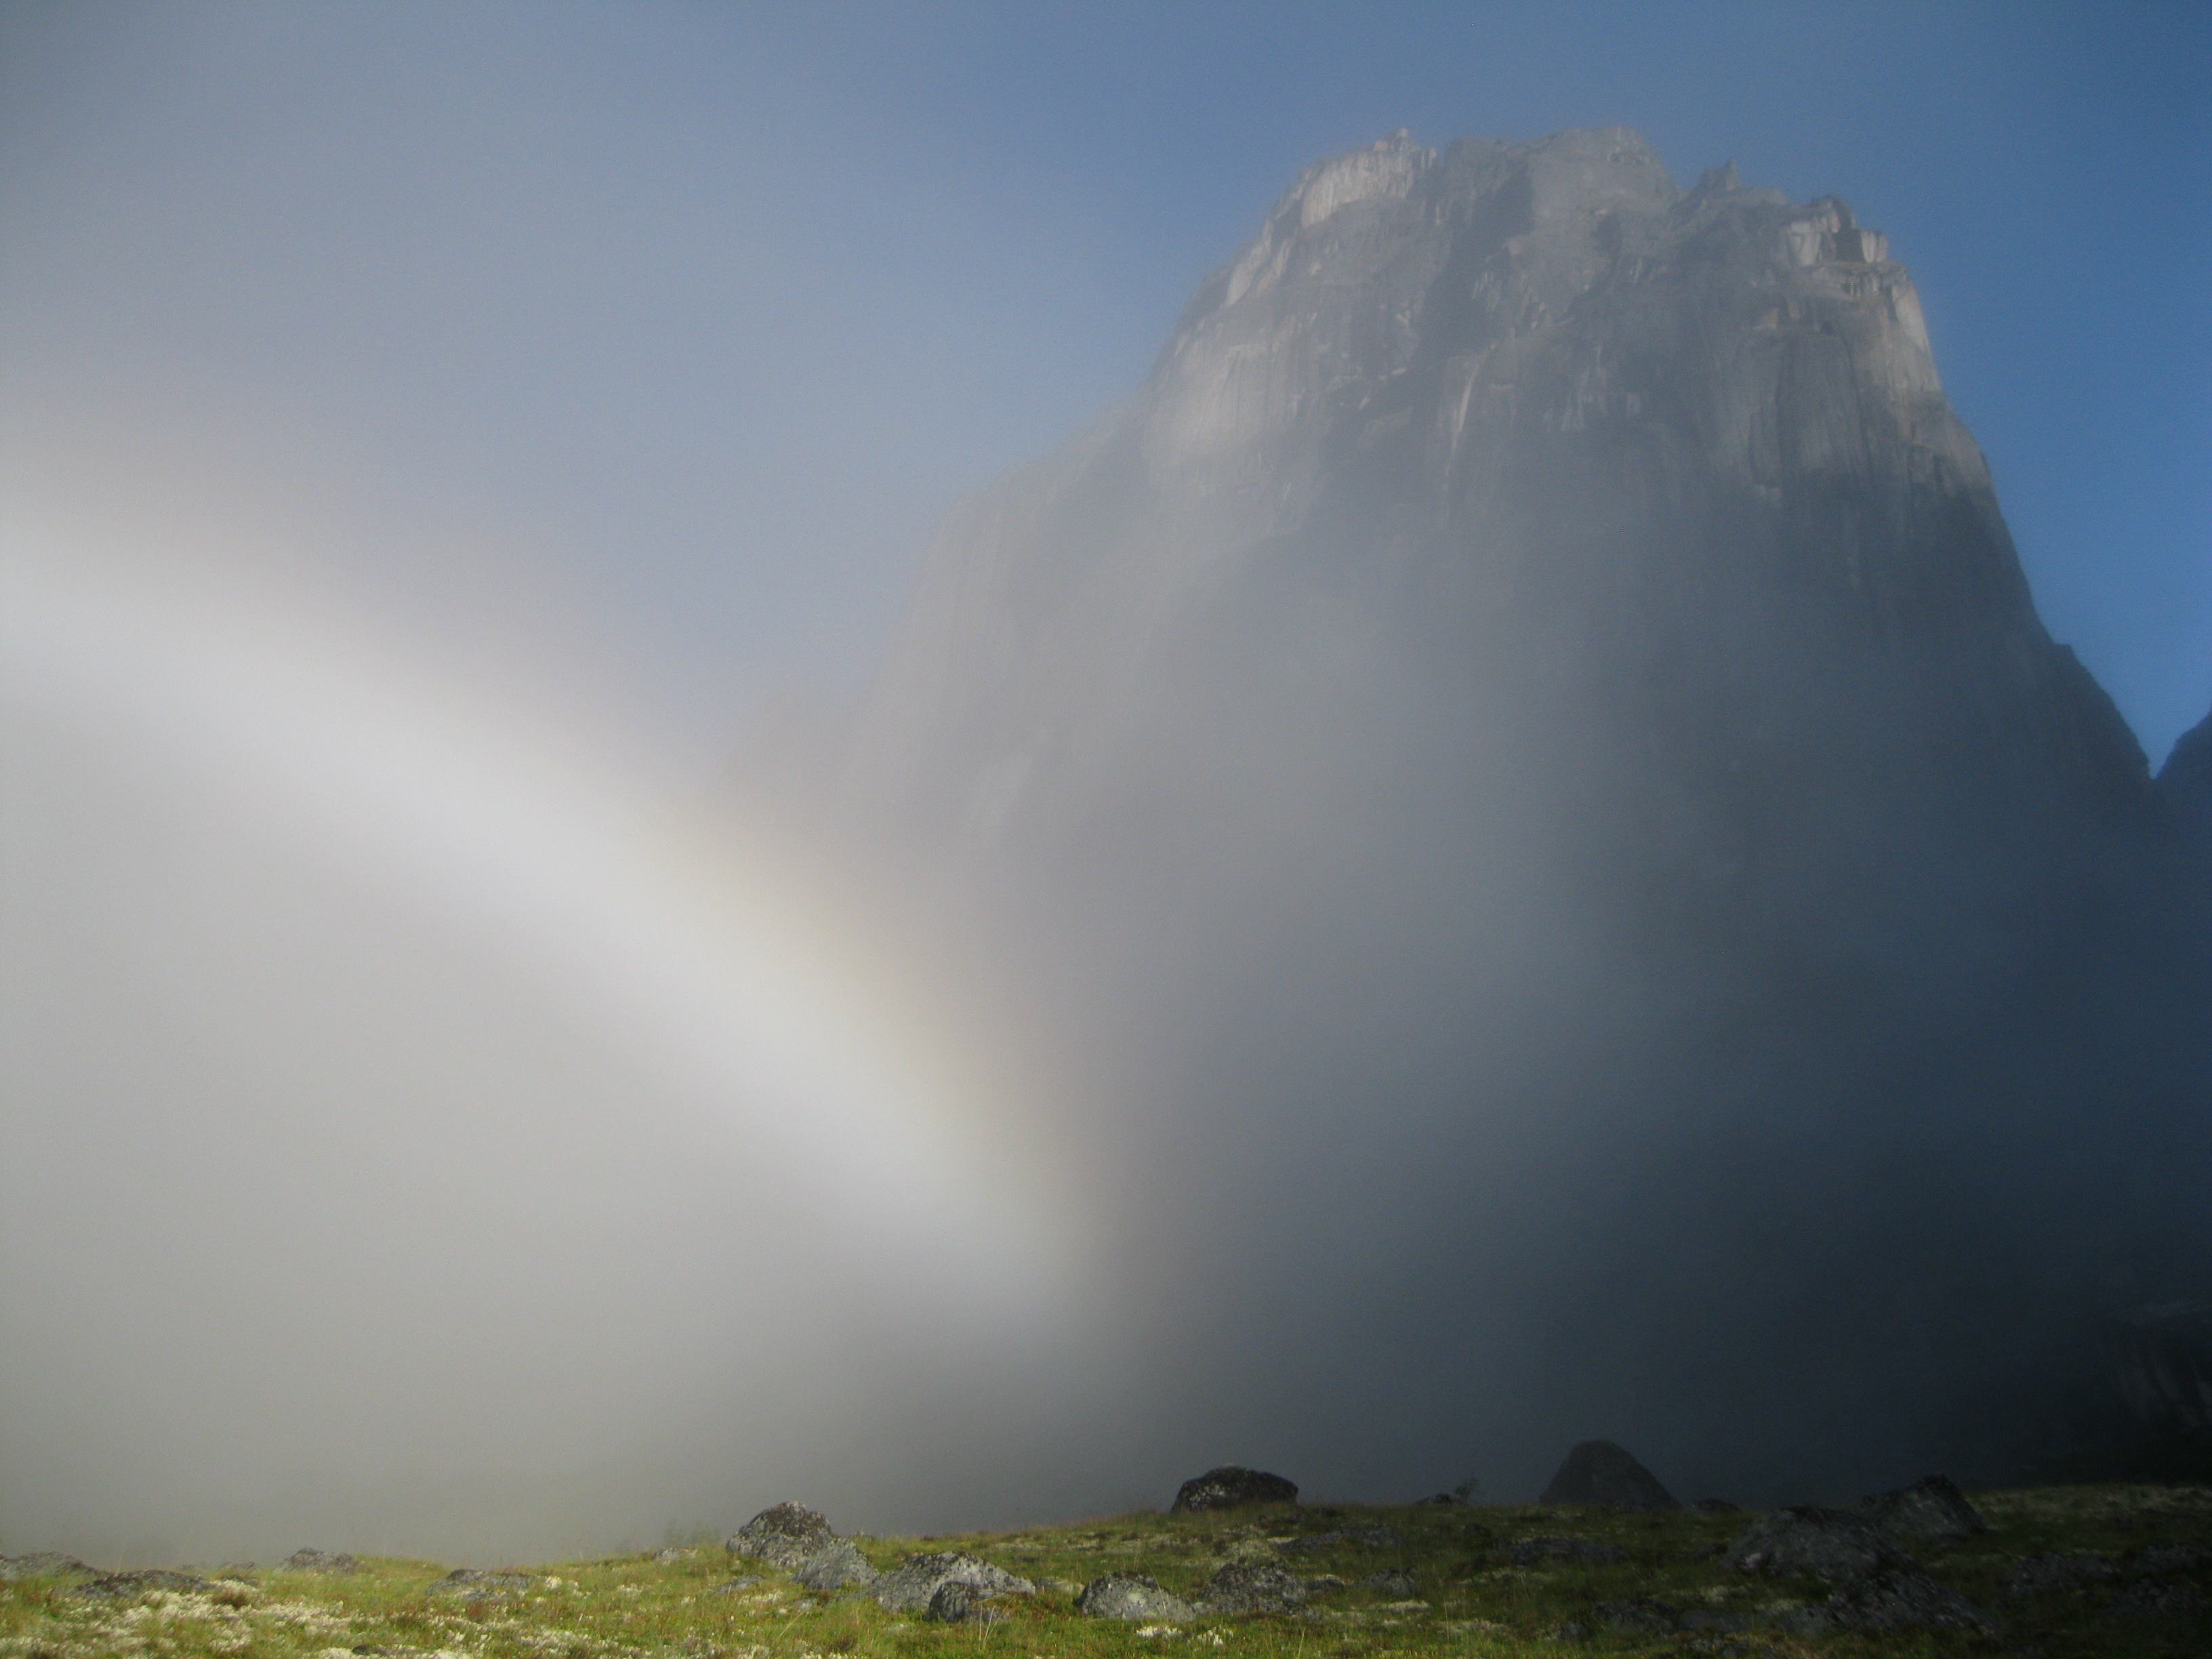
There will be plenty of opportunities for amazing images if the mist passes through the Cirque with all sorts of motifs when the clouds stretch around the towering rocks. So cool. You may just find yourself in a middle of a cloud and you cannot see the peaks at all. This is quite an experience with the air being all moist. The peaks won’t be visible at all and you can only see four metres ahead.

As you are strolling around Fairy Meadows it is very possible that you will spot a fair bit of marmots. They will make a little squeaking noise if you are getting close to their little home in the ground. So make sure you give them a bit of space. But if you spot them messing around in the grass or on a boulder, you can get pretty close a get great shots of them. Again, make sure you give them sufficient space and that you don’t bother them.
The Cirque of the Unclimbables – The Hike to Lotus Flower Tower
There are several options for hikes at this magnificent cirque. One highly recommended excursion is down towards the Lotus Flower Tower and its surrounding peaks. This will be on a marked trail with awesome scenery all the way.
As you start on hike from Fairy Meadows you will be turning towards the right up the trail surrounded by massive stunning boulders in the meadow with glorious views of the many peaks around you. There are plenty of opportunities to take great photos. You can take some shots of the boulders against the peaks as a backdrop. The possibilities are endless. There’s a fantastic view when looking back towards Mount Harrison Smith and its neighbouring peaks.
The massive East Huey Spire is located at the far right of the skyline of peaks in the cirque to the right of Mount Harrison Smith and you will have a fantastic view of this peak on your way. To the right of the East Huey Spire there’s a killer view of the Lotus Flower Tower and its neighbouring peaks. You will be climbing a hill on your way, surrounded by more boulders and with a great bird’s eye view down towards Fairy Meadows. From here the camp of tents is visible in the meadow in the distance and very small next to the massive Mount Harrison Smith.
The closer you get to the Lotus Flower Tower the better the view, with some great opportunities for great shots. Again, check out all the boulders lying around. There are some really interesting formations all around. As you continue onwards the trail heads into a section through a wonderful meadow to your left with creeks and streams running off the hill which is really stunning.
Followed by a big creek and the view of the Lotus Flower Tower fronted by a big moraine. This is a great spot to have your lunch and a break. This is also a perfect spot for taking some shots of the beautiful surroundings.
The Lotus Flower Tower is the biggest peak of them all located to the very left. It is a pretty popular destination for mountaineering by rock climbers. This is yet another cirque within the Cirque of the Unclimbables and it is nothing short of awesome.
After lunch and a well-deserved rest, continue down towards the towering peaks and the Lotus Flower Tower. Head down to the left and after a while a massive moraine appears in front of you which have to climb to get to the top. For some people this is a bit scary so if you feel uncomfortable and insecure, it may be a good idea to turn back.
The climb is a little bit hard and challenging but it is not too difficult. But the further you ascend towards the massive rock walls of the towers, the more loose rocks will appear and these loose rocks are huge, so it can be quite dangerous if you are not careful. Therefore only do this climb if you feel confident and you are an experienced rock climber.
If you do decide to make you way up the massive talus slope it is quite exciting and upon arrival at the top of the hill you will have a great sense of accomplishment. It is cool to stand right next to the gigantic steep mountain wall and actually touch it with you hand. This first peak is the neighbouring peak of the Lotus Flower Tower and if you want to continue onwards to this peak will be downwards a bit and then across.
If you decide to return you have to descend the same slope as you ascended. Take your time and do it at your own pace. Keep a safe distance to the person in front of you and do not ascend right above them as rocks can easily dislodge, tumble downhill and hit your fellow traveller. These rocks are really big so the consequences can be severe.
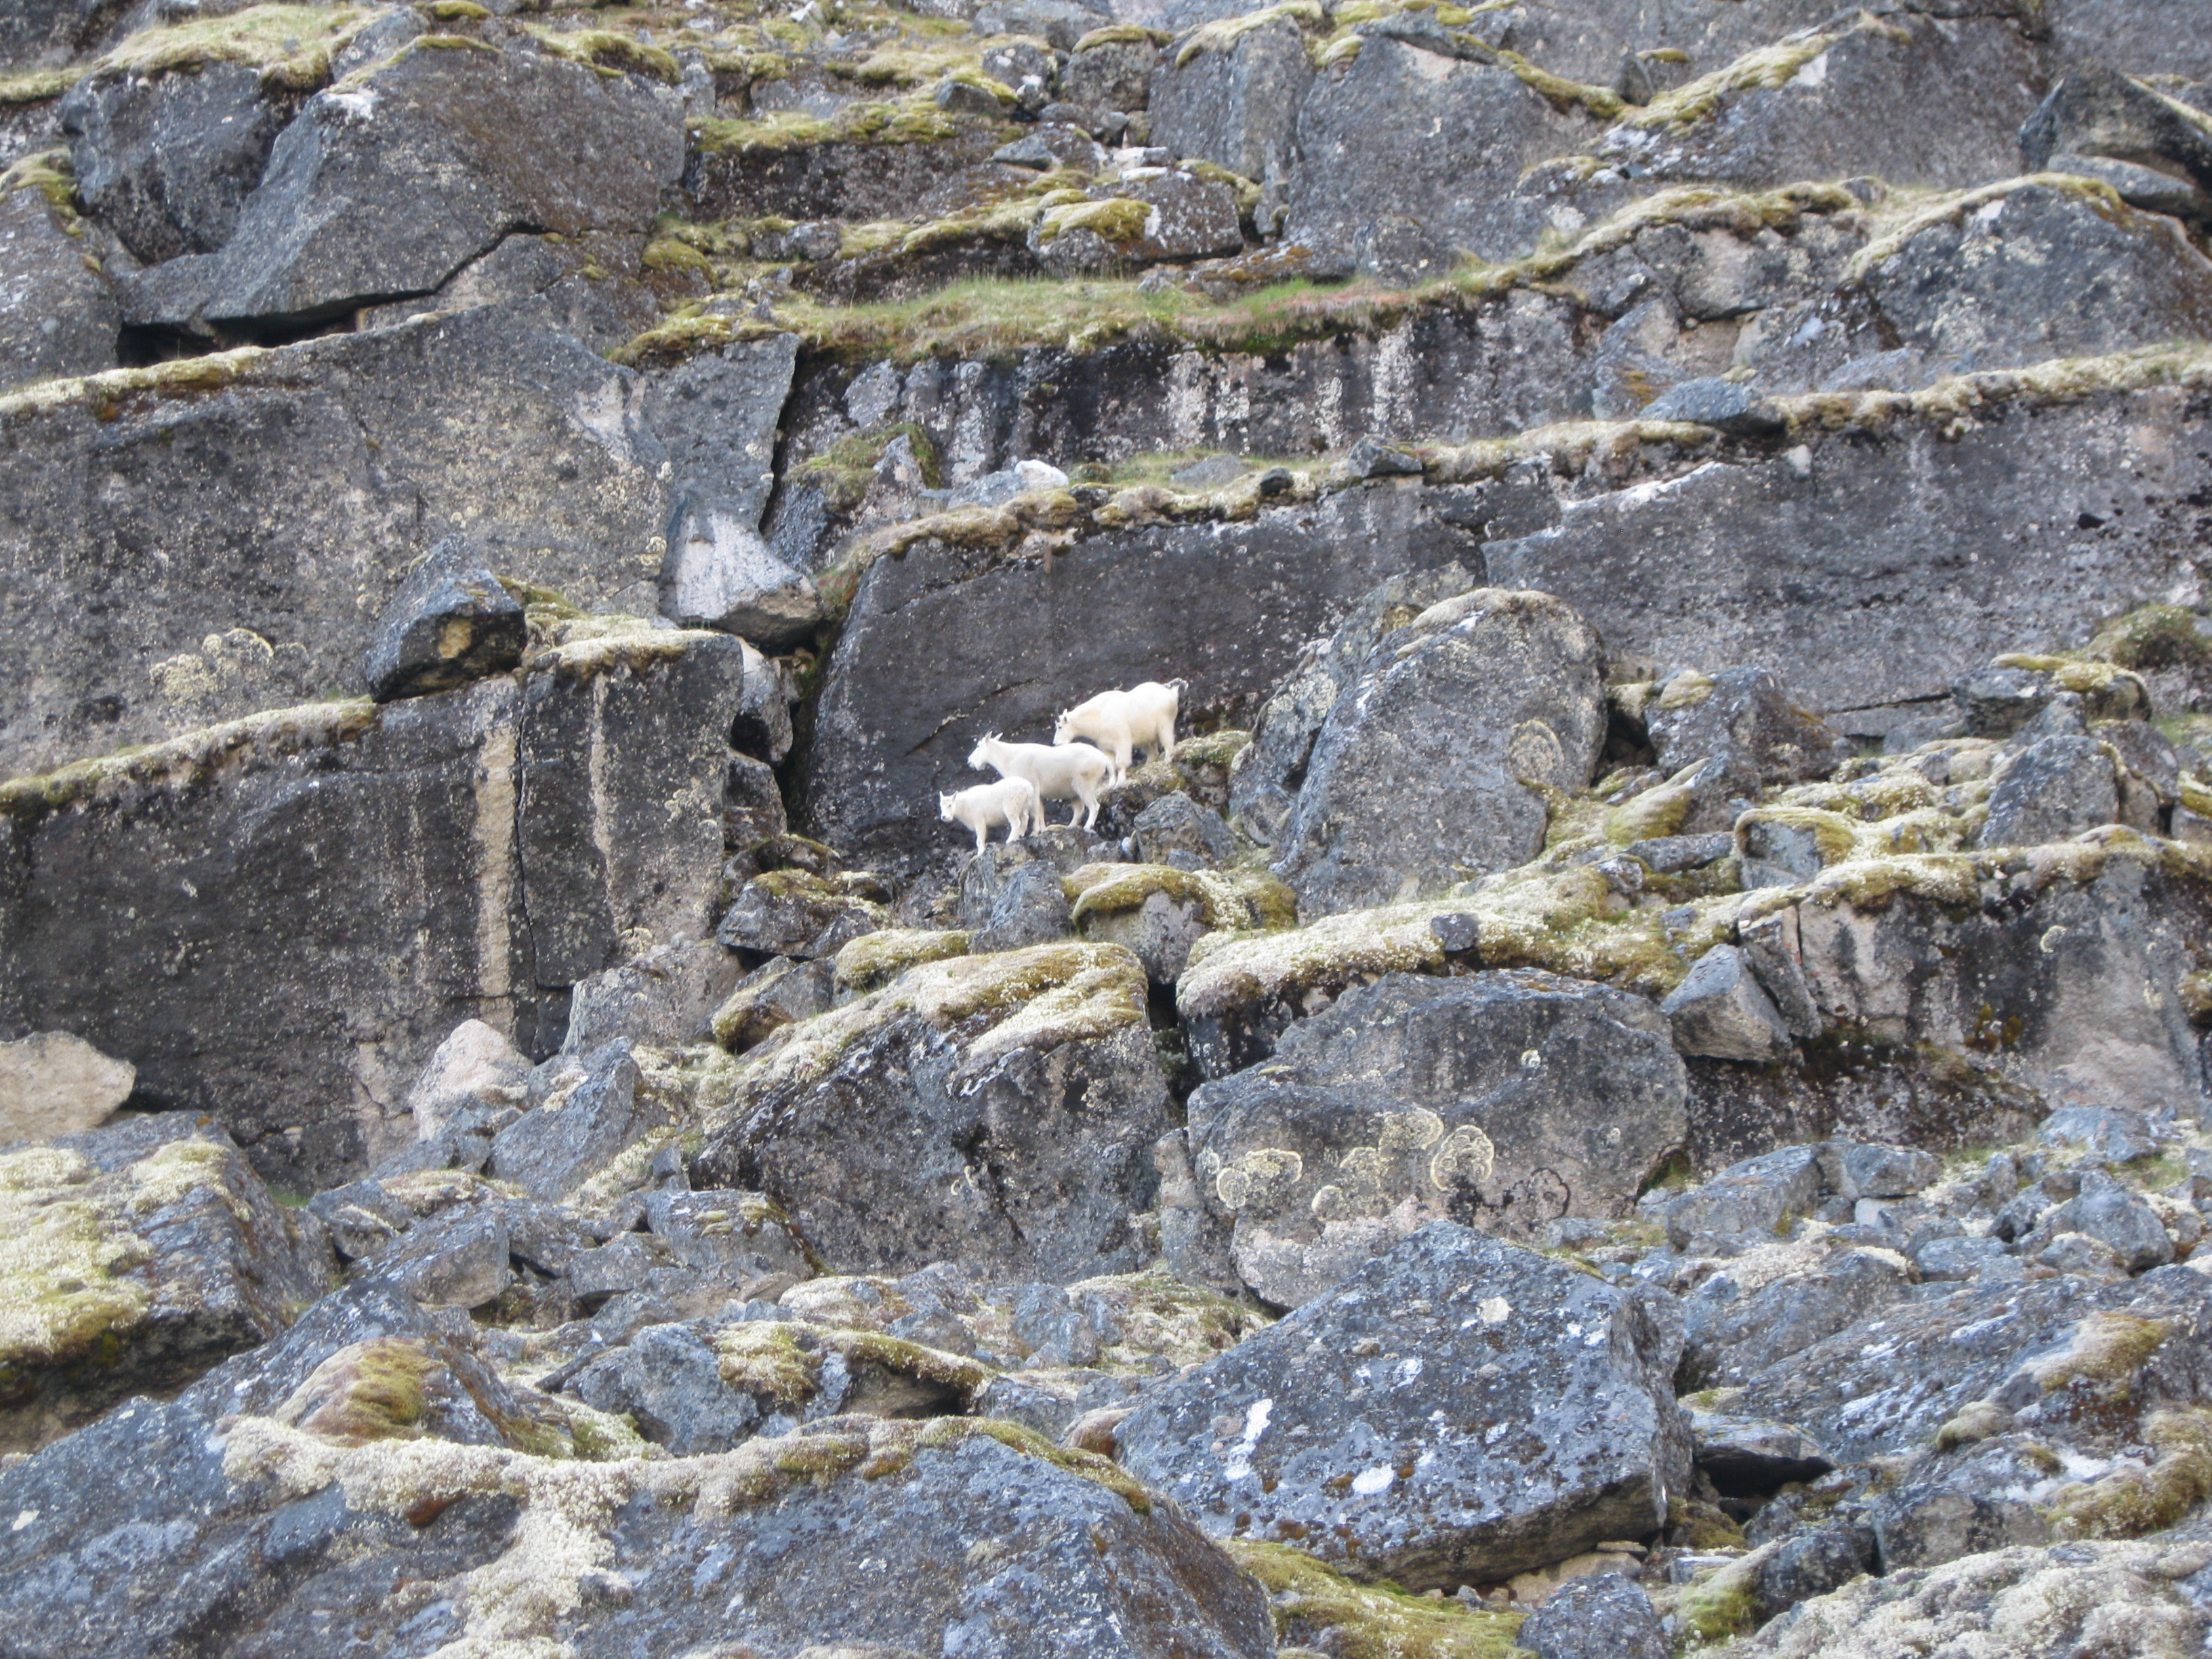
The return to the campsite will be on the same trail. The views of the cirque down the meadow are fantastic. Keep your eye out for wildlife. You may just spot some mountain goats up the slopes.
Check out the small creeks along the way. You may be able to get a great shot of them against the mountain peaks with a great reflection of the peaks in the creek as well. The peaks to your far left have a bit more of a brown colouration to them in comparison to the rest of the cirque which is more grey-ish. If time allows it, this could be an interesting destination if you have a third day planned at the cirque.
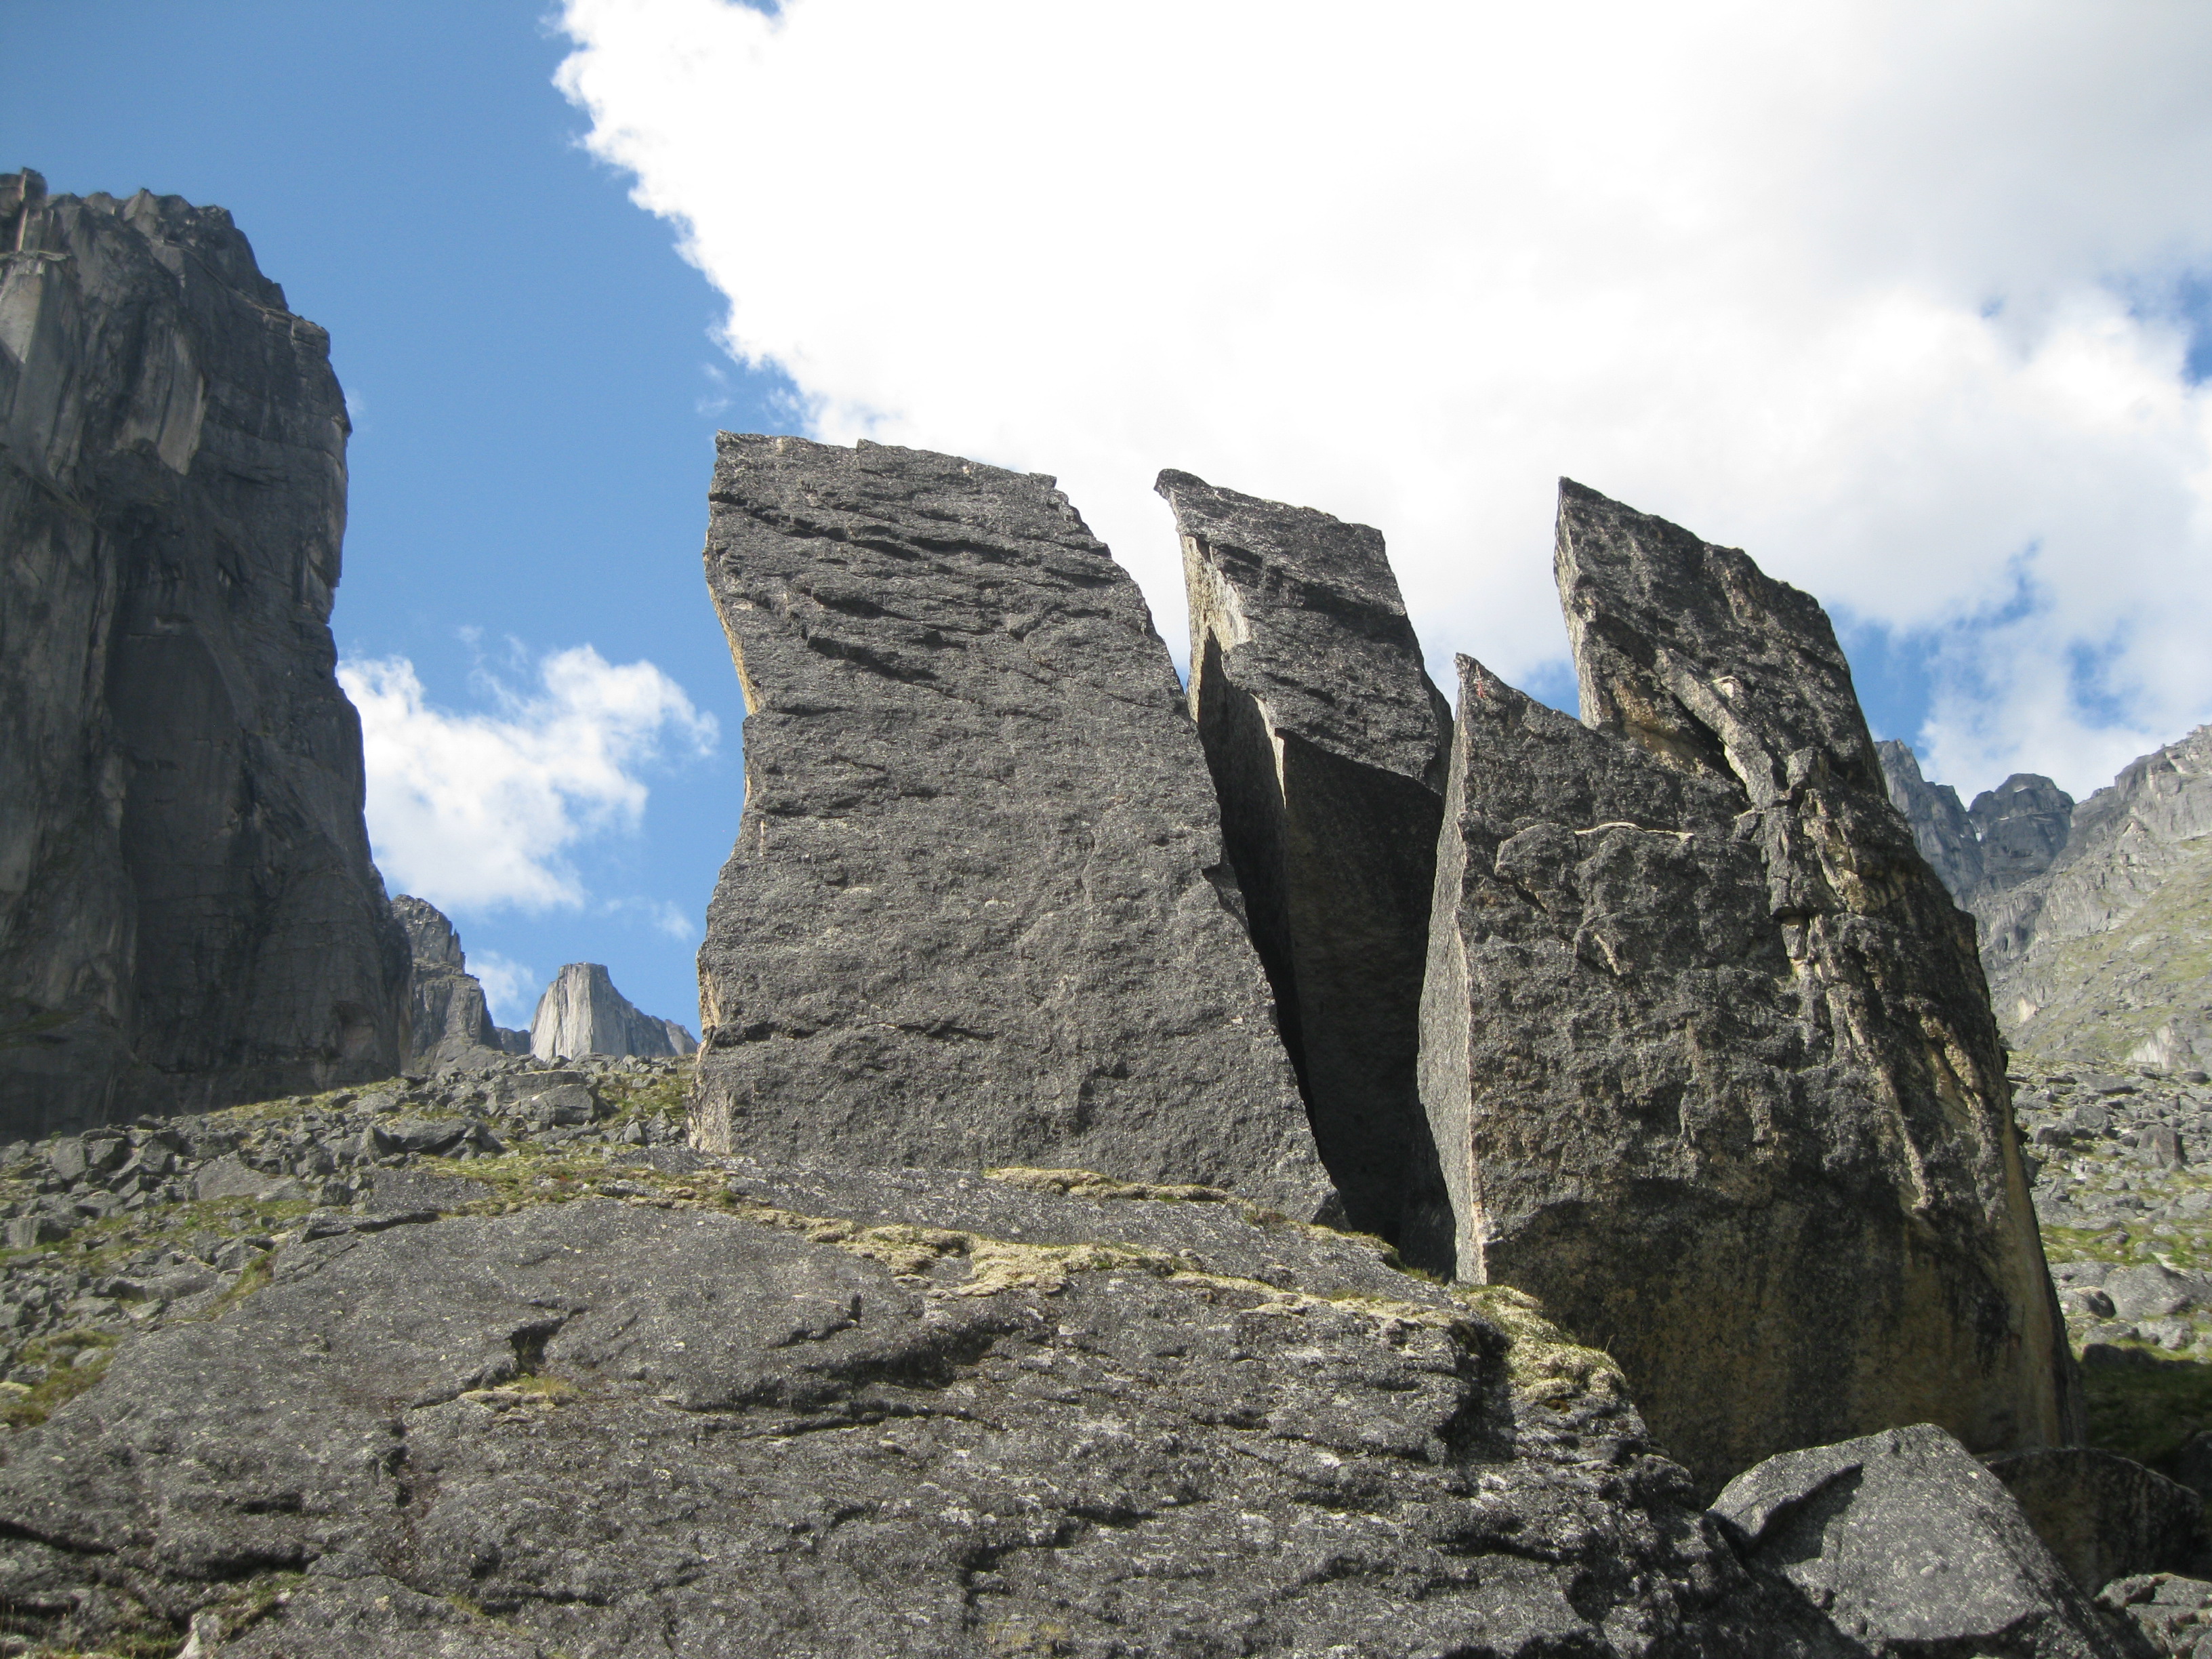
On the return there are many great opportunities to take amazing photos of the beautiful scenery of boulders, creeks and peaks. Some of the boulders have awesome cracks with lichens and moss residing on the surface. There are massive boulders that have cracked into several big pieces. Absolutely stunning.
The Cirque of the Unclimbables – The Hike to Mount Proboscis
An option on day 2 of your stay at the Cirque of the Unclimbables is to hike down towards Mount Proboscis and its surrounding peaks. This is the cirque located to the right of Mount Harrison Smith.
From the campsite at Fairy Meadows, walk down towards the creek. The scenery is magnificent and there are plenty of opportunities to shoot the creek against the amazing peaks. To find the easiest way to cross the creek, you have to scout around. It can be done without getting the feet wet.
When crossed, there are a couple of minor streams to be crossed as well. Head through the beautiful setting and when looking to the right towards the East Huey Spire and back to the campsite there are glorious views of the peaks against the stream and creek. Another opportunity for great shots.
Heading onwards, the ascent of the hill towards the peak begins by approaching a massive talus slope. Behind you now to the left is Mount Harrison Smith. Ahead are the staggering peaks of the cirque. From left to right are Mount Proboscis which will be your goal, then the peaks called Flattop, Bustle Tower, Terrace Tower and Phenocryst, which is also visible from this angle, and the East Huey Spire.
The climb up the talus slope is a bit steep but it is not too hard and not anything as challenging as the climb towards Lotus Flower Tower. The rocks on the slope towards Mount Proboscis are way more steady and firm so it doesn’t feel like you have to mind your every step. The key is to concentrate while you ascend and do it at your own pace. Also bear in mind that there are some rock slides in this area so be careful.

The easiest option is to head up on the left side. At one point you will arrived at the very base of Mount Harrison Smith. You can get an amazing photo from here up the steep face of the peak towards the very top. So cool. To the right is the awesome vista of the skyline of peaks.
As the climb continues you wonder if there is a lake or a glacier beyond the talus slope at the foot of Mount Proboscis. It’s getting pretty close now. Remember to have a look back at Fairy Meadows which is quite a sight as well. The closer you get the more impressive the peaks are becoming and it is really amazing as they take a different formation than the one you have seen from Fairy Meadows.
When arriving towards the top you will discover that there is no lake but just a small glacier right at Mount Proboscis and Flattop Peak. The view of Bustle, Terrance and Huey Spires is really impressive as they look like one massive vertical rock wall from this angle. Take your time to take in the view. Both of this magnificent cirque but also down towards Fairy Meadows. The walls of Mount Harrison Smith together with Mount Proboscis are nothing short of amazing. the East Huey Spire with the peaks on the opposite side of Fairy Meadows are absolutely stunning as well.
When heading off the hill and the talus slope, do it to the left, which would have been to your right when ascending, so in the opposite direction. The view and experience is different this way. Be careful on the way down as it is a bit steep. Upon arrival at the creek you can get some awesome shots of the creek against the peaks and the talus slope. It changes all the way down, so remember to look back and check out the view. It is quite beautiful.

When returning to camp in this direction it is a bit challenging to find a spot where the creek can be crossed. So you will have to scout around a bit which is quite fun.
The Cirque of the Unclimbables – The Hike up the Hill to the Boulders Next to the East Huey Spire
After you have returned to the camp from the climb up to Mount Proboscis, grab some well-deserved lunch. During the afternoon you could head down Fairy Meadows up the hill towards the boulders to the right of the East Huey Spire. There are some quite interesting rock formations in this area. This is also a bit more of a relaxing hike in comparison to the one you did before lunch which is quite good as you should not push yourself too hard.
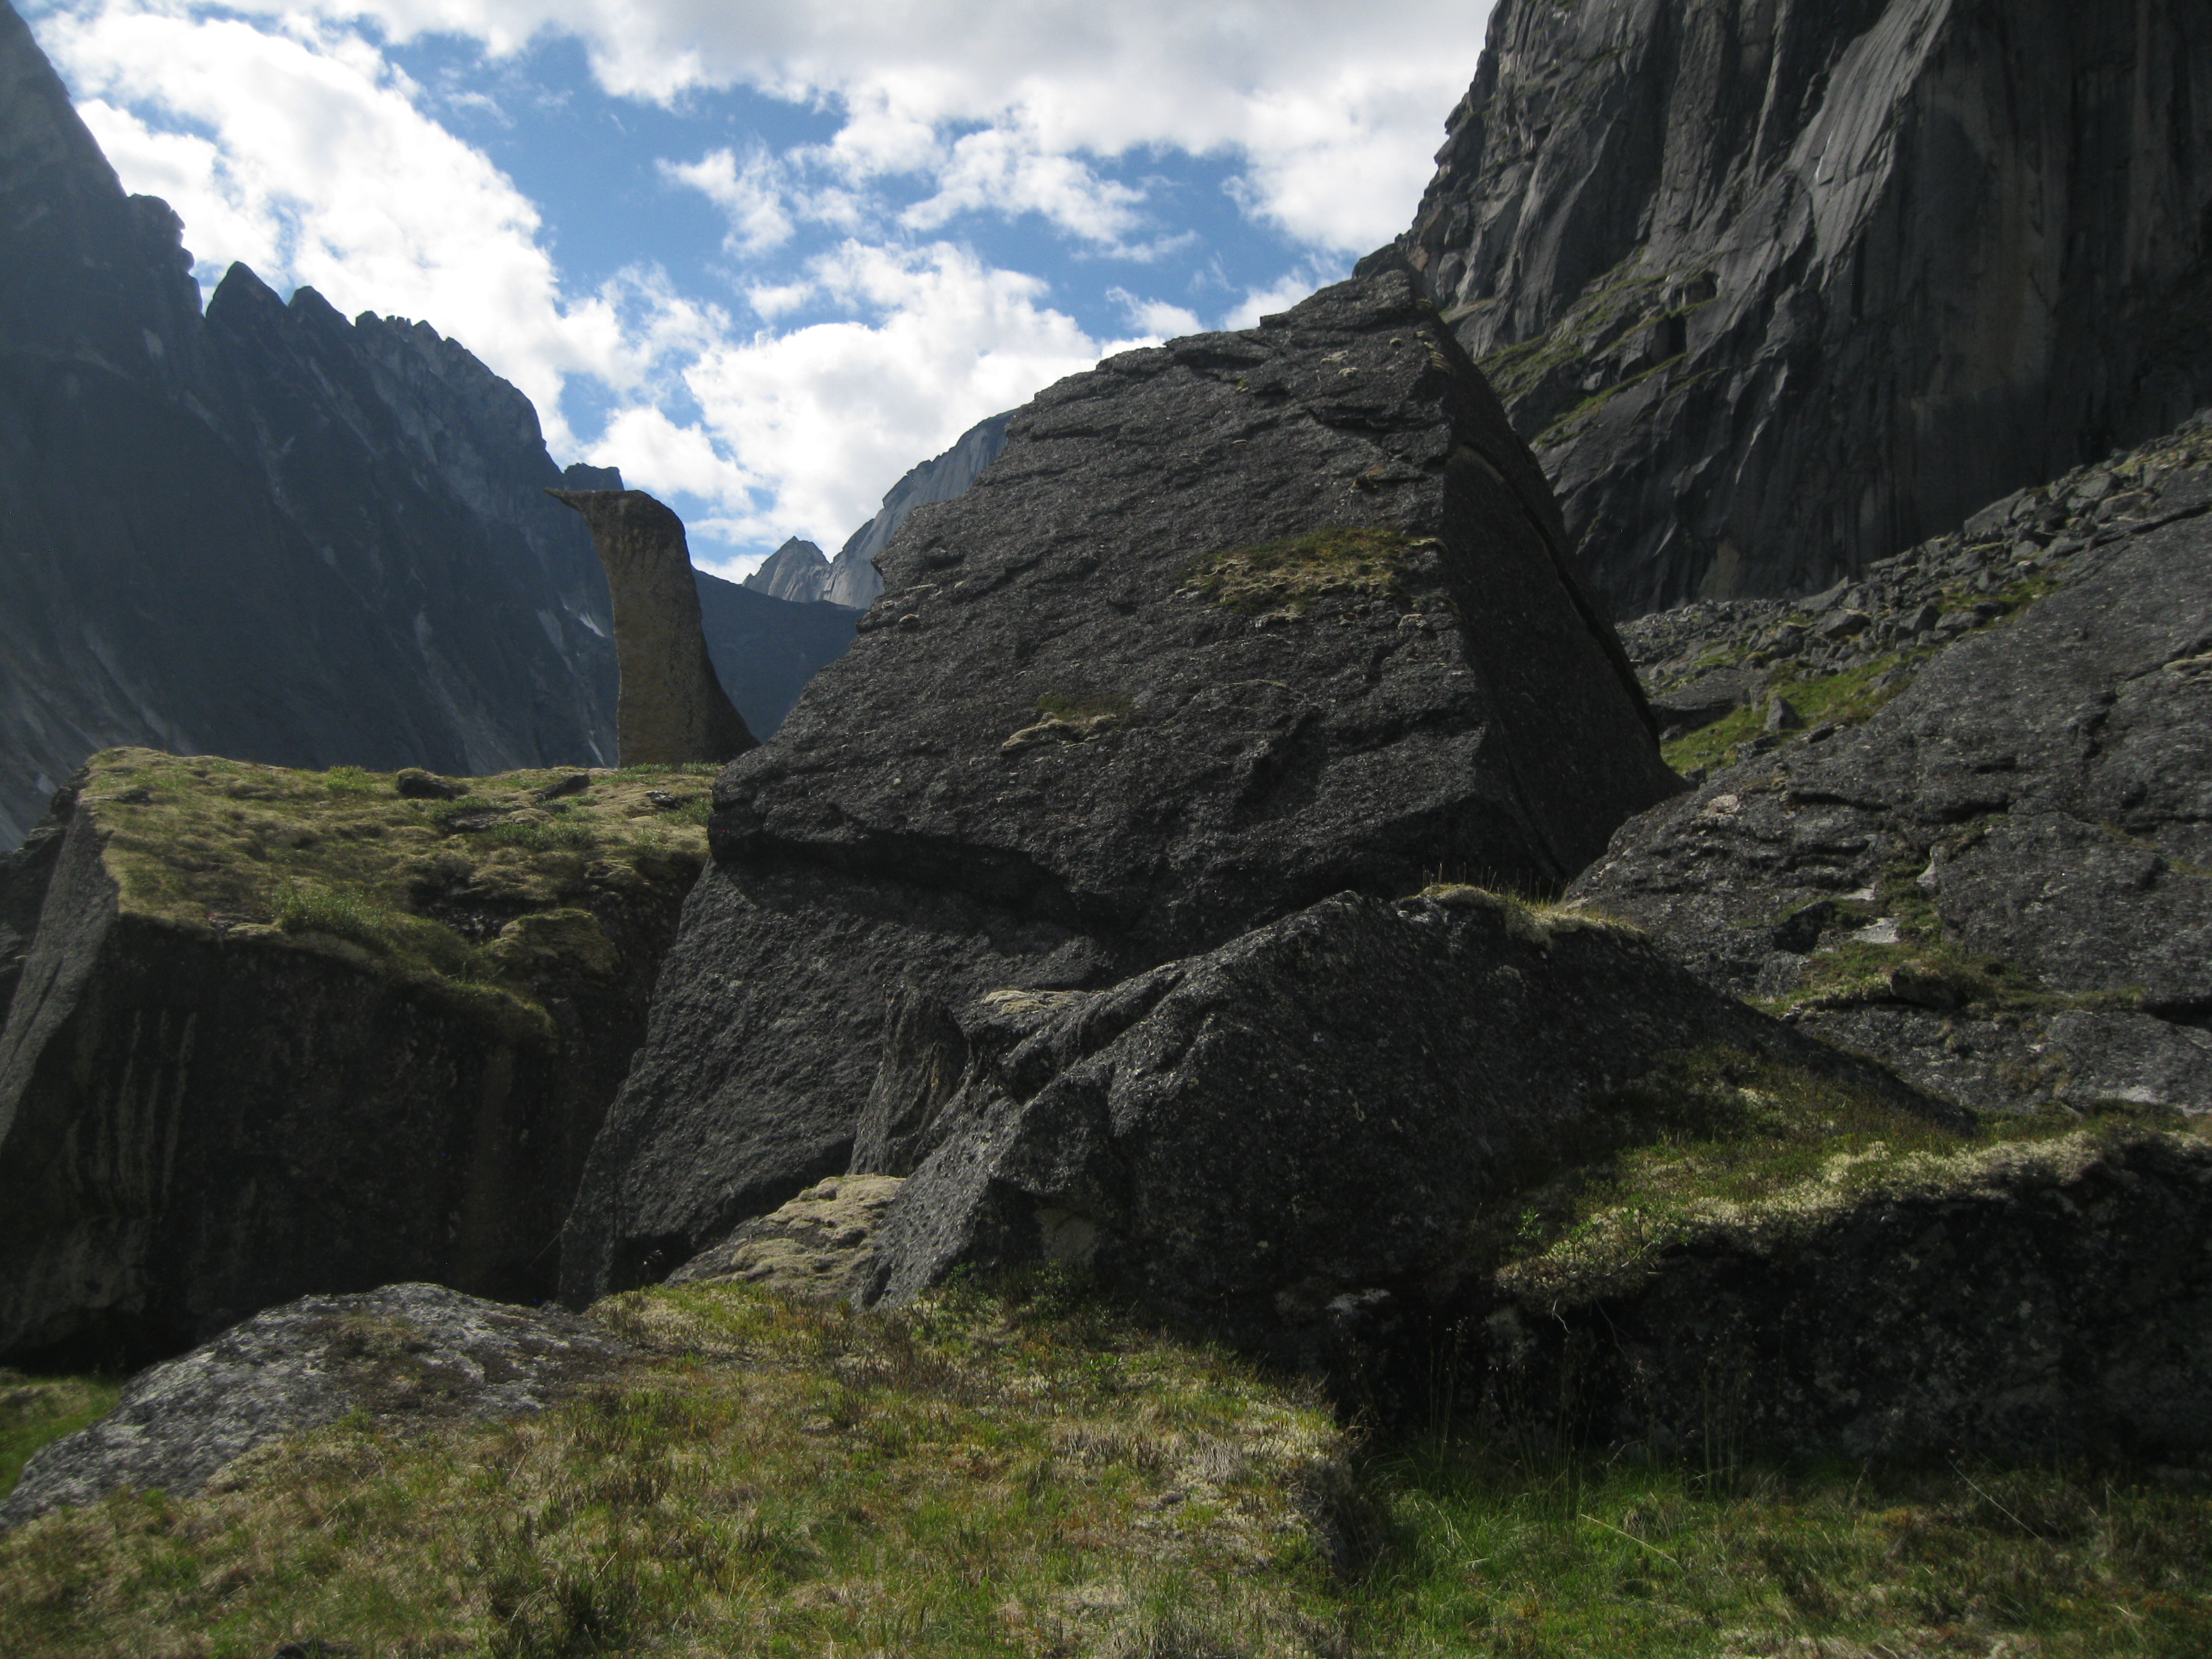
When heading towards the massive boulders of Fairy Meadows there is a good photo opportunity against Mount Proboscis, the other peaks and the massive moraine you have just climbed up. From a distance it looks small but it is quite an effort to get up there. Heading into this area of boulders is so awesome with many photo opportunities as the boulders are scattered around on the hill as pieces of art work. From big blocks of rectangular rocks, to pointy funny shapes and massive rocks split into several pieces.
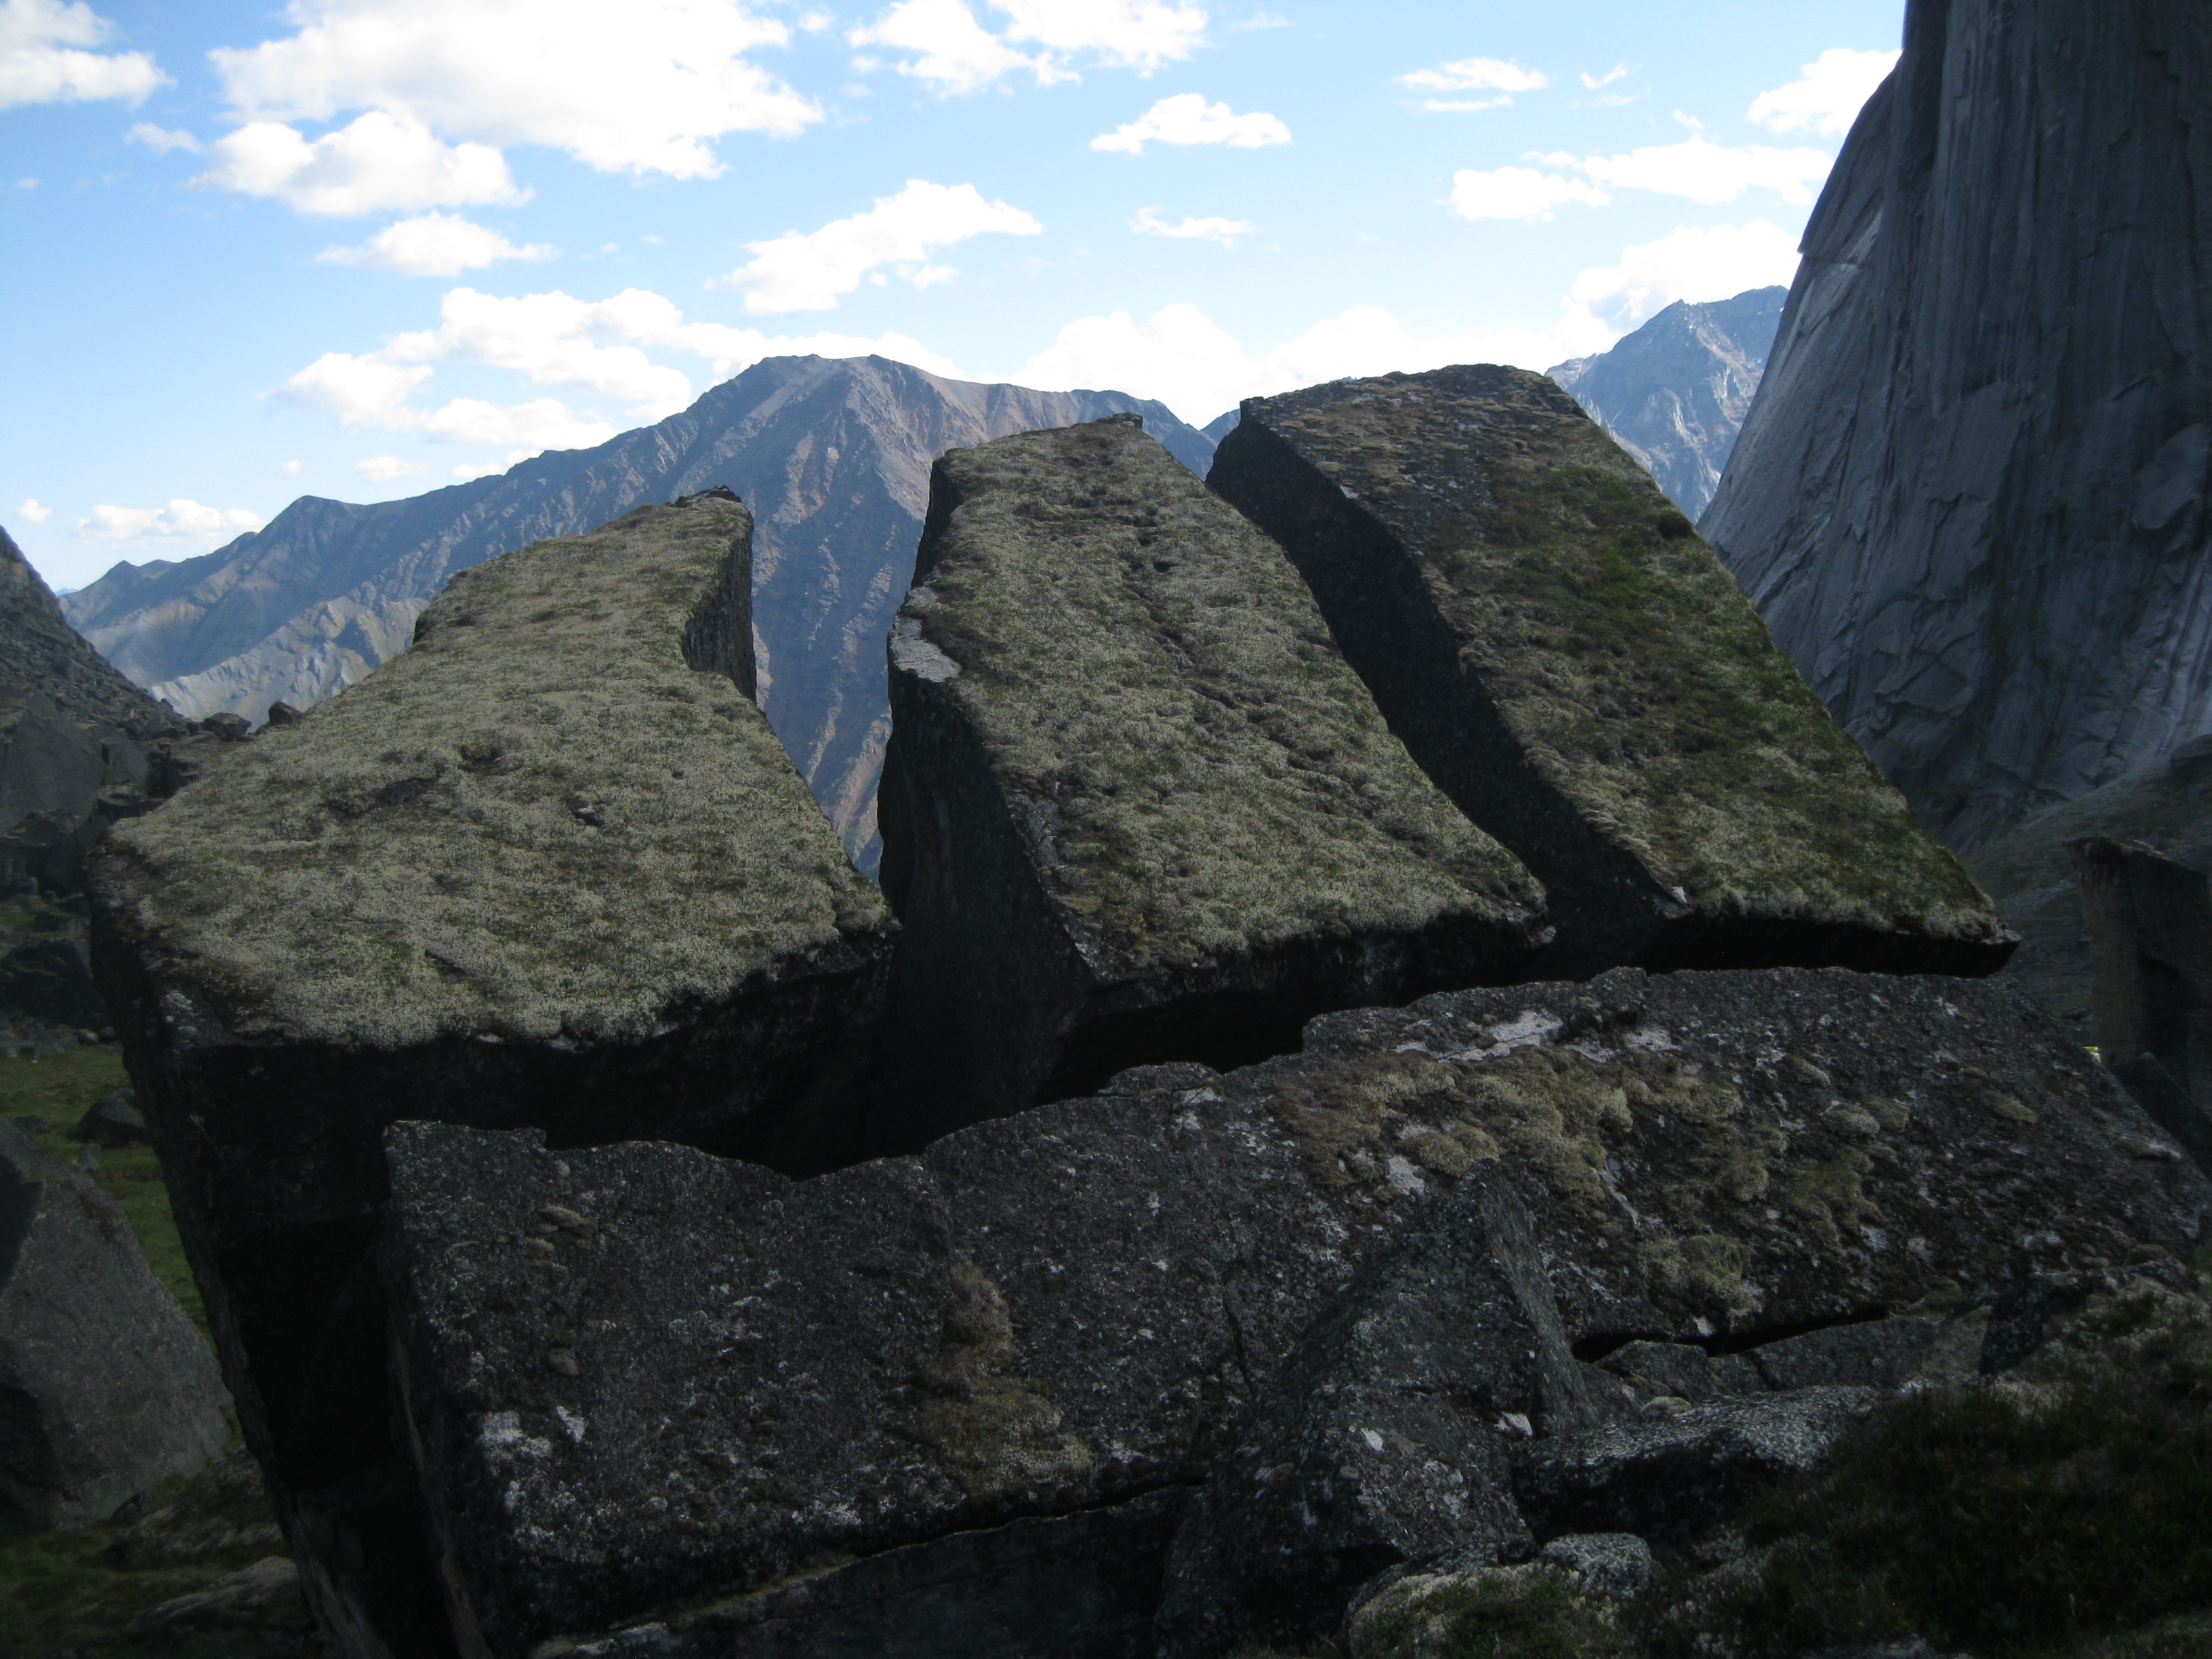
A really interesting rock formation is boulder known by different names. Some called it the Penguin and others the Goose’s Neck. It looks like both. It’s based in the middle of several massive boulders and sticks up looking like a penguin or a goose. You can take several of cool shots of this rock from all different angles.
It’s really a nice to hike around on this hill after a long day. Just take your time, take breaks and sit around on one of the boulders and have chill. Climb up on boulders and take some shots. You may just get a great photo of a marmot sitting on the top of a boulder against the mountain peaks as well.
When you get to the top of the hill there’s a stunning view of the cirque with the Lotus Flower Tower as the centrepiece. So awesome. As you stroll around you may also see several beautiful wild flowers. If you study the moss and the lichen on the boulders you will find quite some impressive patterns as well.
The cracks in some of the boulders are quite amazing and some have small chasms between them as well. There are massive boulders probably up to 10 metres (33 ft). When you stand below them and look up they are pretty tall.
The Hike from the Cirque of the Unclimbables back to Glacier Lake
After you have spent time exploring the magnificent Cirque of the Unclimables you have to head off the hill again and return on the same trail back to Glacier Lake. Sometimes descending a hill can be more challenging than ascending, but in this case it is much faster heading downhill. It is still a hard day and it will be challenging, but it is much faster than the climb.
The first section across the boulders on the talus terrain is fairly straight forward. Just do it at your own pace and concentrate on the descent. Hiking poles are quite useful on the way down. Remember to look back up at Mount Harrison Smith and also down the valley to the Brintnell Creek glacier. So beautiful.
You will get to the section when the trail heads in to forest terrain. It is quite steep and is the most challenging part of the trail. Be careful and take your time. If you don’t concentrate you may fall. Again, the hiking poles are a good companion to support you. This section can be pretty hard on the knees.
If you have started the hike in the morning you should arrive at the glacial stream at around midday. The perfect lunch stop. Doing this section from the top to this spot would have been done much faster on the way down than on the way up. A great accomplishment already. This is a great spot for a chill, lunch and an opportunity to refill you water supply.
On the descent there are some great views of Mount Harrison Smith, the valley, Brintnell Creek and the Brintnell Creek Glacier. When continuing after lunch and leaving the hill to the level section of the hike, there’s access to the creek on some sections on the trail with a great view of the creek, the glacier and the surrounding peaks.

The last stretch of the hike is a bit hard as you really want to get to the Glacier Lake campsite after a long day. Be a bit careful towards the end as the trail is not completely clear so it is best to stay pretty close to your group so you make the right turn. At this point it is getting closer to the end and upon arrival at the shore of Glacier Lake, the canoes, on which you arrived a couple of days earlier, should be there ready for you. Paddle across to the campsite which will take about ten minutes.
Set up your tents and get ready for dinner. The great thing about returning to Glacier Lake is that you may have a different view of the lakes and the peaks of the Cirque of the Unclimbables as the weather may have changed. It will probably take you about 5-6 hours from the Cirque of the Unclimbables to the Glacier Lake campsite.
The Hike from Glacier Lake back to the Snye
This is yet another brutal day. You have done it once and now you have to do it in the opposite direction. At least this time you know exactly what lies ahead which is an advantage. You know how to attack the beast and will be determined to crush it as quickly as possible.

With that in mind, head off early canoeing from the Glacier Lake campsite 4 km (2.5 miles) across the lake to the trail. As soon as you arrive just start hiking and manoeuver through the harsh swampy and muddy trail as fast as you can. Have appropriate breaks along the way.
If you start early and you do it fast it won’t be as hot as it will be early in the day. You will have more strength and will get to the lunch spot at Brintnell Creek fast. Remember to bring at least 3 litres of water as Brintnell Creek will be the first spot where the water supply can be refilled. Bear in mind that the water needs to be filtered.
Have a good break and lunch at Brintnell Creek and then continue onwards. Again, you know from you past experience, that the trail can be pretty unclear in sections, so make sure you stay pretty close together. Make sure at least one of your mates is visible in front of you at all times. For emergencies carry a whistle.

It’s a tough day especially after lunch as it will be harder with the heat picking up and in the afternoon. You will get there in the end and arrival at the trailhead at the end you will be exhausted and a bit worn out, but also feel a good sense of accomplishment. As the campsite is not at the best location, it is recommended that you gather all your things and canoe down the river for about 1 km (0.6 miles) to find a decent gravel bar which is better for camping.
This is pretty tough after a demanding day, as it is hard work getting all the luggage, food supplier and barrels in the canoes and then canoes into the river, but it is worth it. The campsite downstream is a much better alternative where you can chill out, have a cup of coffee or hot chocolate and dinner. Furthermore, on the following day the time frame allows for more room in the morning to get ready and with less time spent on organising the canoes as much. It will be a long day of probably 9-10 hours but again, you will feel a great sense of accomplishment when the day is done, and you will sleep well.
Rabbitkettle
As you continue down the river the following morning, the next major point of interest is the Rabbitkettle where you will head ashore. The Rabbitkettle staff cabin is located here and it is recommended that a guided tour is pre-organised with the rangers to the Tufa Mounds. They offer interpretive hikes during July and August. As the Tufa Mounds are categorised as a Special Preservation Area, visitors have to be accompanied by Parks Canada Staff to minimise the impact.
Rabbitkettle is easy to spot as there is an information kiosk with a with a sign saying ”Rabbitkettle” close to the river. Right next to the kiosk the hiking trail, which leads down to the ranger cabin, is located. Spend a bit of time checking out the information at the stand before heading on to the trail. Change from the wet boots or neoprene foot wear into your hiking boots to be prepared for the awesome hike.
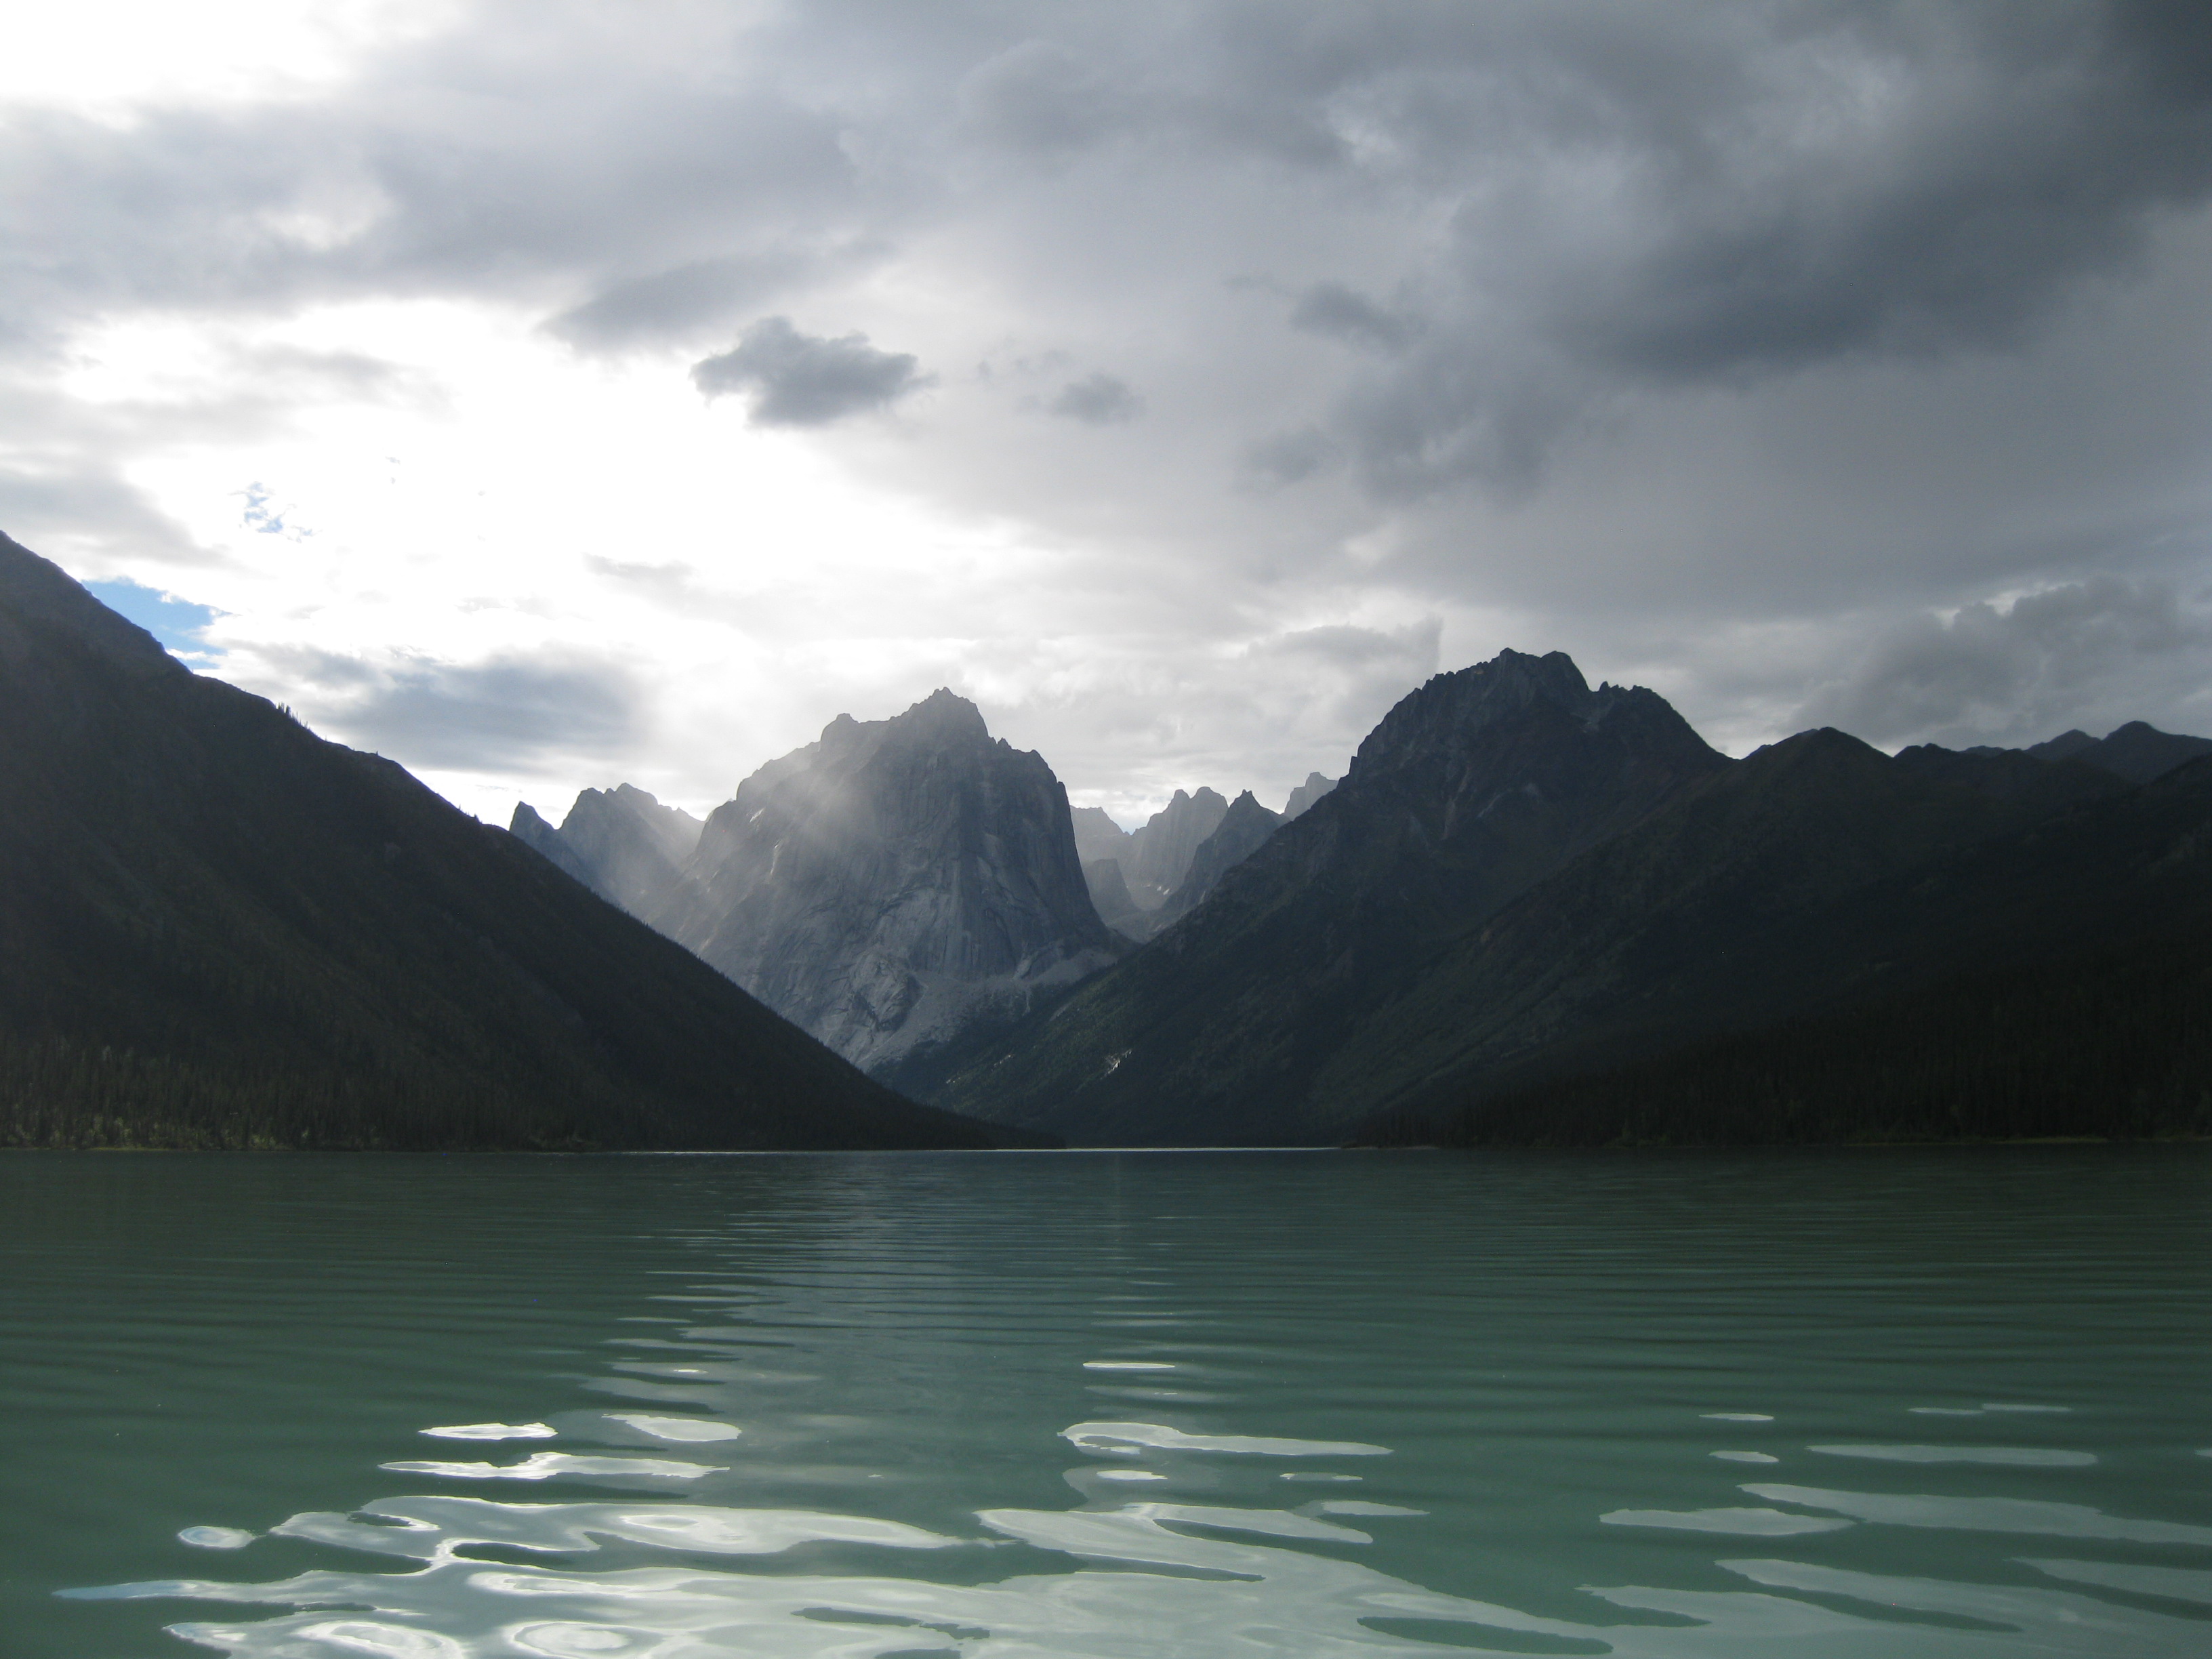
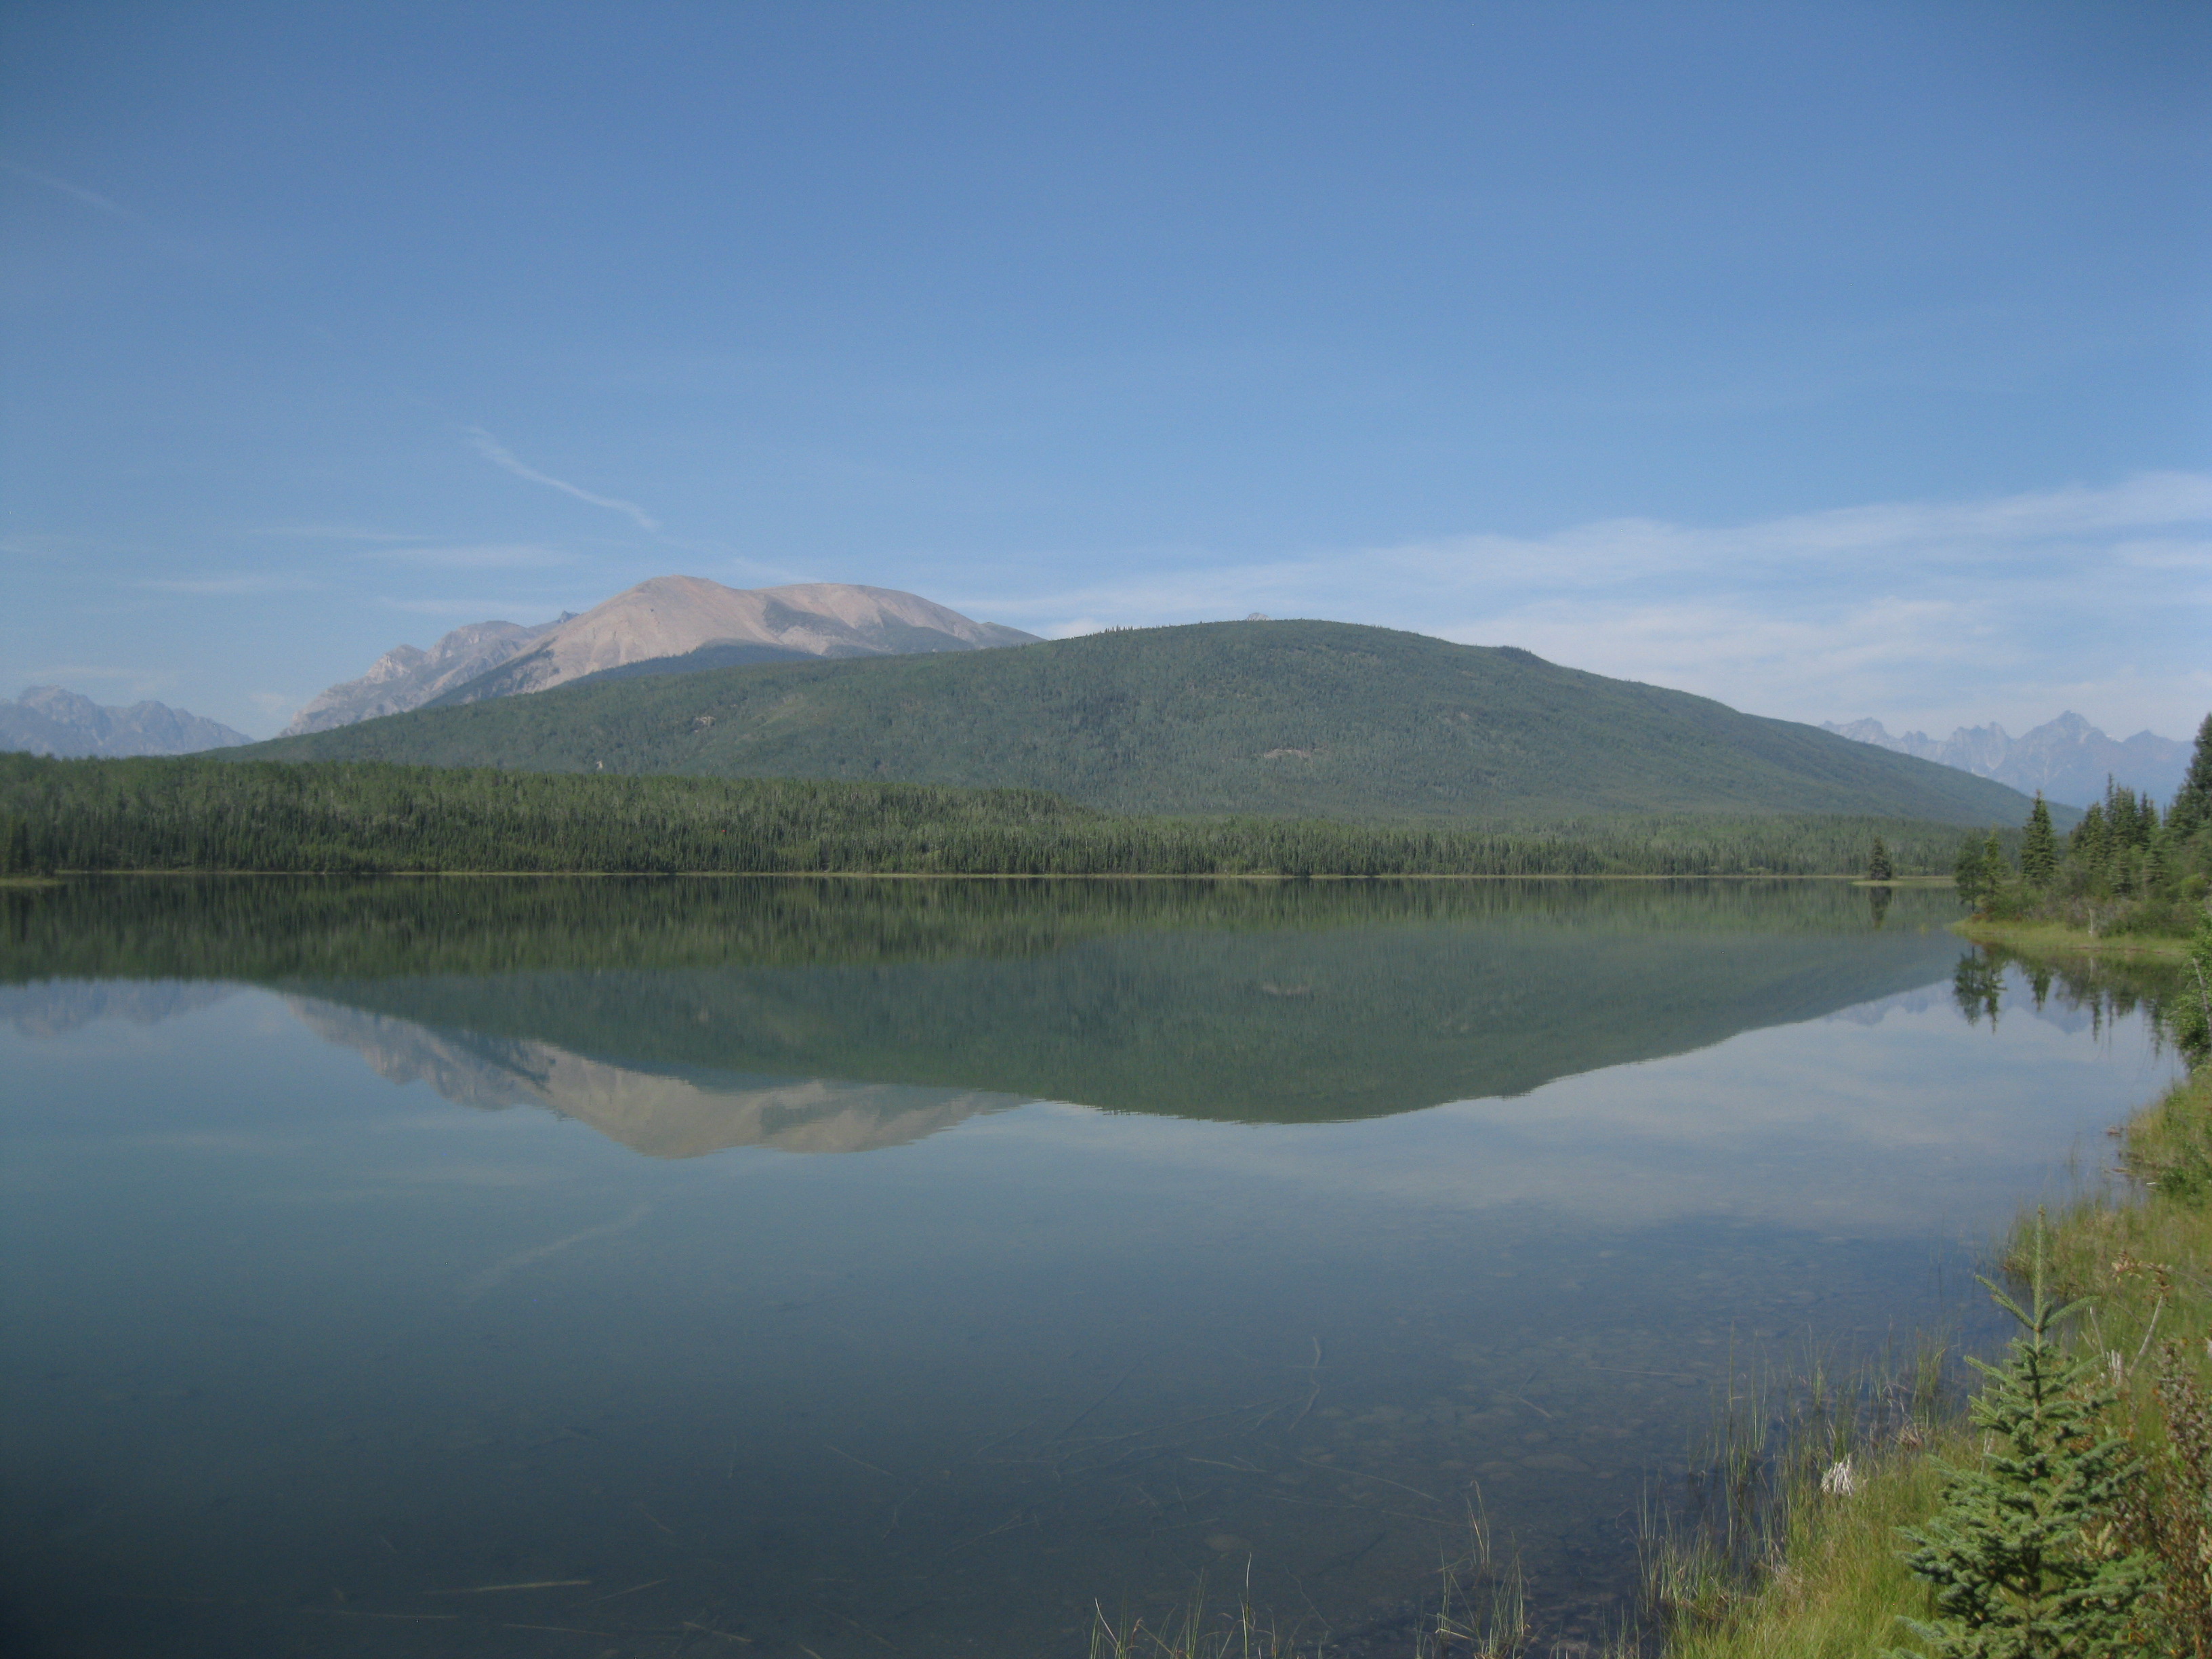
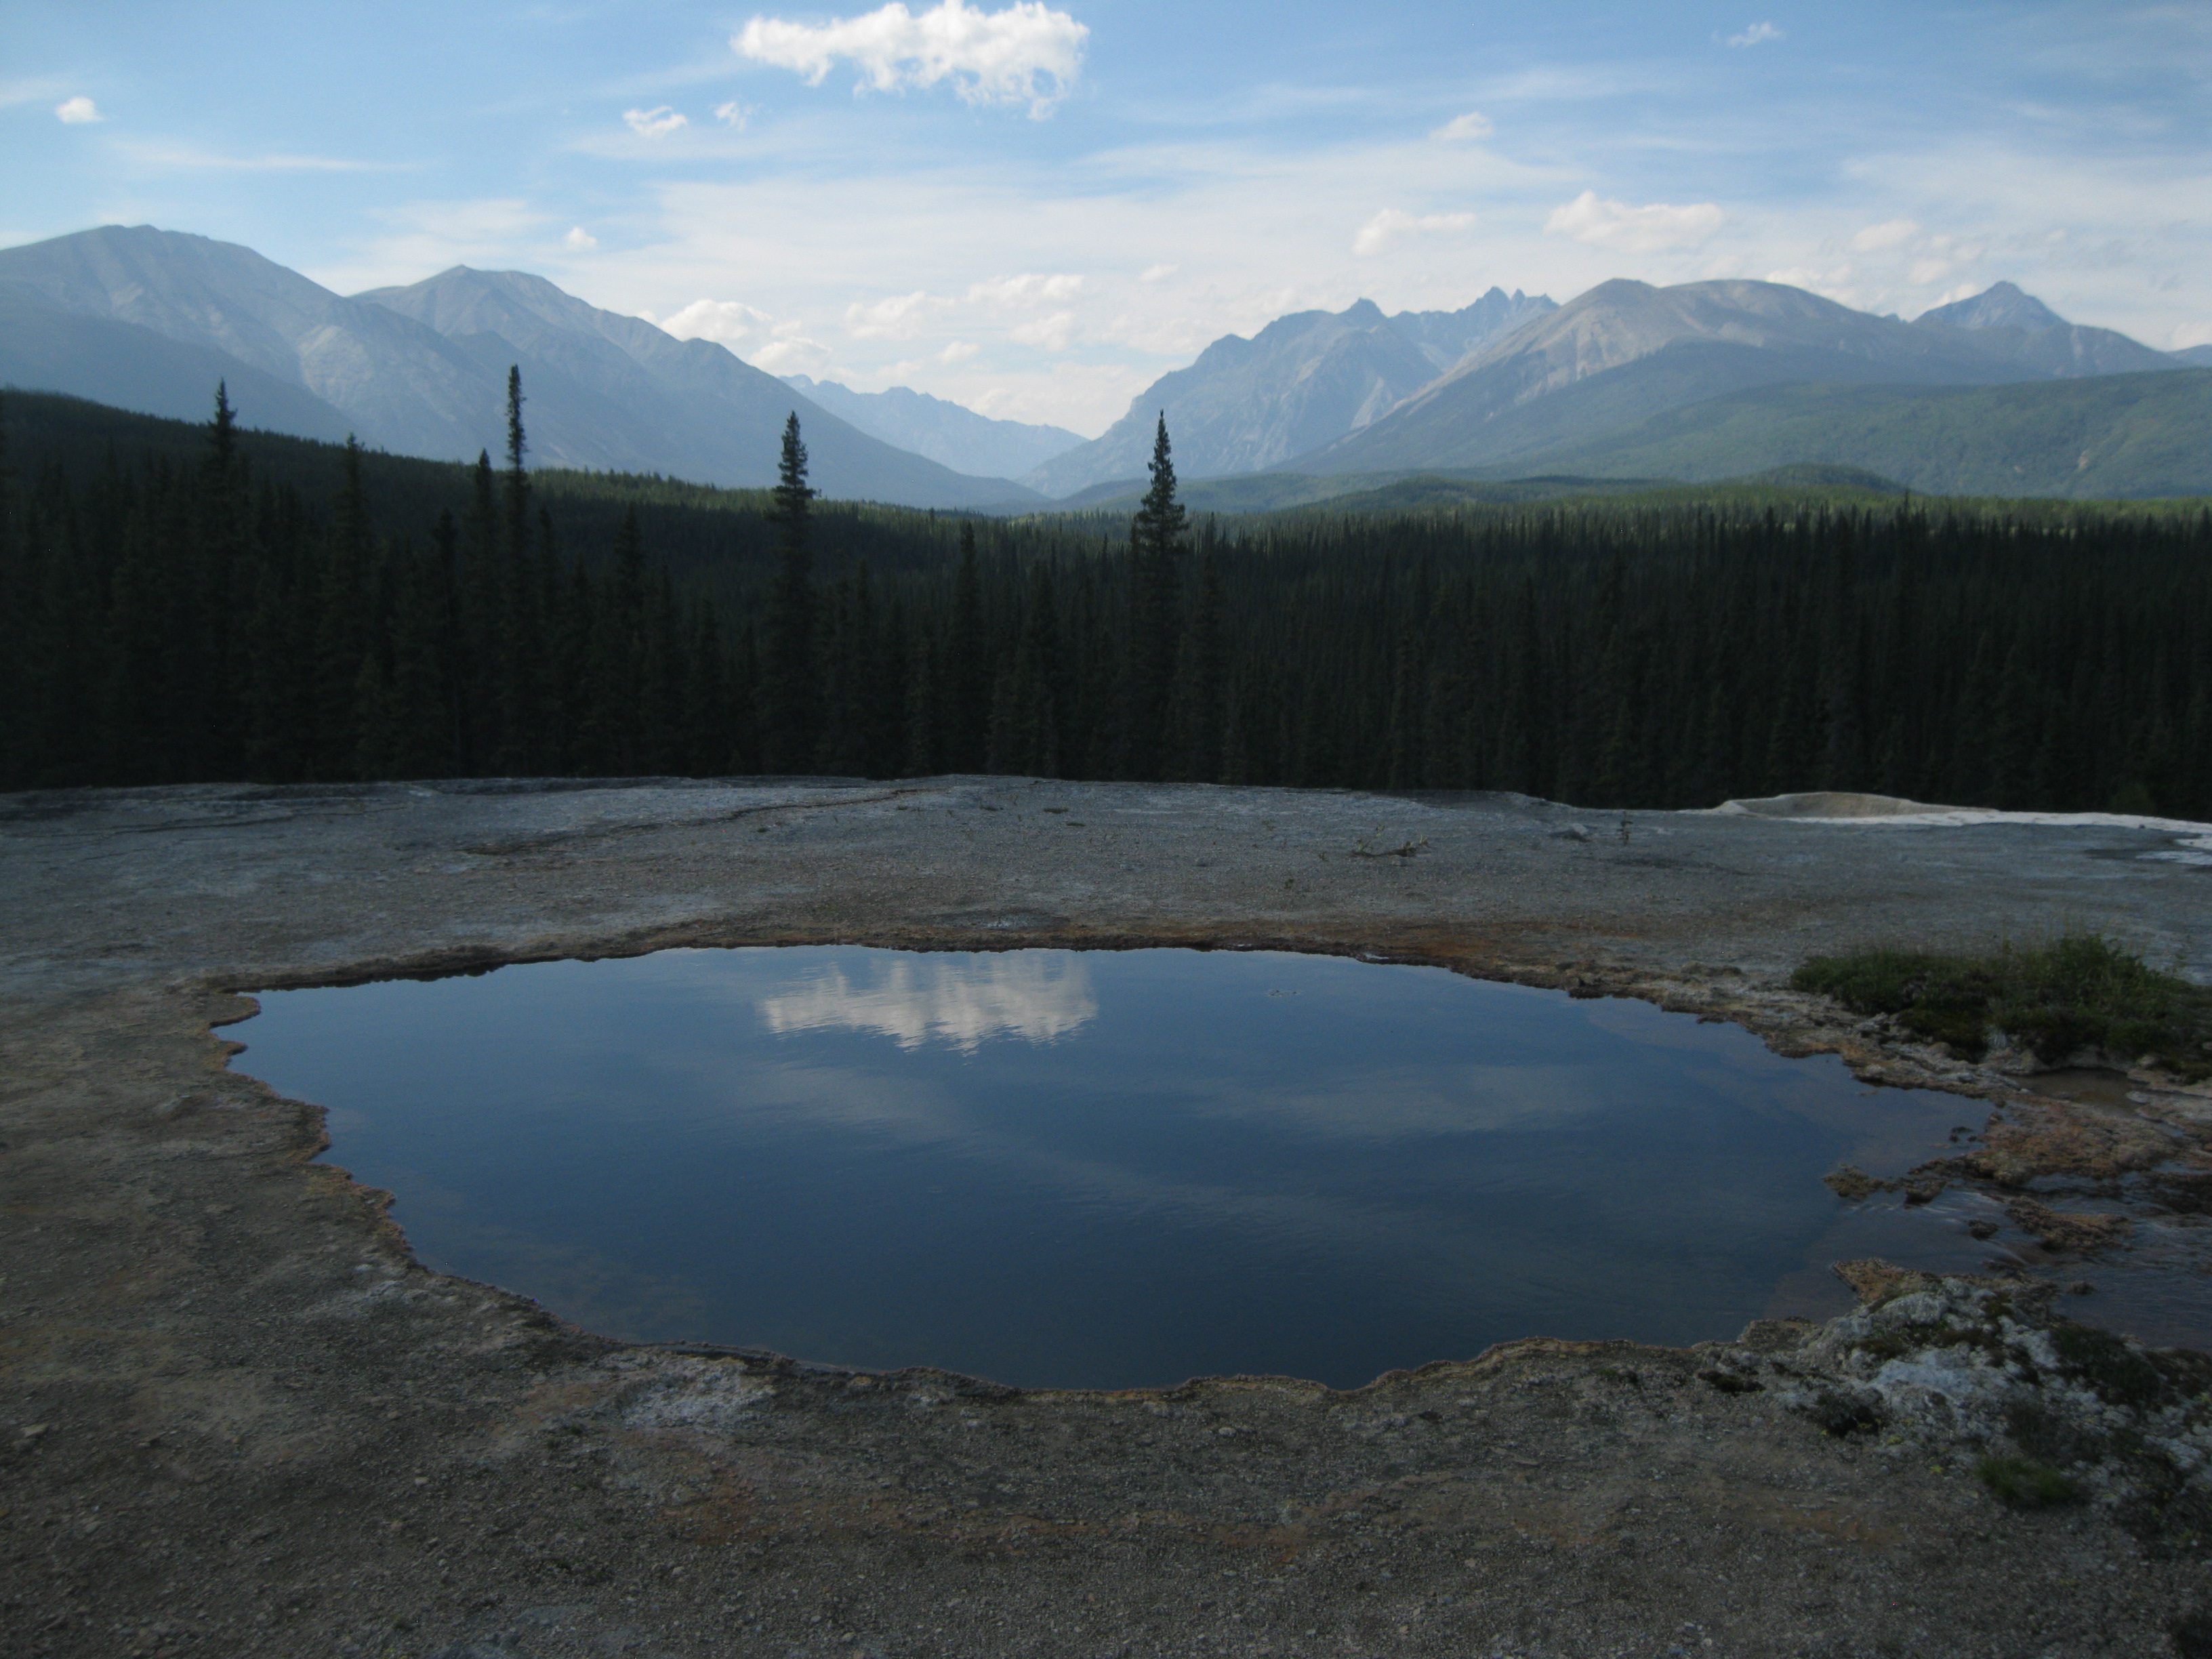
The staff cabin at Rabbitkettle Lake is located only a short 10 minute walk from the South Nahanni River. This is such a beautiful spot of the stunning lake surrounded by glorious peaks. The lake will probably be still so you can get a good shot of the peaks reflecting in the lake. Awesome.
As you will probably arrive around midday, this is a pretty good spot to have lunch before heading off on the hike. Benches are available accompanied with a bit of shade at the ranger cabin.
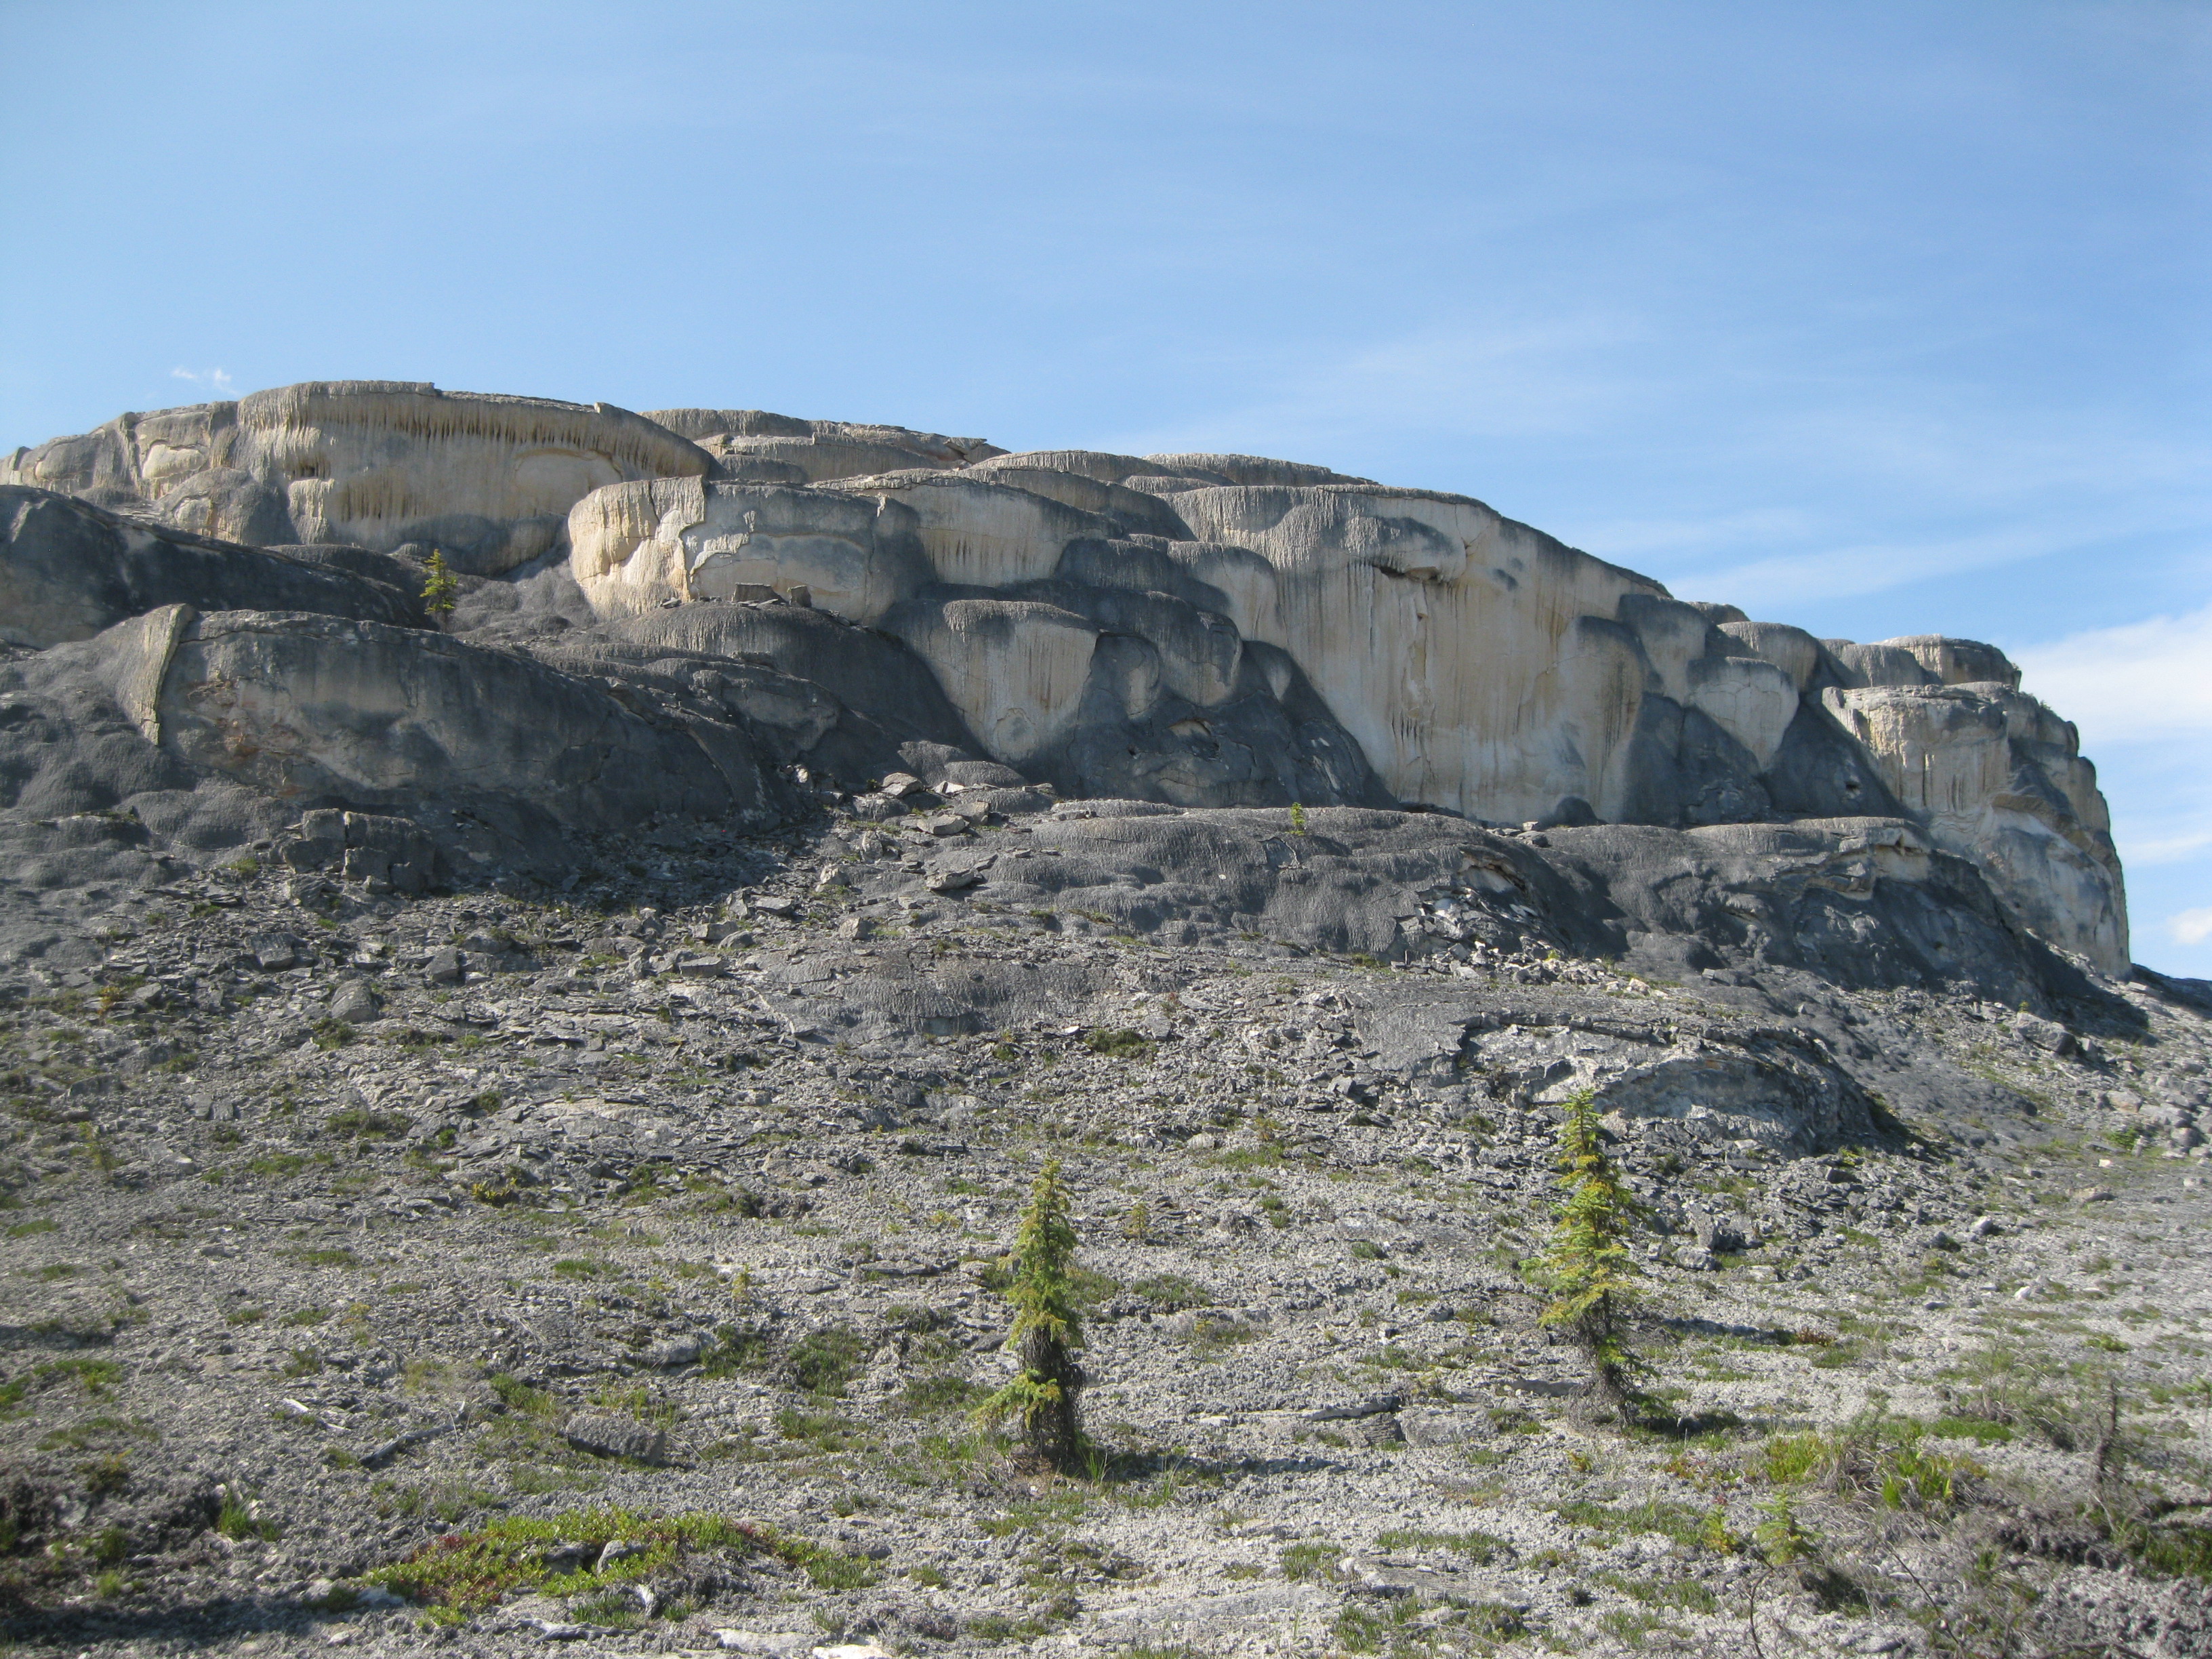
The Geology of the Tufa Mounds
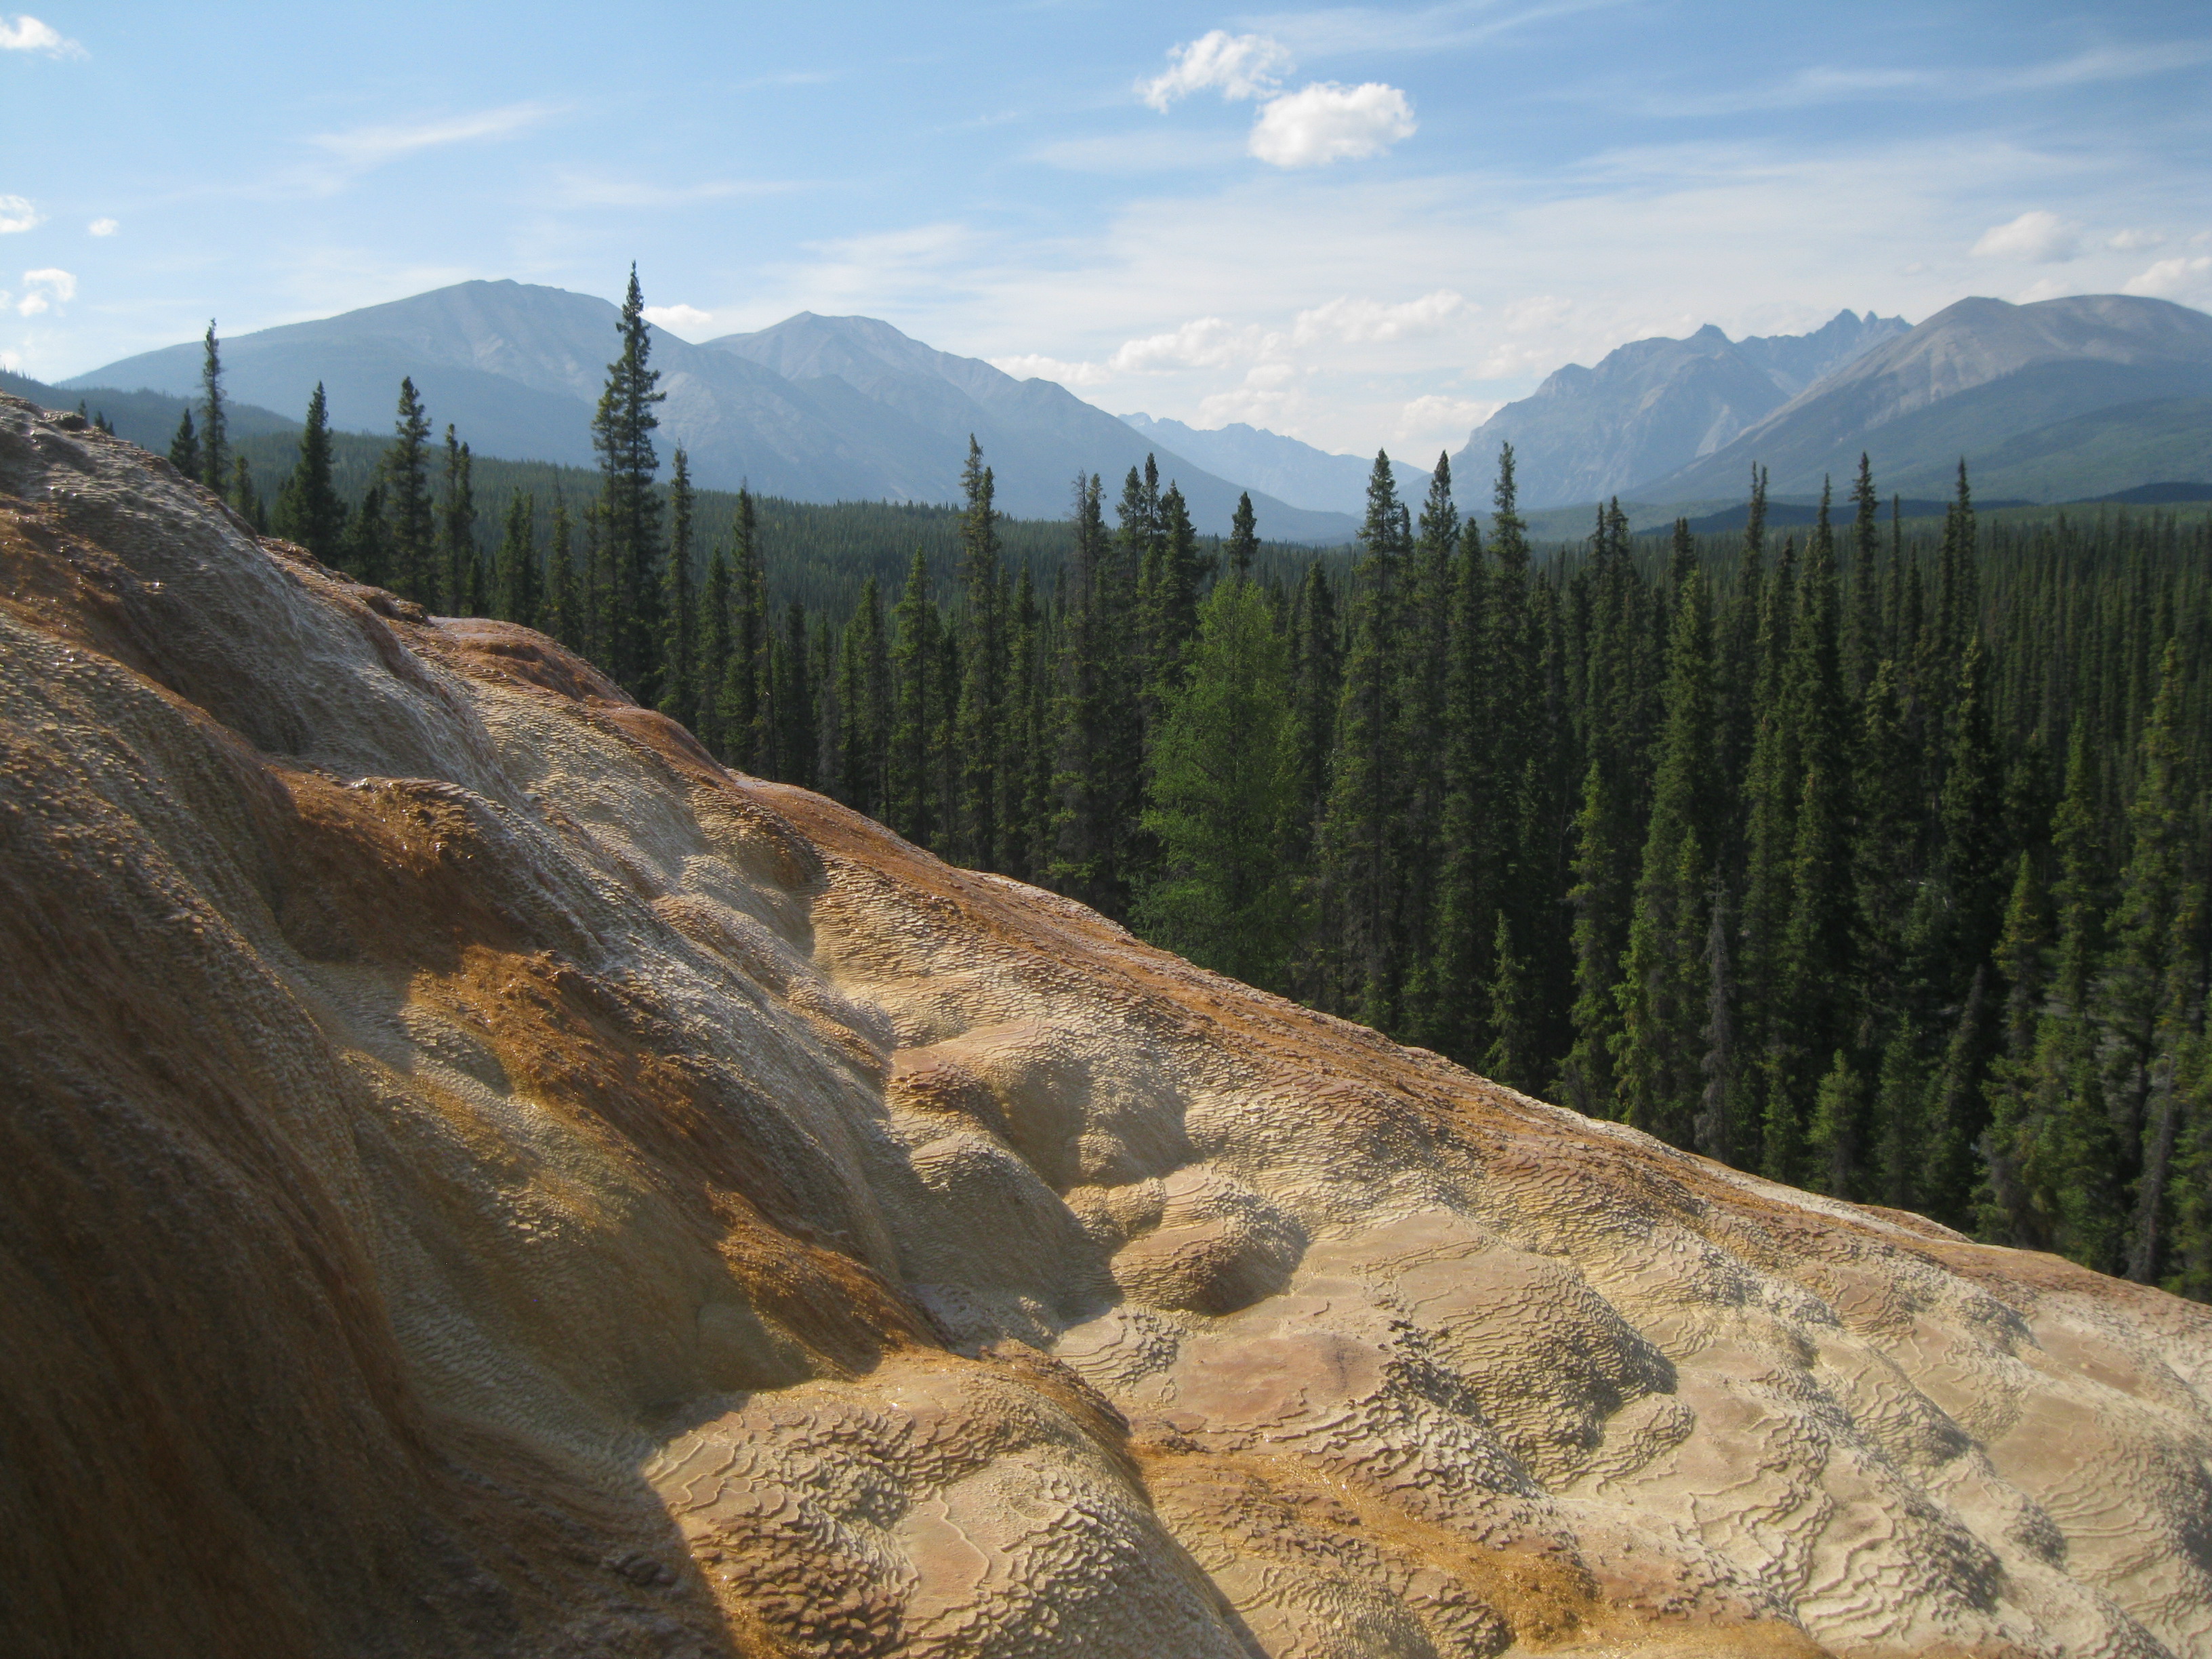
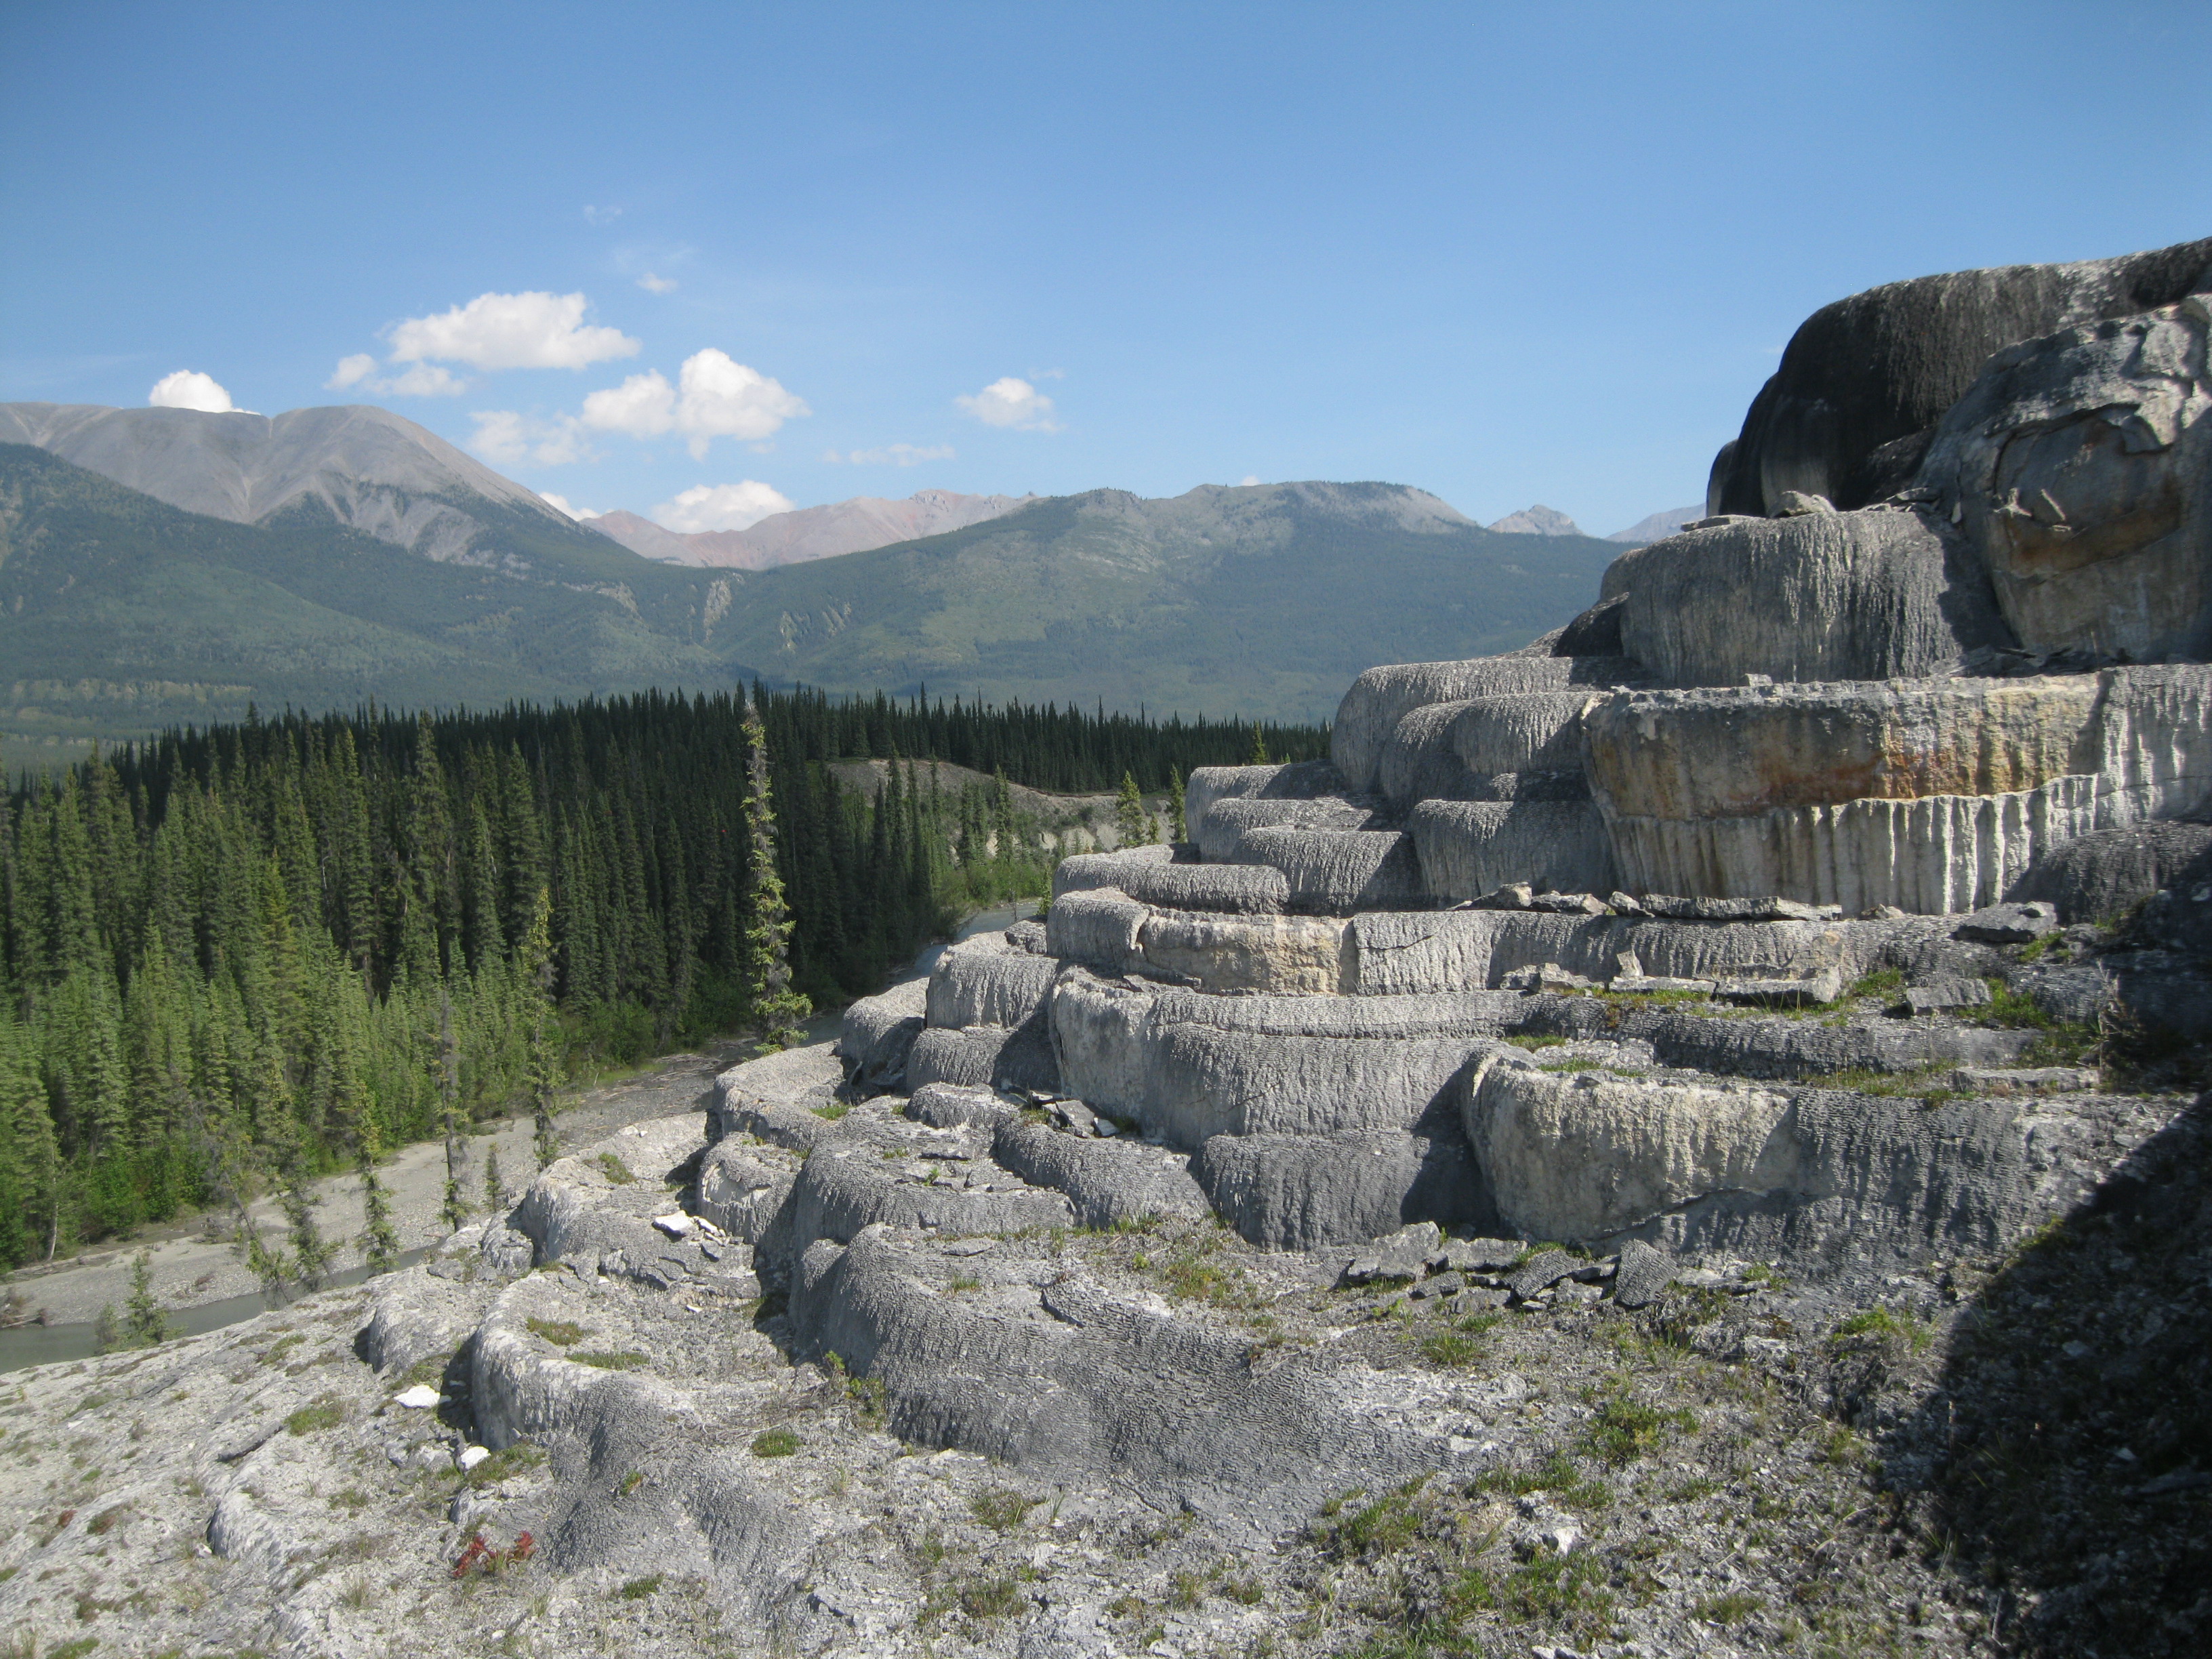
The Tufa Mounds are the largest of its kind in Canada. The biggest mound is 27 metres (88.6 ft) high and 74 metres (242.8 ft) across. The source is located deep within the earth where water is heated by residual energy from volcanic activity that created the Ragged Range.
As the hot water rises, it dissolves calcium carbonate from the limestone. When it reaches the surface, calcium carbonate is released and porous calcite rims are formed around the water pools, that have been created, damming the water. These pools vary a lot in size, from the size of a fingernail to the size of a hot tub.
The Tufa Mound Trail
As soon as the rangers are ready you will be heading on a fantastic hike from Rabbitkettle Lake down to the amazing Tufa Mounds. The trail is called the Tufa Mound trail and is very well marked. There are a couple of hills to be climbed, but it is not strenuous. Still it is recommended to bring hiking poles which can be borrowed by the rangers.
Remember to bring at least three litres of water and bear in mind that there aren’t really anywhere the water supply can be refilled on the trail, so it will be a good idea to pre-hydrate before heading on the hike. Water can be filtered at Rabbitkettle Lake beforehand. If you are not careful, dehydration can kick in especially on a hot and sunny day as the trail is heavily exposed.
The stroll goes through beautiful forest scenery at a steady pace on easy terrain. About an hour into the hike, the trail passes a spot where barbed wired embedded into a tree. This is used for research as the rangers can collect the bear fur off the wire from when the bears rub themselves against the tree. Pretty cool little detail.
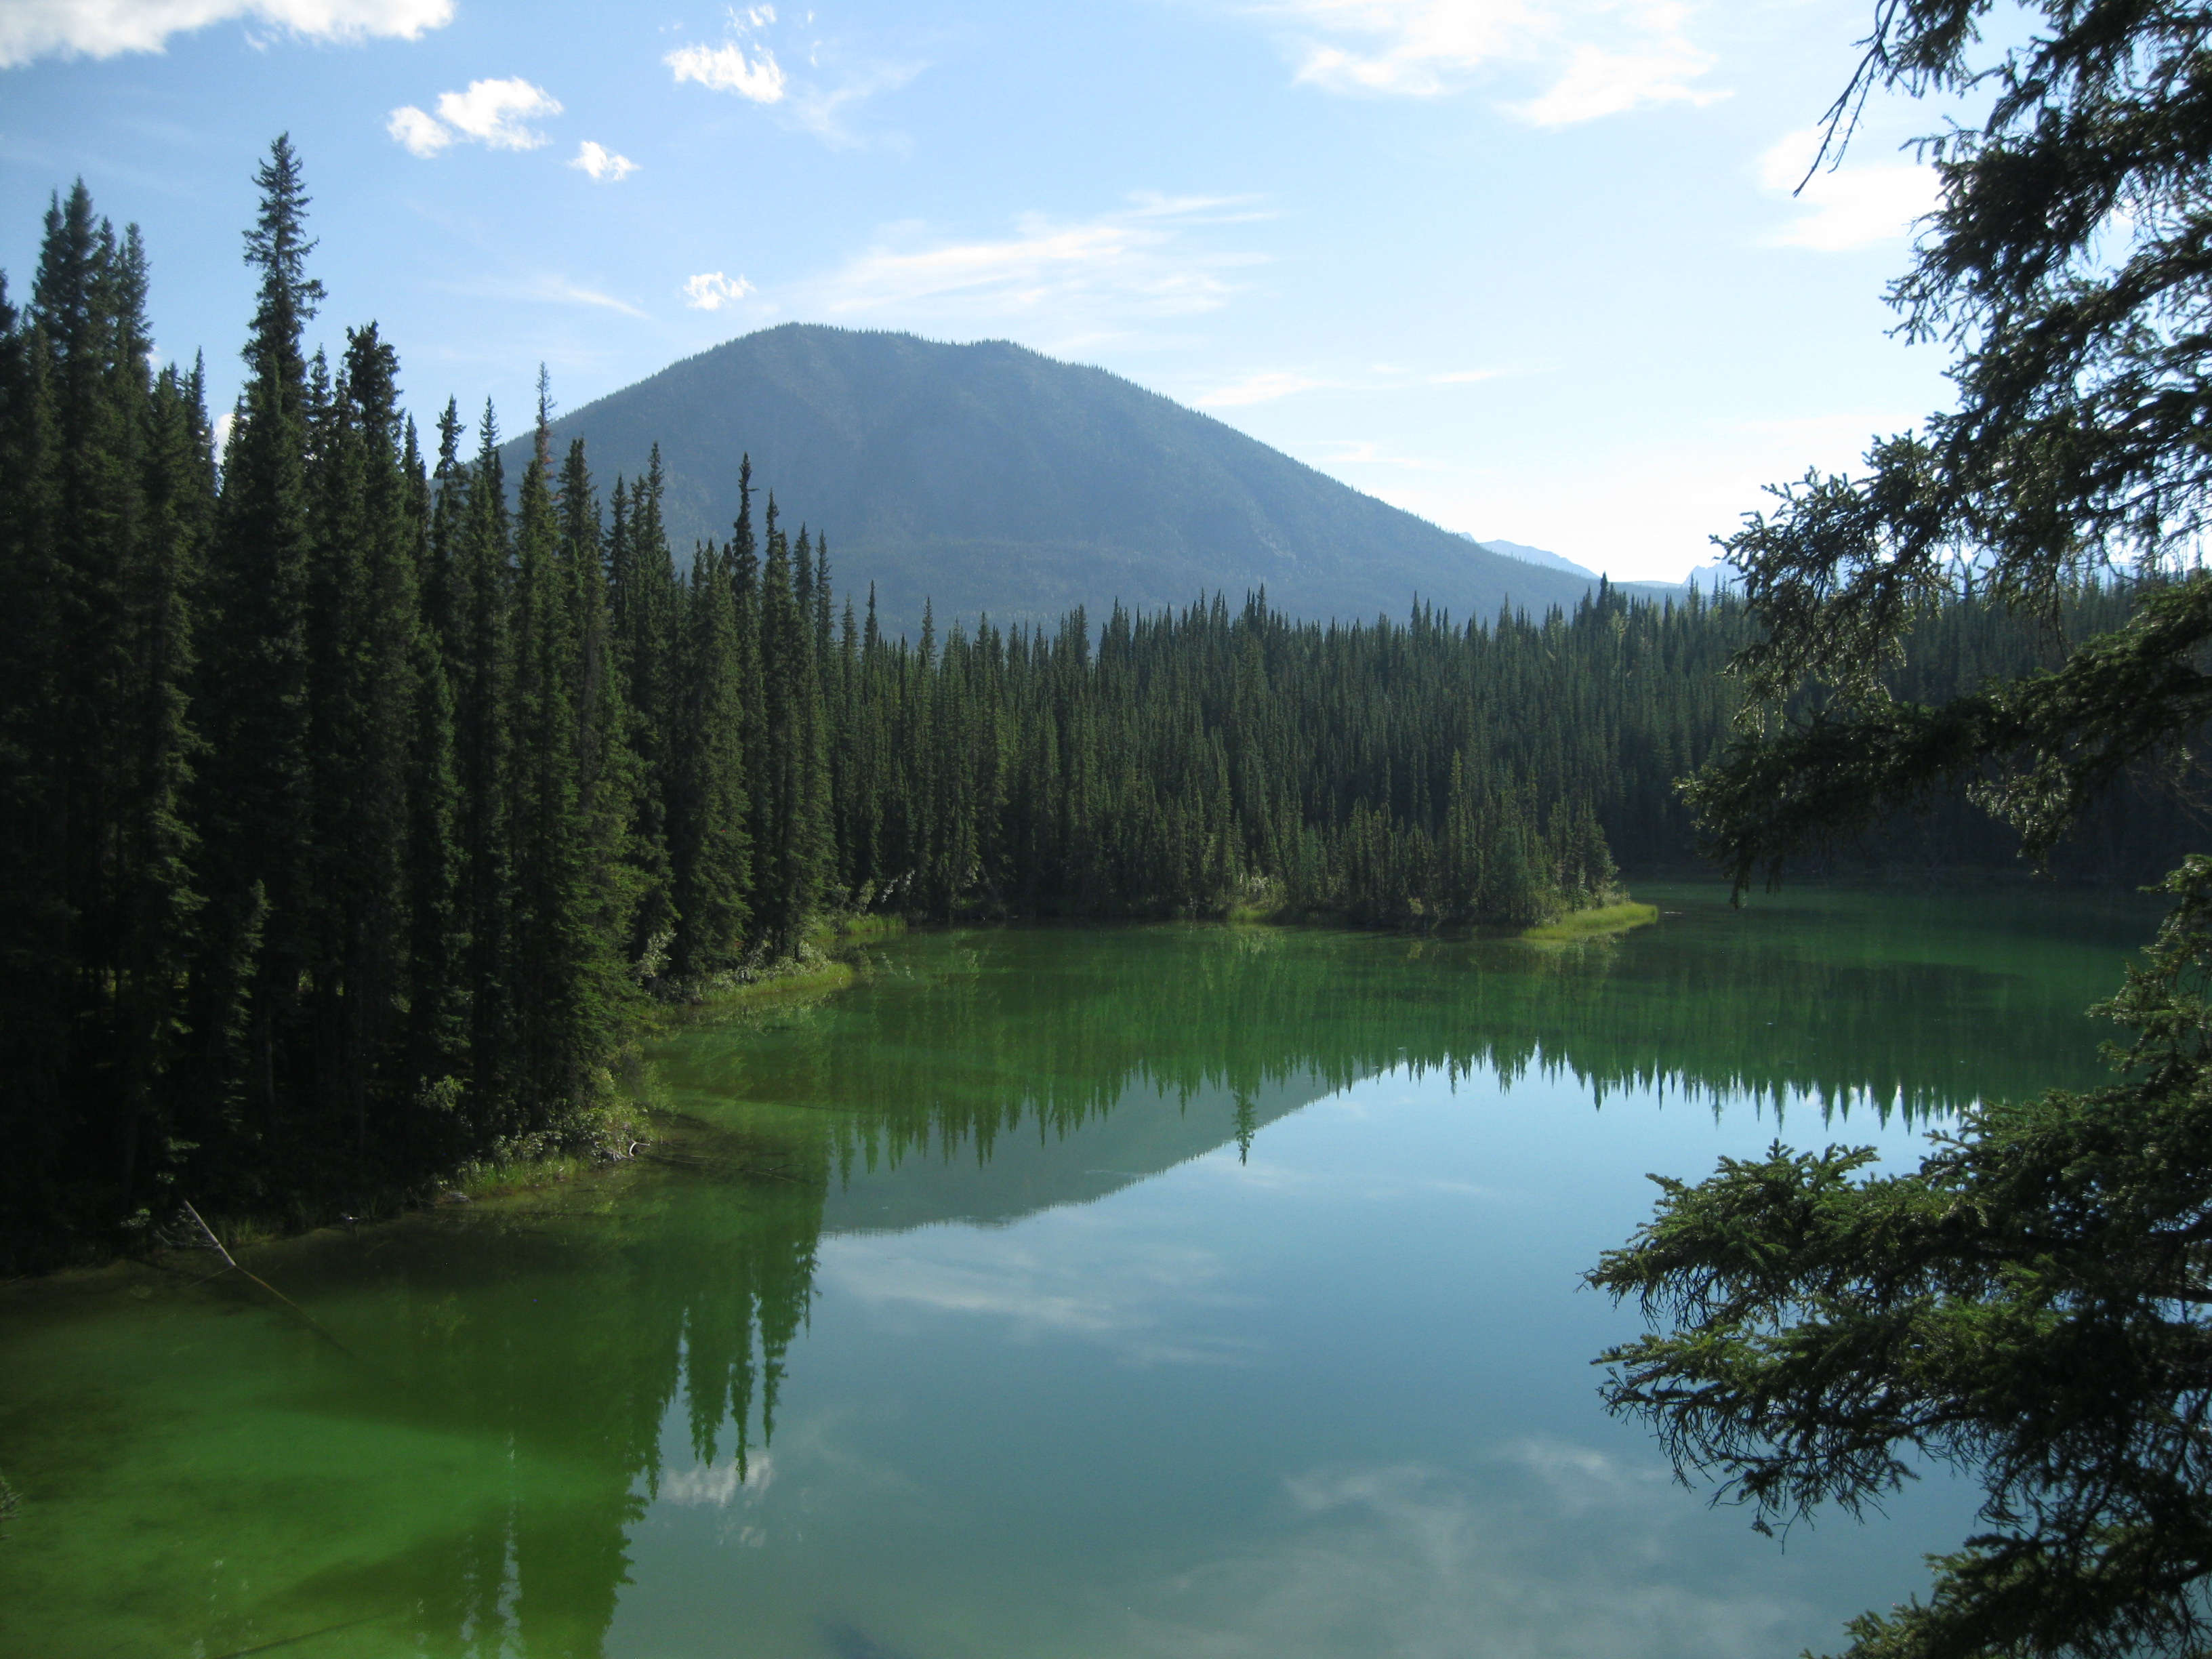
Only a couple of minutes of walking from here the landscape opens up to the magnificent view of Emerald Lake and Aspen Valley with mountain peaks all around. Note the beautiful different colouring of the lake. In some areas it’s dark green and in other areas more blue. This is a great spot for a short break and for taking some photos. As the name suggests there are a lot of aspen trees. If you rub the bark on the aspen tree you will get a thin white layer on you hand which the Dene traditionally use as sun screen.
The hike continues along this lake to the right with glorious views of the lake and the mountain peaks. Have a couple of stops along the way, take in the view and take some shots. After about half an hour from the first view of Emerald Lake, the Tufa Mounds comes into view for the first time in the distance. As you head on you will have more great view of the peaks, forest and creeks.
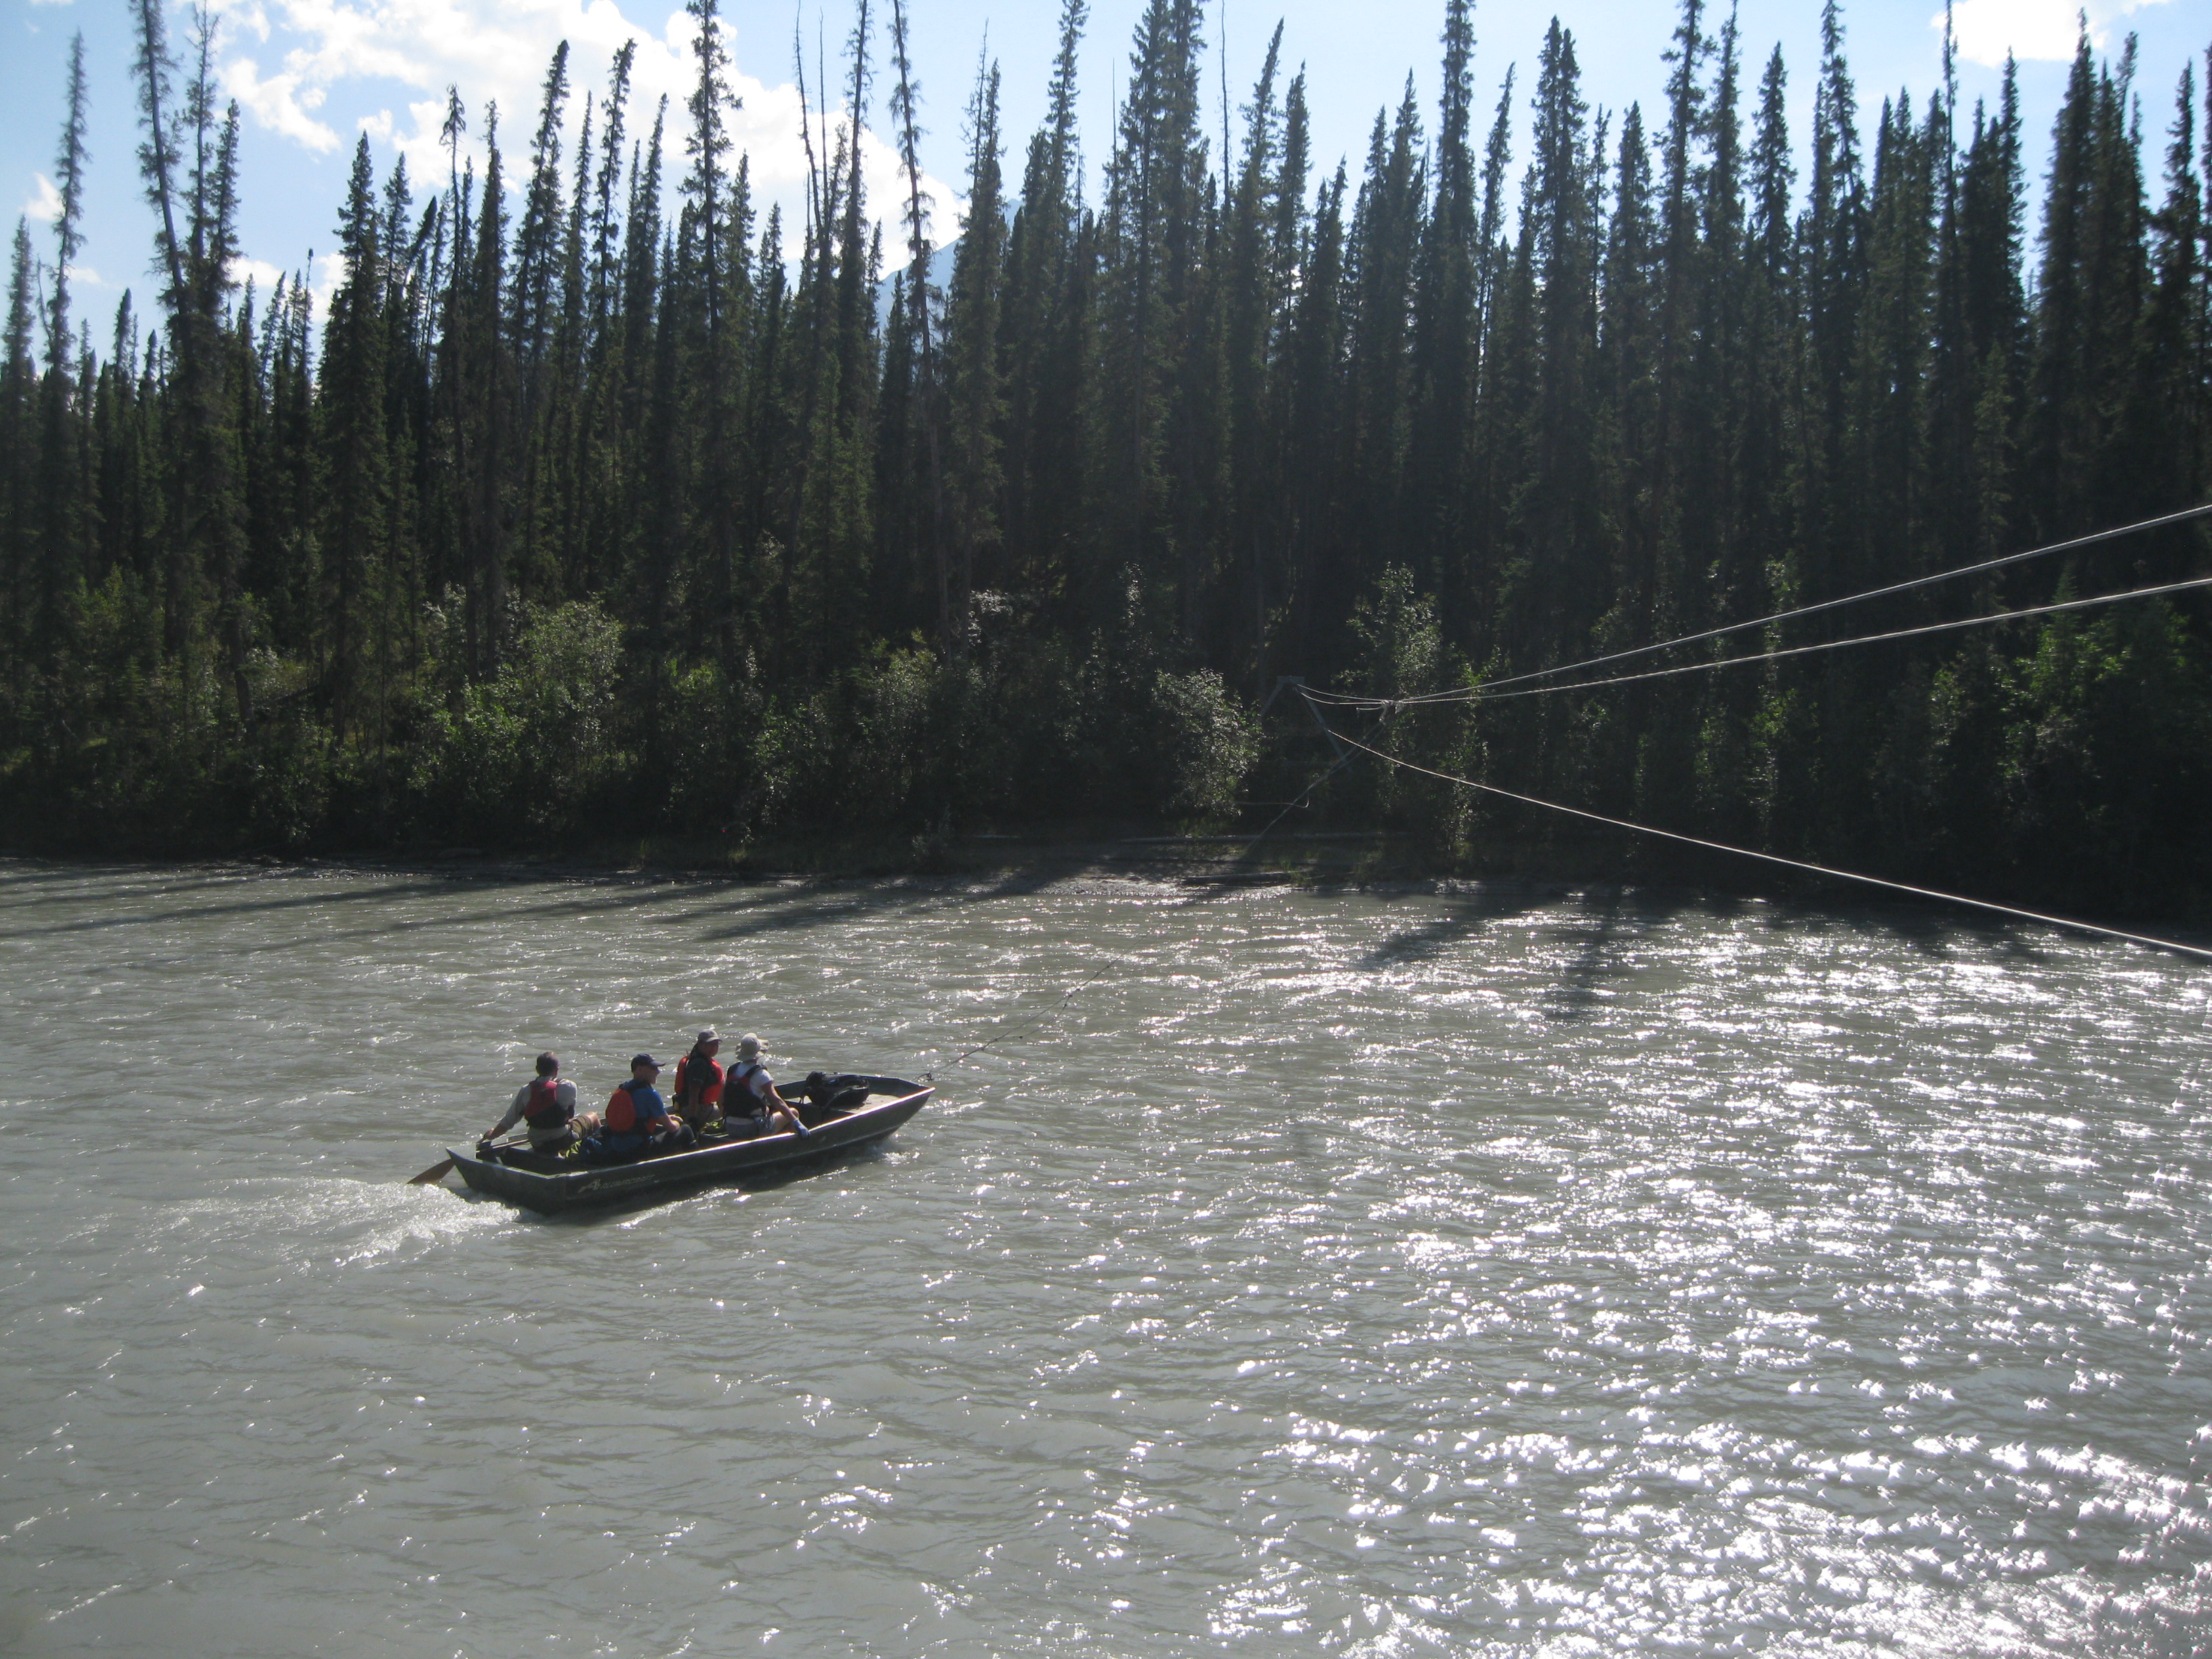
About 20-30 minutes after the first view of the Tufa Mounds the trail arrives at the Rabbitkettle River which will be crossed in a small metal dingy attached to a metal wire. It can take about four passengers across at a time including one person in the back steering with a paddle, while about 3-4 persons should stay on land and pull the dingy across the river with the metal wire in unison.
You can pull the wire from both sides of the river, but initially it makes more sense doing it from the side of the river from which you are crossing. It will only take about half a minute to cross and when done, you have to pull the dingy back to the starting point. All this will take a bit of time but it is a pretty cool experience.
When everybody has crossed, the Tufa Mounds are not too far away just a couple of minutes down the trail.
Exploring the Tufa Mounds
The Tufa Mounds are located to the right as you walk down the trail. This is quite an impressive and otherworldly sight. The trail takes you around the mound to the place where it will be ascended. To prepare for this you have to take your hiking boots and socks off. It has to be done in bare feet as the mound is very sensitive.
Before climbing the mound, the ranger will most likely ask you to participate in a Dene tradition. You will be given a pinch of tobacco to be placed in your left hand, as it is the closest to the heart. Then make you own wish relating to the climb, say thank you in Dene which is “Mahsi Cho” and throw the tobacco to the ground.
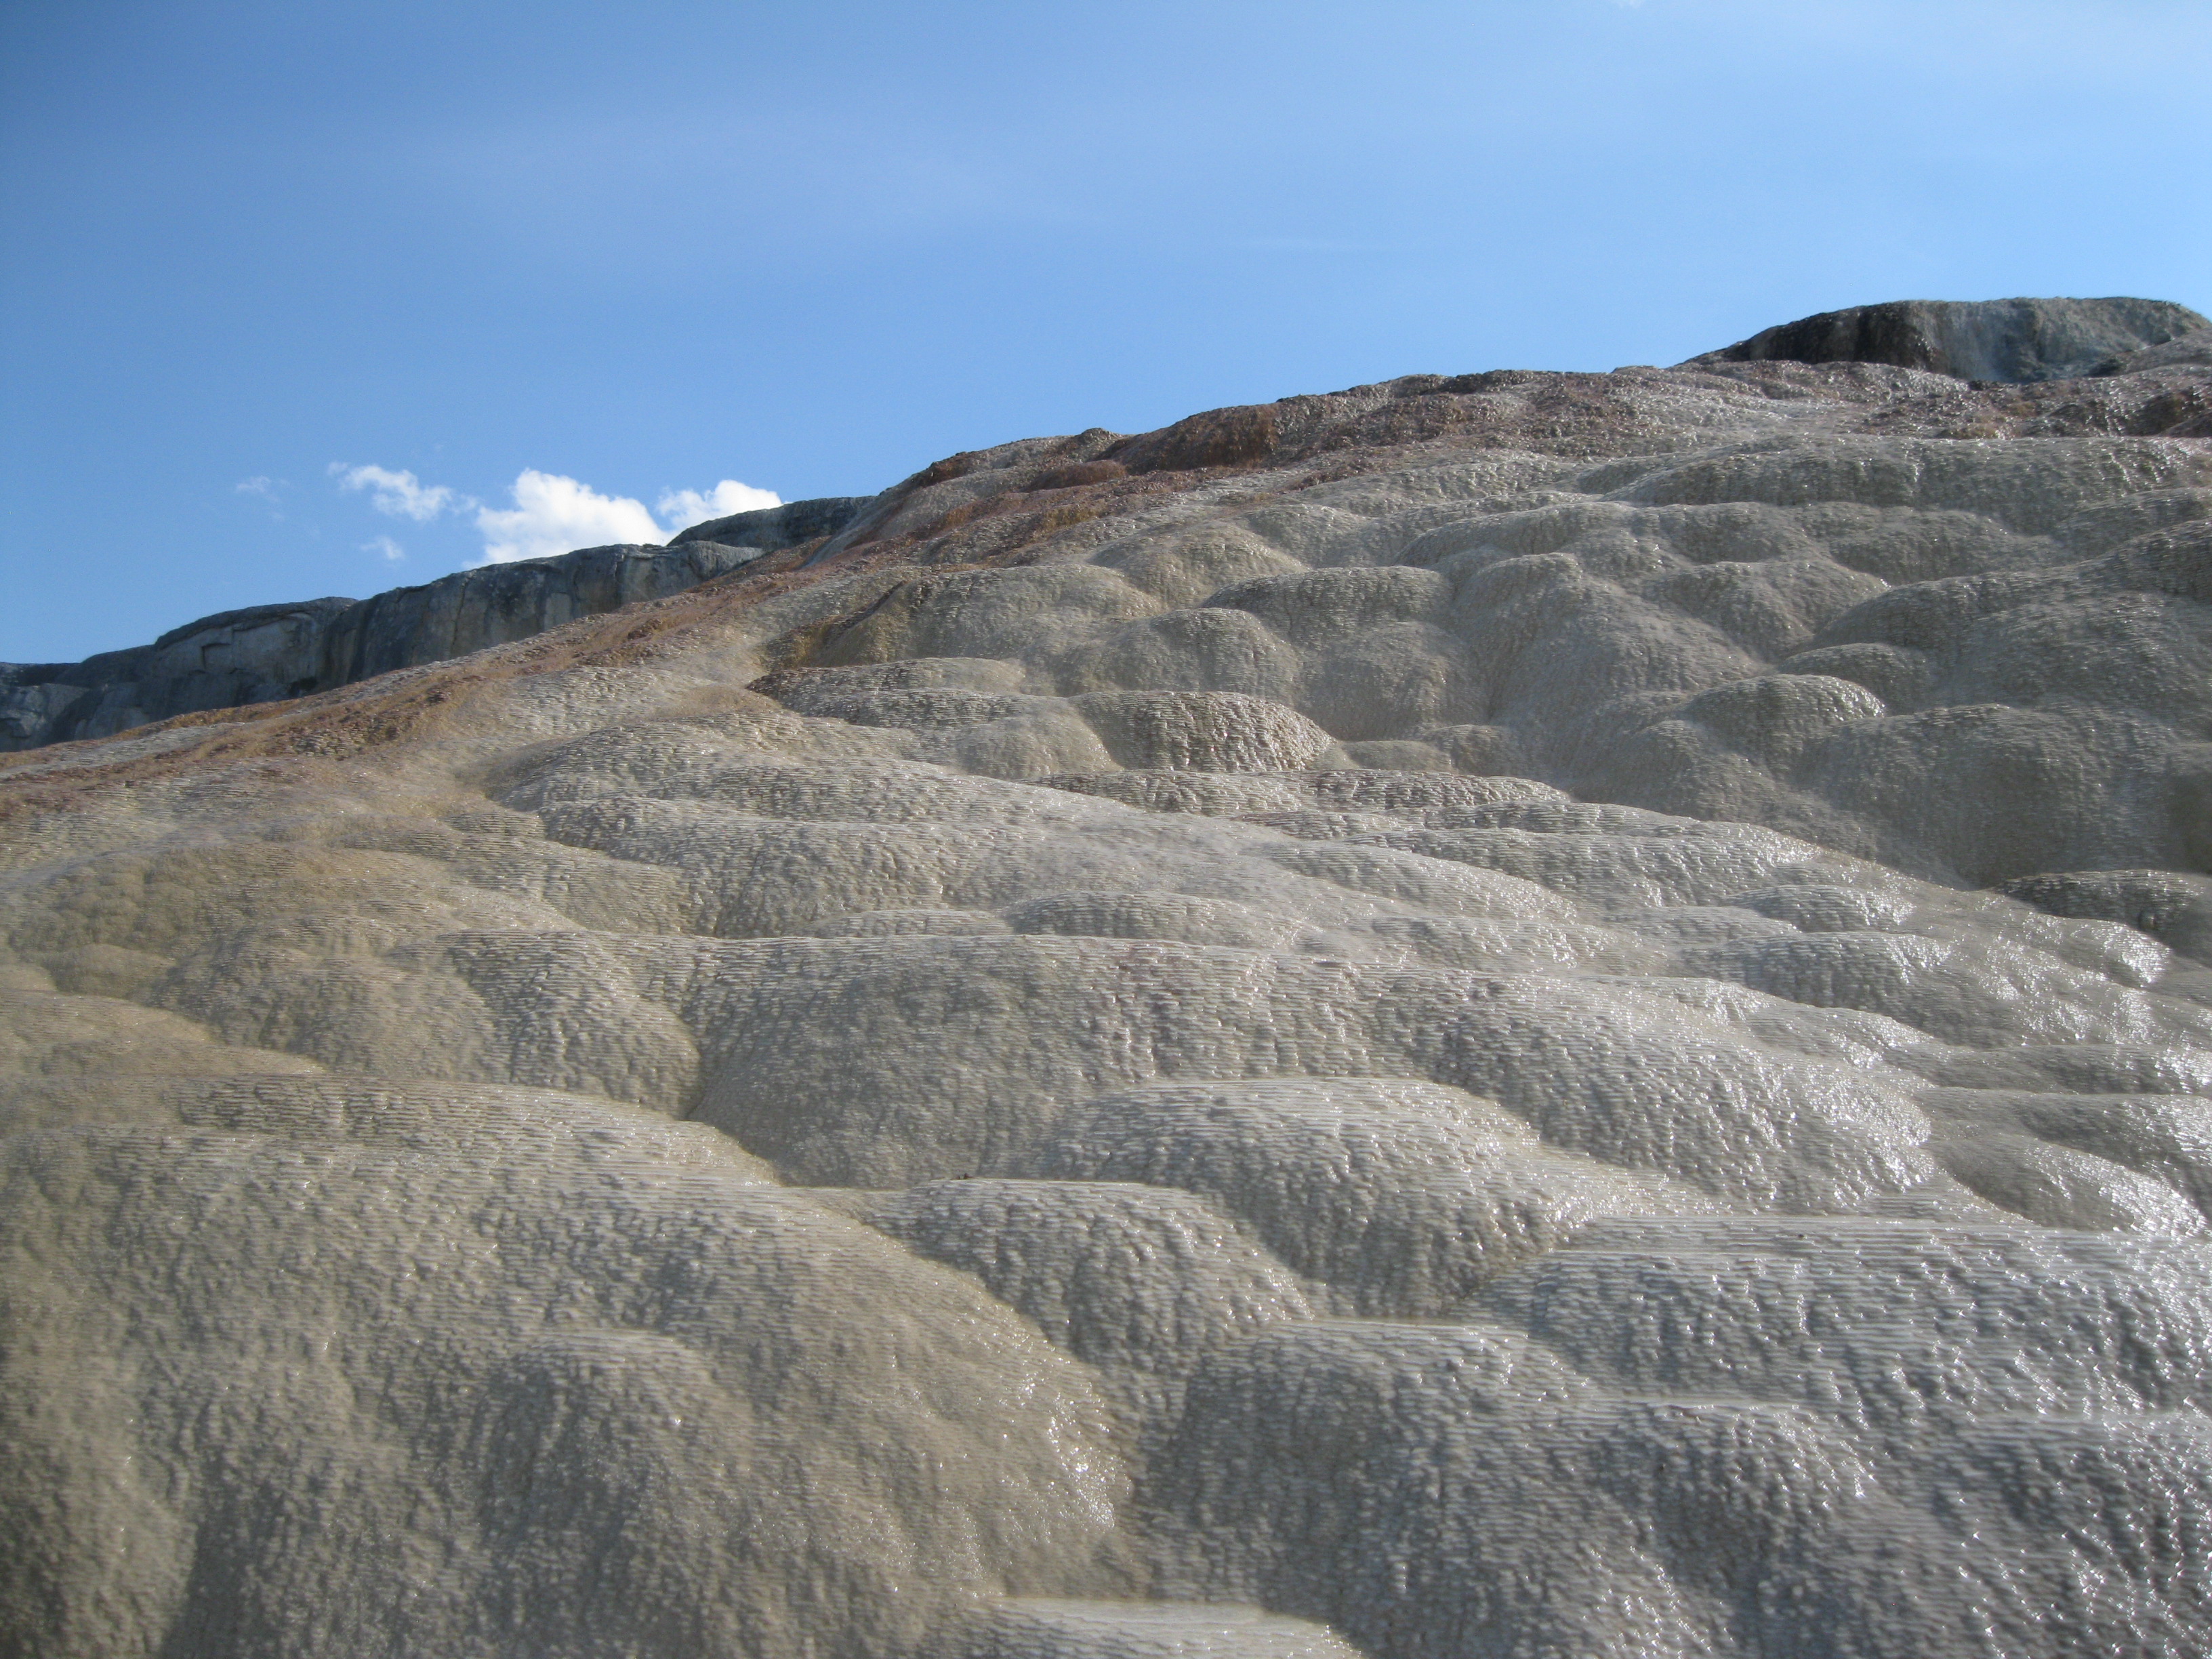
The climb of the Tufa Mounds will happen at a steady pace as it can be a bit hard on the bare feet. It is nicely designed with natural steps all the way to the top which make it all a bit easier. A constant stream of water is flowing off the mound. It’s such an awesome experience heading up this mound which is really out of this world.
Pay close attention to all the marvellous details of the mounds. The many different steps, layers, pools and streams on this massive rock. When getting to the very top you will find the hole where the water comes from. Get a photo of yourself next to the hole. There are also amazing photo opportunities of the hole against the surrounding mountain peaks.
When heading off the mound be a bit careful. It is a bit hard on the feet and you certainly don’t want to trip and fall of the mound. On you way down you can get some amazing shots of the mound against the surrounding mountain peaks. An absolutely glorious motif.
Once you are off the mound, have a snack and a chill. There are some of the beautiful flowers in the areas such as the snow cinquefoil which is predominant in the area and really nice. Put the socks and hiking boots back on and then head down the hill where a trail is leading to down below the Tufa Mounds. This is quite an amazing view as well where the forest vegetation and the mound kind of merging.
Returning to Rabbitkettle Lake
When the Tufa Mounds have been explored head back on the same trail towards Rabbitkettle Lake. Remember to stay hydrated on your way back. Once again Rabbitkettle River will be crossed in the metal dingy and the hike continues down the trail. The photo opportunities will be better on the way back due to the way the sun hits later in the day. You will be able to get some great photos of Emerald Lake.
Upon arrival at Rabbitkettle Lake you can have a dip in the lake or just a chill and drink some water if needed. It can be a really hot day on this hike.

There are camping facilities in the area of Rabbitkettle Lake but it is recommended to continue down the river and find a good gravel bar for camp. At this point it will be pretty late so you should set camp at the first decent spot you find down the river. Set up your tent, have a chill and get ready for dinner.
Have a short stroll around the area and check out the scenery of the river and beautiful mountain peaks and then head to bed as it’s been a long day and the following day you will be back to paddling a full day.
Paddling from Rabbitkettle to Flood Creek
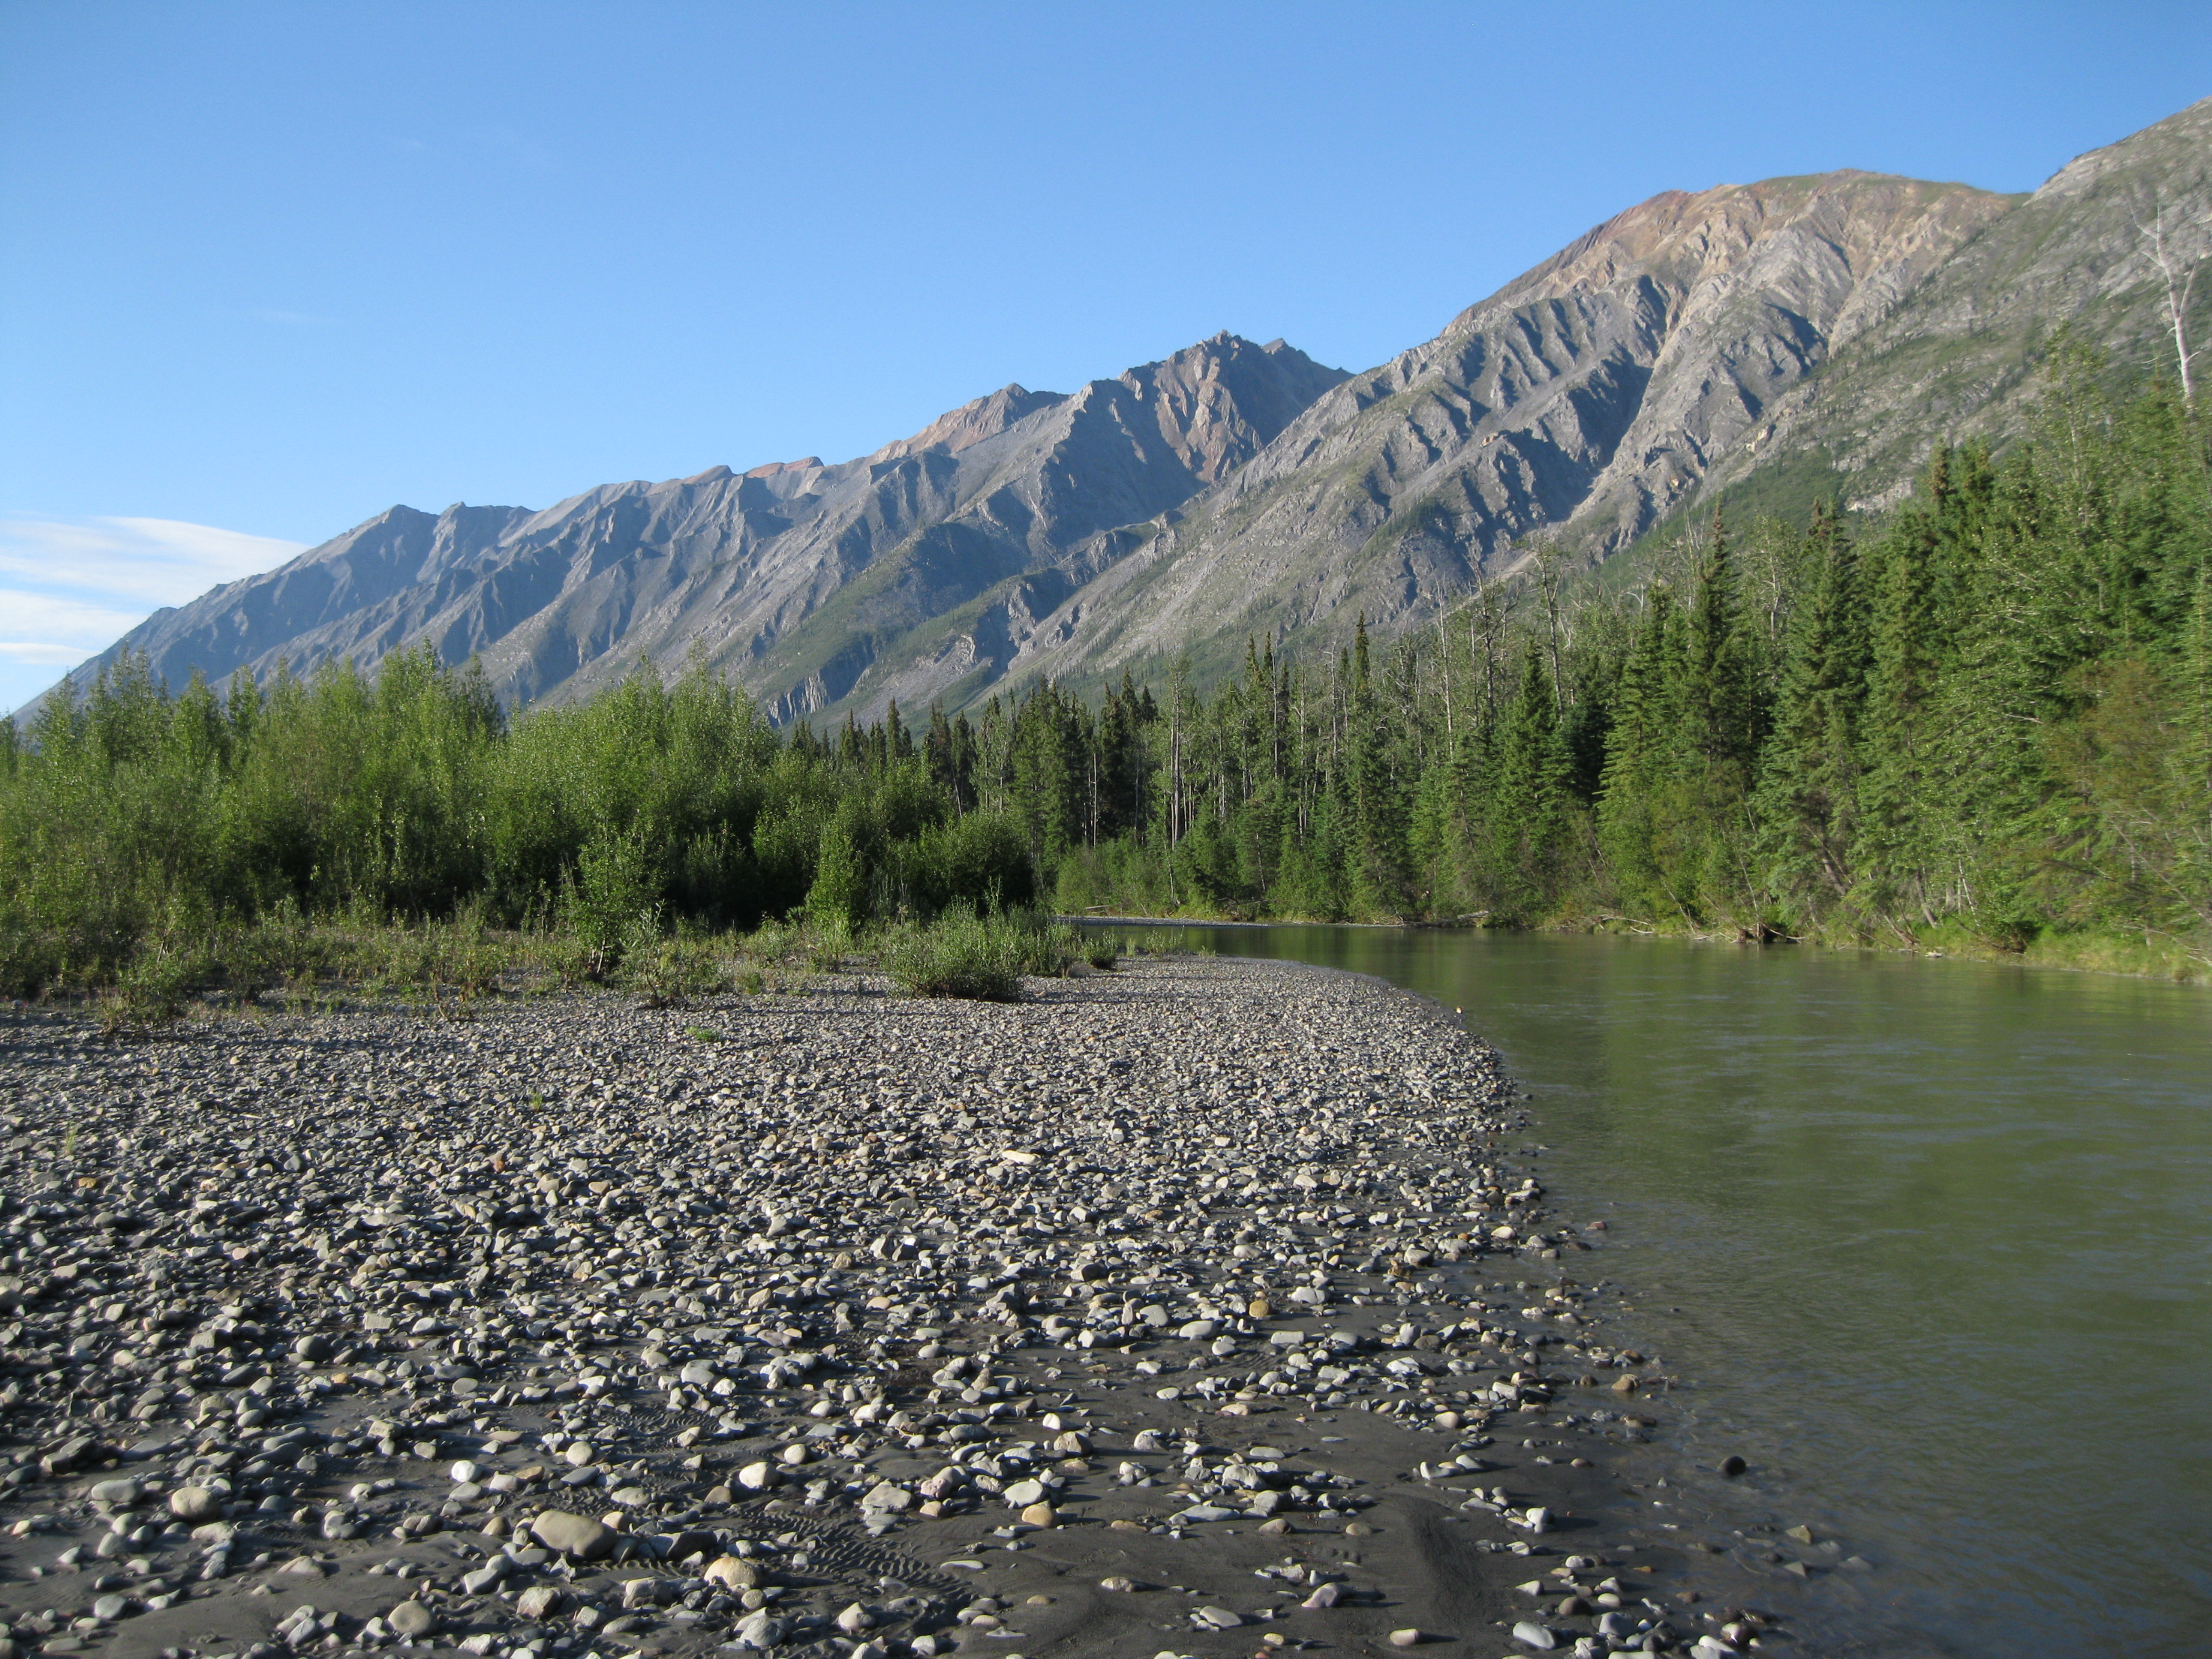
When continuing the next day from the gravel bar close to Rabbitkettle it is recommended to paddle the whole day for a total of around 50-55 km. This can of course be varied based on what suits your itinerary, but it is pretty easy stretch with few challenges and little current. Some extensive paddling has to be done to get further down the river.
The River meanders through a broad U-shaped valley from Rabbitkettle all the way to Virginia Falls. This area was carved by glaciers more than 130,000 years ago and was not impacted by the more recent Wisconsin glaciation that shaped the Ragged Range.
When you head down the river you will continue to be exposed to gorgeous views of mountain peaks, forest scenery and the South Nahanni River. The landscape is pretty similar all the way but it is very beautiful. Find a gravel bar around midday for the lunch break and take time to chill out for a bit.
As you continue down the river make a stop at Hell Roaring Creek as this a really awesome spot with a beautiful creek and amazing peaks. You can get some great shots of the creek against the peaks. It will probably take you about 3 hours to get here from the lunch stop. Hell Roaring Creek is based about 40 km (25 miles) from Rabbitkettle.
From here there are about 15 km (9.4 miles) left before you will reach the end destination for the day at Flood Creek. This last stretch can be hard and probably with a strong head wind especially during the last 5 km (3.1 miles) where you really have to dig deep and just give it your all and paddle through. When reaching Flood Creek you will feel such a sense of accomplishment as it’s been a tough day.
Right next to Flood Creek there is a pretty big area in the valley with plenty of space for camping. There are both sandy spots and areas with pebbles and rocks. You can camp on both really depending on what takes your fancy. This is a really cool place. There are plenty of amazing photo opportunities of the river and the mountain peaks in the direction you will be going the following day.

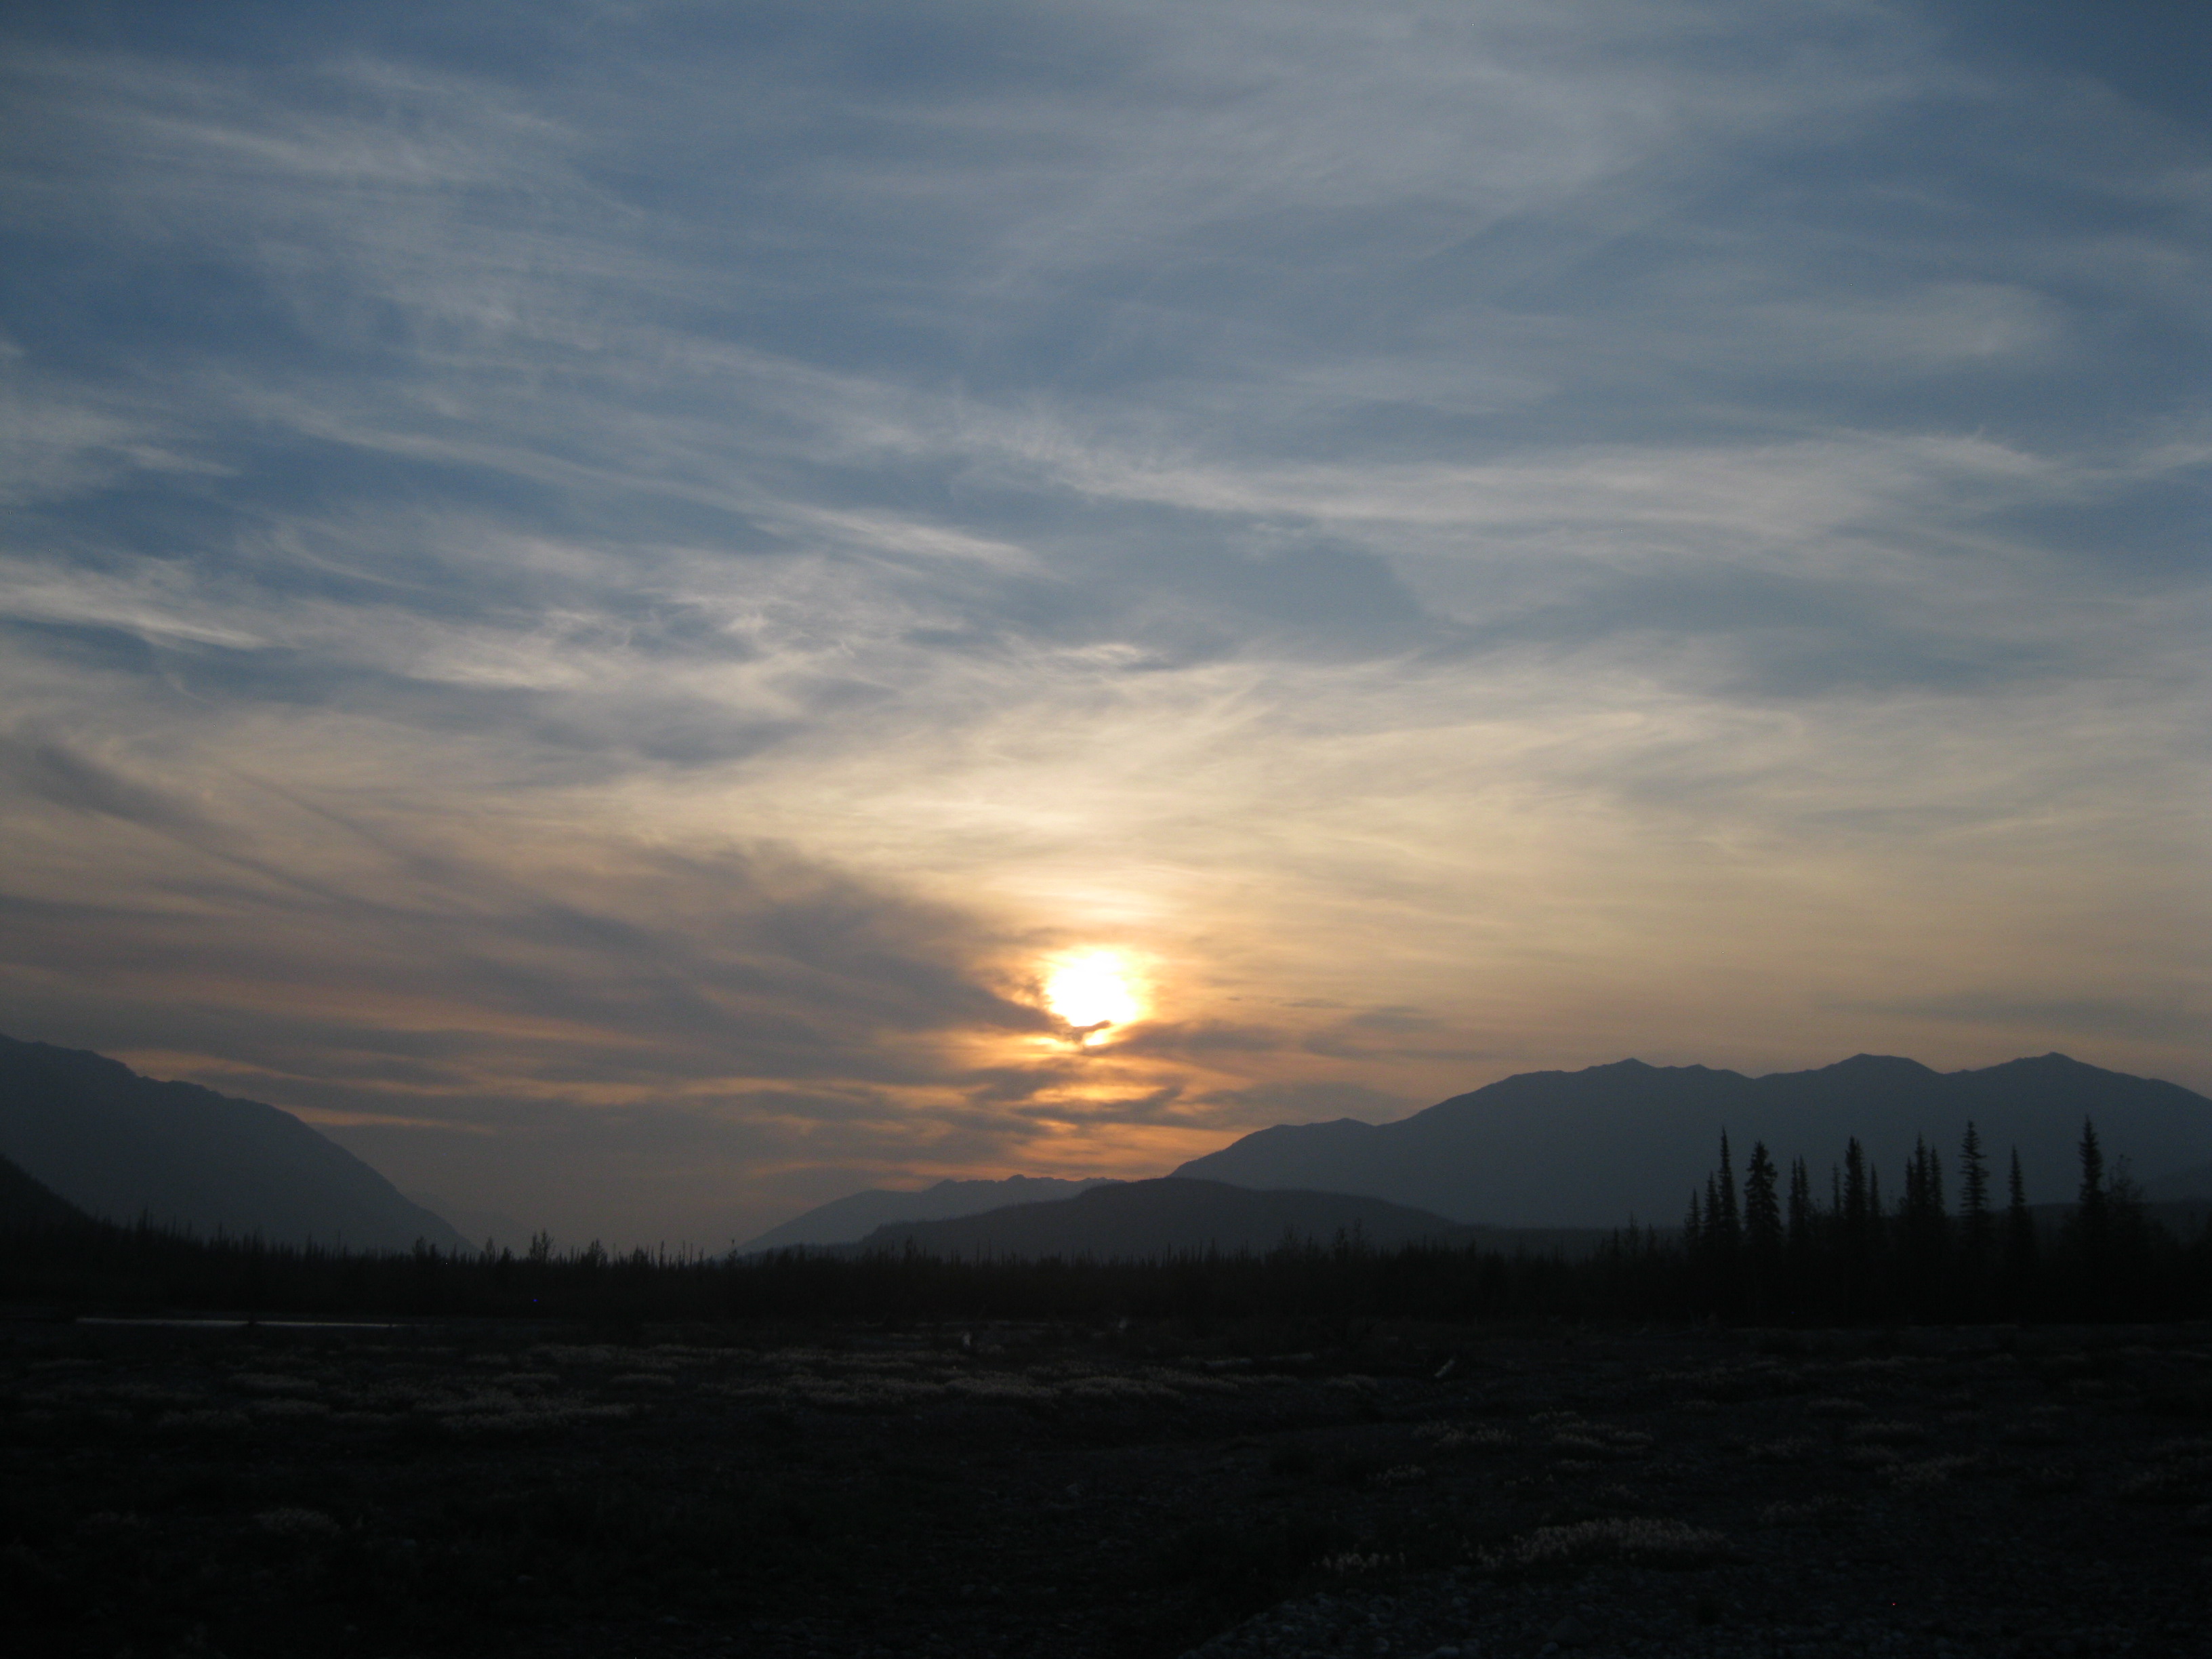
You can also take some killer photos down the valley towards the creek. Walk down closer to the creek and make some great images of the creek up close with the peaks as the backdrop. There are also some pretty flowers across the valley which are picture worthy as well. During summer at around 10-11 in the evening, when the sun sets you will be able to take some amazing shots of the scenery across the valley. The sunset is so beautiful at Flood Creek.
Paddling from Flood Creek to the big gravel bar island
The following day the trip continues with paddling down the South Nahanni River. This will have to be a day of 30 km (18.8 miles) as termination point will be at the last the last gravel bar for about 20 km (12.5 miles). As you have paddled 50 km (31.3 miles) down a still river the previous day, you definitely don’t want to push yourself to hard. This stretch will also be with very little current.
Maybe have a bit of a slow morning, as they previous day was hard, and leave around 11-ish. It is yet another beautiful day on the river with amazing mountainous scenery. Have a lunch stop and a chill along the way. Keep your momentum and continue onwards and find a massive gravel bar island after around 30 km (18.8 miles) which is just the perfect stop and last chance for 20 km (12.5 miles) to set camp. Arrival time should be around 16:30-17:00 hours.
This gravel bar island is probably one of the absolute best camping spots on the South Nahanni River. It is really big and then terrain is great for camping. There is plenty of space to spread out, set up camp and a nice little kitchen area. The first big section of the island is a rocky and sandy gravel bar where you will be heading ashore. The remaining part of the island has forest vegetation and a sandy beach on one side. The river flows around the island on both sides but you will be heading ashore on the right side.
A fair bit of time can be spent strolling around on the island. Especially an early arrival as there will have plenty of time. Head down towards the tip of the gravel bar. On the way you will be exposed to beautiful scenery of the mountain peaks. You can take some amazing shots of the peaks and of the gravel bar with the peaks as the backdrop. Upon arrival at the tip of the gravel bar, the campsite is already pretty far away. It will probably take about ten minutes to get there, when taking time to enjoy the scenery. Remember to wear your hiking boots as it is a bit rocky.
Head around the tip to the shore on to the left on the island, opposite of where you went ashore. Also here there will have plenty of amazing photo opportunities of the gravel bar, the river and mountain peaks interacting with each other. When continuing further down the beach bordering the forest section you may just see some very cool moose and wolf tracks in the sand. As you get down to the very end of the beach and the forest section, stop and return as you can’t really get around it unless you head into the forest which is not really recommended as it is very dense.
When finished exploring the island head back to camp and just chill and enjoy the day. If it’s nice and sunny this is such a fantastic spot.
Paddling from the big gravel bar island to Virginia Falls
The following day continue paddling down the South Nahanni River towards the next major sight which is Virginia Falls. It will be a bit of a long day in the canoe on flat water all the way for about 35 km (21.9 miles).
Around km 325 there’s a large tree that has been occupied by both bald eagles and ospreys in recent years so keep your eyes open for wildlife. Around midday, find a gravel bar for lunch and a well-deserved rest after a hard day on the river. Paddling down the river for a whole day without any current is quite the task.
When continuing after lunch, the next interesting spot is at Oxbow Lake. Look out for a small channel on the left side of the river at around km 331 where you can paddle through. This is such a beautiful flat lake with a lot of solitude. Absolutely amazing.
This can be a good place to spot moose. Be quite when passing through the channel into the lake because if you talk to loud it can be heard far away as it is so still in here. Canoe all the way down to the end of this wonderful lake and then return back towards the channel where you entered.
When back on the river continue onwards. Sunblood Mountain becomes visible as the end destination of the day approaches. Find a gravel bar before the falls as firewood has to be collected for camp. There won’t be any firewood at the Virginia Falls campsite.
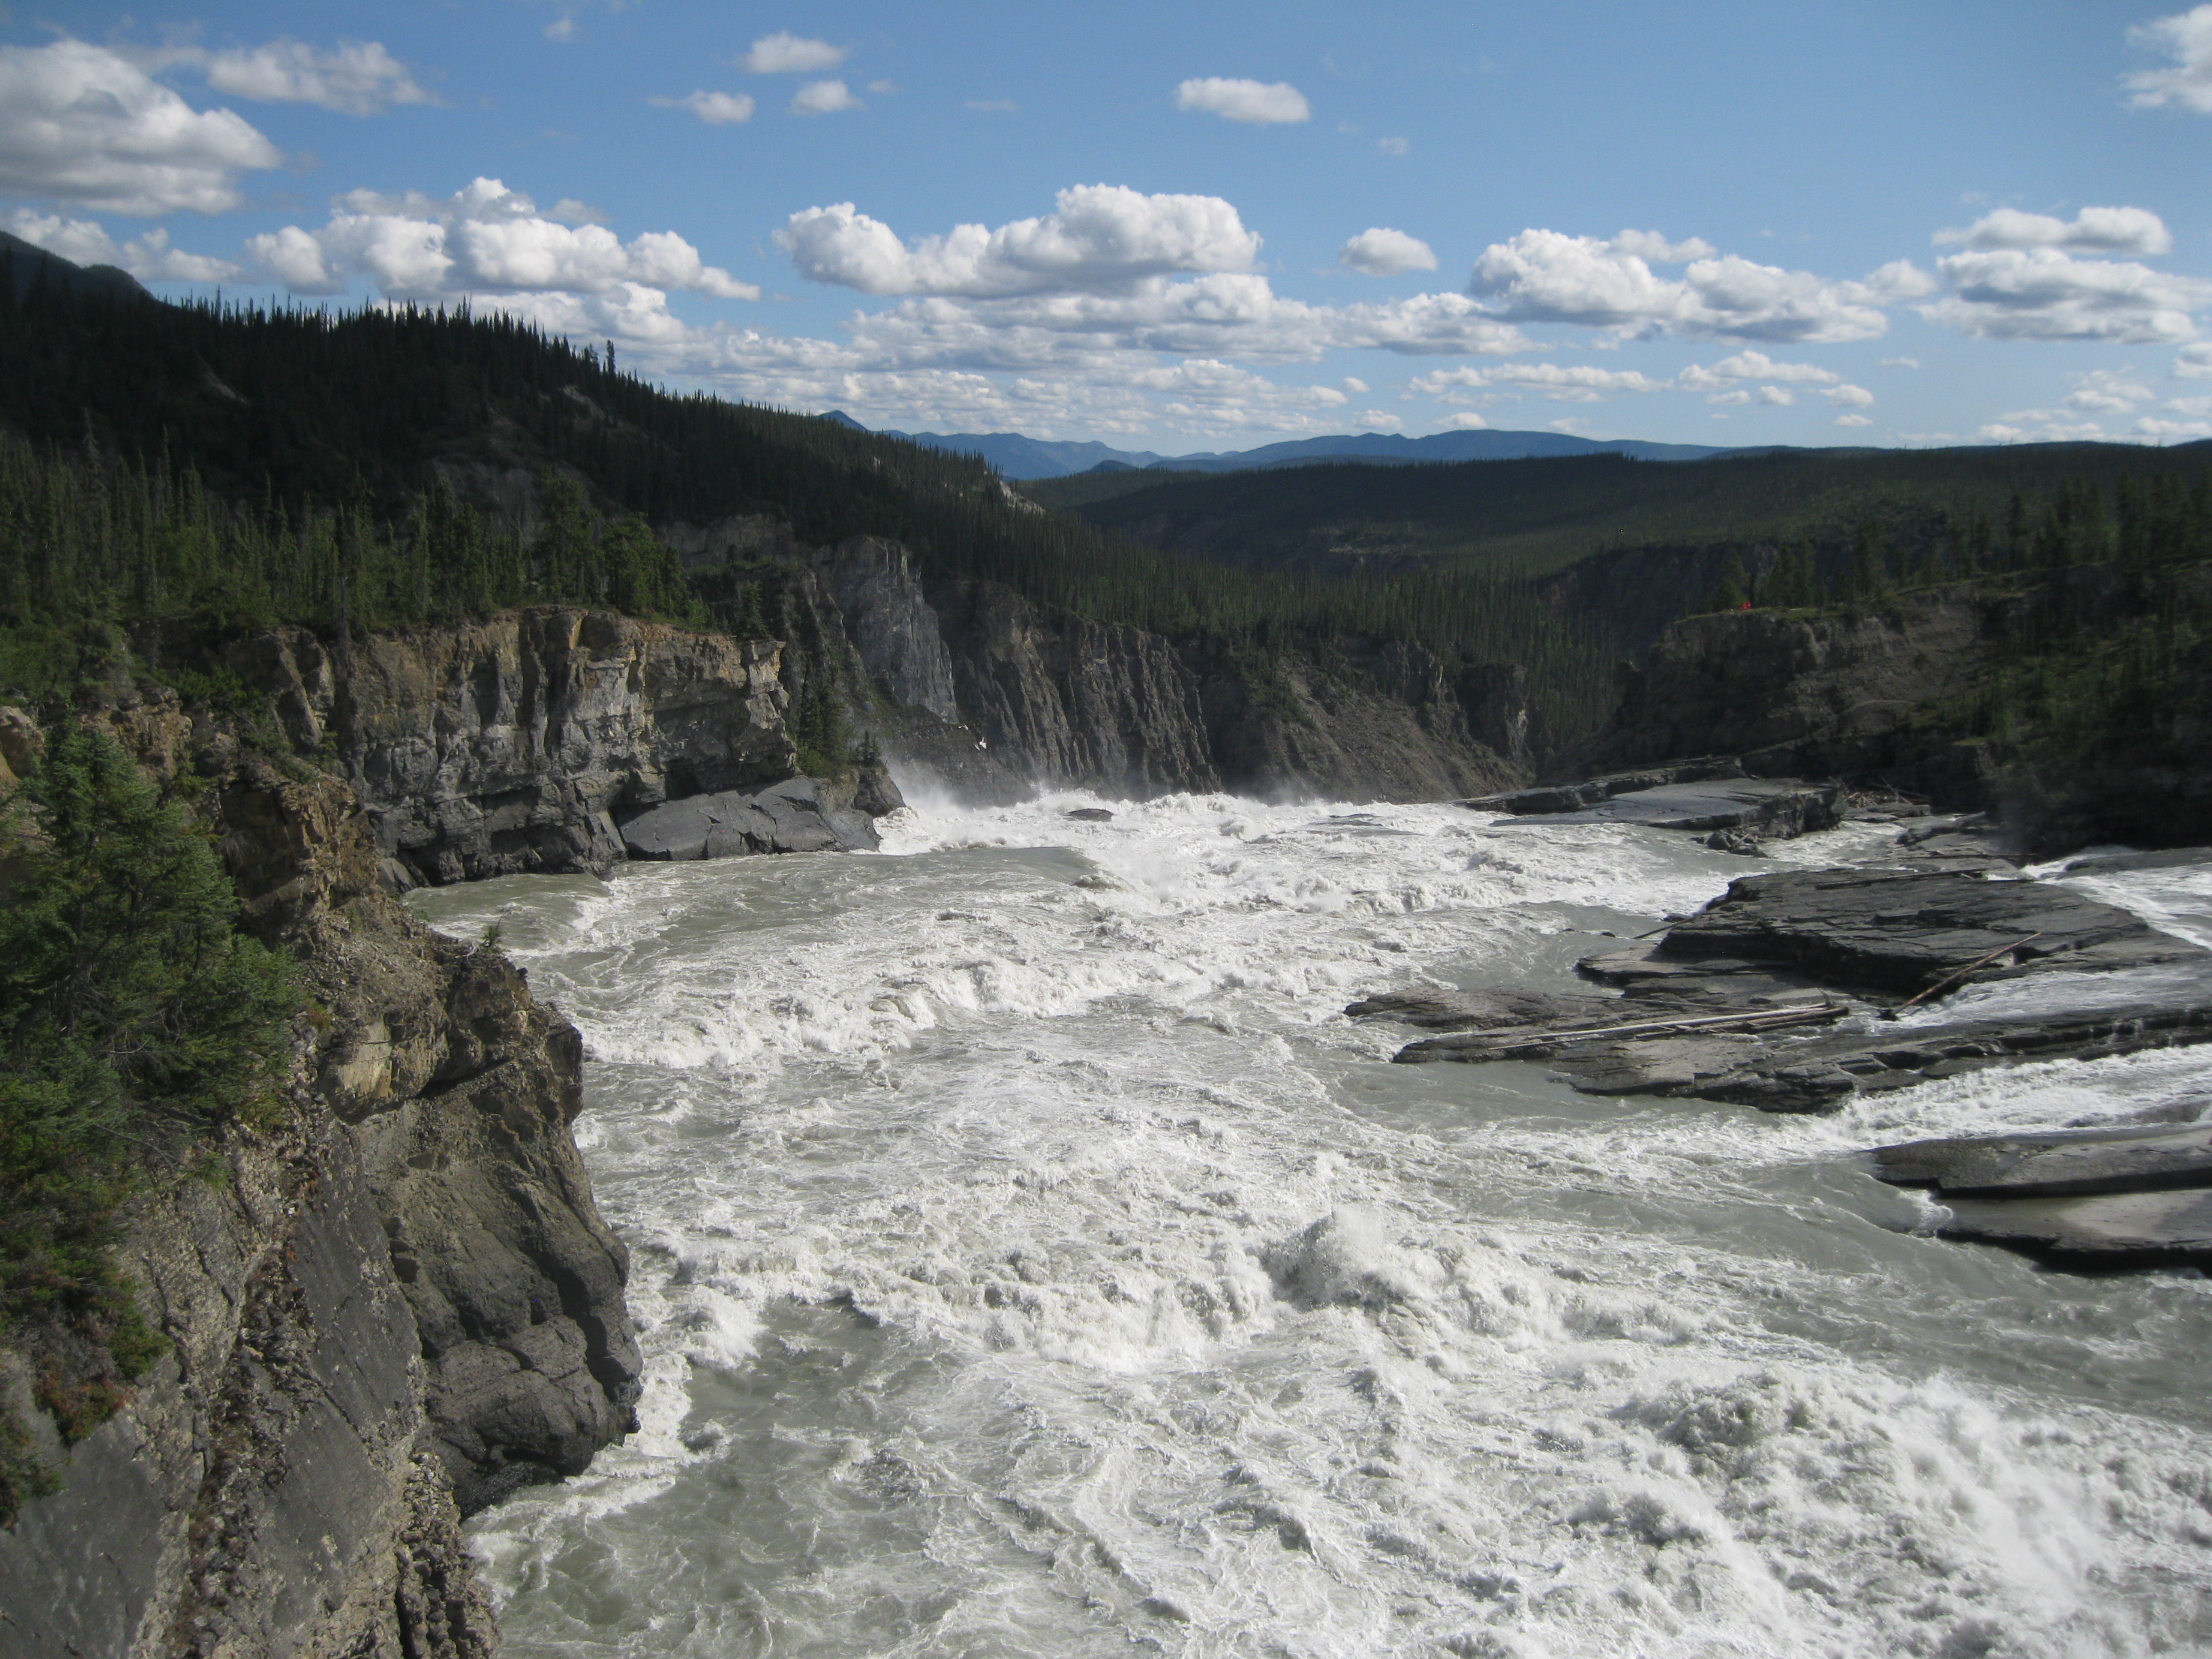
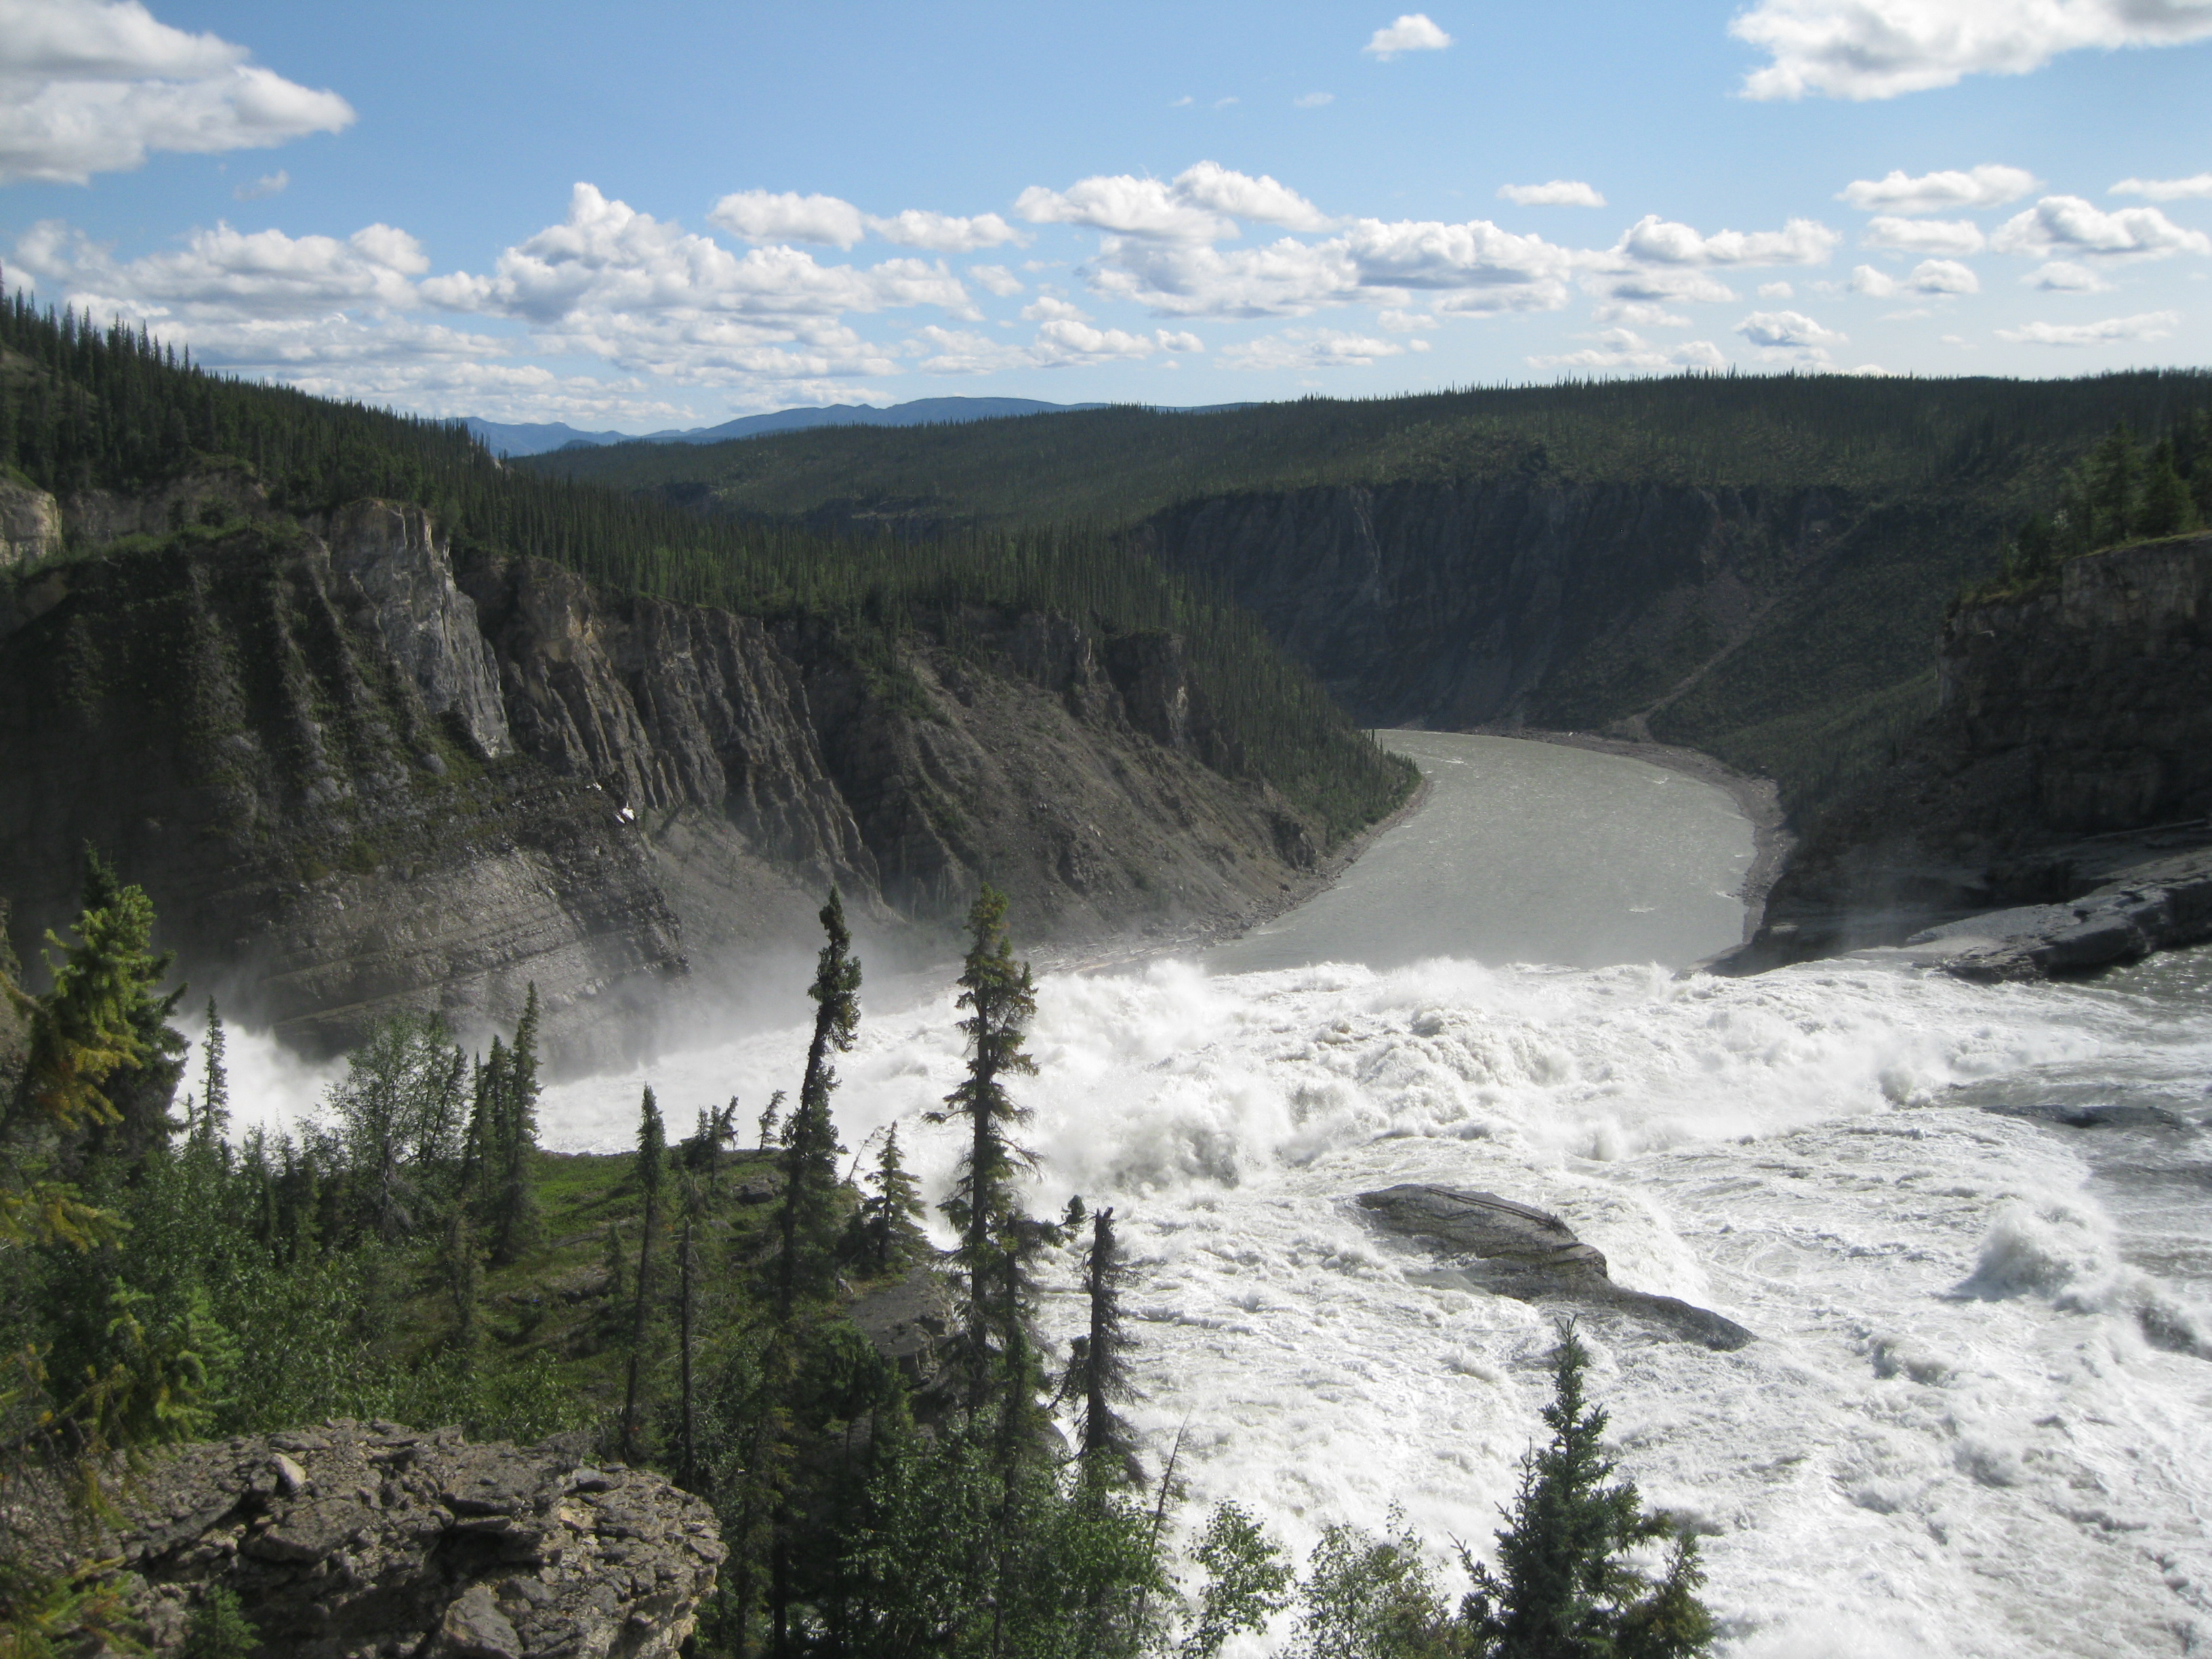
At around km 344 you will arrive at the Virginia Falls campsite which is easy to spot. Paddle up to the shore, offload the gear and haul the canoes clear of the water up on to the shore. Wooden paths lead all the way down to the campsite which is nice and kind of strange having even ground underneath the feet all of sudden for the first time ever since the trip started.
There are plenty of wooden platforms to set camp on with your tent. It’s a very nice place where it is recommended to spend a couple of nights as there are several of awesome options for day excursions.
The campsite has camping benches. Perfect for a chill and dinner. The sites are placed in the forest in cosy surroundings. Drop toilets can be found as well in the camping area which are quite nice equipped with toilet paper and sanitiser.
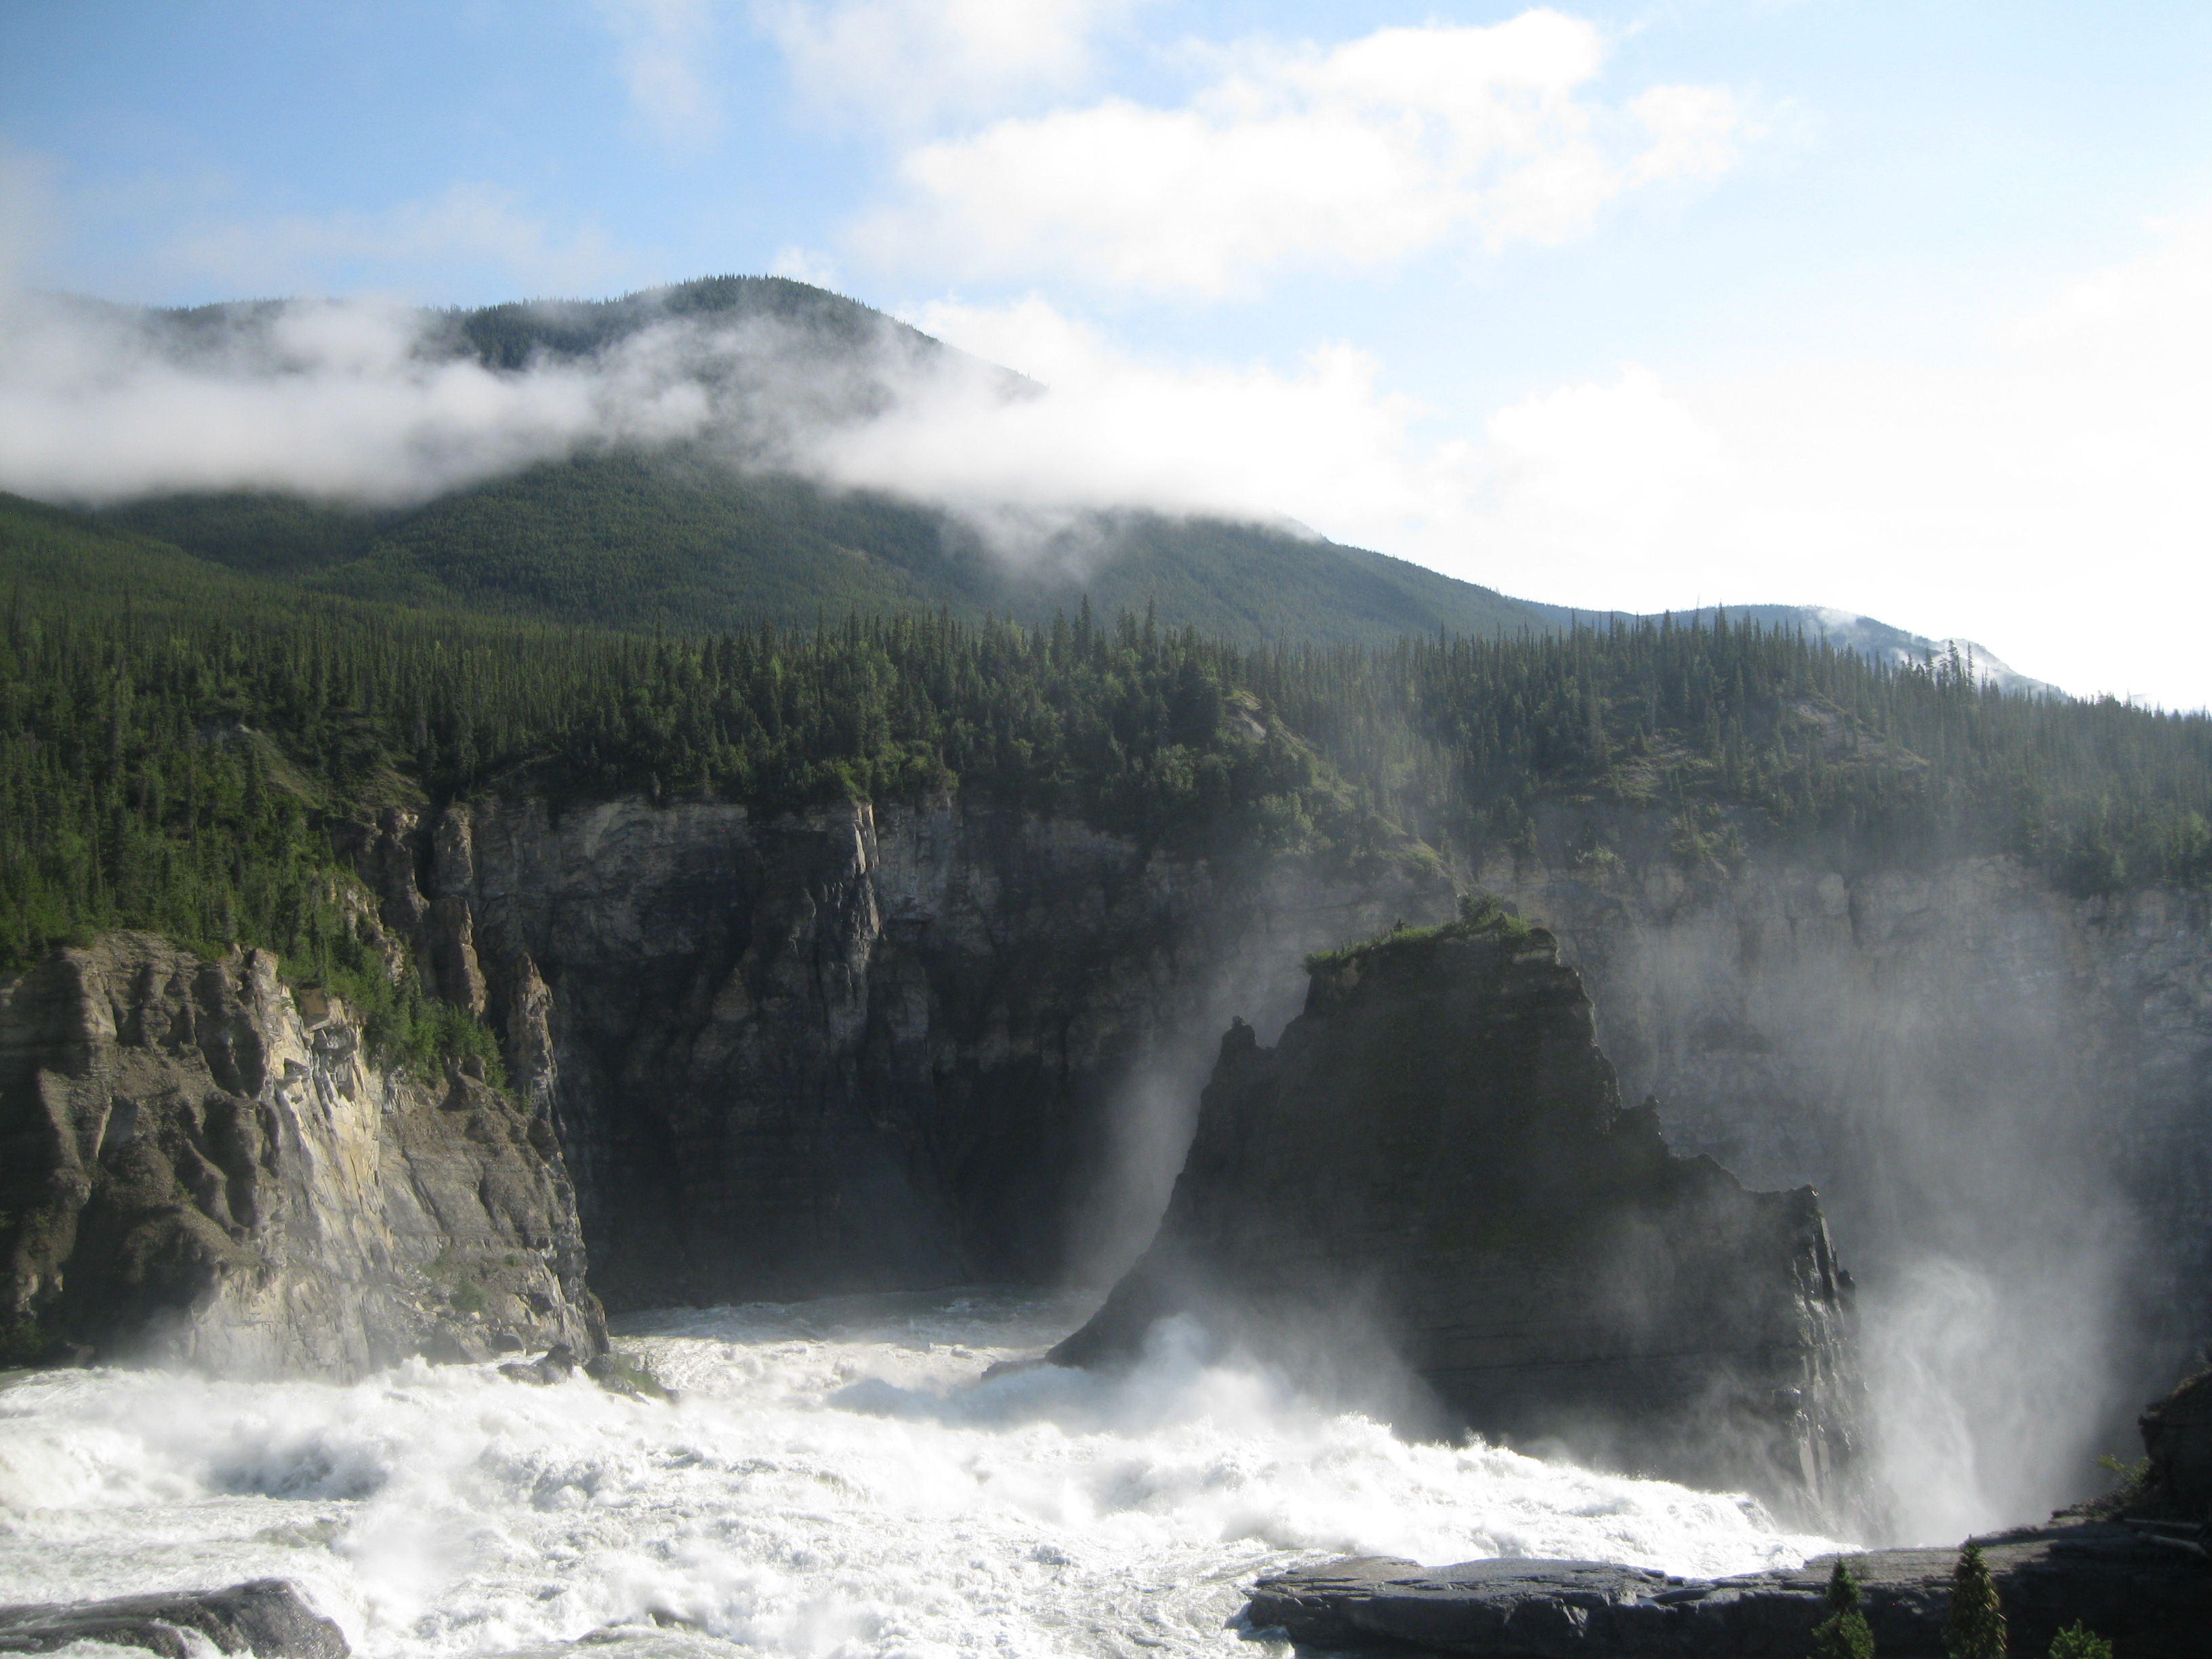
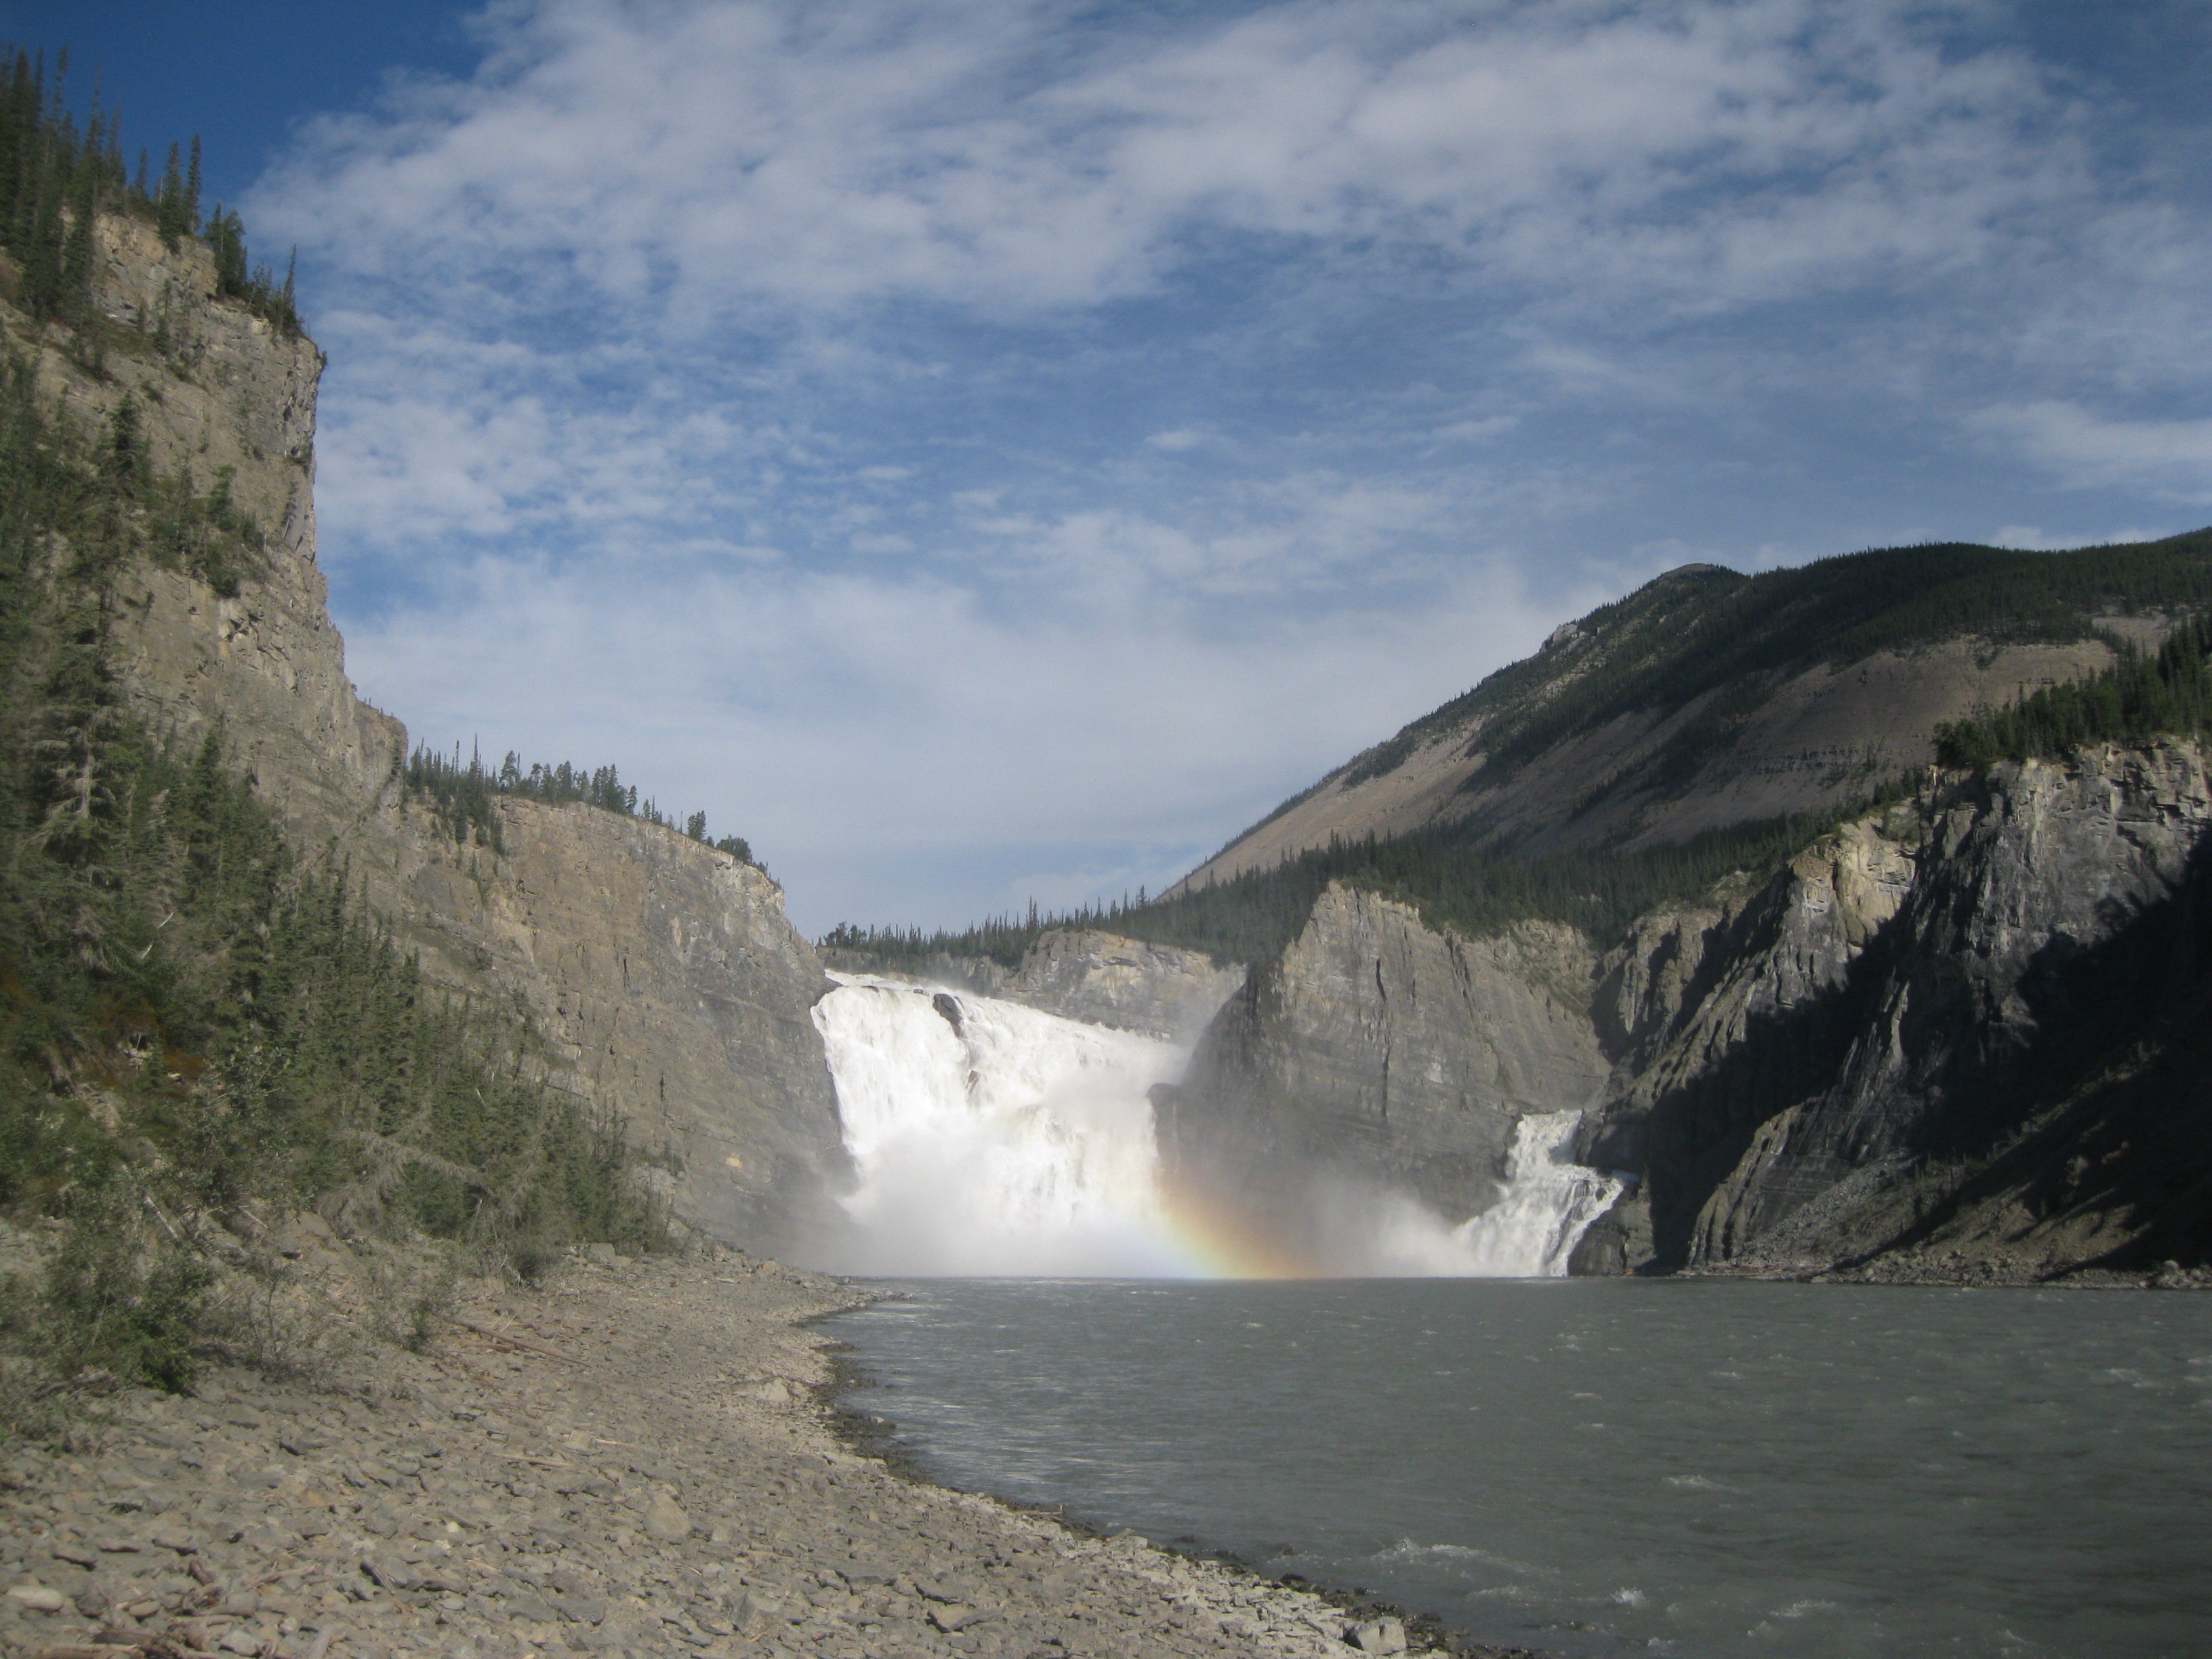
The Geology of Virginia Falls
The Virginia Falls are a 90 metre (295.3 ft) vertical drop and if the rapids above the falls known as the Sluice Box is included, the drop is 117 metres (383.9 ft). This marks the beginning of the Fourth Canyon
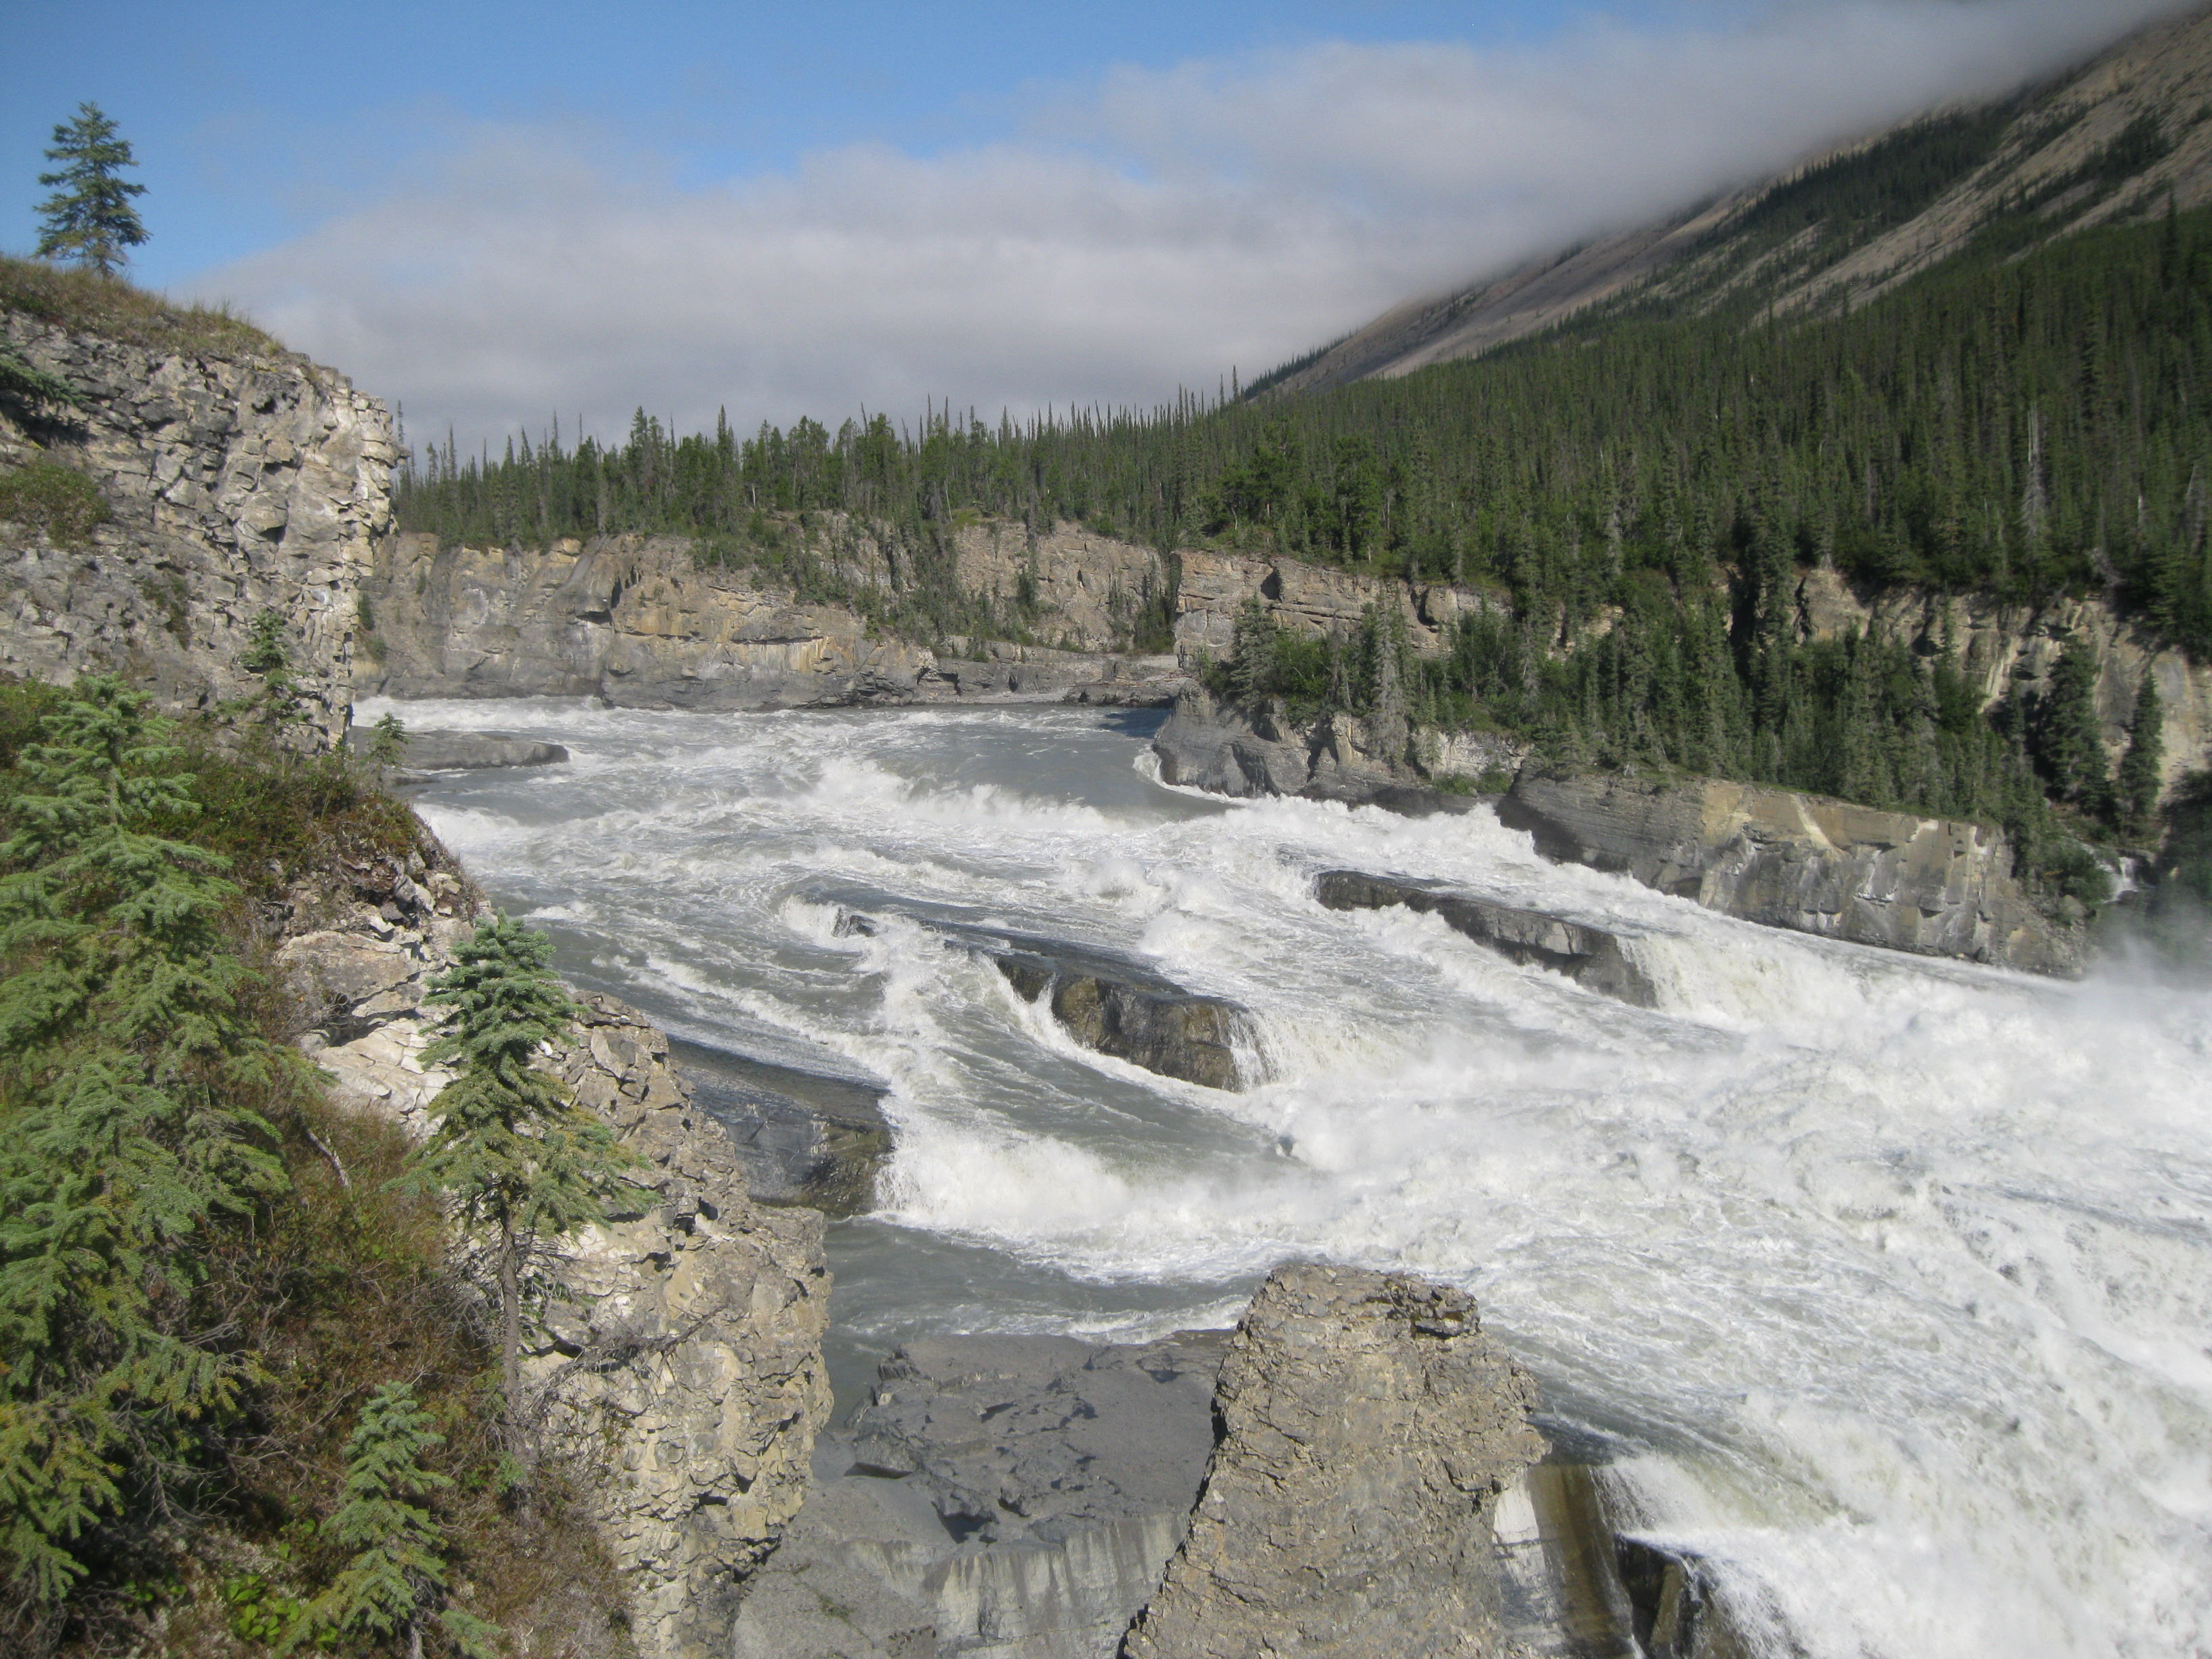
The falls haven’t always had the present day location. At one time they were based at the lower end of the Fourth Canyon, also known as Five-Mile Canyon or Painted Canyon. It was the power of the waterfall breaking over the edge that cut the Fourth Canyon.
For a while the falls were located where the portage trail is based today. The river and the glaciers that carved the U-shaped valley skirted of a rock spur that extended from Sunblood Mountain. Ancient lakes followed and completely covered the flooded Virginia Falls. Sediments filled the gorge and 40 m (131.d ft) above. As the lake drained, the river took its current course by cutting a new path through the sediments above the falls and washed the gorge away.
Exploring Virginia Falls
When arriving at the Virginia Falls campsite there may not be time to check out the falls. It could be a good option to wait until the following day and organise a guided tour with the parks staff. They are based in a staff cabin not too far away at the campsite. It is definitely a must to check out the falls.

The hiking trail to the falls, known as the Viewpoint Trail, extends directly from the campsite and it is a very easy trail on good level ground. There are several spot where you can stop on the trail, have a look at the falls and take some awesome photos.
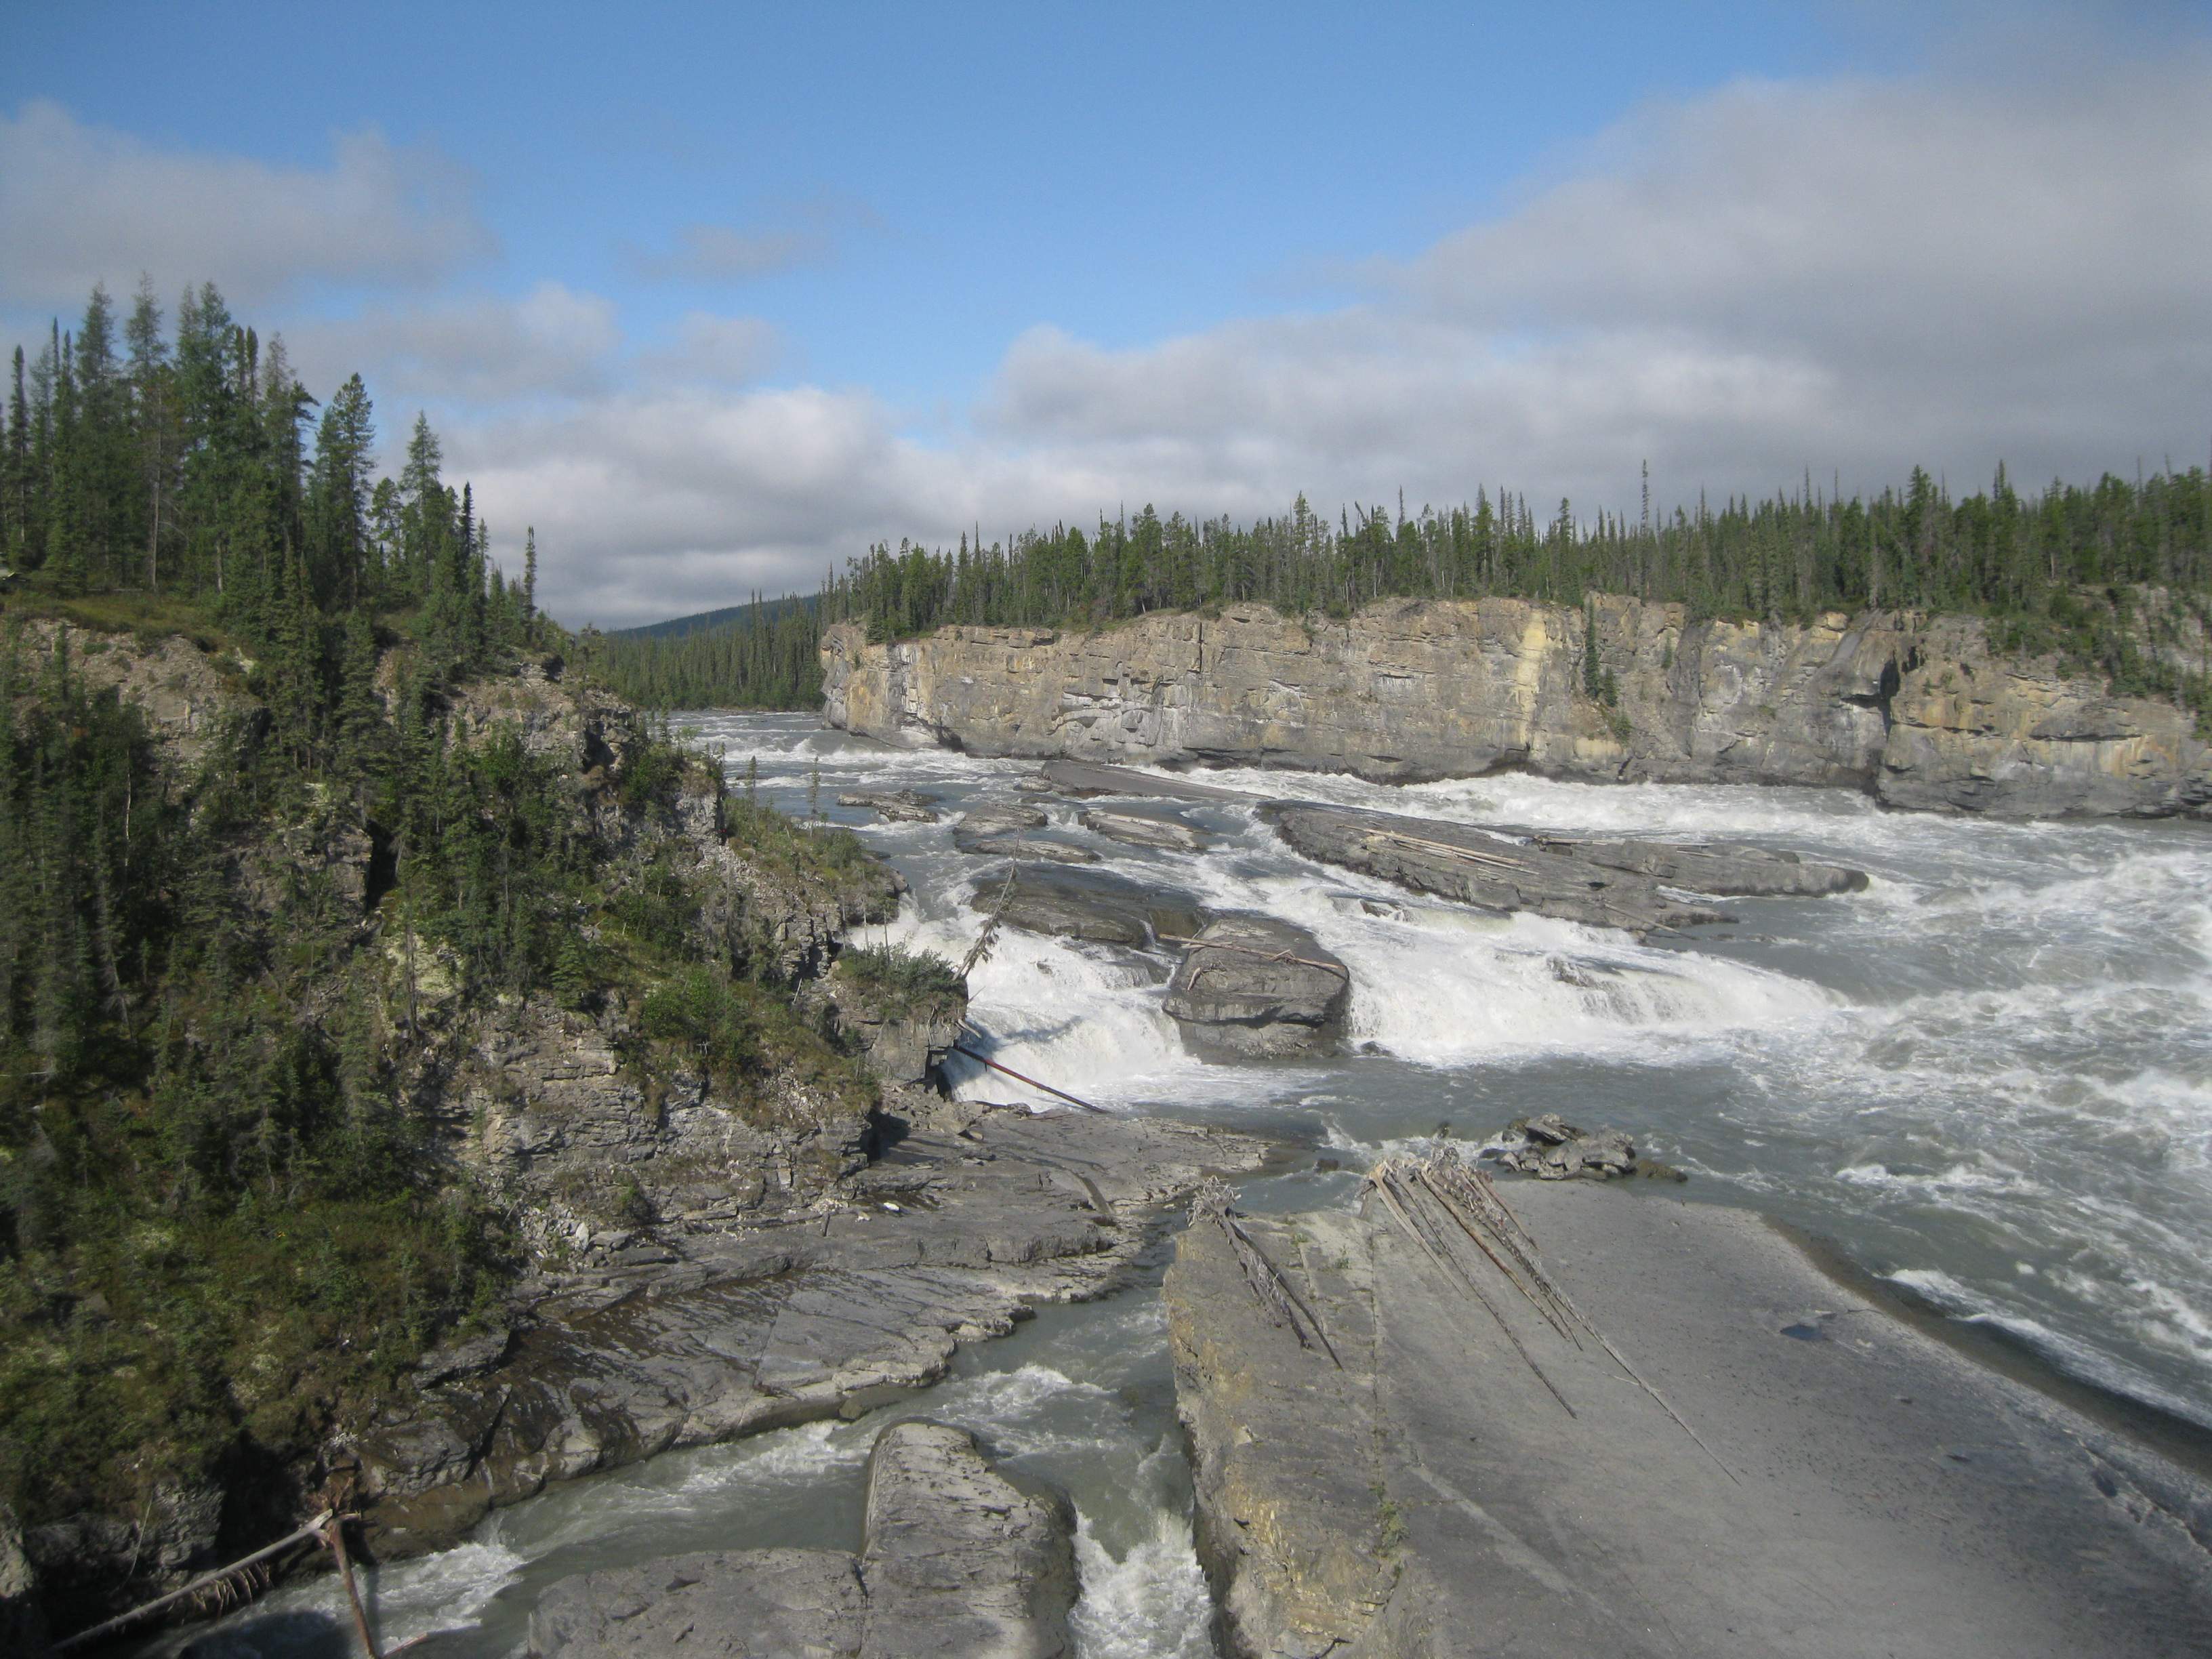
The first stop provide a close up look at the major rapid not too far from where you pulled up your canoes the day before. This is called the Sluice Box and is pretty massive. It’s quite an impressive sight. When continuing further down the trail the closer you will get to the falls and the more amazing it gets.
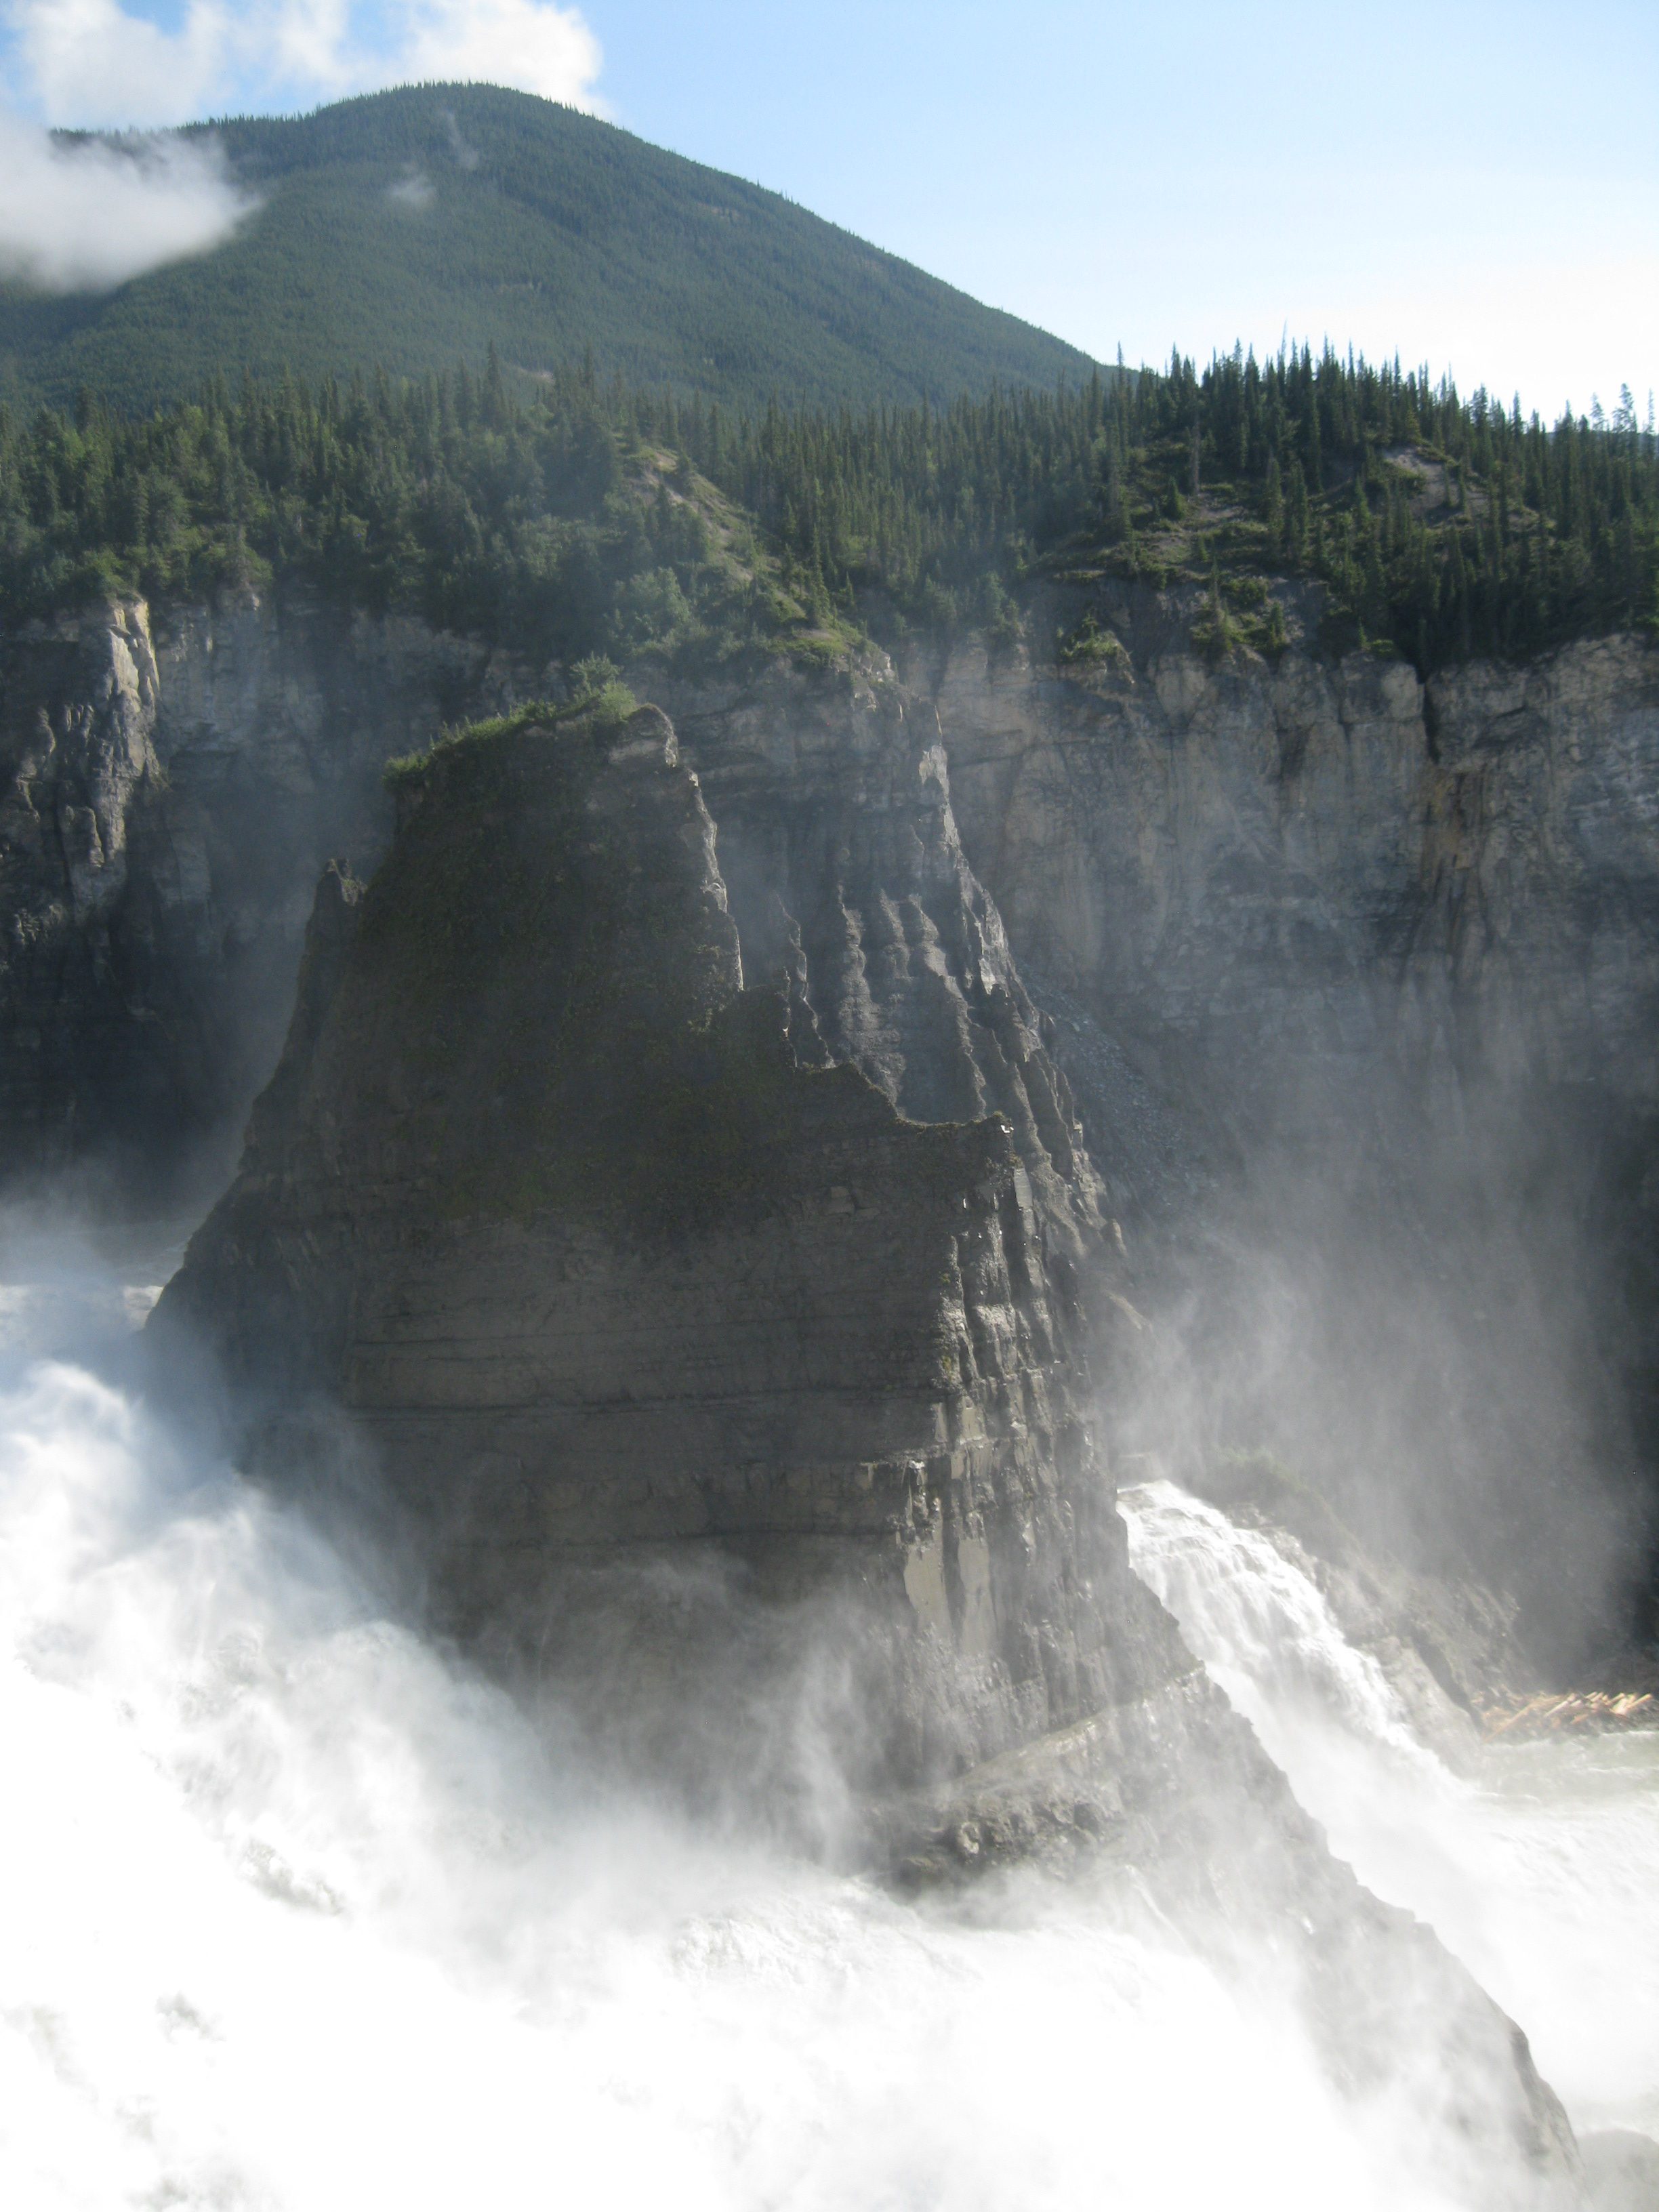
The next major stop will be at the beginning of the falls and the big canyon-like rock walls. A great photo opportunity but straight ahead, back towards the South Nahanni River, the Sluice Box and down towards the falls where the mist coming up from the falls and the peak of the stunning Mason’s Rock as the centrepoint in the middle of the falls.
At this second vantage point there is plenty of space to walk around and take some killer shots. Take your time here as it is so beautiful. You can also get a great photo of the falls, the canyon wall and the peaks in the background.
Further down the trail the third vantage point appears. This is even closer to the falls and with a great view of Mason’s Rock. Really amazing. The mist is rising from the falls hugging Mason’s Rock. Such a great shot with the peaks and forest scenery as the backdrop. Again, the view down towards the Sluice Box is awesome as well with the water manoeuvring through massive rocks in the river against the rock walls.
Continuing down the trail, the fourth and final vantage point is coming up at the falls and Mason’s Rock. There’s plenty of space to walk around and check out the falls from many different angles. It’s amazing if you are standing at the edge and look straight down towards the falls you will really notice the massive powers of the water and also see big stems from trees caught in the rocks. Awesome stuff.
Mason’s Rock and the falls are just so beautiful and pretty mind blowing. This is definitely one of the highlights of the whole park and one of the most stunning waterfalls around. You can get an amazing shot of Mason’s Rock, the falls and the peak in the background at this point. The view of the Fourth Canyon is perfect which is on the schedule for the following day. It’s amazing view of the river beyond the falls continuing down the canyon along the massive rock walls. So cool. Take your time to explore this spot as it is nothing short of glorious. You can easily spend about 45 minutes here. Time just flies by when you’re at such a beautiful place.
Afterwards head back the same trail towards the campsite. Remember to have a couple of short stops on the way back to enjoy the views once again. Exploring Virginia Falls can be done in less than half a day so there’s plenty of time to go on an excursion afterwards. You can also just choose to chill out at the camp and have a rest as it’s been an active and full on trip so far. The arrival at camp will probably be a bit past midday and time for lunch. Then you can decide on what to do.
Last Chance Harbour
In the afternoon there are two options for hikes, the Last Chance Harbour hike and the Sunblood Mountain hike. Both can be done in the afternoon. The trails are located on the other side of the river, which have to be crossed by canoe directly across the river from the Virginia Falls campsite. It will only take about a minute. Bring the canoes safely ashore clear of the water so they are ready for your return.
Just bring a small day pack for these hikes. Remember plenty of snacks and carry at least 3 litres of water. You cannot refill on the trail.
You can start by going on the Last Chance Harbour trail. This is a short trail of about a kilometre (0.6 miles). The trail is pretty level and well-marked. There are some obstructions along the way such as tree branches and it can be a bit swampy in the beginning. The hike can be done in your hiking boots, just try to avoid the wet areas by jumping across or walking just outside the trail. Don’t do this first part of the hike in thongs or sandals as that is just too difficult. Use the hiking boots all the way.
There are a couple of vantage points on the trail with magnificent views of the Sluice Box and the waterfall. It’s really cool to see the river from the opposite side. You can get some awesome photos at the first look out, a magnificent shot of the massive rock wall and the roaring water along it. Also a great spot to get a photo of yourself against this beautiful scenery.
As you continue down the trail the second vantage point appears only about five minutes further down with an amazing view of Virginia Falls, right at the falls with the Fourth Canyon as the backdrop. Absolutely stunning view. There’s a really good view in the opposite direction back towards the Sluice Box and the massive rock walls. You can get some awesome shots from many different angles here. Take time to take it all in.
There’s an option of continuing further down the trail for a bit or decide to return to the trailhead from here. On the way back remember to have a couple of stops to check out the views yet again.
Sunblood Mountain
Upon return to the trailhead, look for the trail leading up to Sunblood Mountain. Finding it can be a tad tricky but you’ll get there in there end.
It is an 8 km (5 miles) long trail one way with a demanding 990 metre (3,248 ft) elevation gain. It can be a bit challenging in certain sections. Again, when heading up Sunblood Mountain bring at least 3 litres of water and snacks. Bringing hiking poles is also highly recommended as are there some very steep sections on this trail. It is a very well-marked trail.

The first part of the trail is through spruce forest vegetation that can be a bit swampy initially, with some obstructions of tree branches along the way but it is on a level trail. There isn’t a lot of interesting scenery here. After about 30 minutes on the trail the elevation will start to pick up through the forest vegetation. Then you will be heading into a section into open space away from the forest heading up a scree slope for a bit which angles across the lower slope of the mountain.
This is nice for a change as there’s a bit more of a breeze and the track is easier. Here the South Nahanni River comes into view to your right, Virginia Falls in the middle and the Fourth Canyon to your left. In the background you’ll see beautiful mountain peaks. As you get further up the slope there’s a point with a perfect view of the mist coming up from Virginia Falls with the Fourth Canyon as the backdrop. Such an awesome sight.
When heading out of the scree slope, the trail enters a pine forest section. This is where the trail gets really steep and the hiking poles will become your best friend especially through this terrain. The key to hiking in general and especially a hike like this, is to do it at your own pace. A nice steady pace that fits your style. Remember it is not a competition. If arriving the whole walk is done at your own pace you will not lose your breath and you will not be too tired when arriving at the top of the mountain.
During this steep section, concentrate on heading upwards. There’s not a lot of interesting scenery so it’s all about moving on. After about an hour you will have gotten beyond this very steep section and into an area with more awesome views of the South Nahanni River, Virginia Falls, the Fourth Canyon and the mountain peaks. A great spot to have a bit of a break and to take some photos.
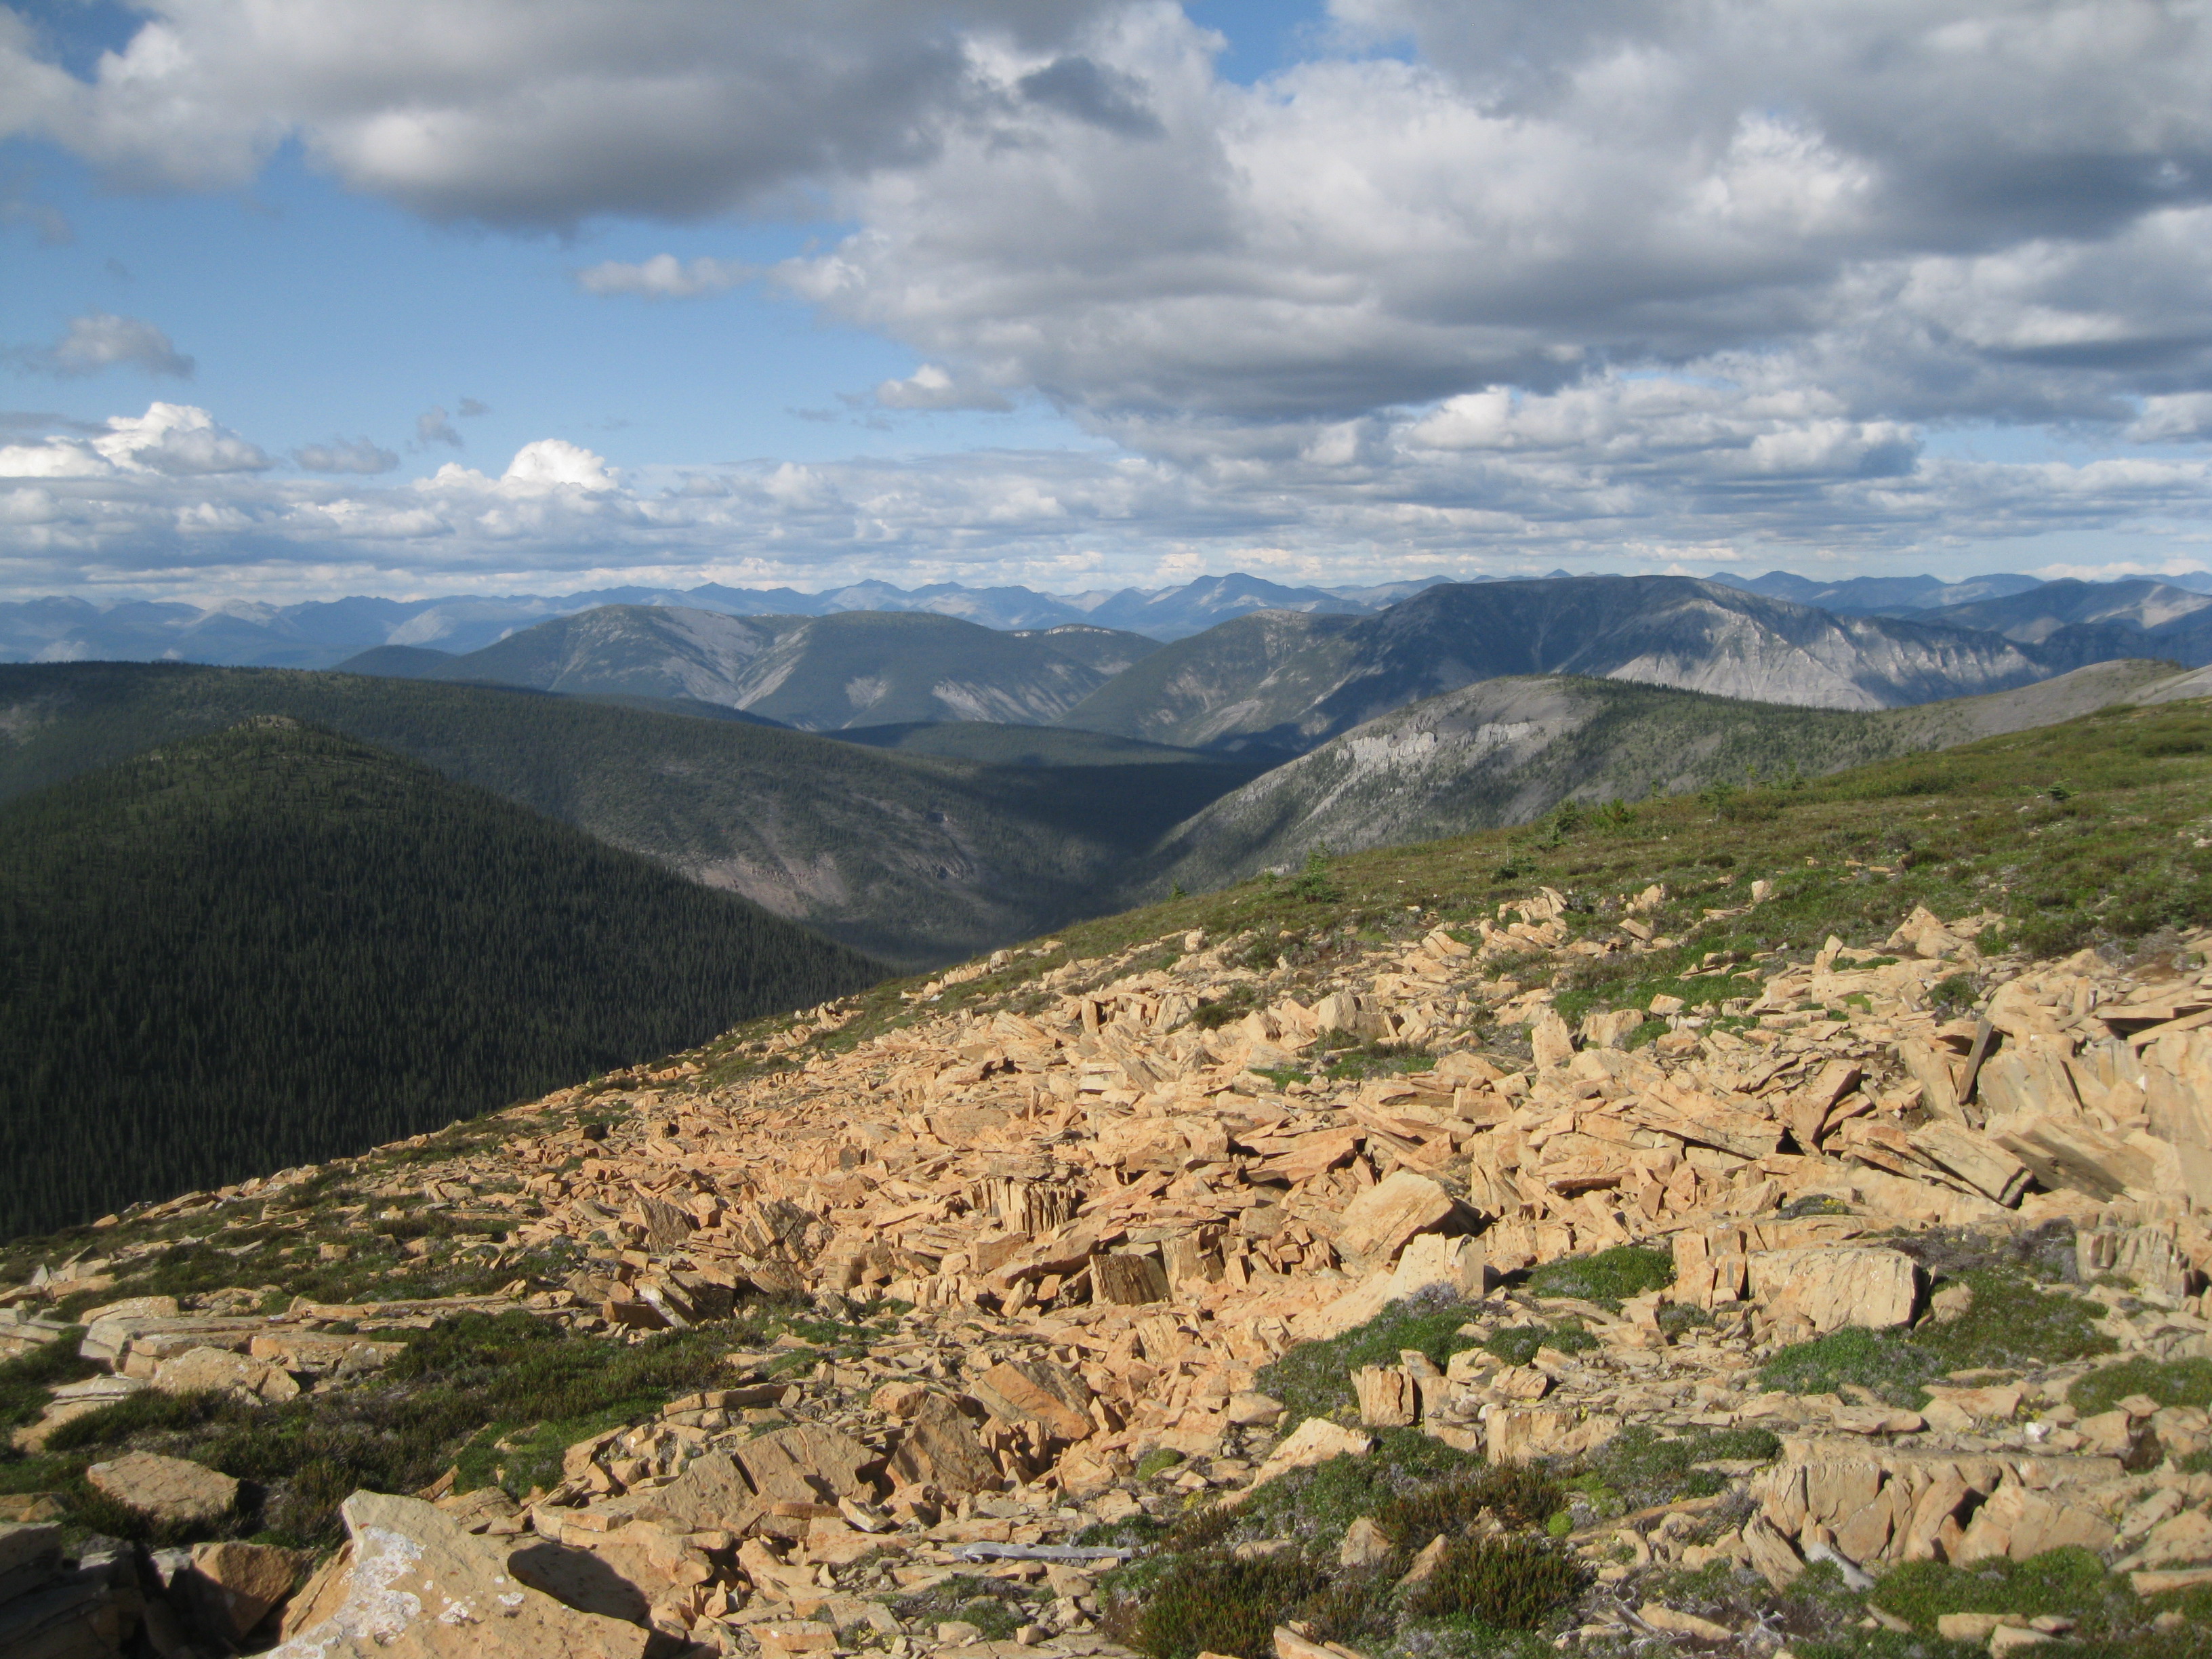
As you continue onwards you will arrive to a spot after about 25 minutes with great vistas yet again without to many obstructions from the trees. There’s a view of mountains for miles ahead, the South Nahanni River and all of the Fourth Canyon. Quite an impressive sight and a great photo stop. This is the long ridge that dominates the skyline as seen from Virginia Falls.
After a walk for about 15 minutes from here another similar view appears just further up the hill. As you look up the hill you can see the end destination which is not too far away. The rest of the hike is through open scree terrain but with no major loose rocks on steep slopes, so it is pretty straight forward but also steep. Arrival at the top in about 15 minutes from here.
When arriving you will have such an amazing feeling of accomplishment. You have just climbed Sunblood Mountain. So awesome. There’s a manmade tower at the very top which you may have noticed from the river the previous days.
The top of Sunblood Mountain is quite a large area. To one side there’s the amazing view of the South Nahanni River, which you came from, curving its ways down the valley surrounded by awesome peaks along the way. There’s also a view of Oxbow Lake which you paddled into only a couple of days earlier. It has a round shape when viewed it from the peak. There are a lot of small lakes when looking down towards the river. Fantastic view and great photo opportunity
Looking towards the opposite side of the hill there’s a pretty good view of the peak, on which you’re standing, and the surrounding peaks. On the opposite side there’s a stunning view of the Fourth Canyon which is on the itinerary for the following day.
Take your time on top of Sunblood Mountain. It’s been quite a hike so enjoy it. Spend at least 30 minutes exploring, having your photos taken and have a bit of a rest. It depends on the schedule for getting back to camp.
When descending the mountain there will be stunning views which you didn’t notice on the way up as you would have been so concentrated on finishing the climb that you didn’t look back. There’s such great view of Sunblood Mountain with Virginia Falls, the South Nahanni River and the Fourth Canyon at the end with amazing peaks as the backdrop. Do take a bit of time to enjoy the views and take some photos even though you will most likely be eager to get down. The view back towards the South Nahanni River is also amazing from here.
Heading down the views of Virginia Falls, the South Nahanni River and the Fourth Canyon will change but they are equally amazing. So cool all the way down. The descent can be a bit hard on your knees so do take your time.
At the point where the trail enters the forest section it gets very steep. This is really hard on the knees and the hiking poles are such a good companion during this part of the hike. The arrival at the talus slope will probably be about 45 minutes after entering the forest area and you will have yet another fantastic view of Virginia Falls, the South Nahanni River and the Fourth Canyon at the end with amazing peaks as the backdrop with a slight bird’s eye view of this magnificent scenery.

As you continue onwards you will get into the first forest section of the hike and the trail leads downhill until you get to the more level and swampy area of the forest. Now the trailhead is getting closer. Upon arrival, it’s back into the canoes, crossing the river back to the campsite and you have completed this awesome today. What an awesome accomplishment. Dinner at this point will be highly appreciated that’s for sure.
There is a small amphitheatre at the campsite. Maybe the parks staff may have a presentation on Dene culture and some of their hand games in the evening. Definitely make sure you join in that case as it is really interesting.
The Portage between the Virginia Falls Campsite and the Fourth Canyon
The following day you will be heading towards the Fourth Canyon and commence your amazing adventure through the canyons. To get there you and your group or mates have to do a portage in the morning. This means that you have to carry all the gear manually from the Virginia Falls Campsite to the Fourth Canyon for about 1.3 km (0.8 miles)
Luckily there is a really good portage trail all the way. First the gear has to be carried from the campsite to the canoes, load the canoes and paddled down to the beginning of the portage trail which is about 2 minutes down the river on your right side. It looks really close to the Sluice Box but you will be good. There is quite a bit of a distance.
Upon arrival at the trail, unload the canoes and bring them ashore. Everything has to be carried all the way down the trail to the Fourth Canyon and this includes the canoes which are heavy. The easiest way to transport a canoe is put it on top of you upside down and carry it with the weight upon your upper back. This is hard so you have to be very strong.
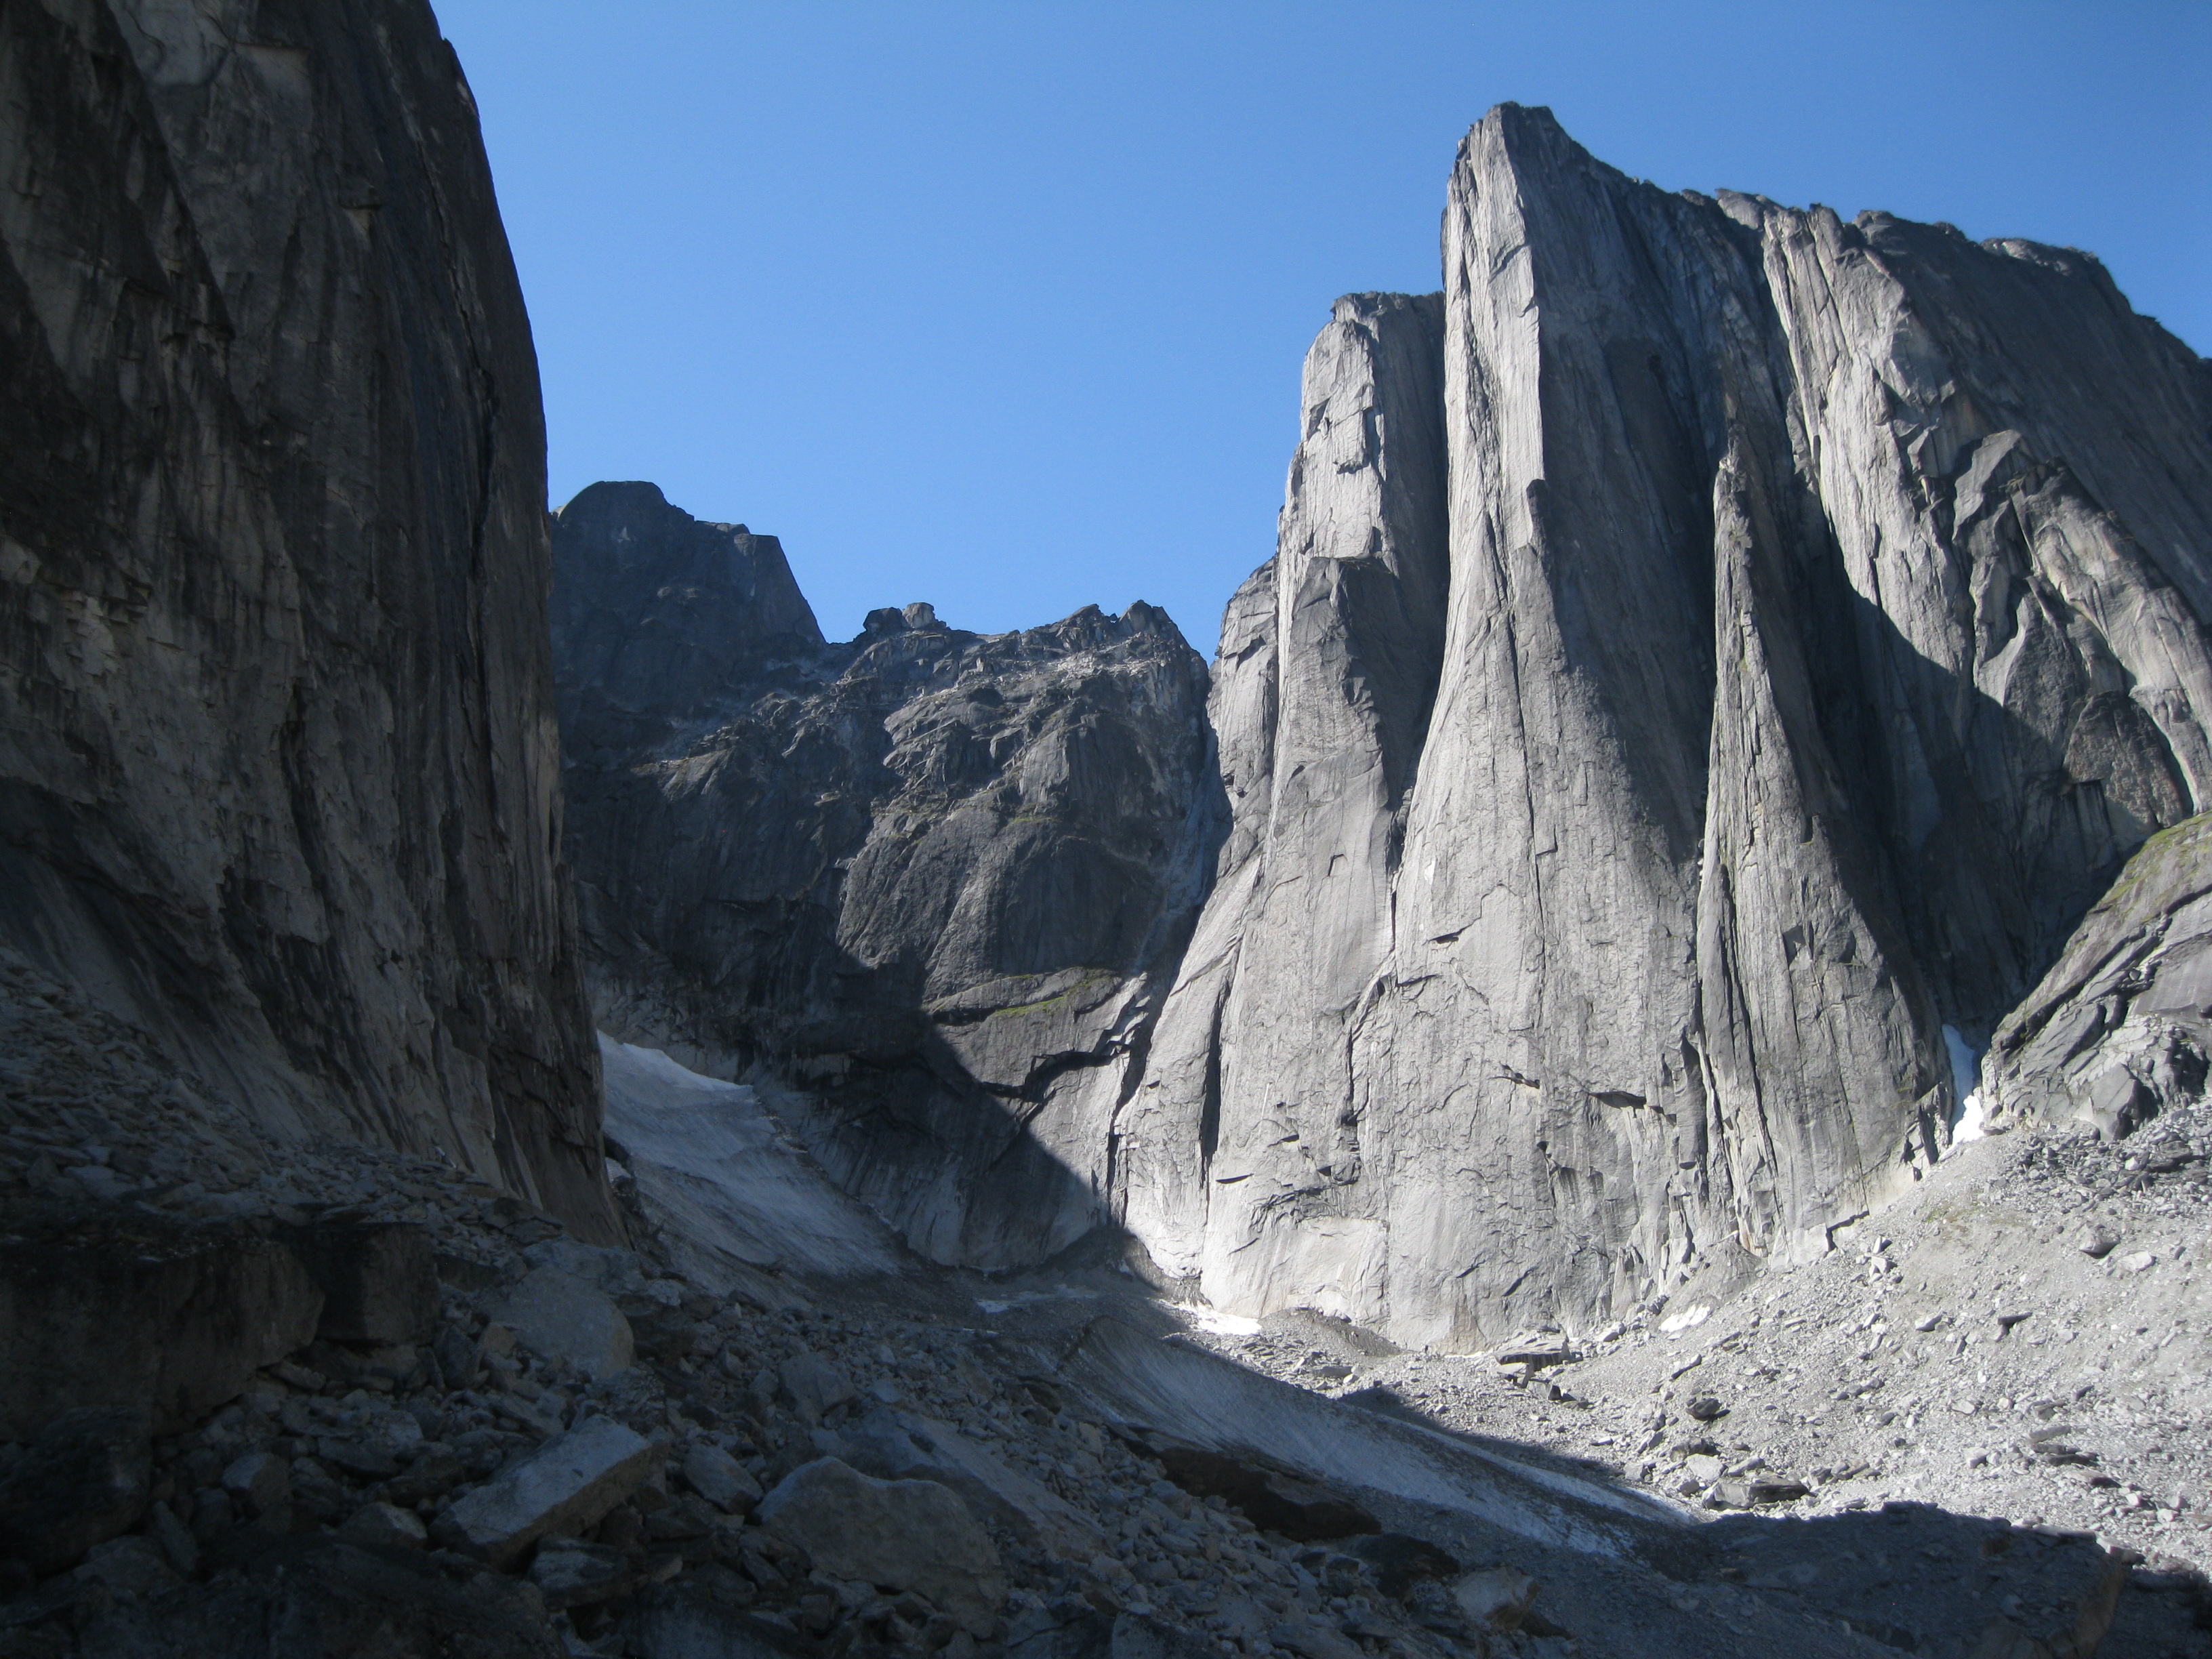
The most of the trail is a wooden platform similar to the ones at the campsite. The end of the trail is on a gravel surface zig zagging downhill. You probably have to walk back and forth three or four times before finished. It will a couple of hours, obviously depending on how much gear you have. It’s pretty hard start to the day but it has to be done and there is no way around it.
At the end of the portage trail you will be met by a glorious view of the fantastic Virginia Falls. This is the perfect view of the falls seen from the front. When the portage is finished, take time to enjoy the view and take some photos. There may just be a possibility of a shot of the falls fronted by a rainbow.

Then it’s time for lunch. Definitely have lunch before heading down the Fourth Canyon. Also make sure to pre-hydrate a bit beforehand as it is quite the challenge ahead.
Geology of the Canyons
The steep sided canyons have not been subject to glaciation for more than 200,000 years. Flowing water, rather than ice, shaped these four magnificent canyons. As the mountains thrust upward over time, the river was able to stay in its course and slowly carved its way through the rising rock strata, creating the canyons and preserving the meanders that developed when the river flowed across the flat valley.
The Fourth Canyon
Going down the Fourth Canyon is the biggest challenge on the whole tour through the park. This is a class II/III rapid. You will experience a class III rapid later at Lafferty’s Riffle, but it will through a short stretch.
If you are on an organised and guided tour make sure to and follow the instructions of the guides to the best of your ability. It is very important that you head down the canyon river with the right angle to get a good start. The most important thing all the way is to keep your paddle in the water no matter what. Do not at any time put your hands on the canoe as it will most likely tip over. Keep paddling.
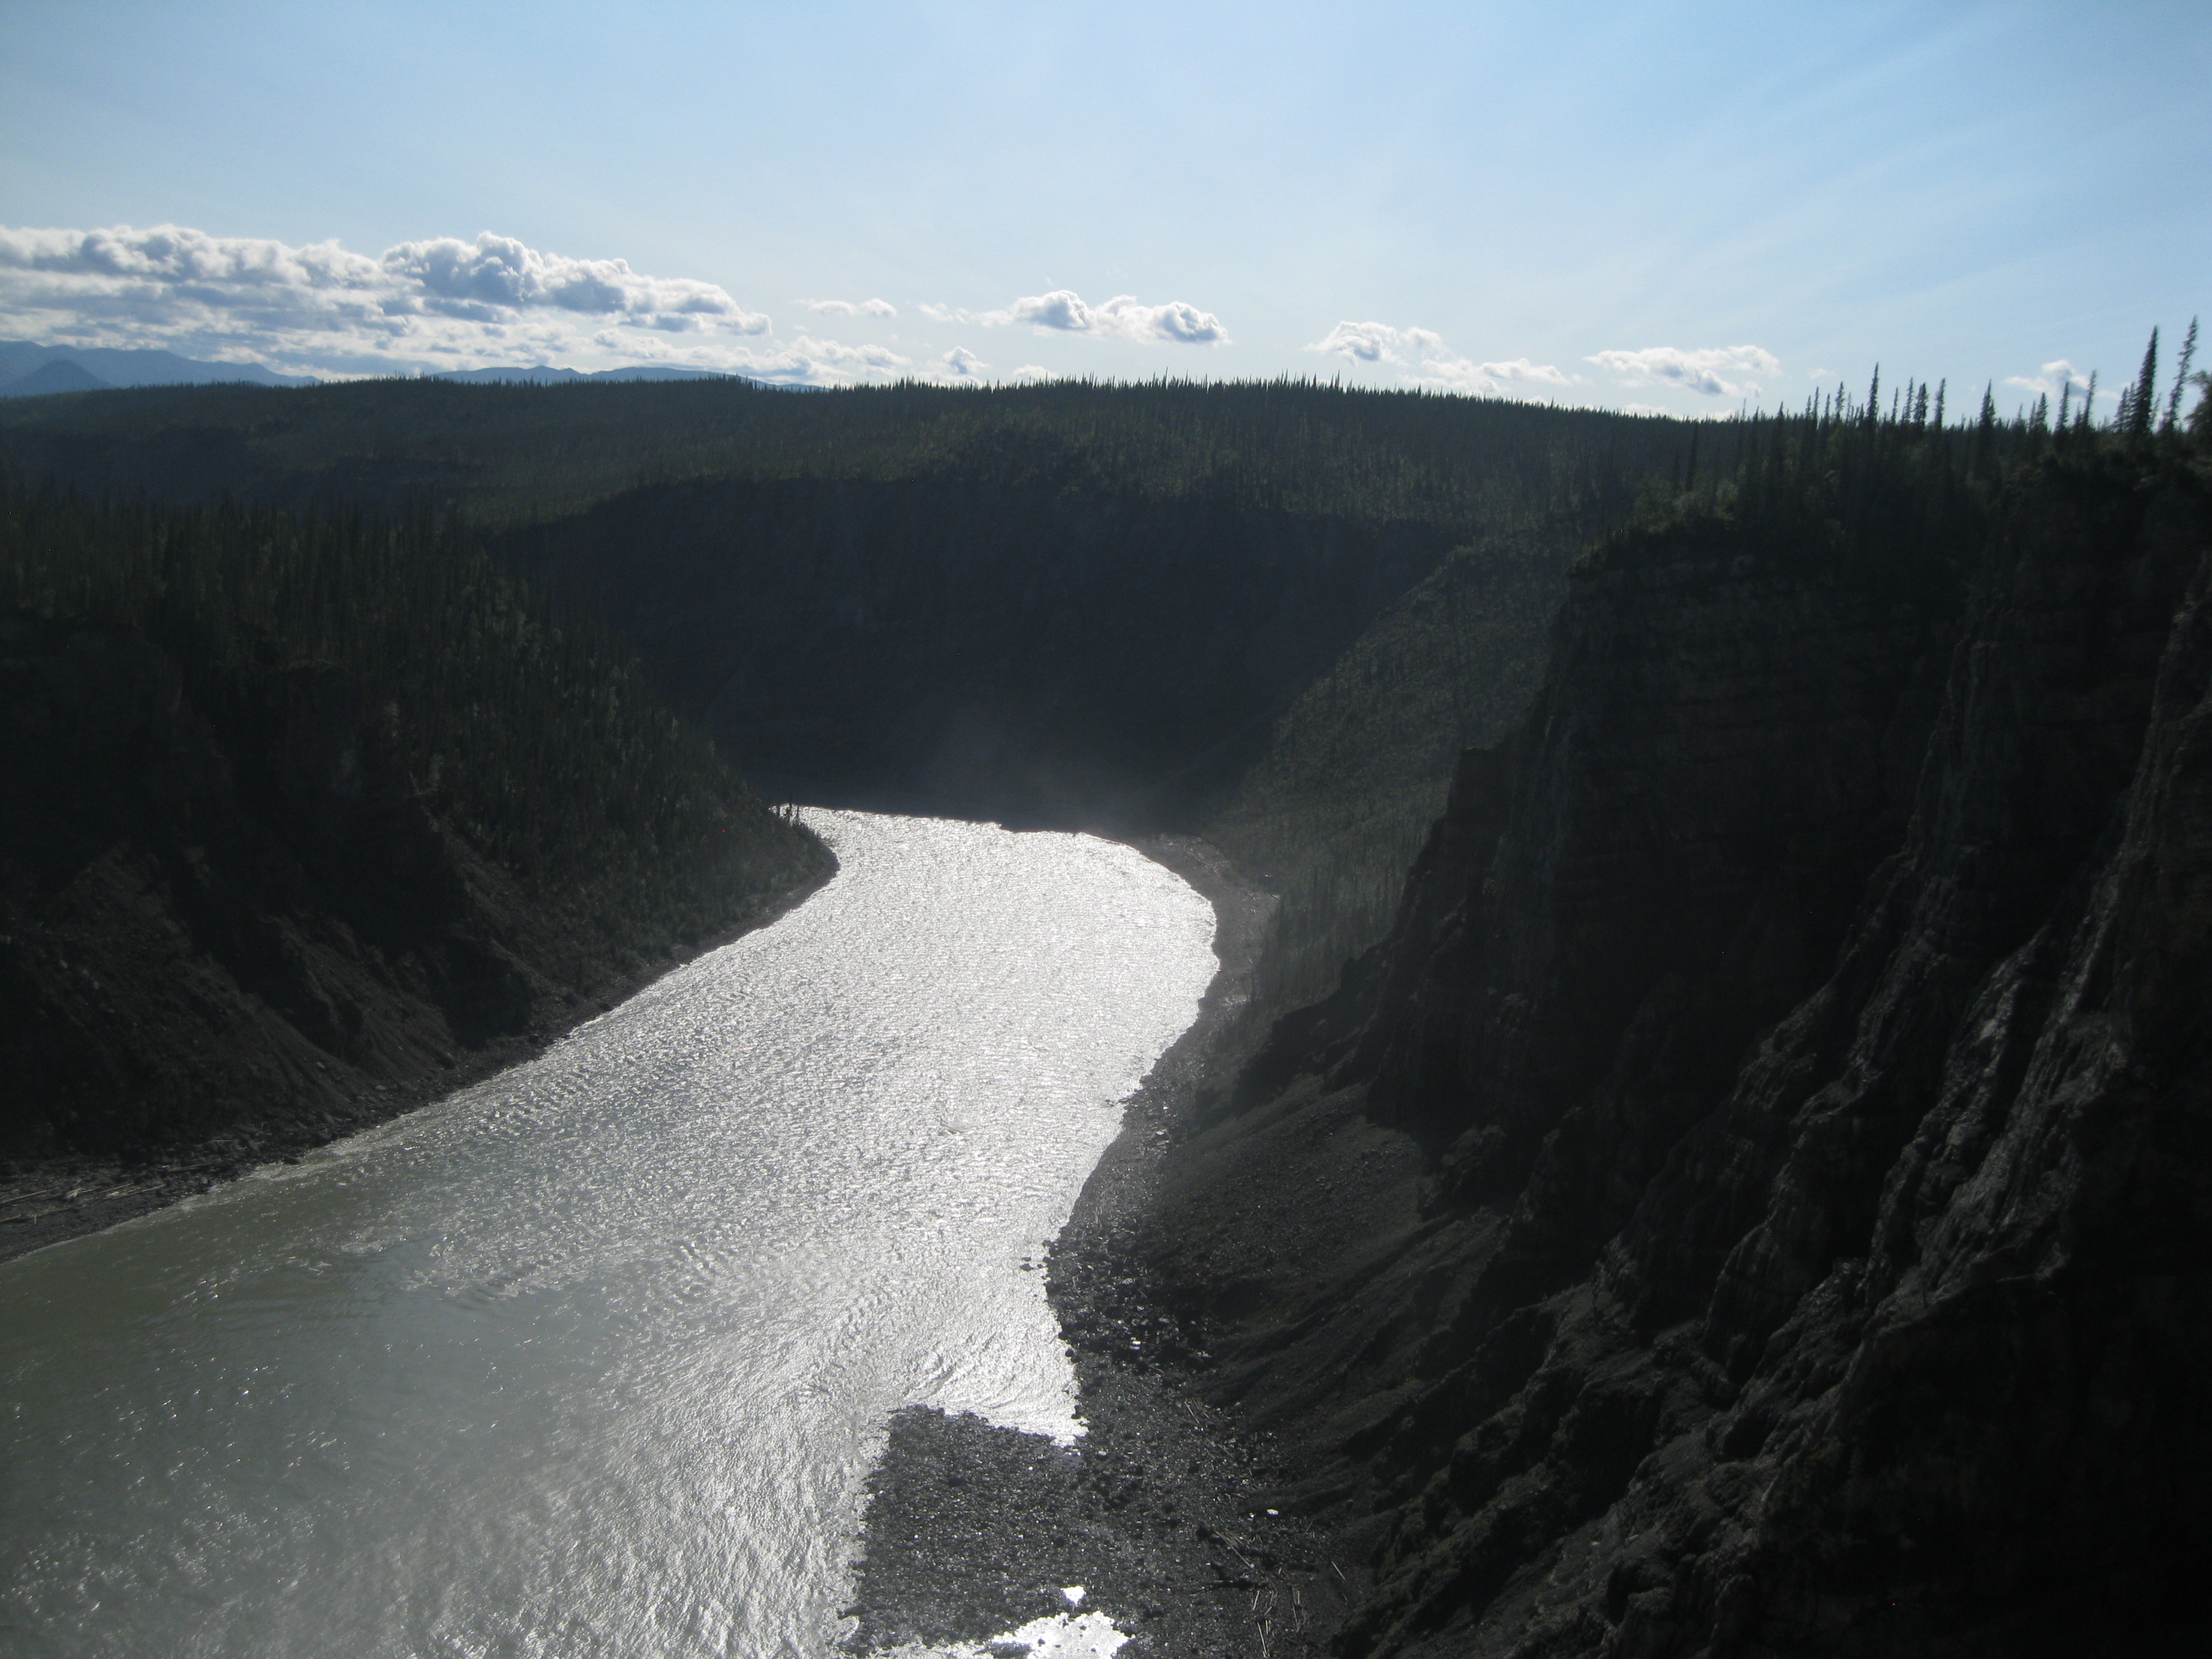
If you are in the bow, paddle at your usual pace and call out to your mate in the stern if you observe features ahead. Follow the instructions from the stern. He will be steering and will tell you if the pace needs to be picked up or if a back draw is needed.
Make sure not to sit but kneel in the canoe as steering abilities are much better with your loose hips. It is highly recommended to kneel for the whole day also after leaving the Fourth Canyon as some of the most challenging parts are further down the river. It is hard on the legs and feet but you won’t notice it as you will be so concentrated and occupied with paddling
If the teamwork and chemistry in the canoe is good, it should work out fine and it will be heaps of fun. The whole session will go by so fast and in no time you will have paddled through the Fourth Canyon.
The Fourth Canyon stretches down the river for about 4 km (2.5 miles) and ends at km 350. There are three sections of major rapids through the canyon.
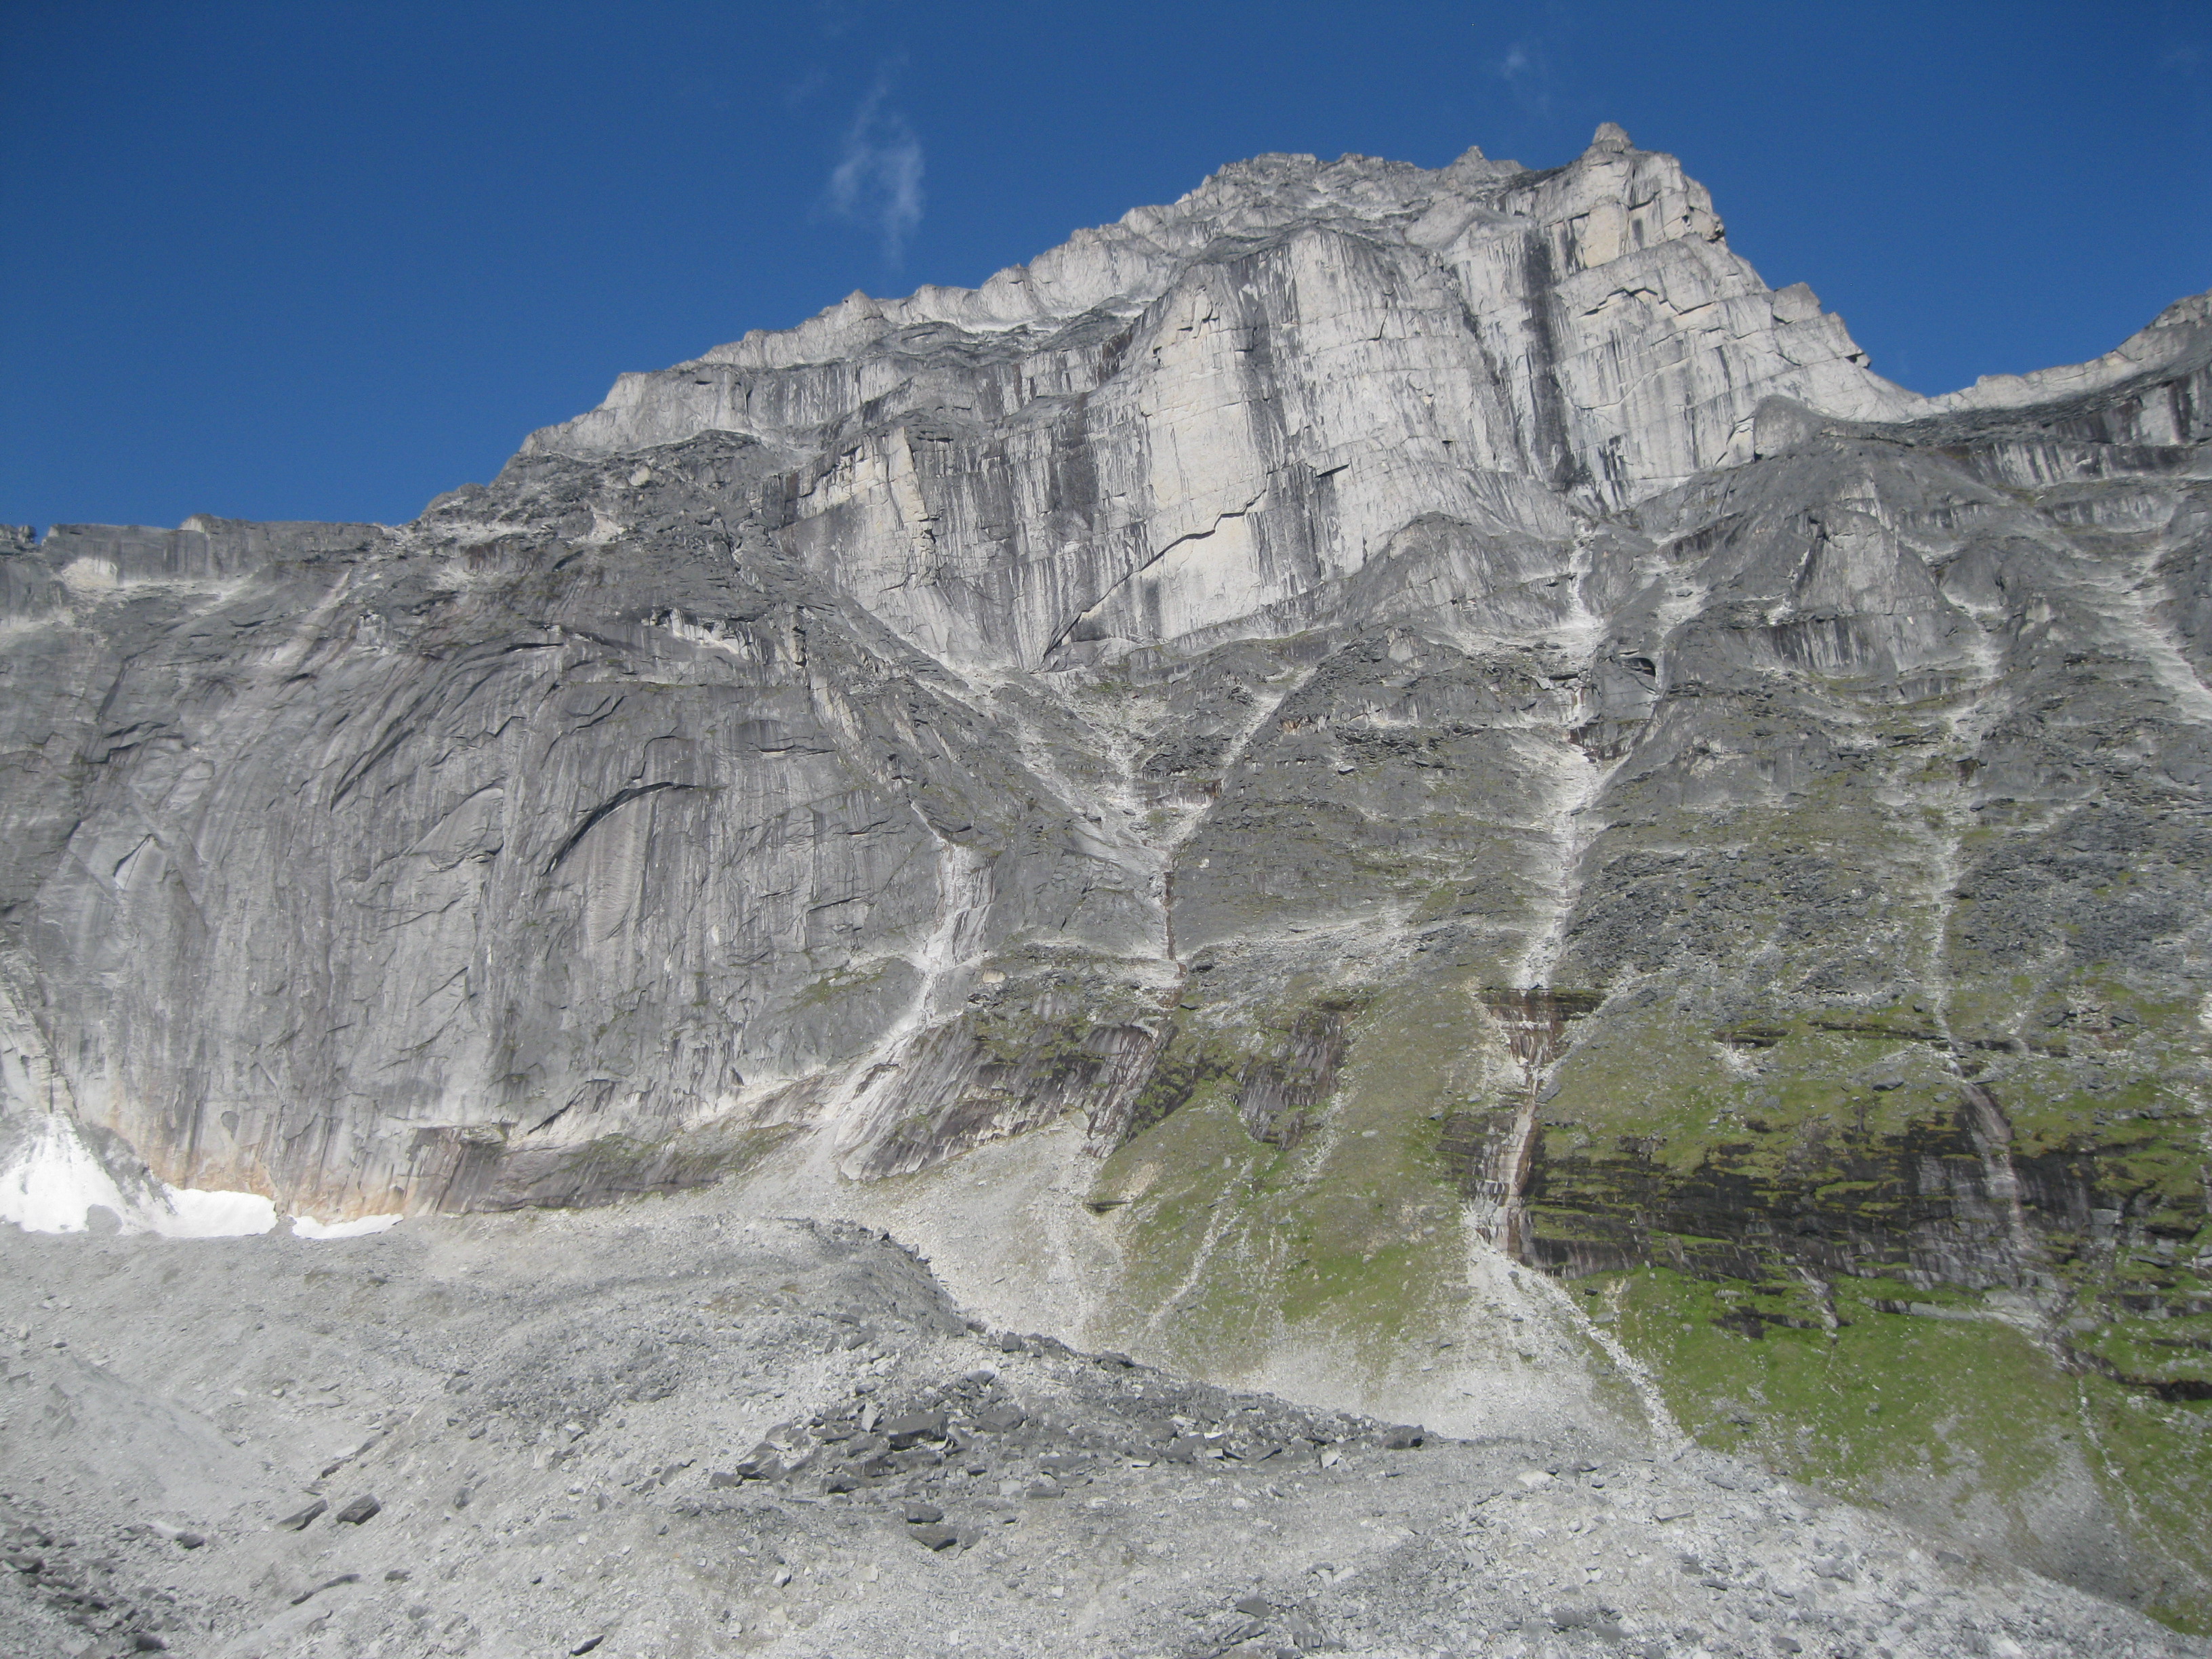
High standing waves stretch almost all the way down the Fourth Canyon. The waves are big, but not scary, but they can be difficult to scout due to canyon walls and bends which hide upcoming waves. There are a couple of rocks to look out for and a massive rock you probably won’t notice before you pass it around the first bend in the canyon. The scenery is absolutely stunning all the way through, but you will be so concentrated on paddling that you won’t have time to pay attention.
Once the canyon have been completed head over to the first gravel bar and have a short rest. You will have such a great feeling of accomplishment. It is so awesome.
False Canyon
When continuing onwards down the river you will be in-between the Fourth and Third Canyons. About 2 km (1.3 miles) after Fourth Canyon you enter False Canyon which starts off with a class I/II rapid. It’s really cool but not too difficult.
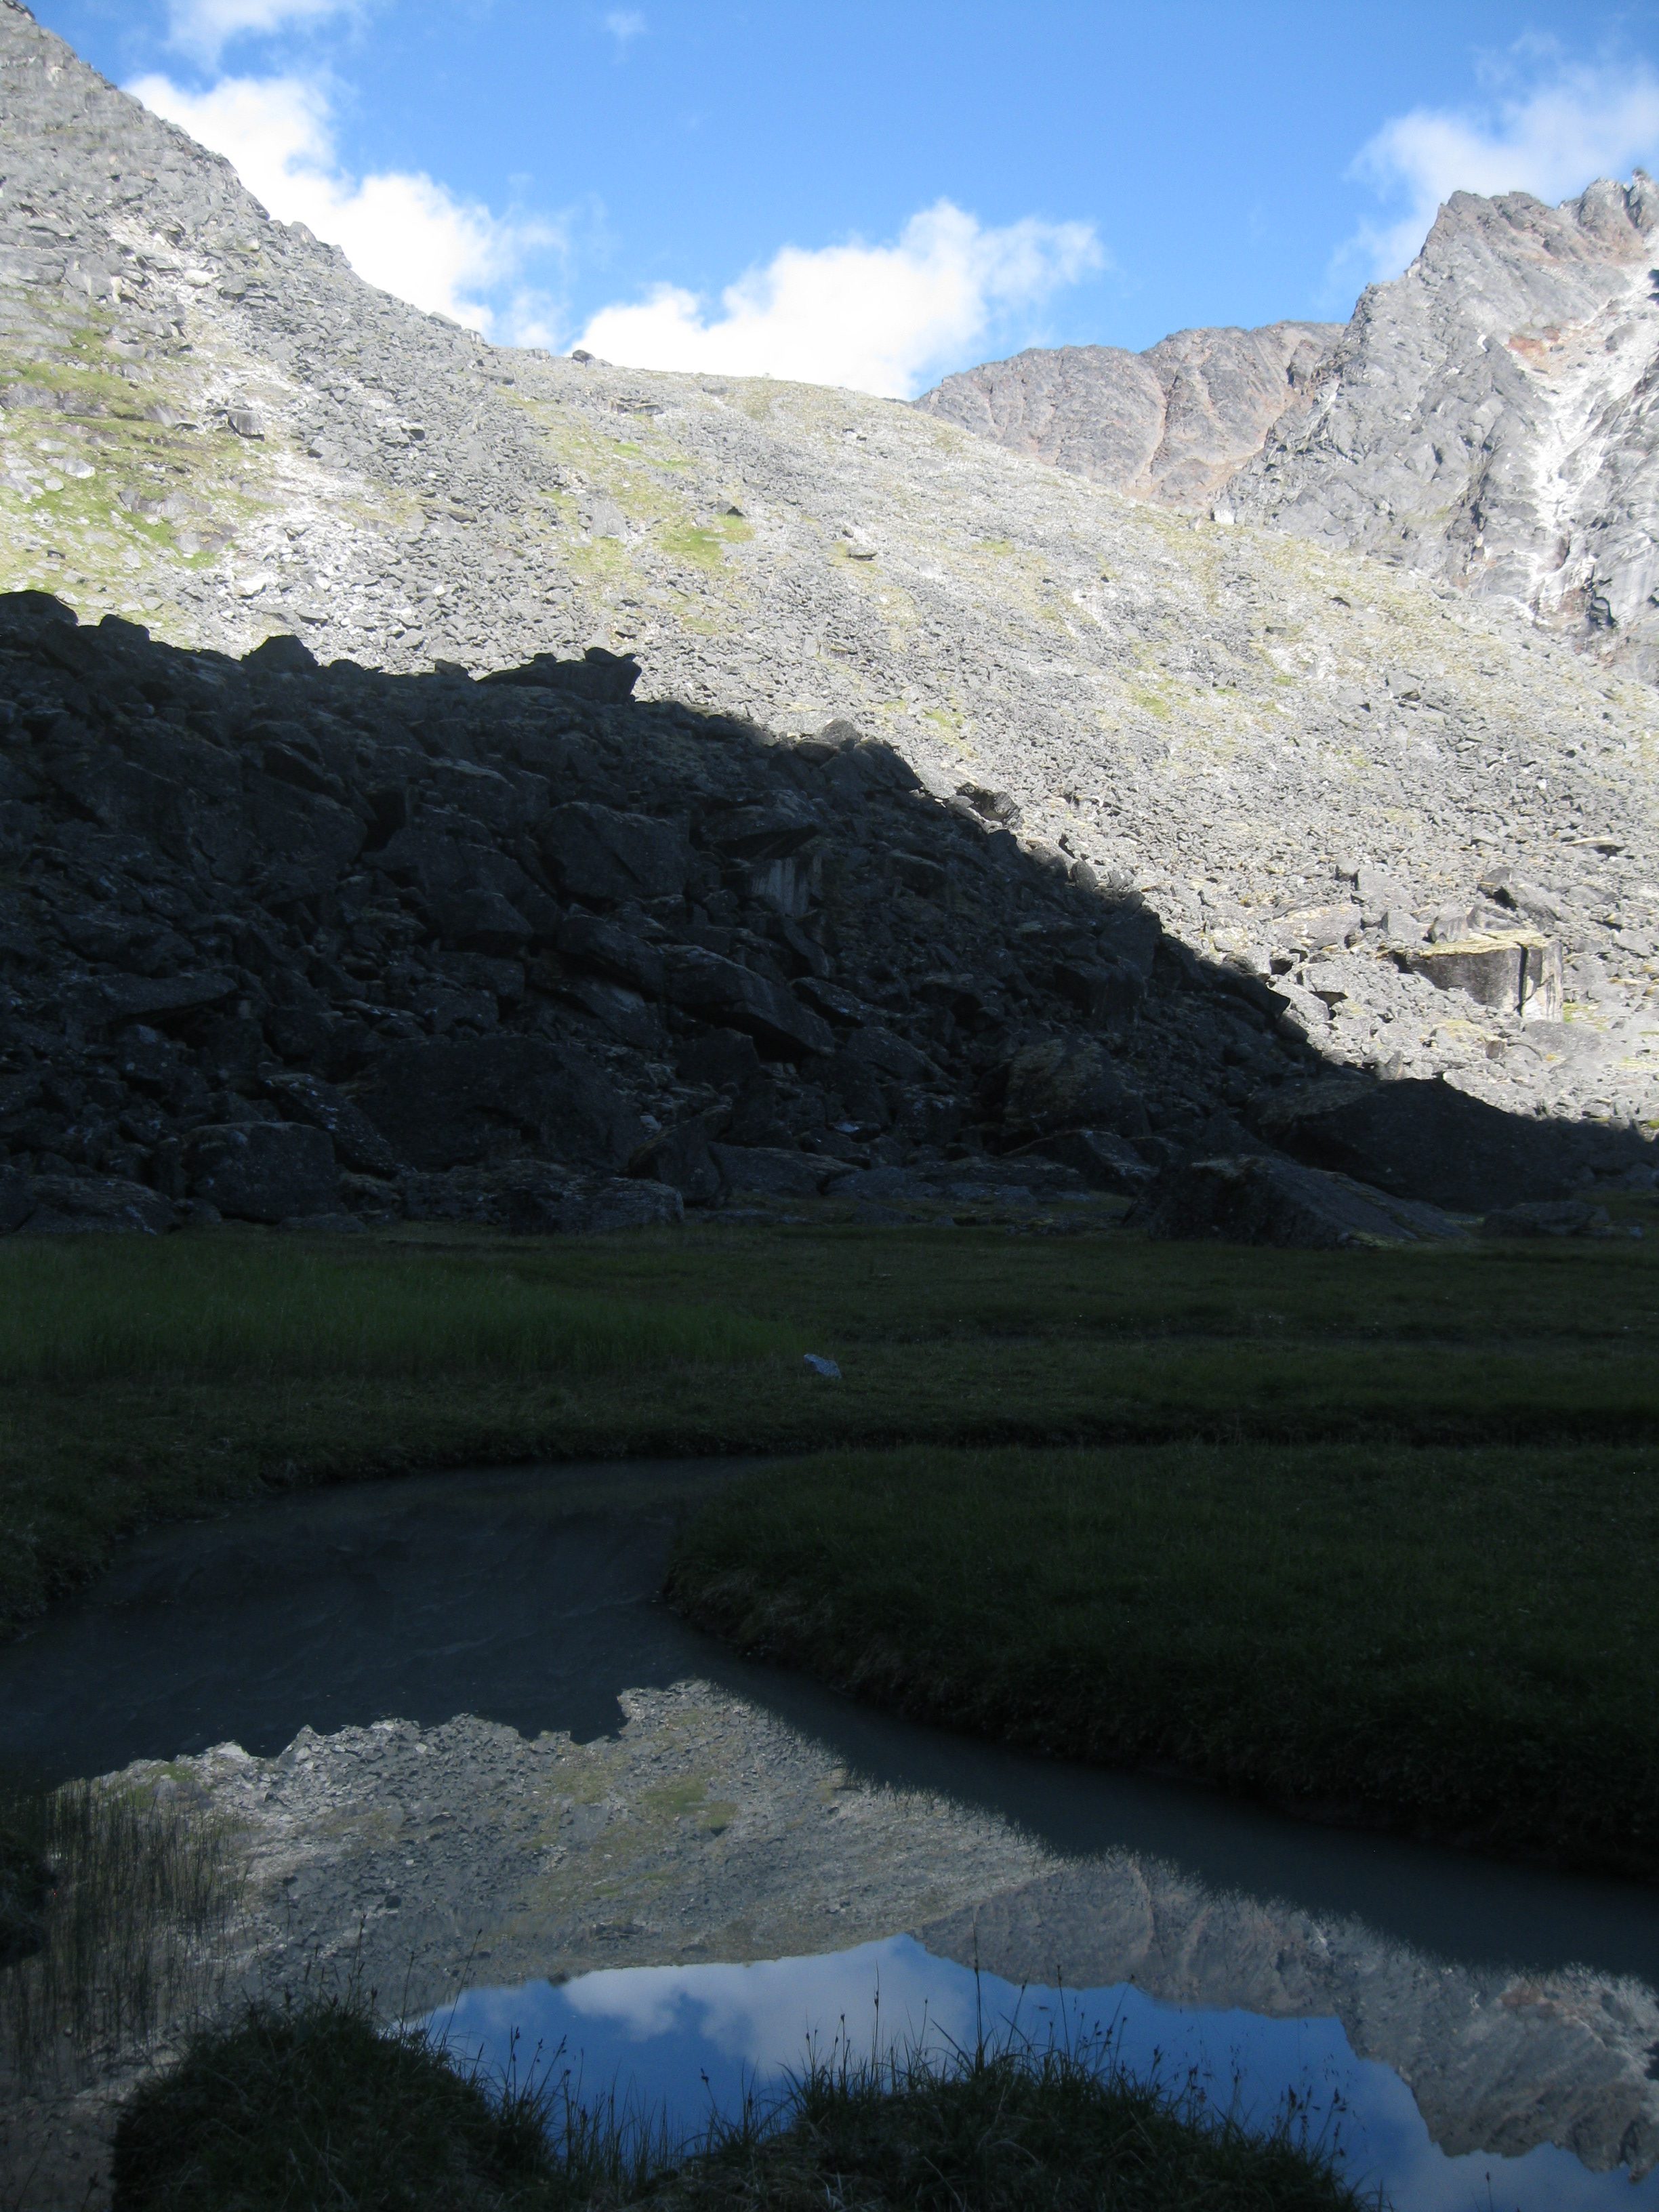
The scenery is beautiful all the way through and after about 2 km (1.3 miles) it’s the end of False Canyon. Between False Canyon and where Clearwater Creek runs into the river, another class I/II rapid is coming up which you have to be aware off. Beyond Clearwater Creek you will reach yet another class I/II rapid about 1.5 km (0.9 miles) before getting to the next major challenge.
Figure 8 Rapids
Just beyond the 360 km mark the Figure 8 Rapids appears which have changed significantly in recent years. High water has altered the upstream cobble beach and dynamics dramatically which have changed the locations of boils and eddies considerably. Therefore it is recommended that you scout the rapid from river right and be cautious when approaching. They are categorised as class II/III rapids.

This section is quite the task and actually more challenging than going through Fourth Canyon. But it is also really cool if you and you paddle mate know what you are doing. Concentrate thoroughly on reading the water during this section. It is so awesome nailing these rapids and it is so satisfying when completed.
Wrigley Whirlpool
Just after paddling through the Figure 8 Rapids you arrive at Wrigley Whirlpool which can be a bit challenging too. Just remember to keep paddling through these whirlpools and it’s all good. They can be a bit intermittent so it’s hard to predict what it will be like on your visit.
Tricky Current Rapid
After the whirlpool, Wrigley Creek is coming up and about 2 km (1.3 miles) further downstream the next and final big challenge for the day is coming up which is the Tricky Current Rapid.
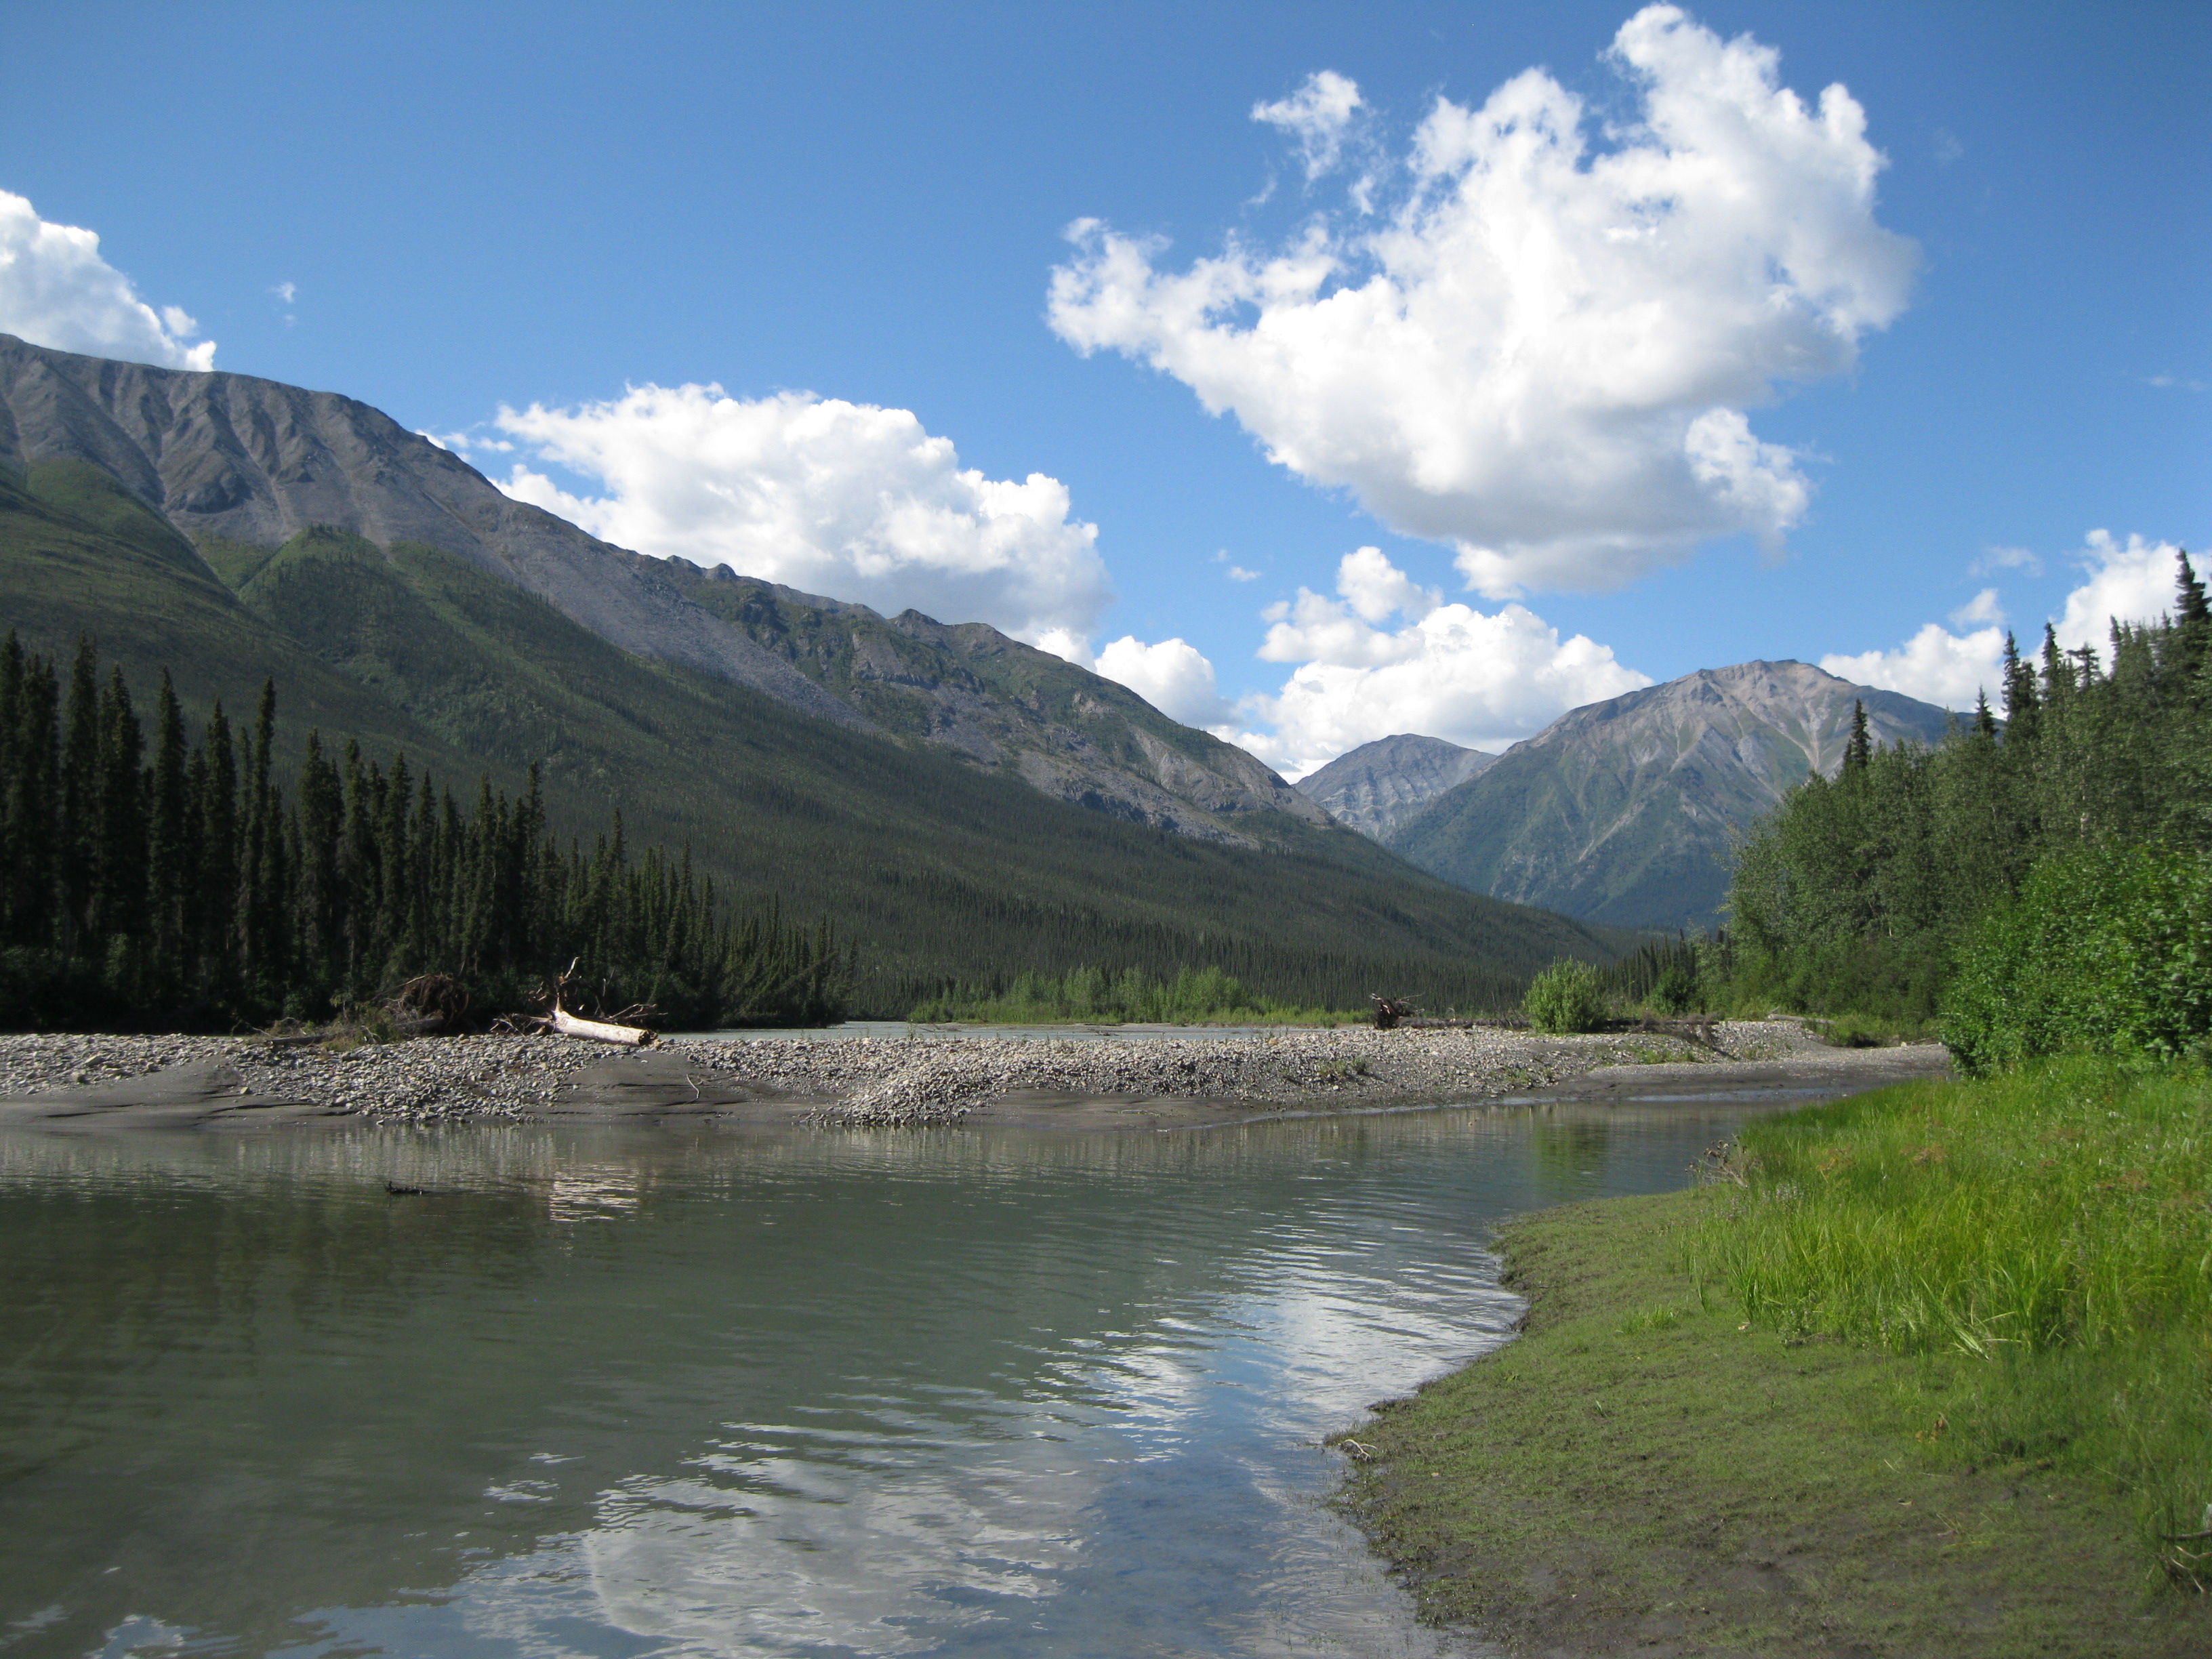
You arrive at two islands. On river right, the main channel, at the end of the first island there’s a powerful and unpredictable whirlpool known as Tricky Current. It is known for being precarious at all water levels. It can avoided by heading down river left of the islands. You really have to concentrate on doing this section as it is, as the name suggests, tricky and also more challenging that going down Fourth Canyon.
Once you get beyond this point all the hard rapids are finished for the day.
Flat River
At around the 370 km mark on the river, about 4 km (2.5 miles) from the Tricky Current Rapid you arrive at Flat River which flows in the South Nahanni River. This is an interesting historic river as this is where the search for gold was often concentrated in the Nahanni area. It began around 1900 when a gold was found in a piece of quartz rock.
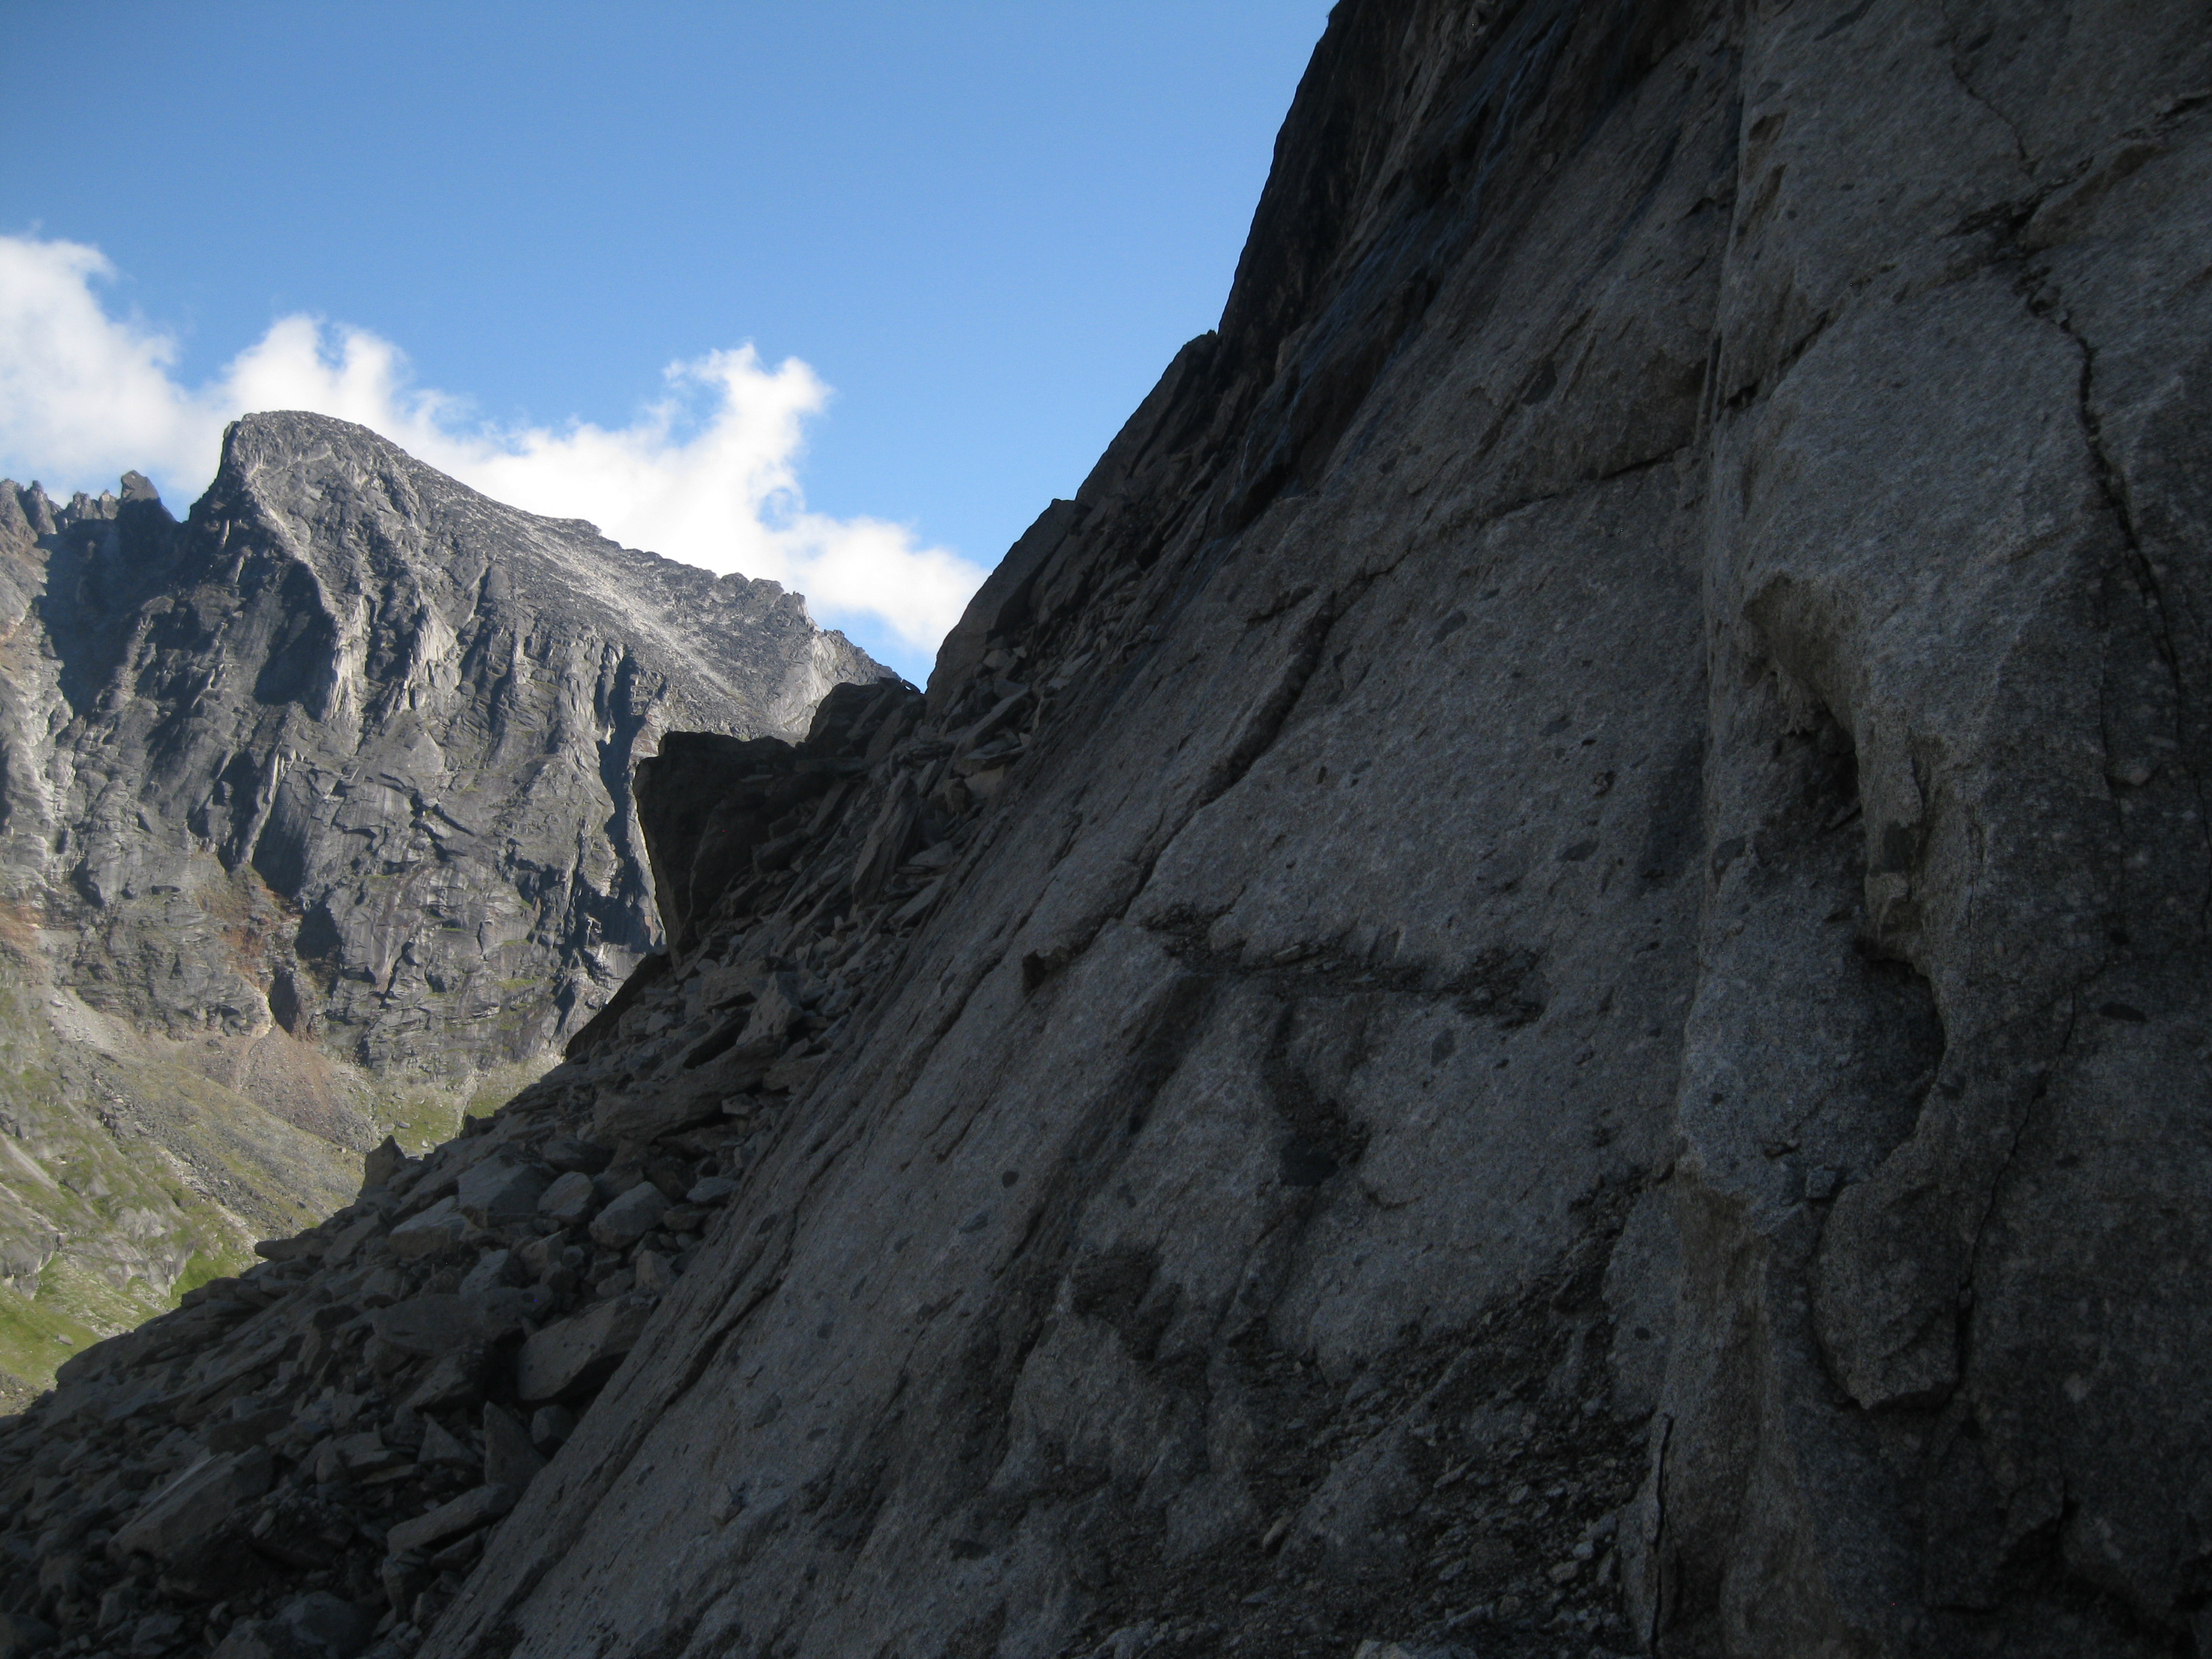
A few years later the McLeod brothers found gold on a tributary of the Flat River believed to be Bennet Creek. Several prospectors followed and the most determined was Albert Faille who spend 46 years up the Nahanni River in his wooden scow. Sadly he never struck any gold worth mentioning.
Vera Creek
About 3 km (1.9 miles) downstream from Flat River, Vera Creek comes into view at around km 375 which is a perfect spot for setting camping after an absolutely awesome and challenging day. Going from Virginia Falls to Vera Creek will probably take you about 5 hours and 30 km (18.8 miles) have been covered. At this point some grub will be appreciated for sure.

At Vera Creek there is a big gravel bar next to the creek where there’s plenty of space to set camp and a kitchen area. The spot is surrounded by beautiful mountain peaks right at the intersection between Vera Creek and the South Nahanni River. So awesome.
You can get some amazing shots of the creek against the peaks and the river against the peaks as well. When getting in to the late evening it will reach the golden hour which will provide some incredible views of the mountain peaks and an amazing sunset is likely to appear as well.
Paddling from Vera Creek to the Third Canyon
The following day you will be heading further downstream towards the Third Canyon. It is much more relaxing than the previous day. There are some rapids along the way but nothing really challenging so you don’t have to kneel in the canoe today.
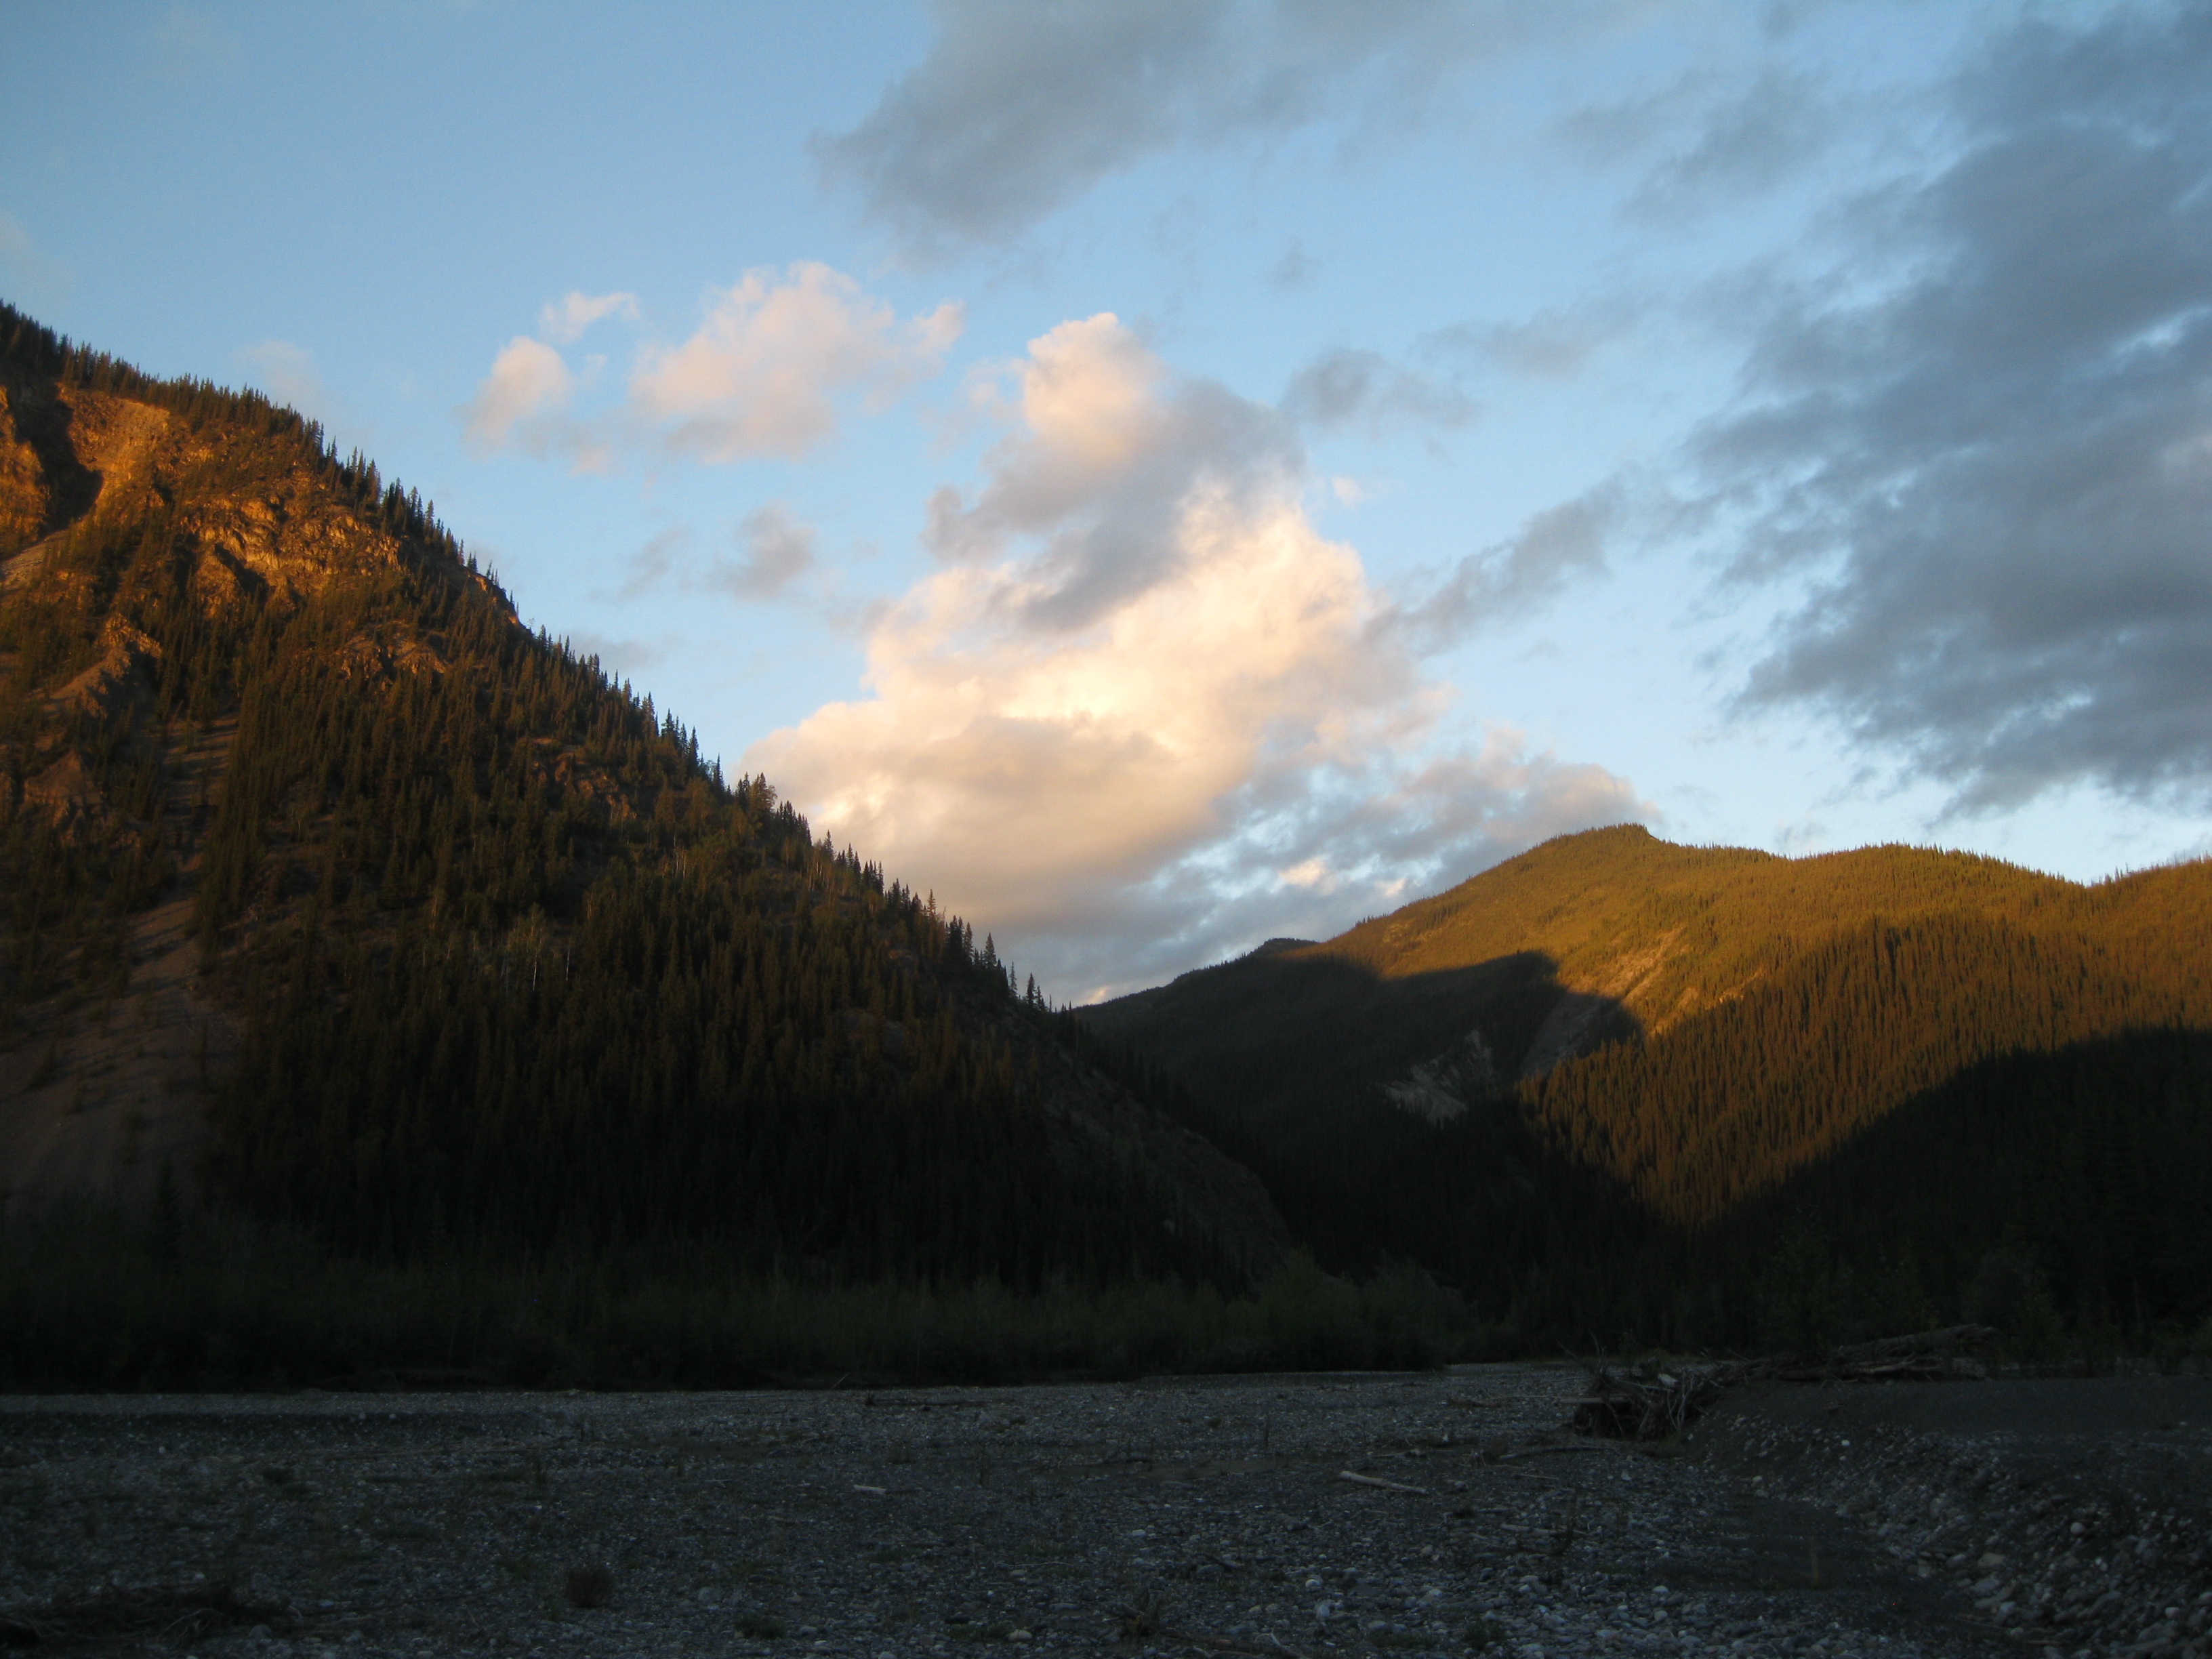
Early in the morning at sunrise you may notice some mist rising from the river in the distances which is the warm water vapour enters a region of cooler air. This is water vapour condensing into small water droplets that scatter the light giving them a cloud like appearance.
When ready to depart, the journey heads down the river for about 13.5 km (8.4 miles) before arriving at the Third Canyon. There’s a bit of current along the way so the duration will be less than a couple of hours.
The Third Canyon
If you leave Vera Creek around 10-11 o’clock the arrival time at the Third Canyon should be a bit past midday. The massive canyon walls are beautiful when entering the Third Canyon at around km 388.5 and as opposed to the day before in the Fourth Canyon you have time and energy to enjoy the views. Absolutely stunning.
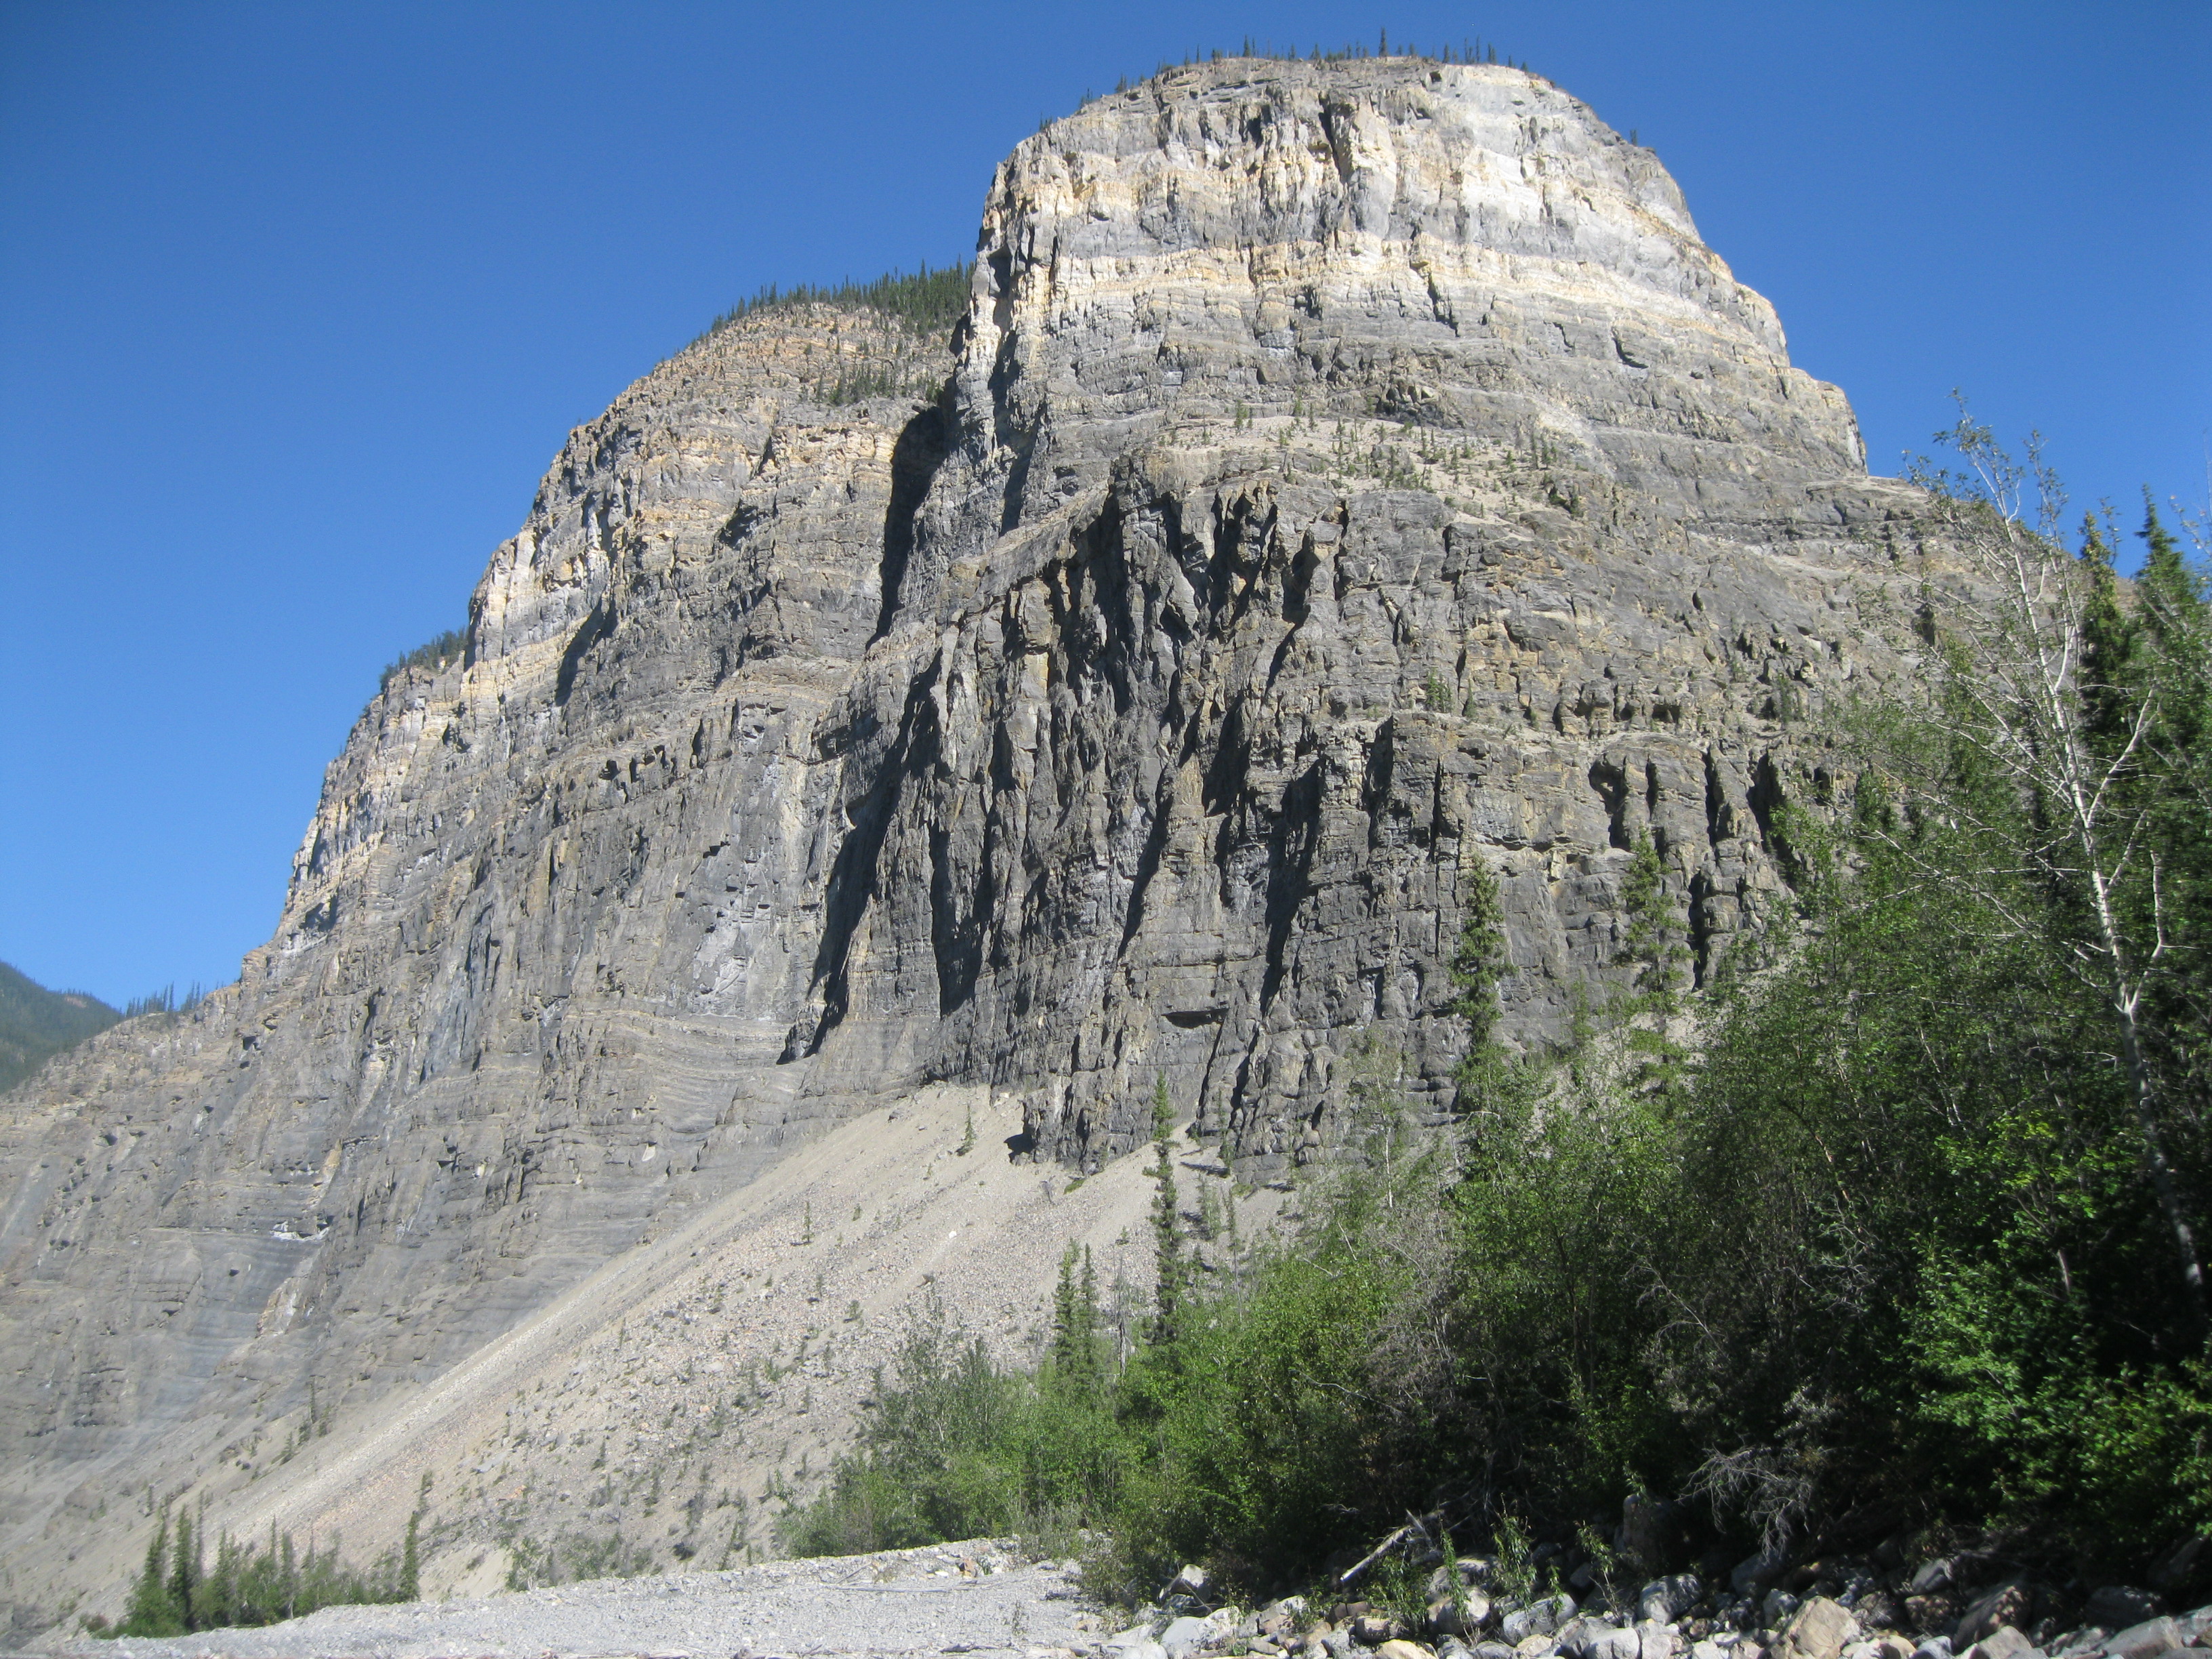
Have a stop on one of the gravel bars inside the canyon for a bit of a break to stretch your legs and take some photos of this amazing scenery. The view of these towering rock walls is really impressive.
The Third Canyon is a 40 km (25 miles) long cleft through the mountains of the Funeral Range. Unlike the lower canyons, long slopes with a lot of loose rocks are present. This is because the rocks do not consist of resistant limestone as in the First Canyon, but a mix of stratum of shales, sandstones and limestones. Where limestone is present, the rock walls are verticals. A great example of this is at the Gate.
The Third Canyon – The Gate
As you continue further downstream you will arrive at the next major and the highlight of the Third Canyon and one of the highlights in the park which is the Gate. It will probably take about an hour from the stop at the gravel bar and it is located at km 404.
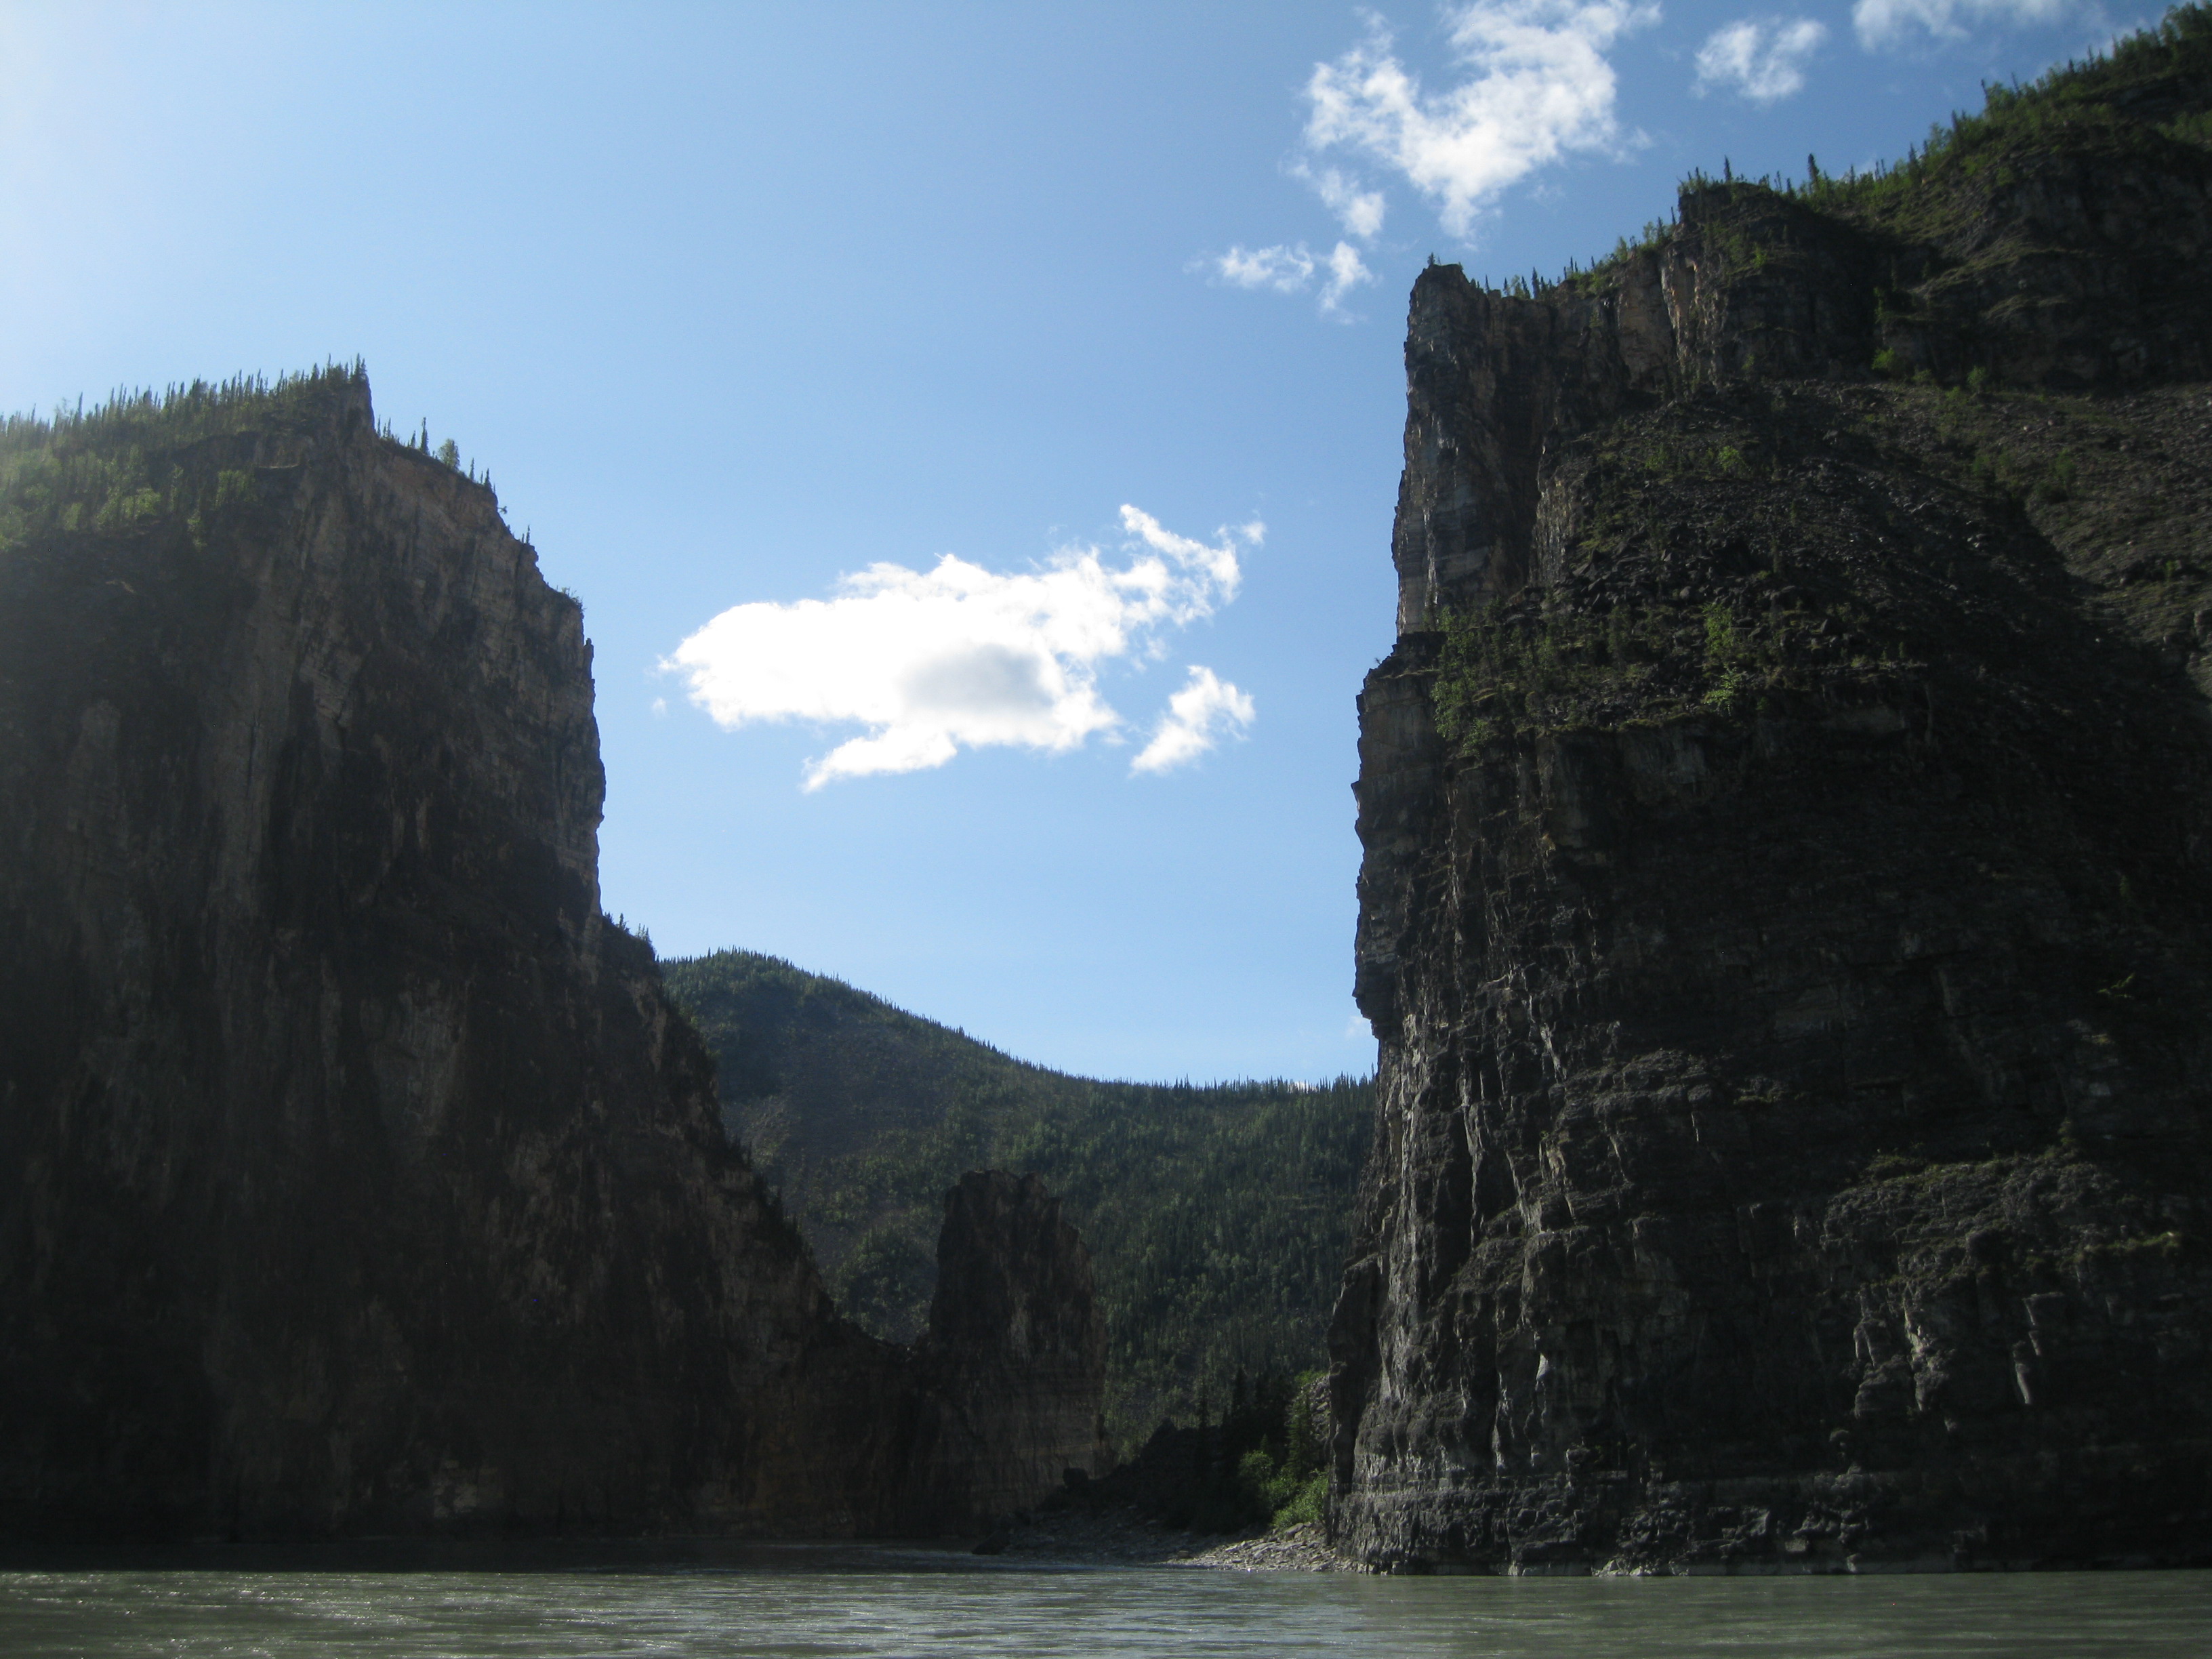
Thousands of years ago, the river abandoned its old course for its present route through the Gate. It is believed that the water started to trickle through the new route and slowly carved its way through the passage along the vertical cleft in the ridge. A natural bridge, thought to be present during the early stages of the diversion, collapsed as the passage enlarged.
It gets to a point where the river narrows with a big rock pinnacle in the middle, takes a sharp turn to the right and it has two massive 460 metre tall (1,509 ft) rock walls on each side. This is known as the Gate and the pinnacle is called Pulpit Rock.
Pull over to the gravel bar just opposite the Gate. It may be a bit late in the day but it is a great spot for a lunch break and it is also the perfect time to boost your energy as you will be heading out on a slightly challenging hike up the hill. This is a 650 metre (1,232.5 ft) hike one way with an elevation gain of 200 metres (656 ft).
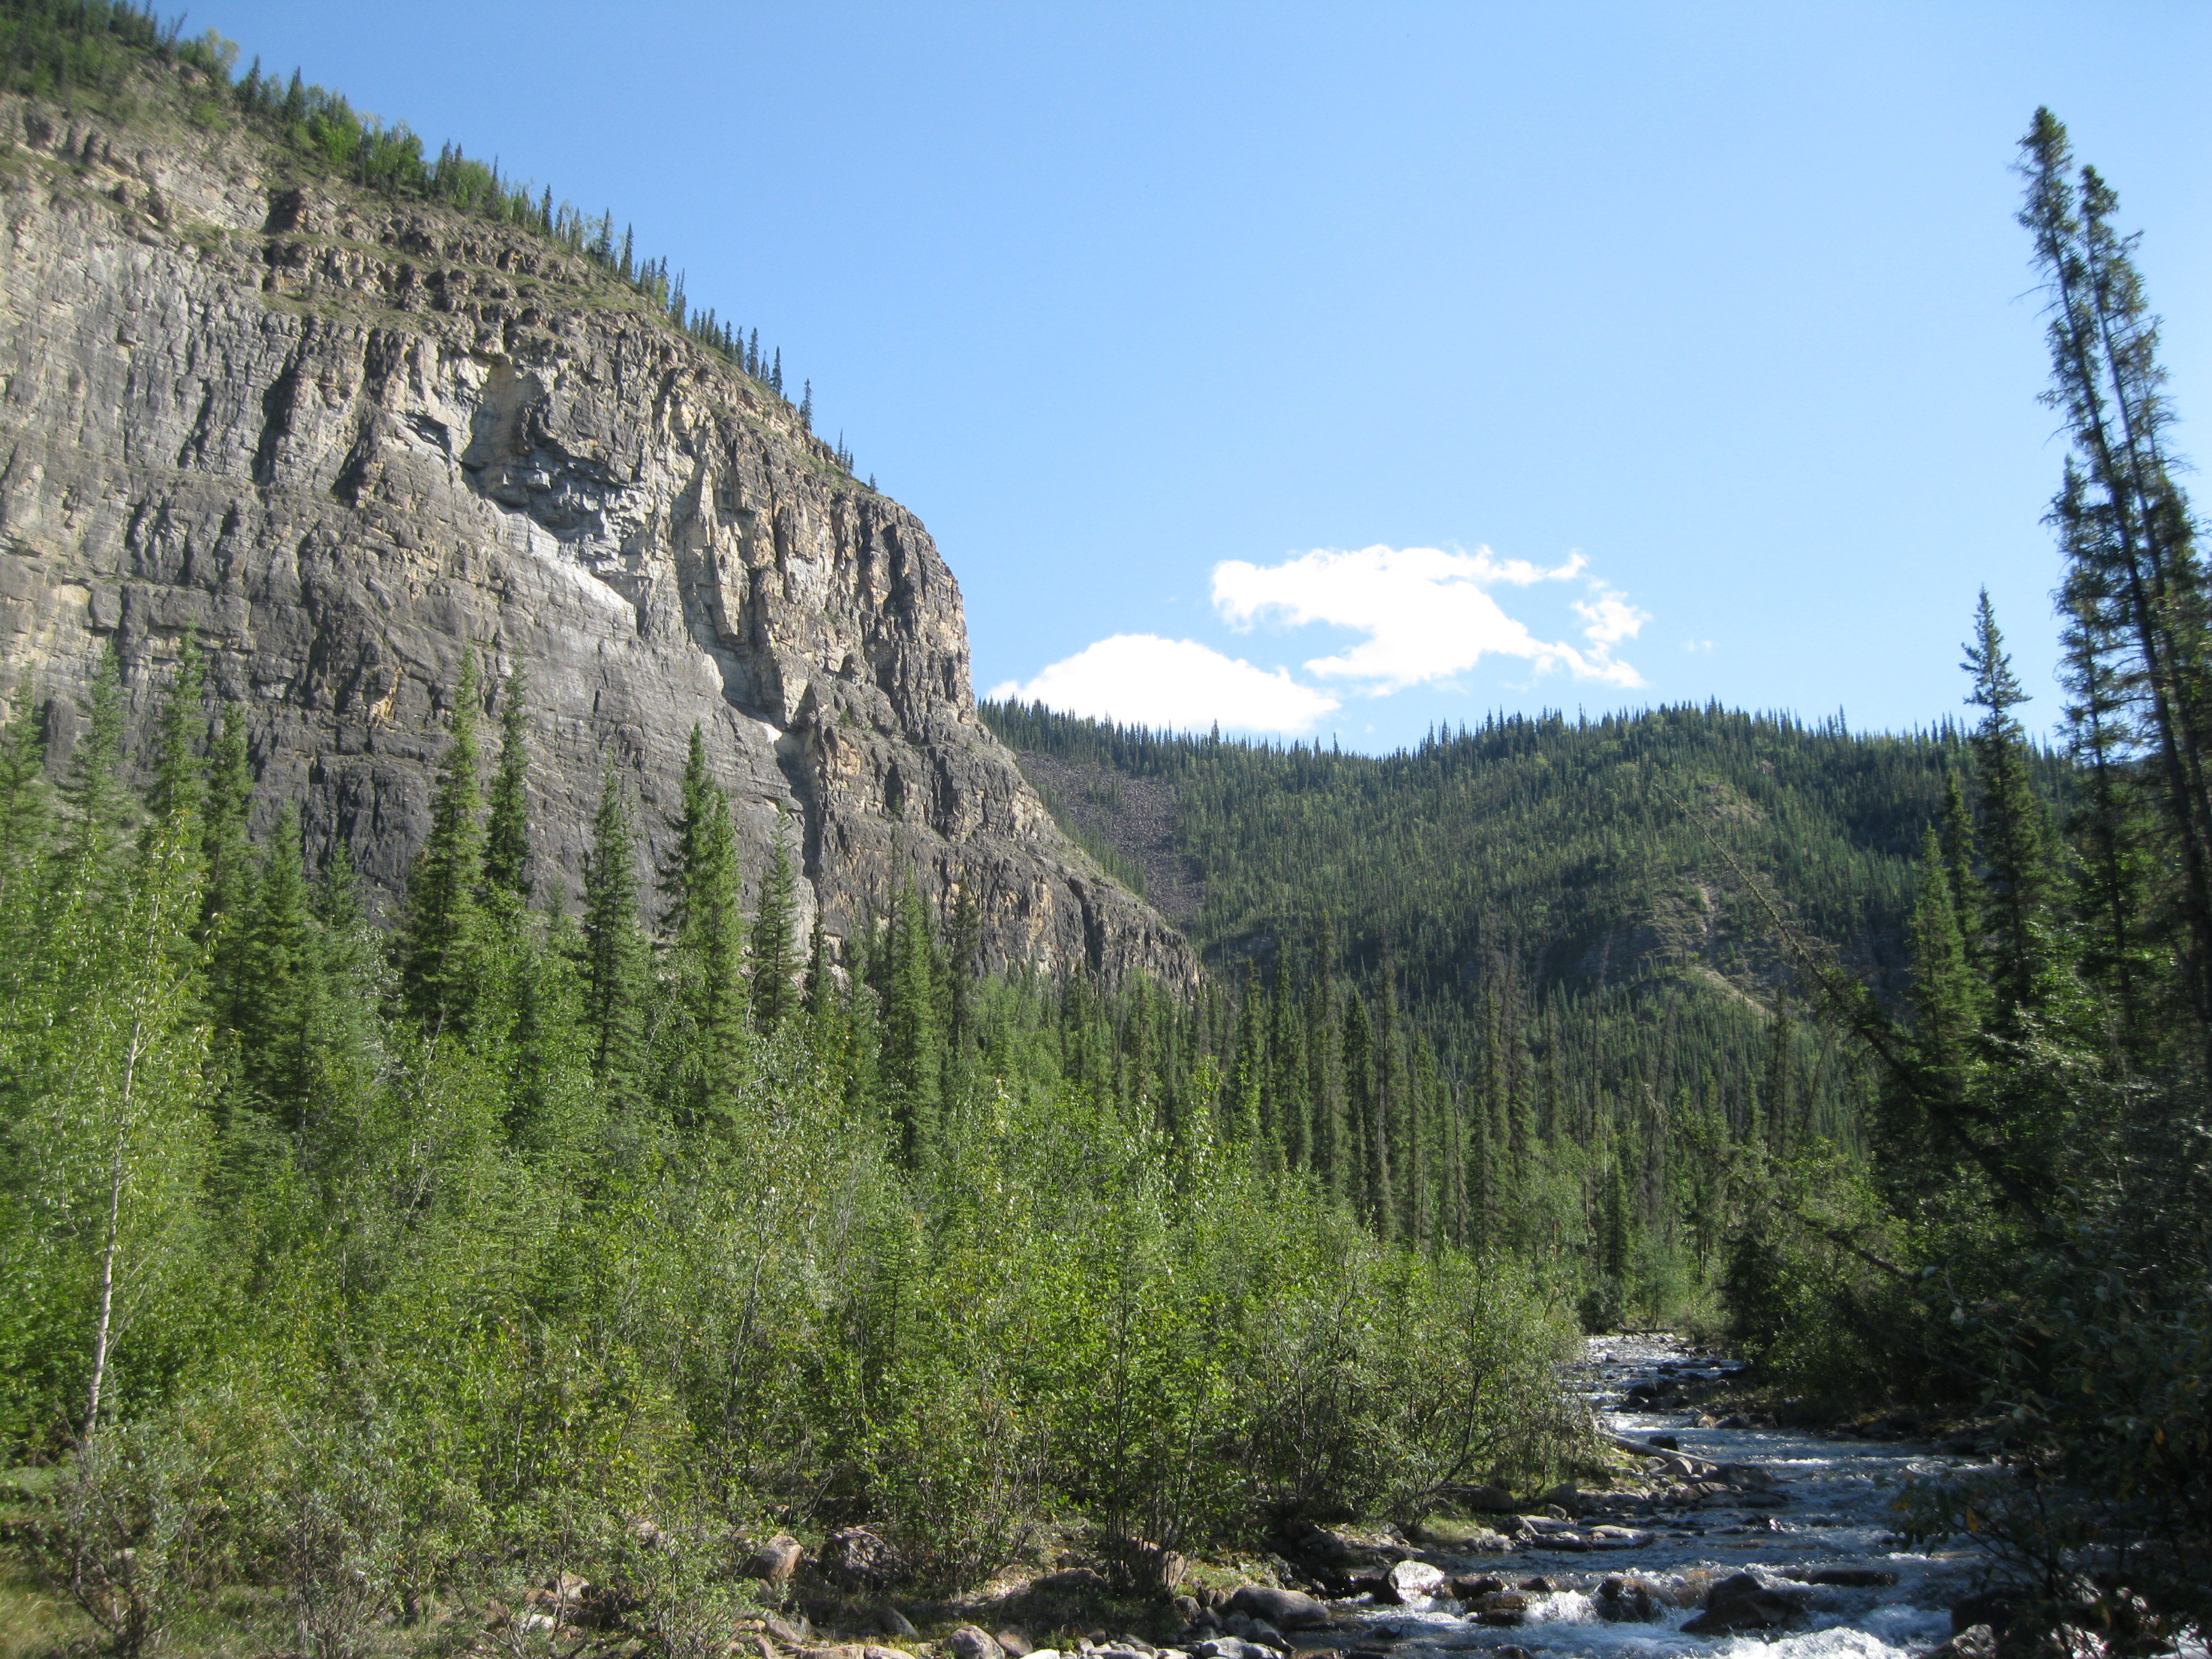
Remember to pre-hydrate and refill your water supply. Take some shots of the Gate and also down the river to where you came from. Amazing views in both directions.
When heading out on the hike, bring your wet shoes, hiking boots, hiking poles, a small day pack, water and snacks. You will be walking from the gravel bar across rocky debris towards a small creek which has to be crossed in your wet shoes.
The creek is probably about 4 metres (13 ft) wide and the cross is not difficult. Don’t have your backpack tightened around your waist for the worst case scenario of falling into the water, you want this to be loose. It should not happen, but better safe than sorry. When crossing the creek it is easiest and safest to do it sideways and take one step at a time, meaning first move your right leg, then you left leg alternately.
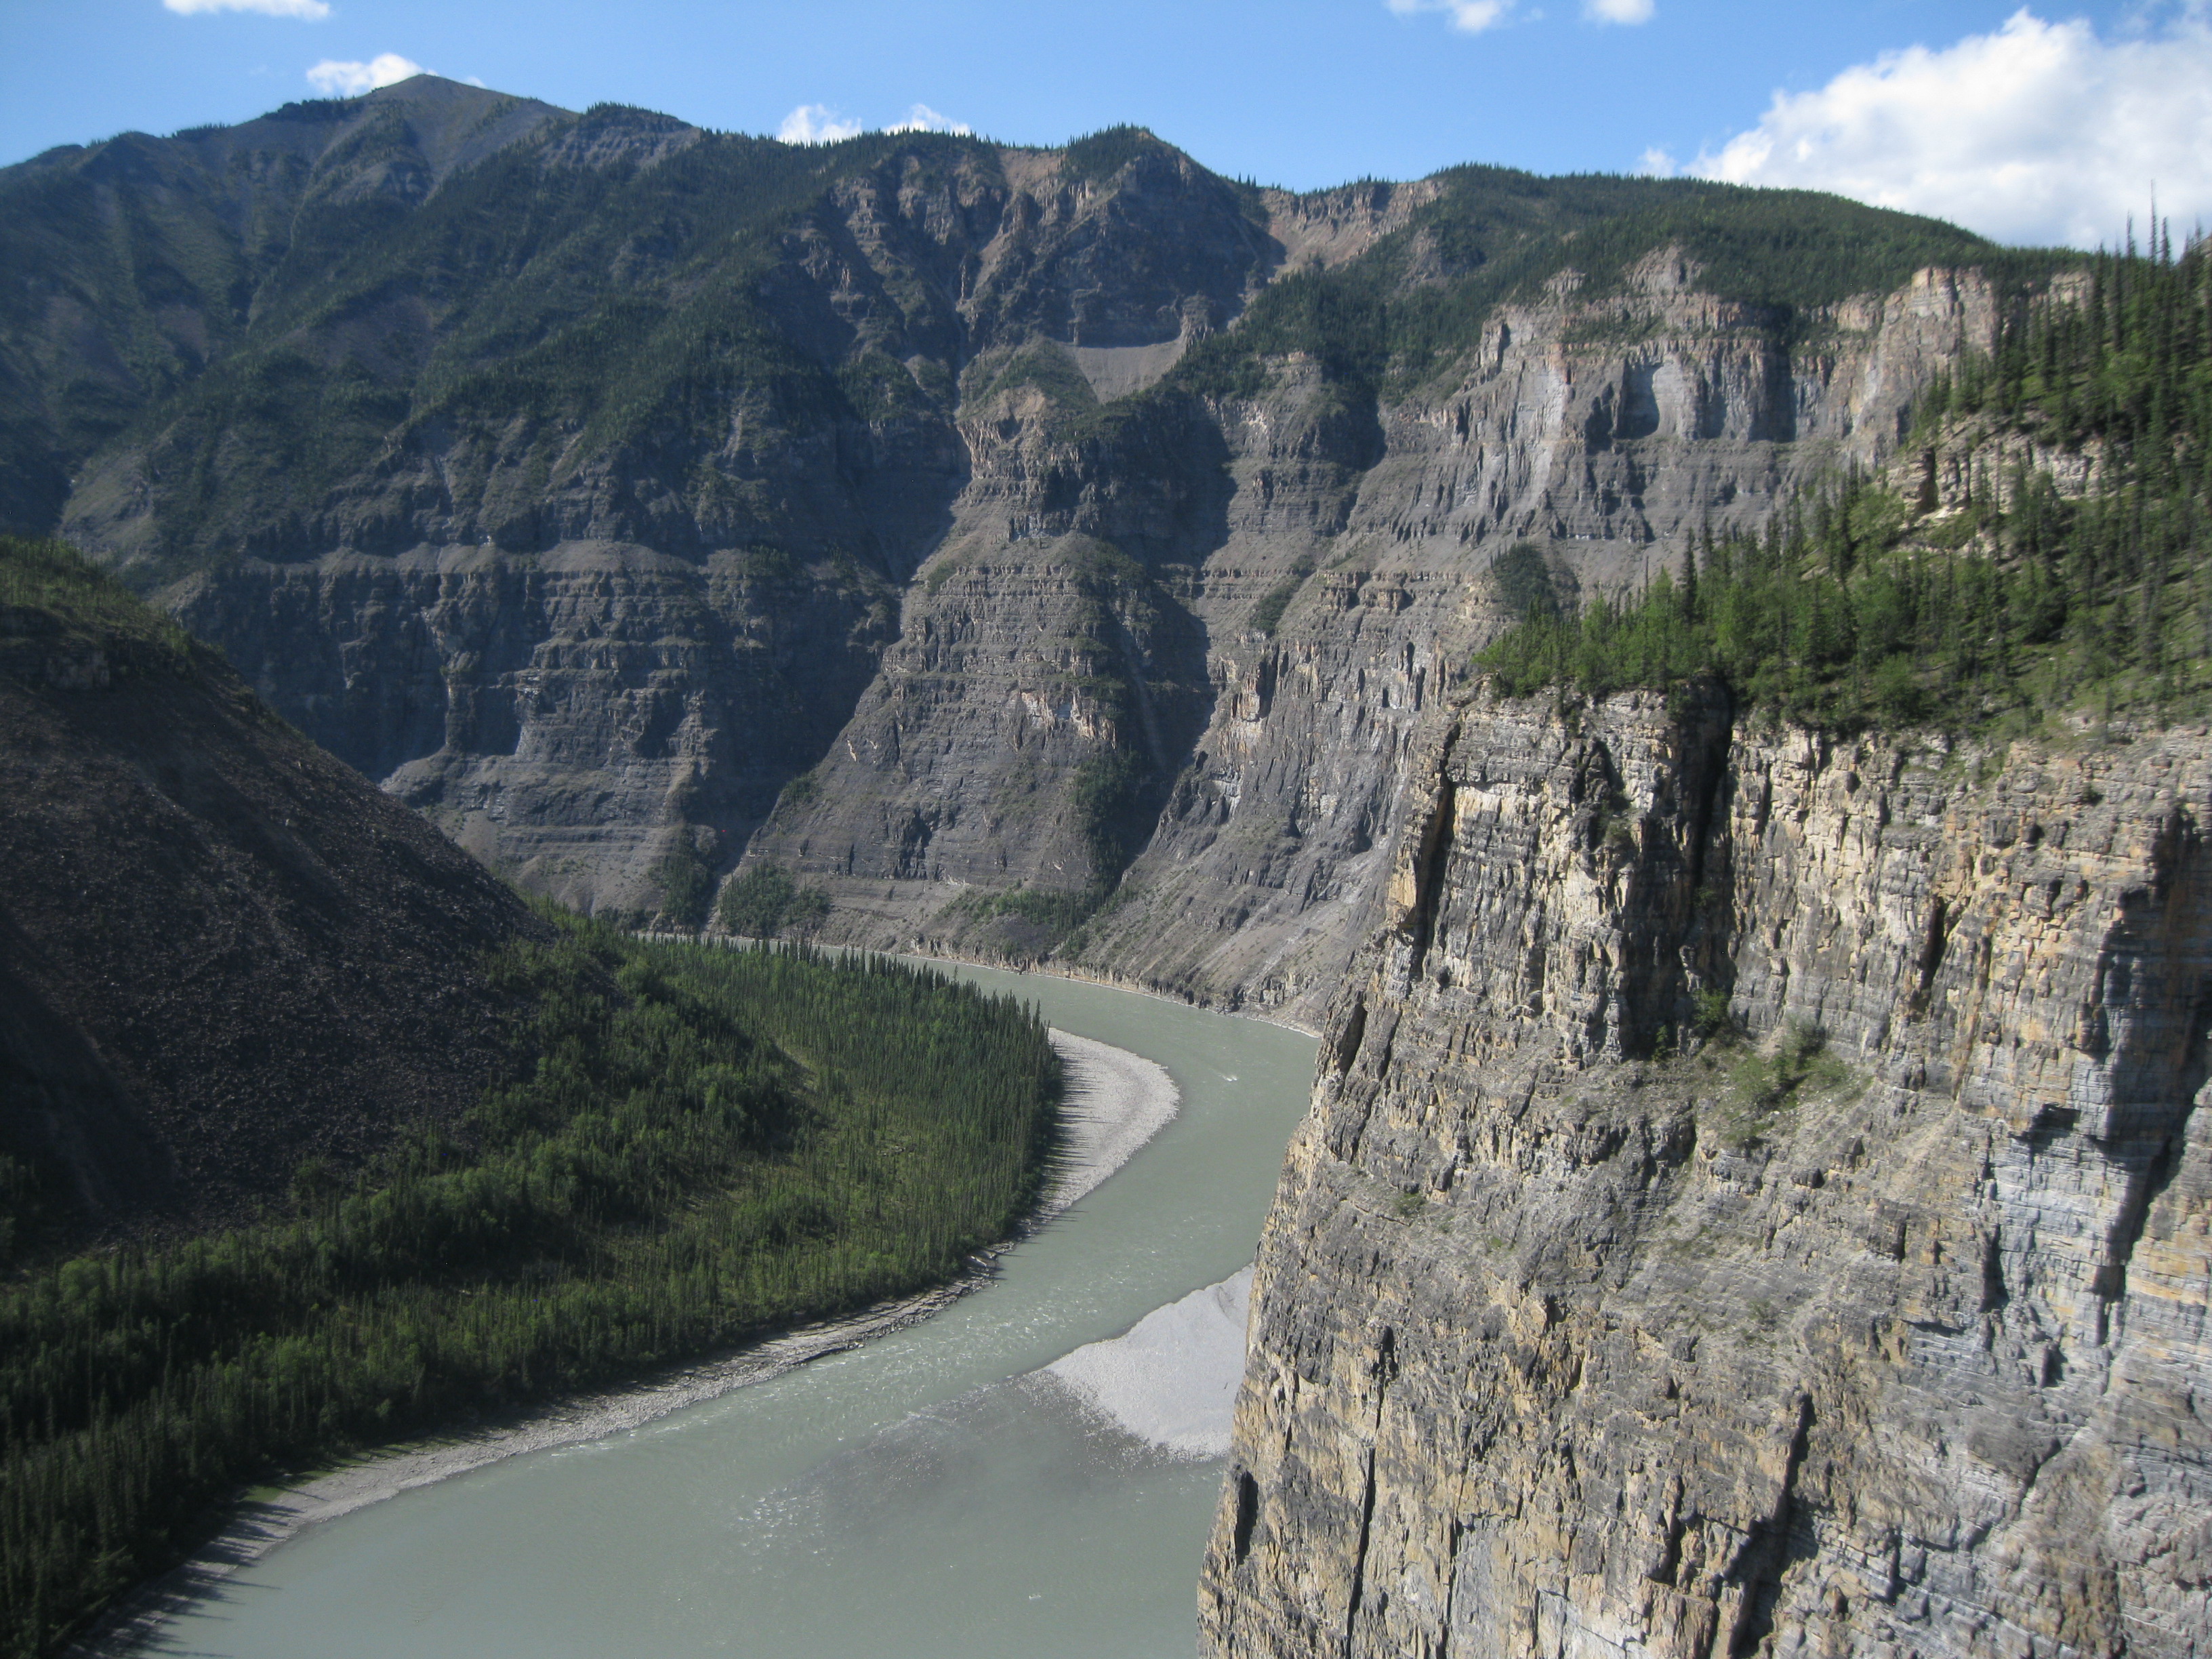
When the creek has been crossed you can get a really good shot of the creek against the mountain peaks away from the Gate. Really beautiful. The trail down to the point where the climbing starts up to the top of the Gate is really obvious.
The continuation of the trail upwards is also pretty straight forward for the first part but there are sections where it is not too clear as you will be meandering across boulders that are not marked with cairns. There are several spur paths but where possible keep to the main trail. The only way is up so at the end of the day you will get there.
The climb is quite steep and intense. So do take your time and do it at your own pace. After about 30 mins on the trail you will arrive at the first vantage point of the opposite rock wall, Pulpit Rock and further down the river of Third Canyon. There is also a view of the very top of the rock you will be climbing. Furthermore if you turn around there is a perfect vista of the river where you came from down the Third Canyon as well. There is a bit of space to walk around to take some shots here. Absolutely stunning.
Much of the rock near the cliff edges are fractured and unstable so hike slowly and choose your route carefully.
There is a tricky spot where you have to jump from this promontory across which can be a bit scary. It’s not difficult, but if you feel confident just do it and don’t look down. If not, just walk down a bit and climb across. From this point it is only about a ten minute walk to get to the very top. Once atop the canyon wall you can admire the landscape you paddled through upstream and get a glimpse of the downstream water yet to come.
Also the view of the rock wall across from the Gate back and down the rock you just climbed. Take your time, have a chill and enjoy the amazing views. You can easily spend at least half an hour up here. Remember to get a picture of yourself against the scenery.
The view from the top is nothing short of amazing. There is plenty of space up here to walk around and take some killer shots from many different vantage points and angles. There’s a perfect bird’s eye view of the big bend of the river that goes through the Gate.
Afterwards return downhill on the same trail. It can be pretty hard on the knees as it is very steep. Take your time and remember to take some shots on the way down too and enjoy the views. You can get a great shot of the creek flowing down the hill into the river. Finding the trail on the way down can be a bit of a challenge at times, but there is only one way and it is down, so you will find it in the end.
When you get off the hill, bring out the wet shoes again as the creek crossing is coming up to get back to the gravel bar and the canoes. The descent from the hill all the back will probably take about 40 minutes.
The Third Canyon – From the Gate to the gravel bar in the Funeral Range
After this amazing continue downstream. The first challenge is heading through the narrow gate and the sharp hairpin turn. It is very important that you enter the Gate at the right angle. Bear in mind that after the turn there are some rapids you have to be aware of. Concentrate on this and you will be alright.
It is really cool and quite an amazing sight paddling through here. You really get the awesome feeling of being in the wild west and being an explorer with these massive canyon walls all around. It is such fantastic experience.
It’s been a pretty hard day and the day before was a challenge as well, so it is recommended that you find a gravel bar to set camp not too far up the river. There is a really good big spot about an hour from the Gate. Bear in mind that there will be parts of the river that can be challenging, so keep an eye out for tricky eddies.
There’s a gravel bar located approximately around the 415 km mark on the river inside the Third Canyon. It’s an awesome spot in the middle of the Funeral Range with fantastic view of the surrounding canyon walls. Set up camp, your tent and the kitchen area. Have a stroll around and take some shots. You may just be lucky and spot some bear or wolf tracks in the sand.
The gravel bar is really big so it will probably take about 15 minutes to walk down to the end of it. Wear your hiking boots as it is really rocky. You can get loads of great photos here of the many mountain peaks in the setting sun as well. The sheer canyon wall at the end of the gravel bar here is quite impressive. It may be a bit of a challenge to get a good picture depending on how the natural light
Early next morning, the natural light will be different, so you should be able to take some shots of the mountain peaks and rock walls which weren’t possible the evening before
When leaving the gravel bar, be sure to head into the current and the stream at the right angle. It will be a day with a little current and small rapids for the most part. At the very end you will reach the only major challenge of the day at George’s Riffle.
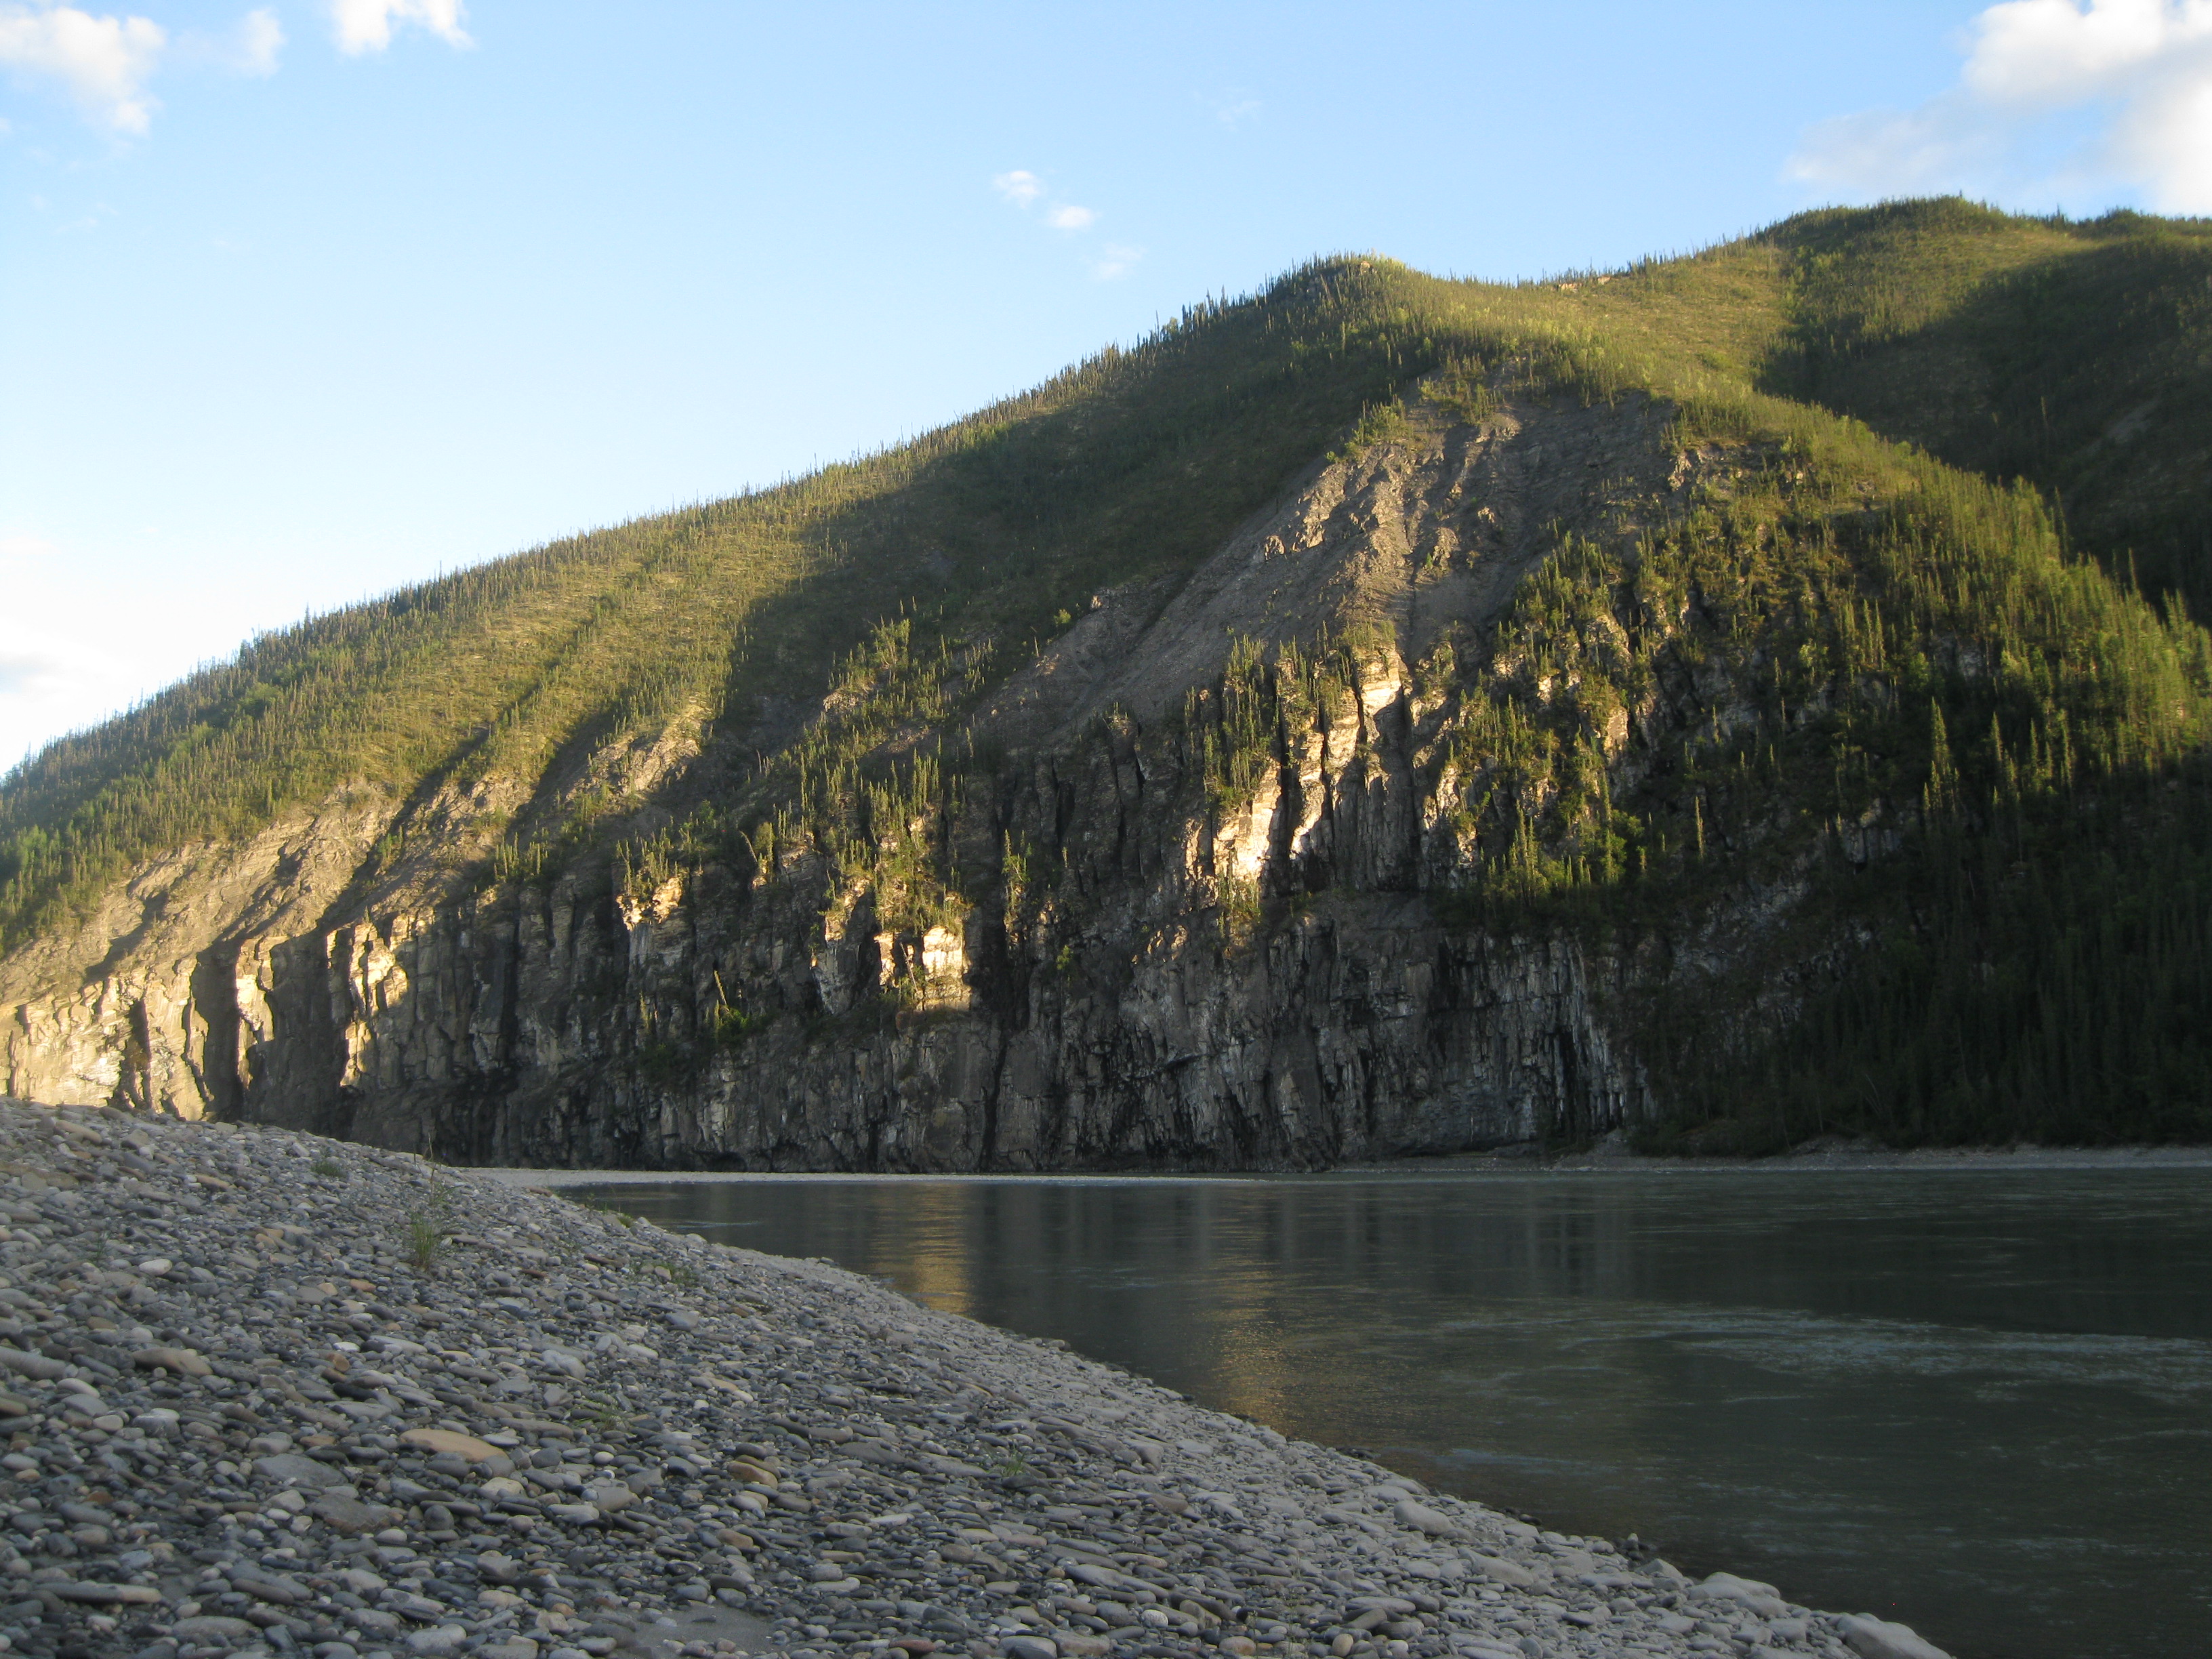
The journey continues through the third canyon for about 10 km (6.3 miles) and at around km 425, the Third Canyon ends. You will be turning around a point know as Big Bend. There will be a gravel bar between the Third and Second Canyons which is appropriate for a short break.
The Second Canyon
At around km 429 the Second Canyon starts with massive canyon walls of sheer beauty. Find a gravel bar where you can chill and have lunch. A great opportunity to enjoy the scenery and take some photos as it’s not appropriate to take photos when paddling through the river.
The Second Canyon is 15 km (9.4 miles) long and was formed by the South Nahanni River carving its way through the Headless Range.
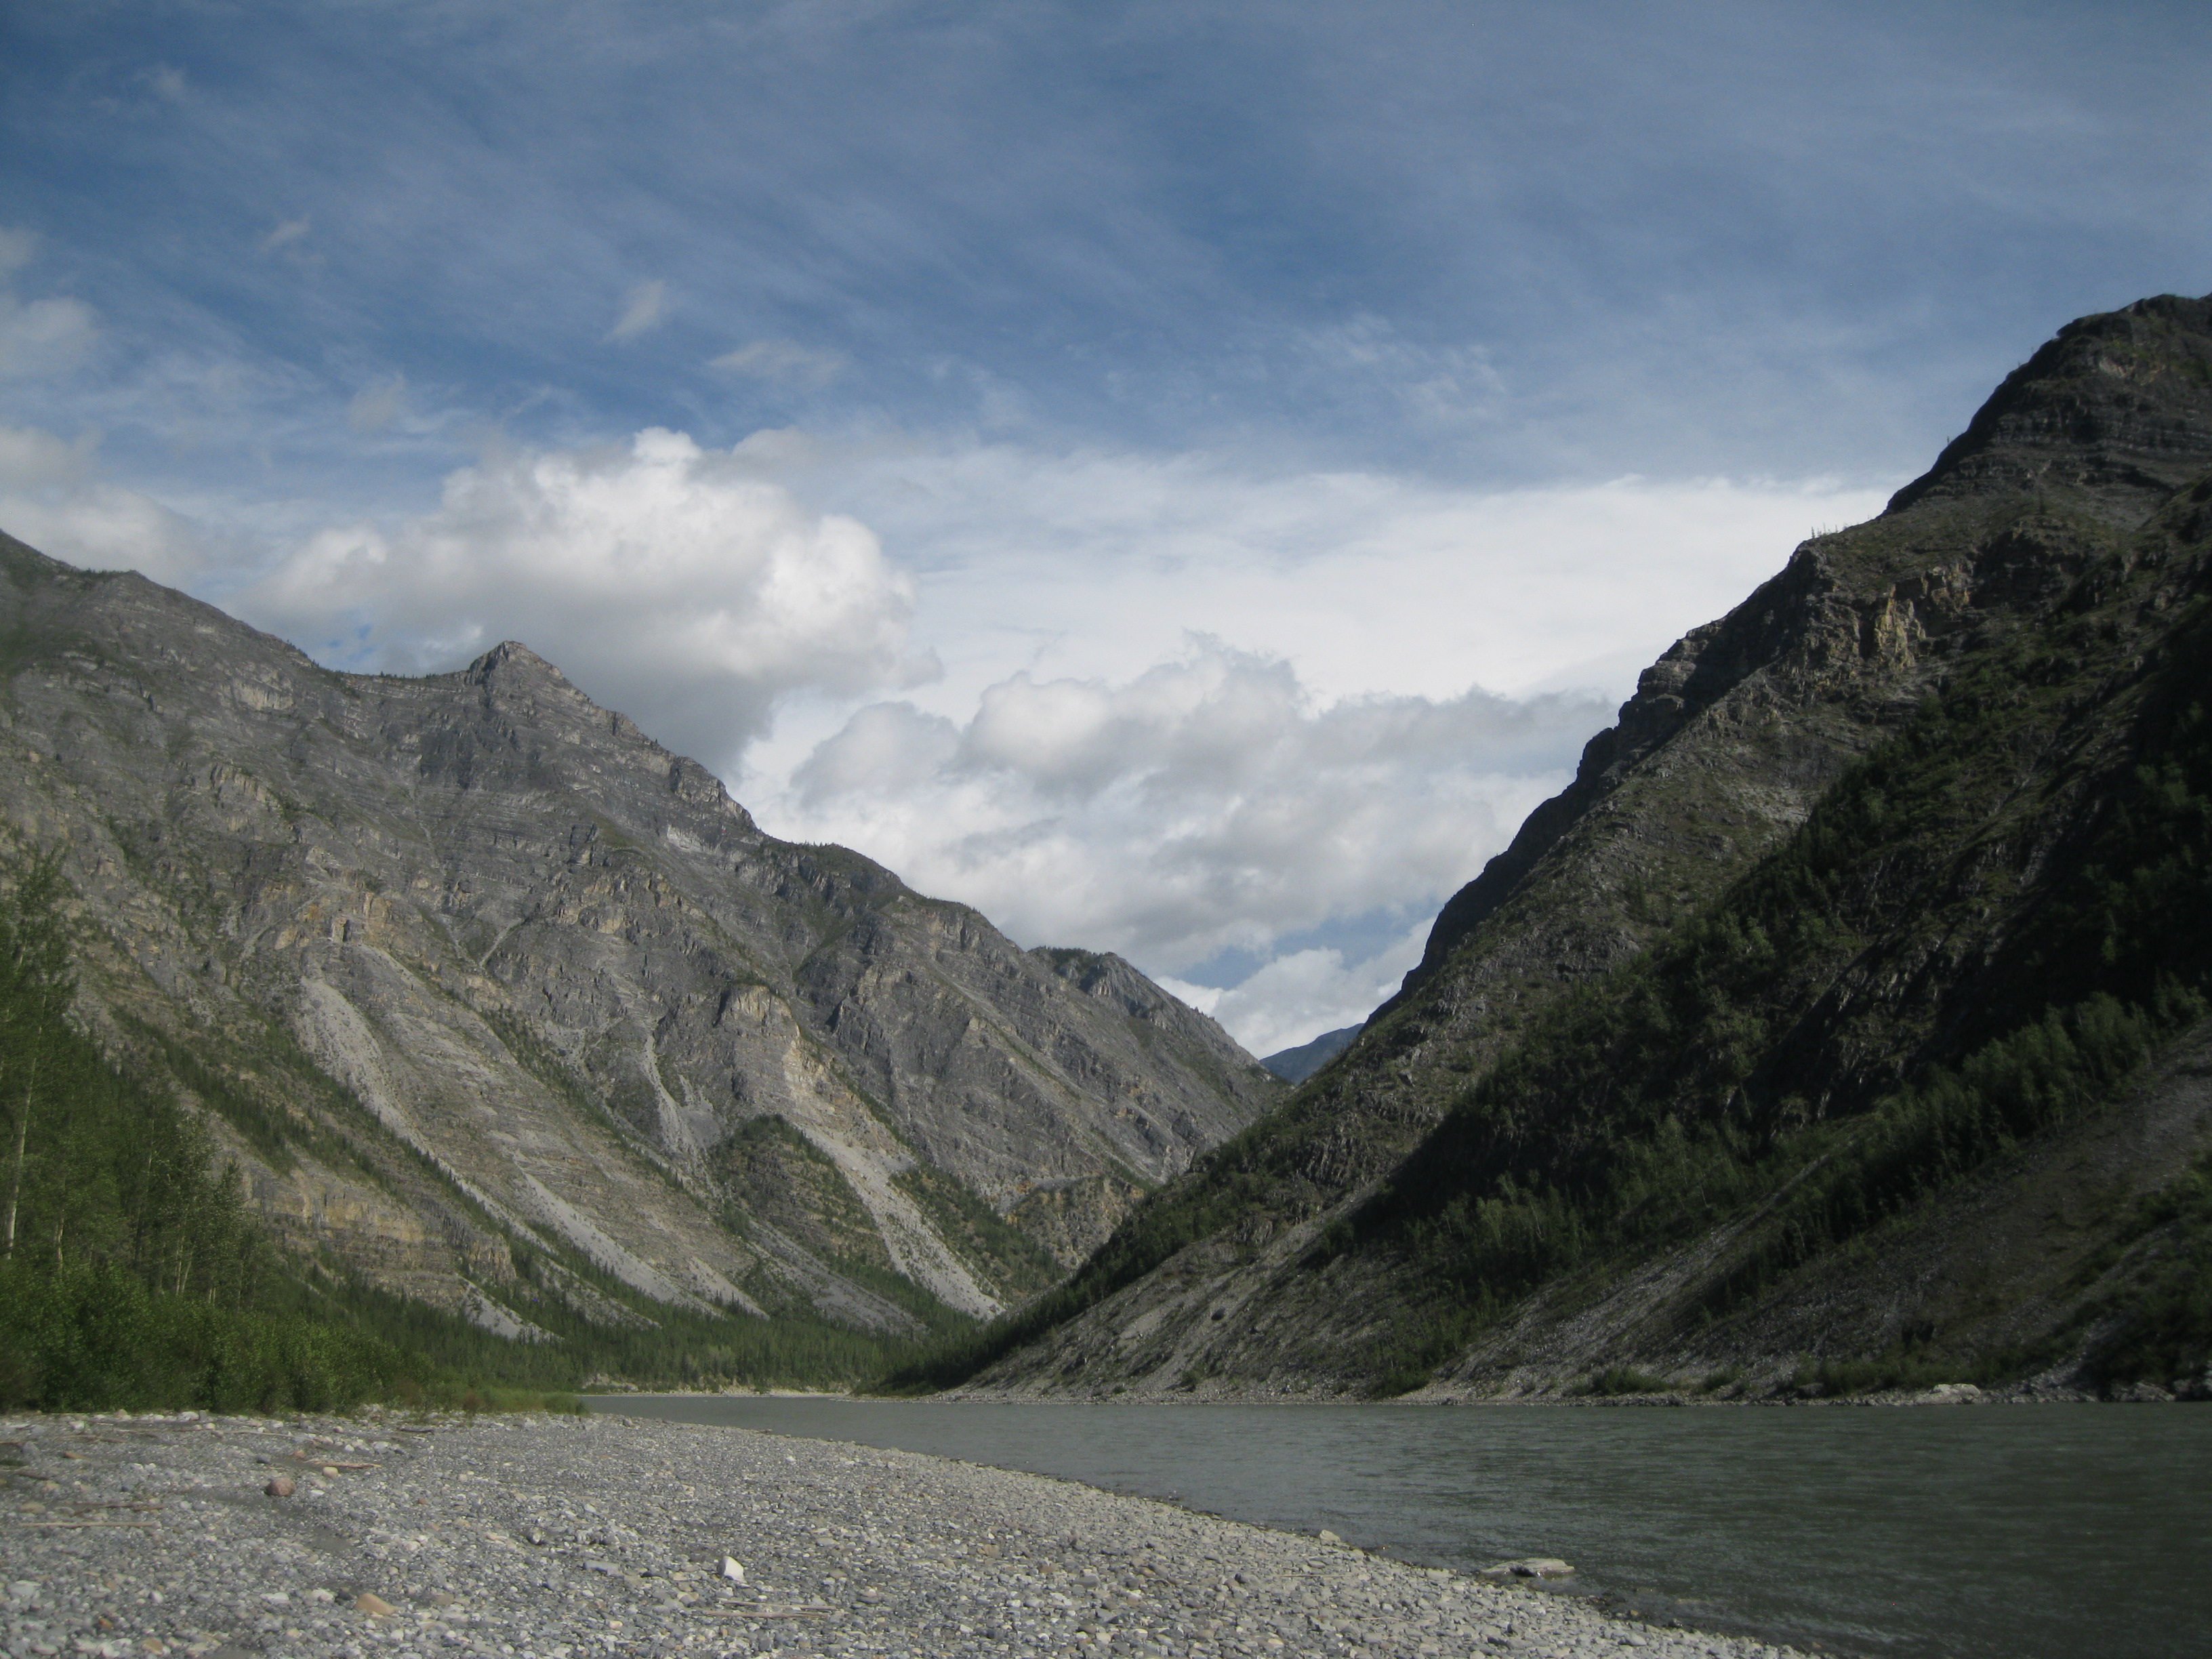
As you continue further down through the Second Canyon do take time to enjoy the stunning landscape. Like the previous day there are opportunities to check out the beauty of the massive rock walls as it will be less challenging than the Fourth Canyon. Still remember to concentrate and pay attention to currents, whirlpools and eddies along the way.
Deadmen Valley
You will be leaving the Second Canyon at around km 443 at Headless Creek as you enter Deadmen Valley.
A well-known Nahanni legend gave name to Deadmen Valley. In 1908, the headless bodies of the two prospectors Willie and Frank McLeod, were found at the mouth of a small creek at the lower end of the Second Canyon, now known at Headless Creek.
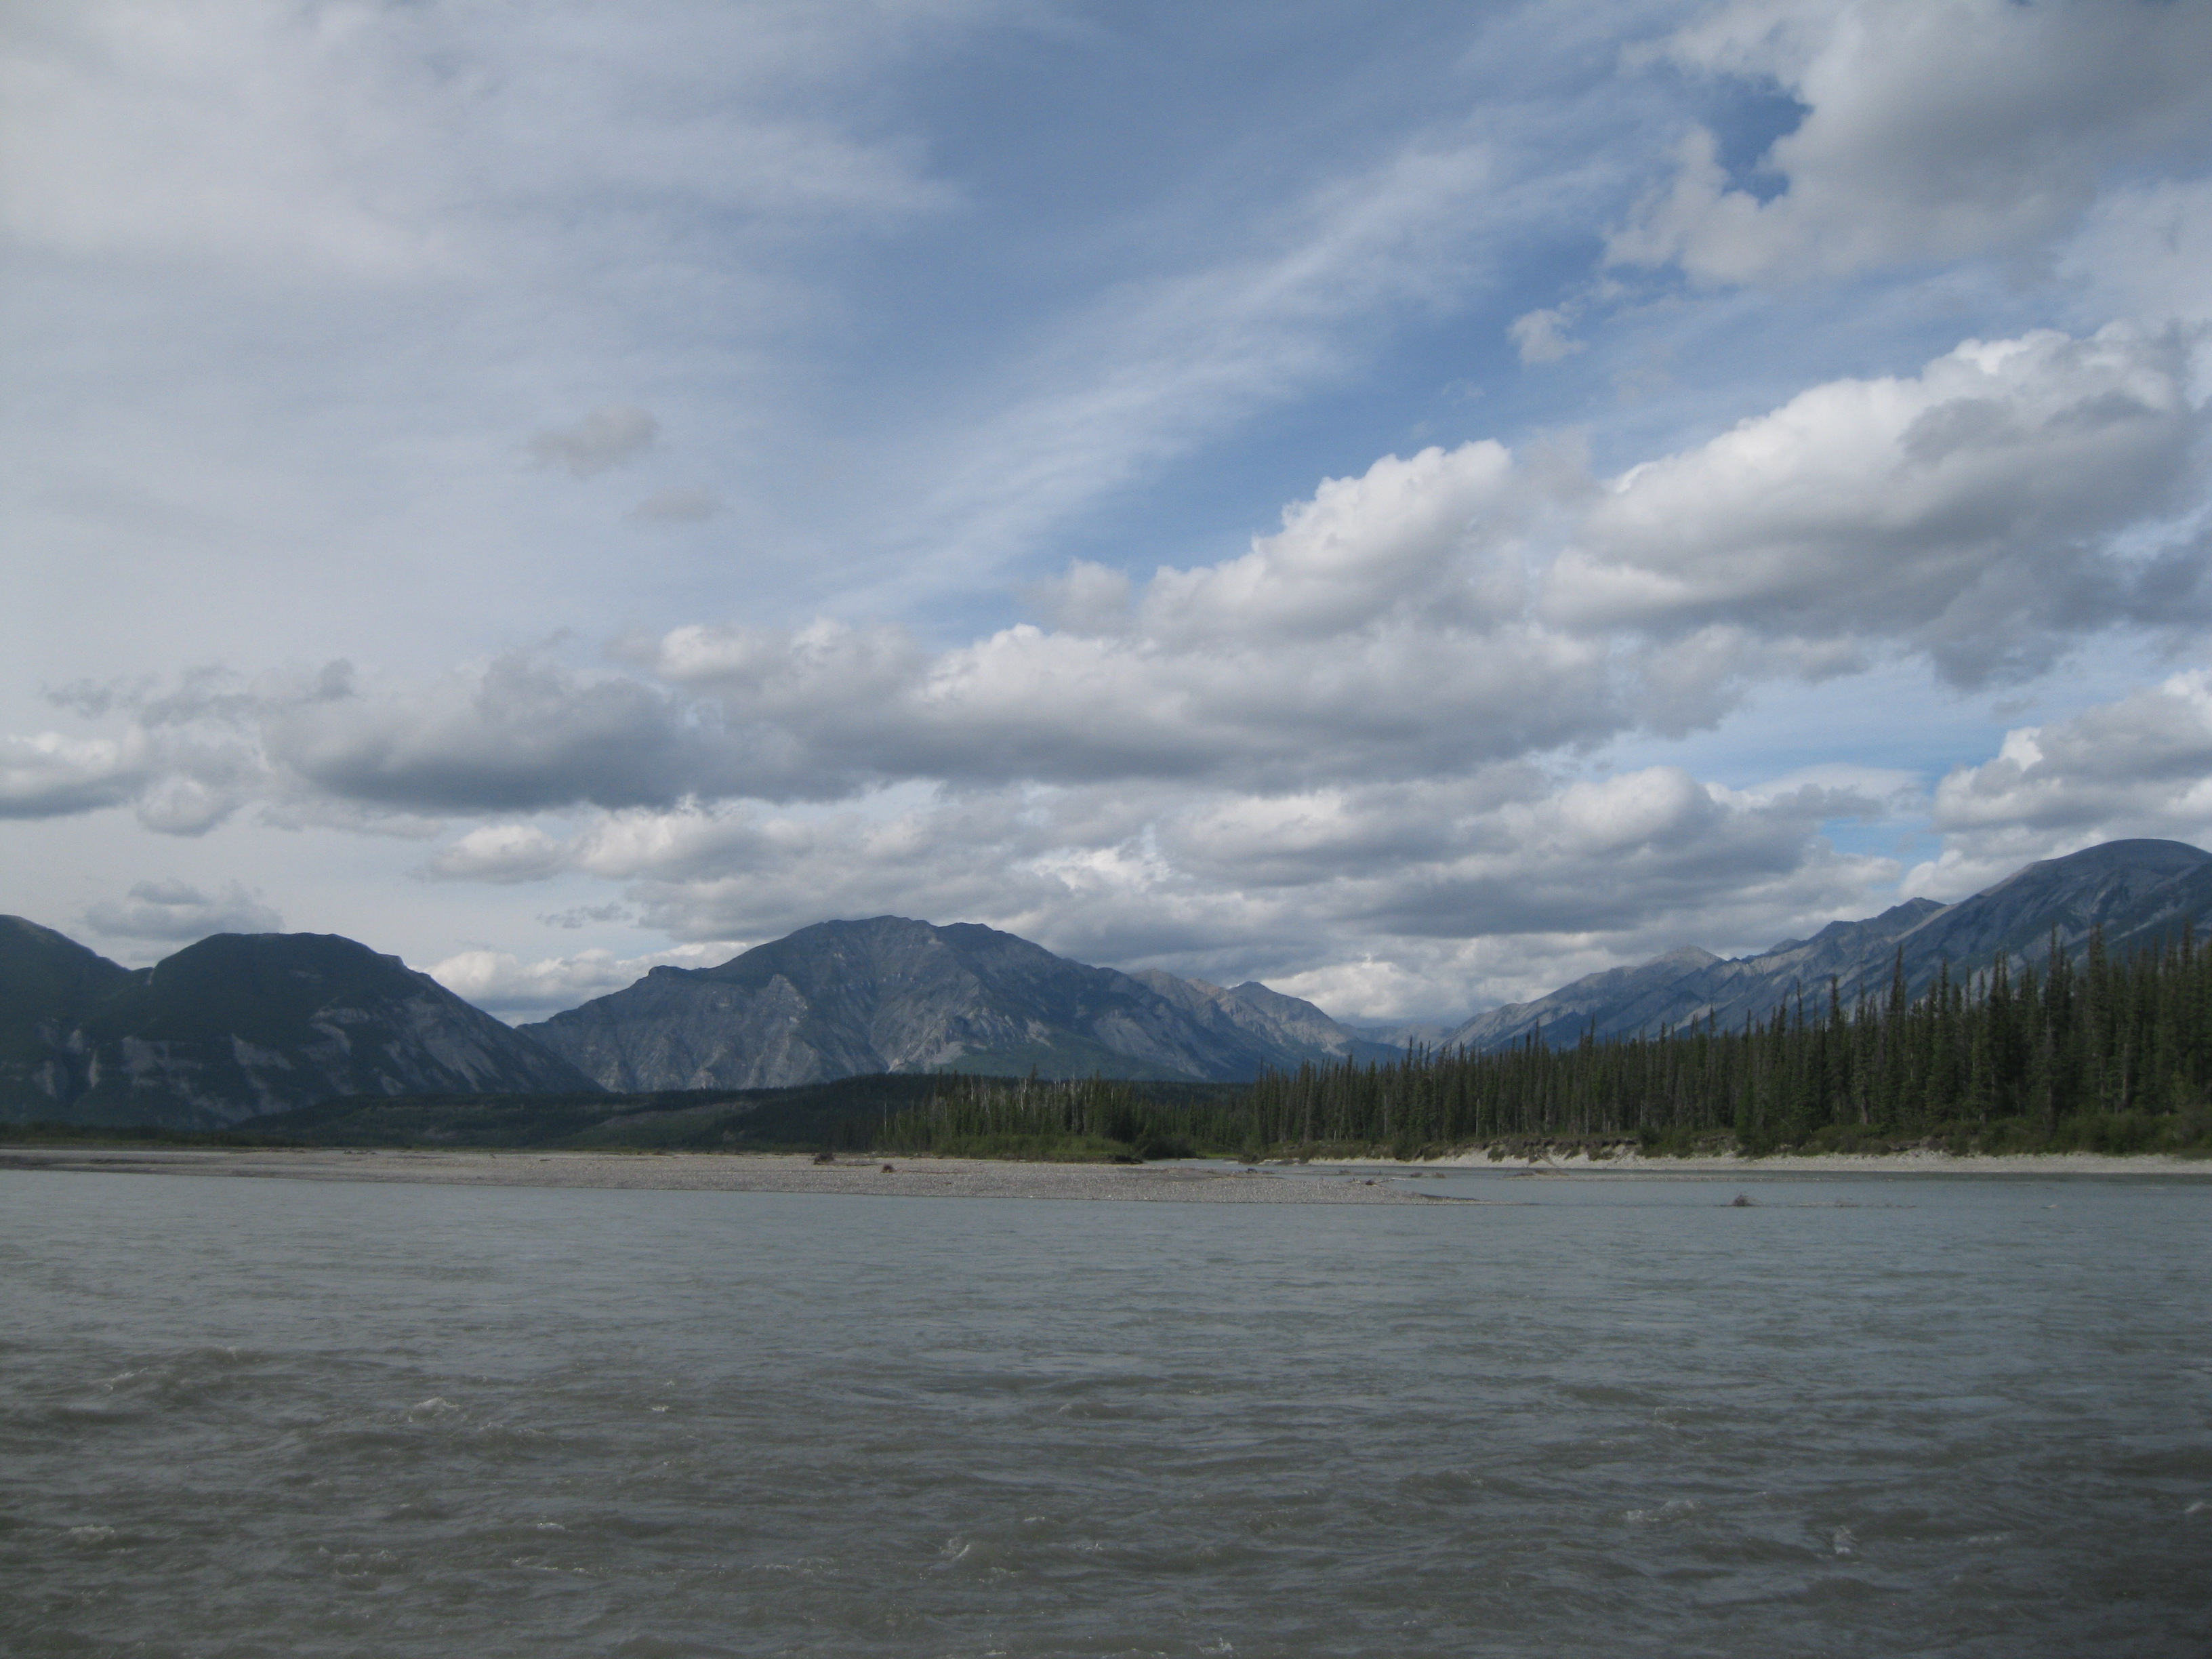
Stories about the incident and the beheading spread fast and for a while the South Nahanni River Valley was known as Headless Valley. This name didn’t last but the event did give name to the Funeral Range, the Headless Range and Deadmen Valley.
This part of the day is a bit more of a challenge mainly because you may experience some massive headwinds where you really have to dig deep and paddle hard. In some sections it can be a bit difficult to figure out in which direction to go as the river splits into different sections and creeks. If you are with an organised group pay attention to where the guide is heading.
Around of Sheaf Creek there’s a spot with the remains of a trapper’s cabin. Head ashore and look inside the woods. It’s located about 20 metres (66 ft) from the river. There’s not much too see but it is still pretty cool as the remains of a stove and the wooden base structure of the cabins are still present. The cabin itself is completely gone.

At around km 455, the Forestry Cabin is located, opposite the upstream end of Prairie Creek. Both stops are a great opportunity to get out of the canoes and take some shots of the marvellous Deadmen Valley.
The Forestry Cabin is a check-in station and an emergency shelter. There are two cabins here within 10 minutes walking distance from each other. The first cabin cannot be entered and should only be used for emergencies. Have look inside the second cabin which contains a lot of miniature carved paddles hanging down from the roof with names and greetings of people who have visited.
Head on back the river and about 4 km (2.5 miles) from here you will be entering the First Canyon.
The First Canyon
All the canyons along the South Nahanni River are beautiful but the First Canyon may be the most spectacular of the four. The First Canyon cuts through the more resistant limestone of the Nahanni Plateau which have formed the highest and most vertical of all the canyon walls.
The First Canyon – George’s Riffle
Right at the entrance to the First Canyon just after the 460 km point you will be heading into Georges’s Riffle which is a class II/III rapid. It’s only a stretch of about 100 metres (328 ft) but the waves are pretty big and challenging. Upon arrival at the 460 km point, head ashore onto the cobble island based here. Walk about 100 metres (328 ft) across the rocky beach towards the rapid. Scout it and plan how to attack this awesome challenge.

The cobble island diverts the main current to the right where a low band of rocks creates high and irregular standing waves. At high water levels it is possible to navigate the channel to the left of the island.
Get into your wet suite, put on your helmet and you are ready to go. If you are in a group, the rapid should definitely be approached in duckie style and keep a safe distance. The person in the bow should paddle through down to the rapid at his regular pace and continue with this pace when entering the rapid. Only change pace or back draw if your paddling mate in the stern tells you to. If the paddler in the stern steers well and you both keep your paddle in the water, you should travel through George’s Riffle easily.
Once the rapid has been completed you will have an awesome feeling of accomplishment and it is great fun going through these massive waves that will just be coming straight at you. It is so amazing when you just nail the stretch.
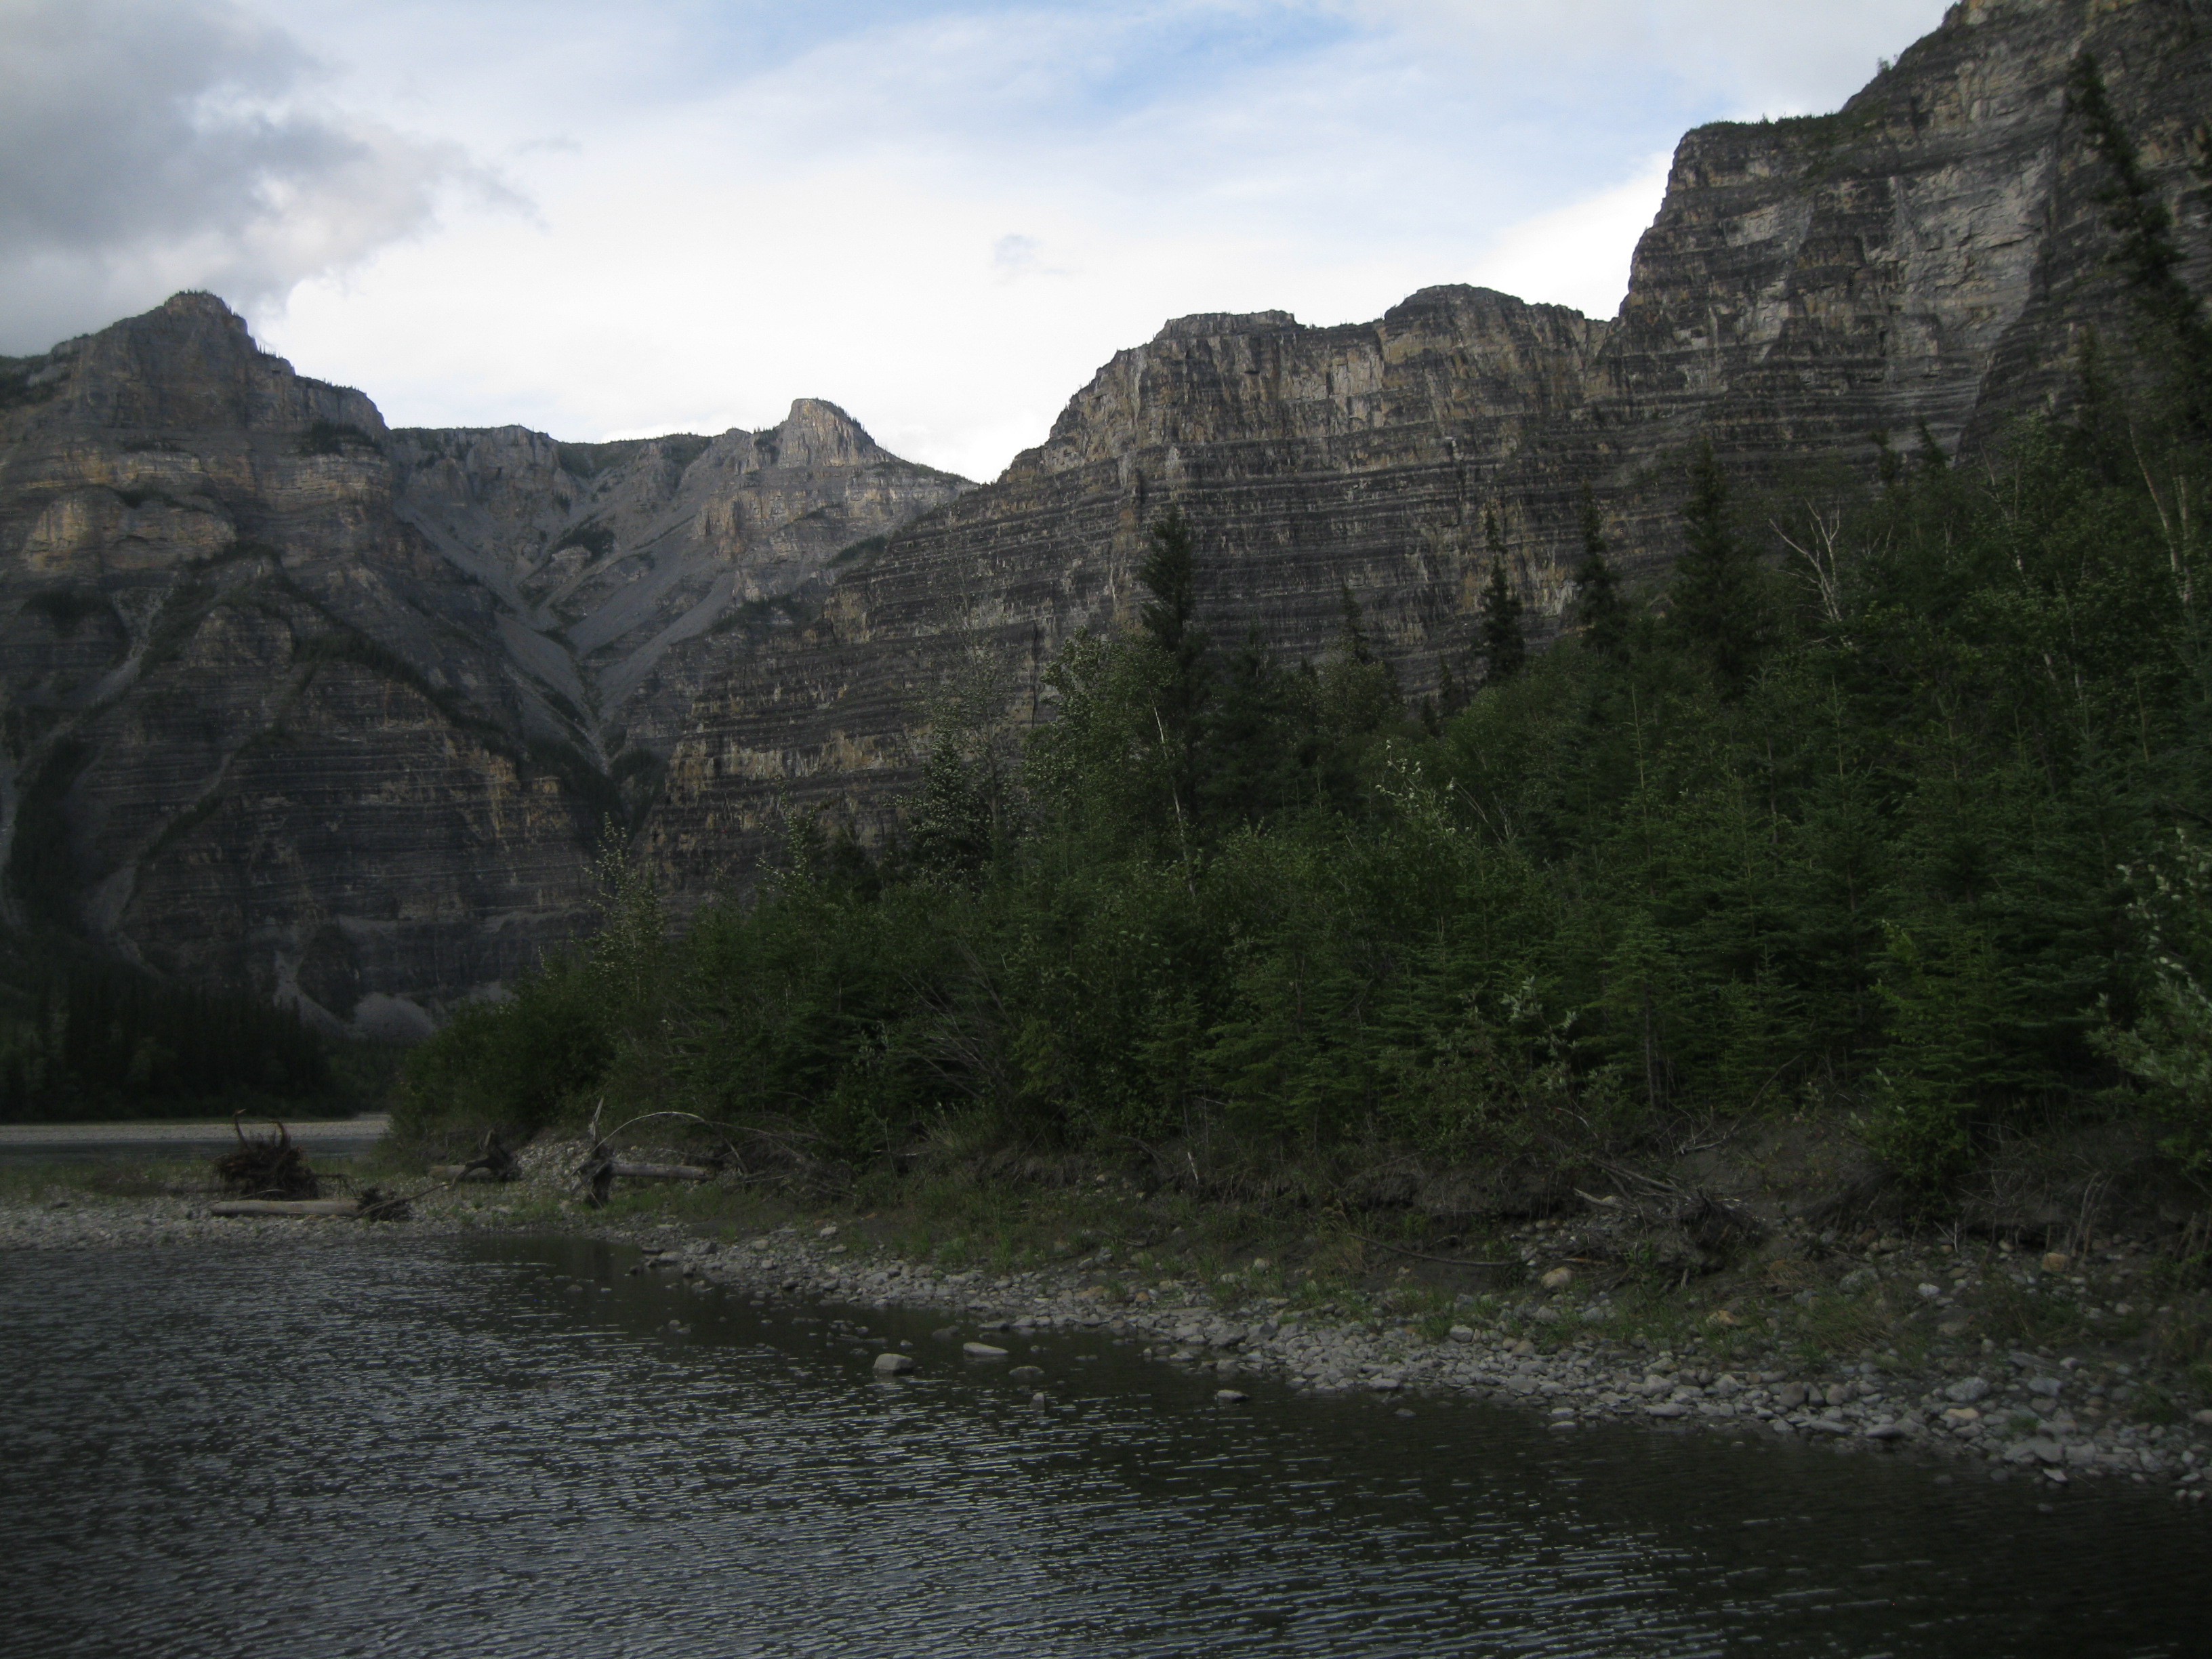
George’s Riffle was originally known as Cache Rapids, but was later renamed after the local hunter and trapper George Sibbeston who capsized here on his return from a winter in the mountains. So if you didn’t tip over going through here, you have done better than the person the rapids were names after.
The First Canyon – the first gravel bar
Once you have completed George’s Riffle, head down to the first gravel bar just beyond the rapid about 100 metres (328 ft) downstream. This is an awesome spot to set camp and the scenery is amazing with massive canyon walls of sheer beauty.
It’s been a long and hard day. So set up camp, have a bit of a chill and get ready for dinner. You are enclosed among beautiful towering rock walls. The scenery here is a bit reminiscent of some areas in the Kimberley region of the north eastern part of Western Australia and the northern part of Northern Territory in Australia.

Have a stroll around the gravel bar and take some shots of these magnificent rock walls, both ahead of you but also down towards where you came from. Next to the gravel bar there’s a creek that stretches around the neighbouring section. Jump across and you will get to a sandbar. Take some shots from here and walk further down towards the entrance to the First Canyon. Look back as the views of the river with the rock walls as the backdrop are awesome.
To the left of the sandbar, a forest section is located. When continuing beyond the sandbar you will get back into a massive rocky gravel bar, so remember to wear your hiking boots on this excursion. You will be getting closer to the entrance and the views are fantastic in both directions. Another sandbar is approaching and once you get past here there’s a section of massive boulders which are difficult to get past.

So return past the sandbar and walk down on the right side of the gravel bar along the creek. The views of the creek against the towering rock walls are amazing. Continue along the creek and head down on the opposite site of the forest section. As you get around here you will be back at the campsite. This little excursion will probably take you about an hour and 15 minutes.
The First Canyon – Paddling from the first gravel bar to Lafferty’s Riffle
The following day the view of the towering rock walls may be a bit different. It all depends on the weather. It may be sunny or a bit misty. The journey continues downstream through the amazing First Canyon for about 25 km (15.6 miles). Have a break along down at the 479 km mark at Whitespray Springs. The water bottles can be refilled straight from the stream as this is glacial water. This is also a great spot to take some shots of the impressive rock walls.
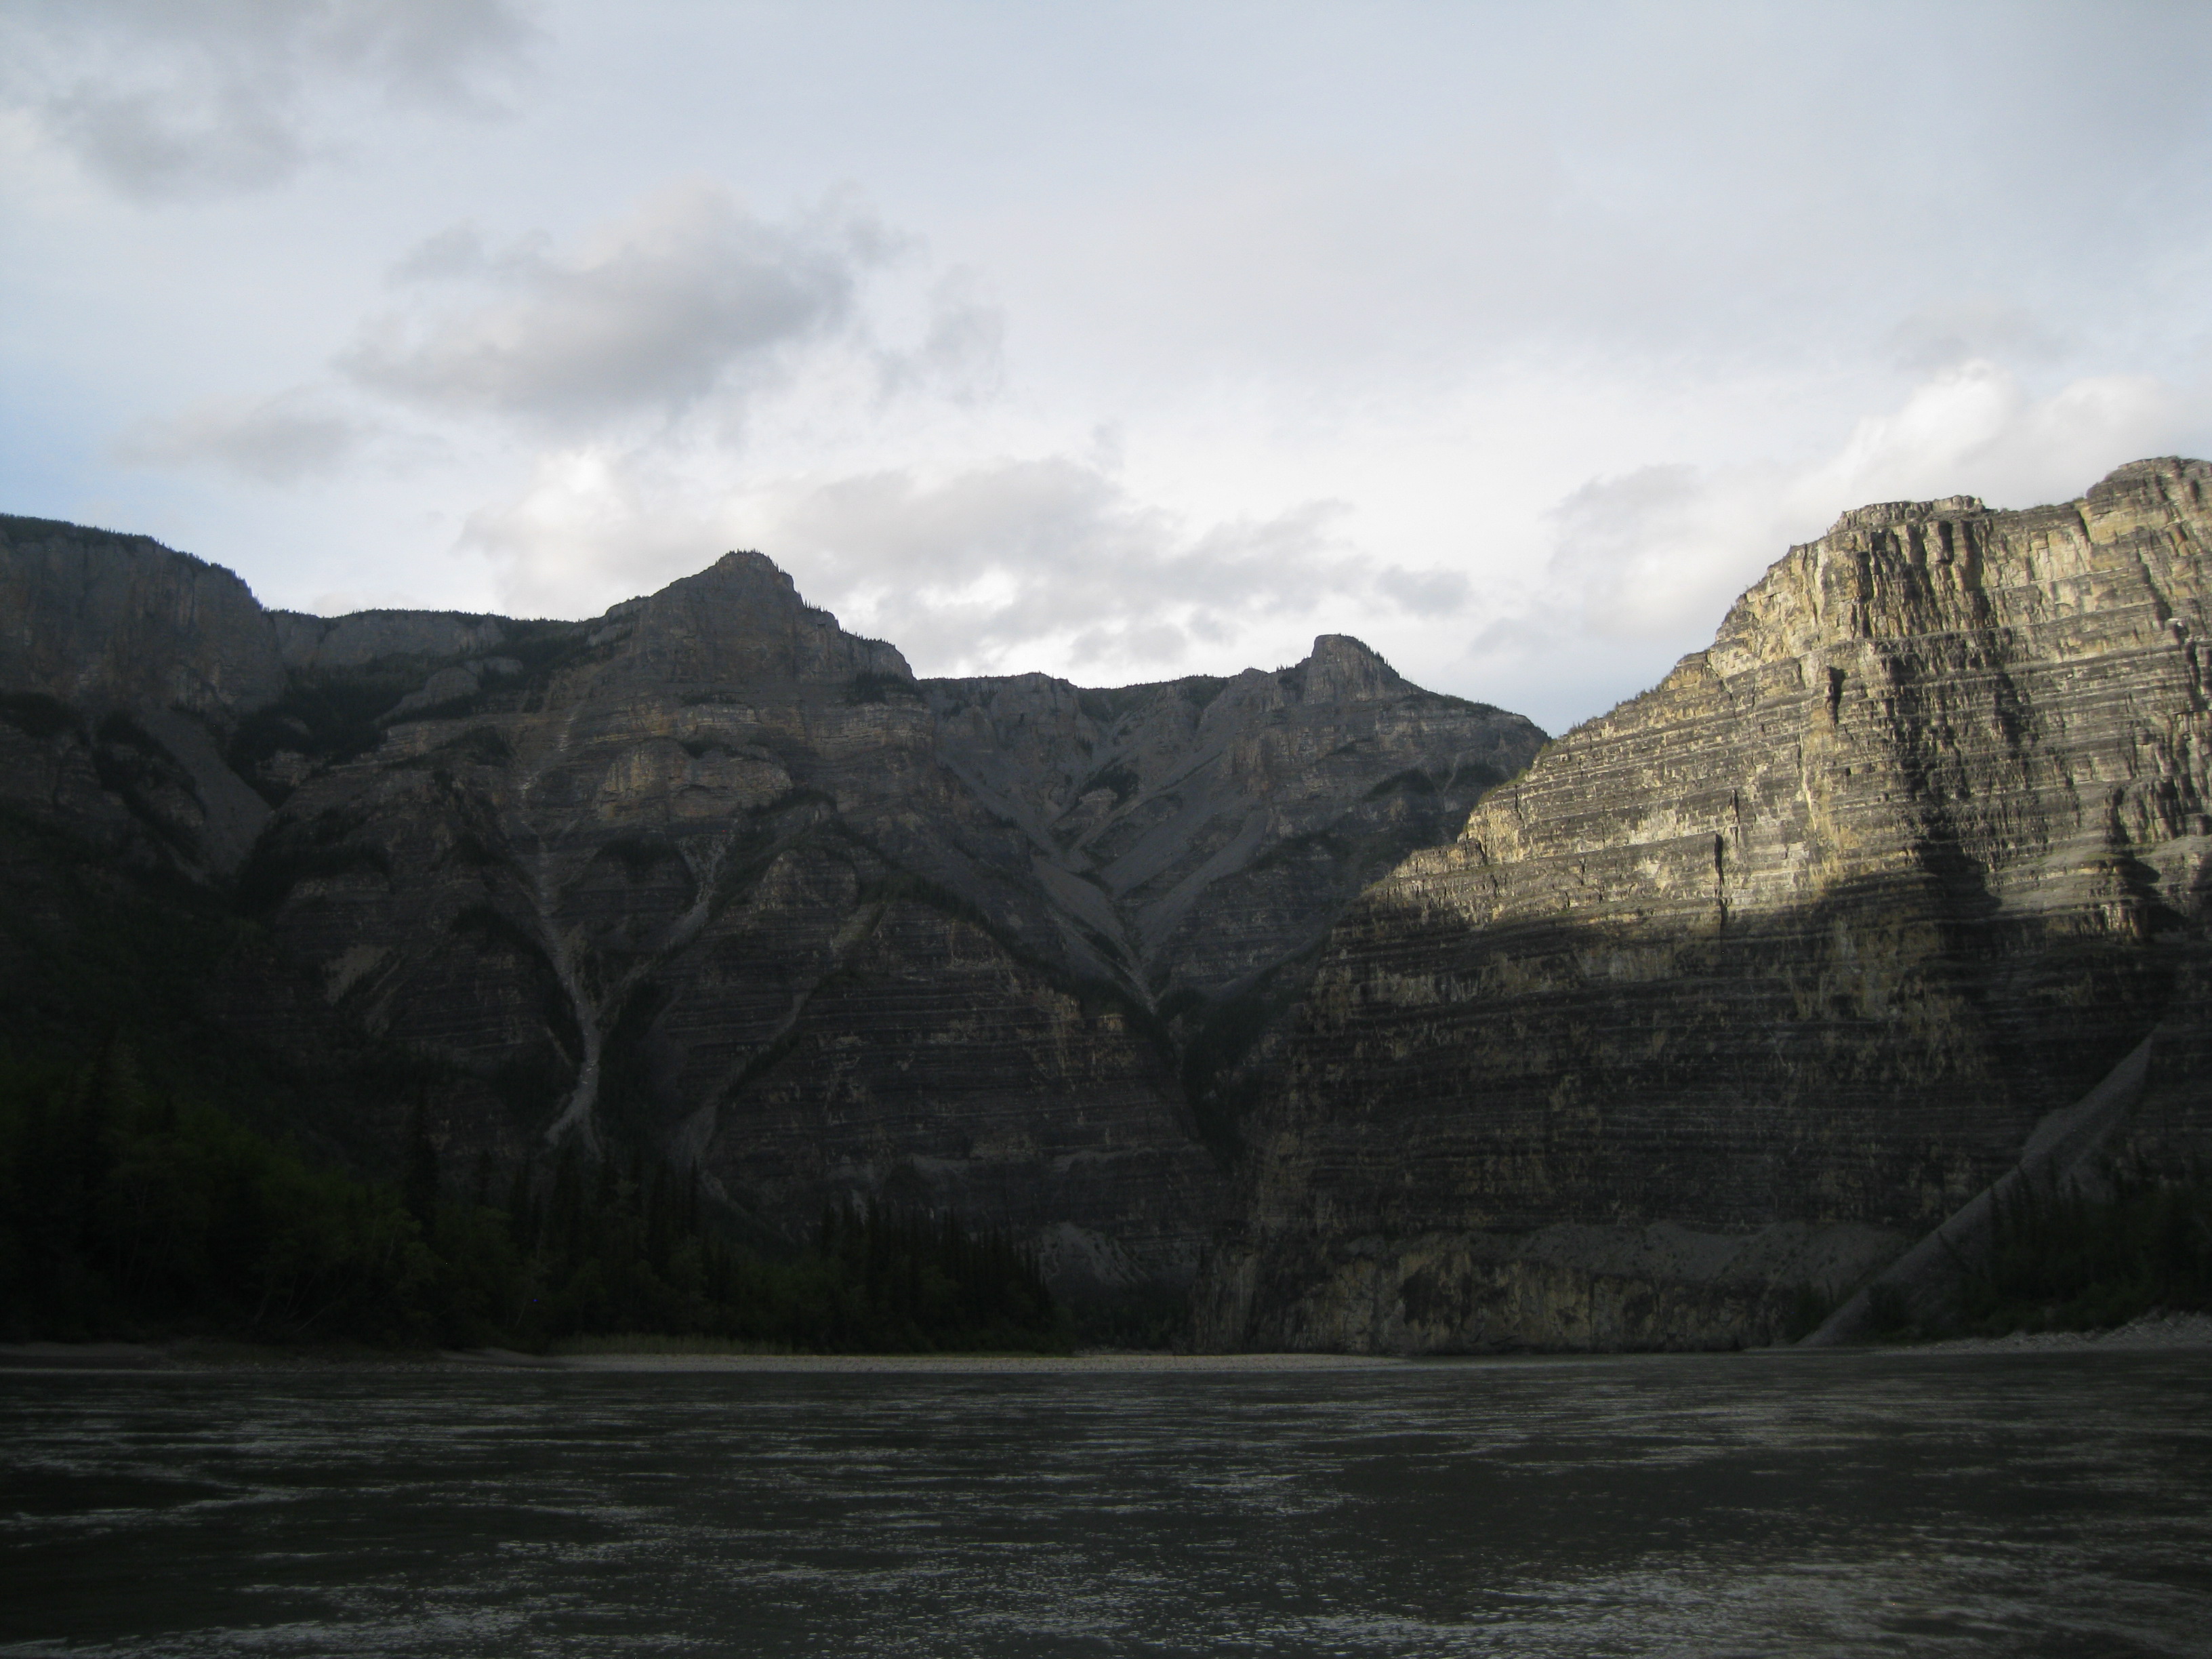
When continuing you will get to a pretty fascinating spot called Grotte Valerie at around the 480 km mark. It is quite stunning but a so-called Zone 1 special conservation area and is prohibited for visitors. It is the most famous of the caves of Nahanni National Park Reserve, where more than 200 are found alone in the First Canyon. It has more the 2 km (1.3 miles) of passages and caverns formed by water draining from sinkholes in the plateau.
There is a section in Grotte Valerie known as Dead Sheep Passage where the skeletons of more than a hundred Dall sheep have been well-preserved for more than 2,000 years. It is not unusual for Dall sheep to seek refuge in a cave during storms but it seems a bit bizarre why they walked in the dark for more than hundreds of metres before they slid over a small icefall, unable to return and they all died. This is pretty mysterious and puzzles scientists.
The First Canyon – Lafferty’s Riffle
Just beyond Grotte Valerie head up to the closest gravel bar just after Lafferty’s Creek and get ready for the biggest paddling challenge on the whole South Nahanni River which is Lafferty’s Riffle. Get your wet suit and helmet on and prepare yourself for an amazing ride.
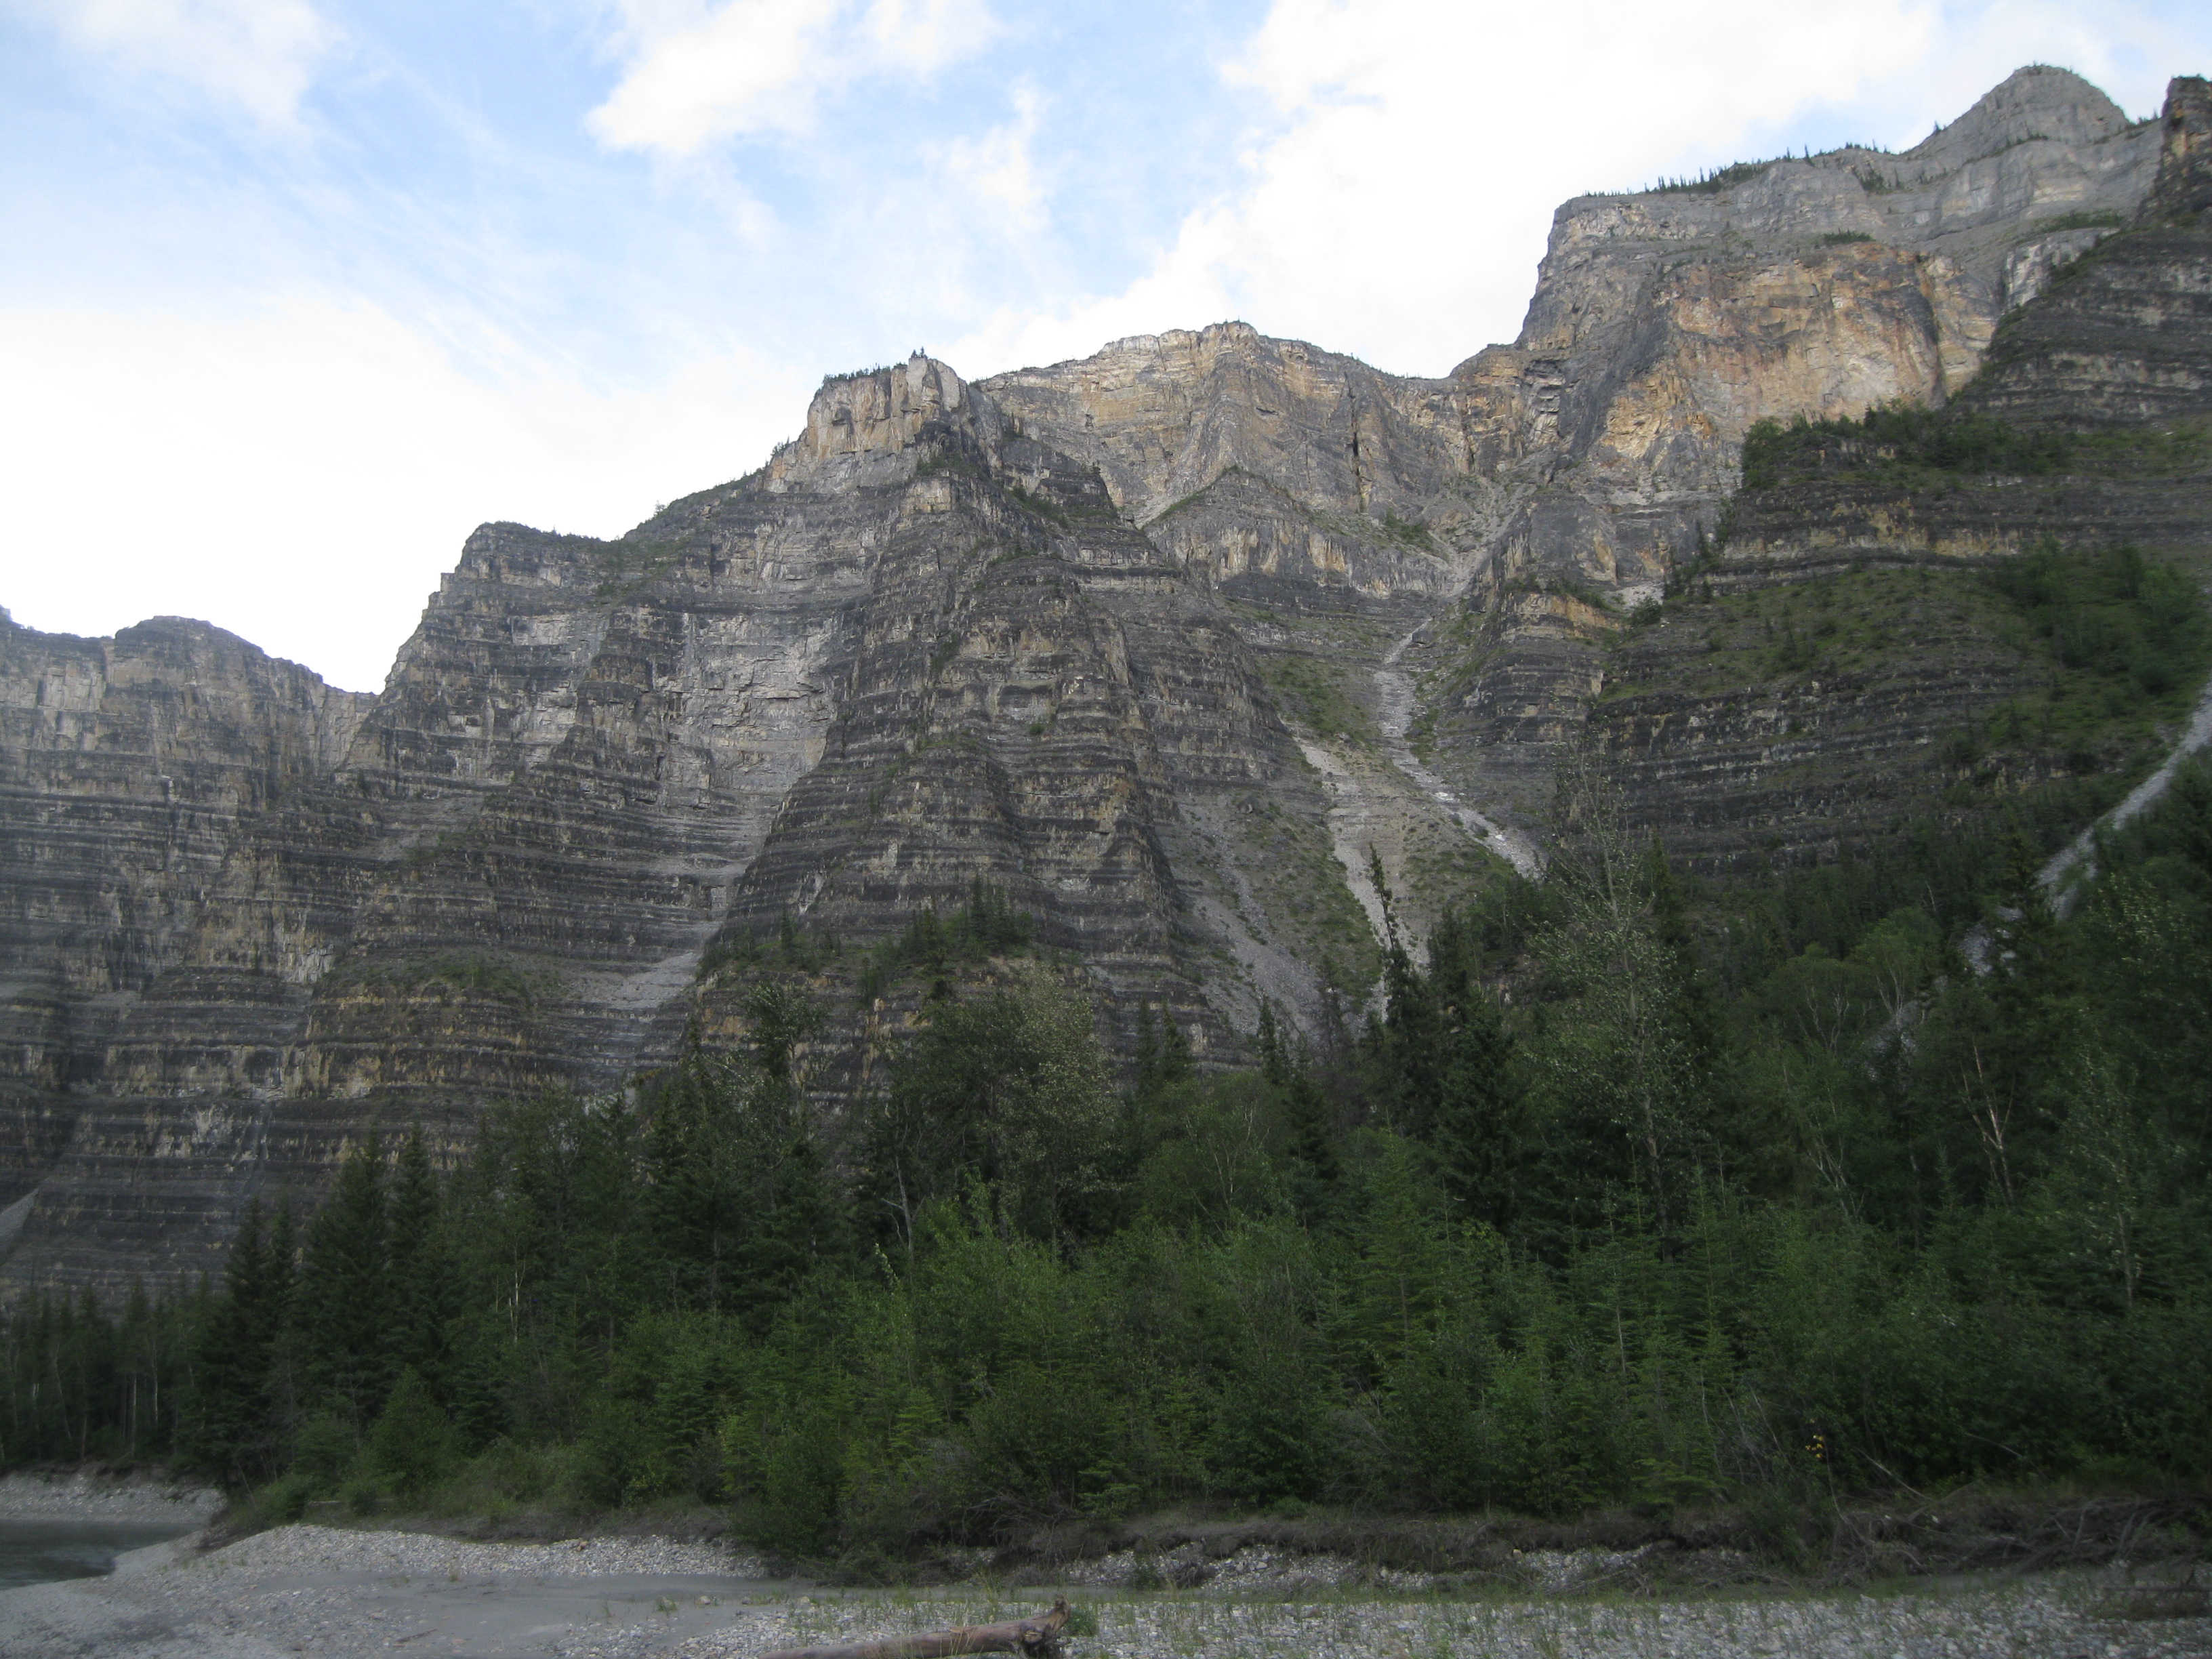
Outwash material from Lafferty’s Creek constricts the river and creates high standing waves on the right. It’s a class III rapid and it is absolutely awesome. You have the option of heading down to the left of the river where the rapids won’t be that big. If you feel confident, definitely head down to the right where you will encounter massive waves.
It’s only a stretch of about 100 metres, but it is a fantastic experience. When paddling through, one big wave hits you and the next humongous wave coming towards you in about a second, you will feel a real sensation in the canoe when hitting. So cool. Once the end of the big waves have been reached be a tad careful as there may be some whirlpools in the river.
When you have completed Lafferty’s Riffle you will feel so good and what an accomplished it was getting through these massive rapids. This also pretty much marks the end of the First Canyon just about 1 km (0.6 miles) down the river around the 485 km mark.
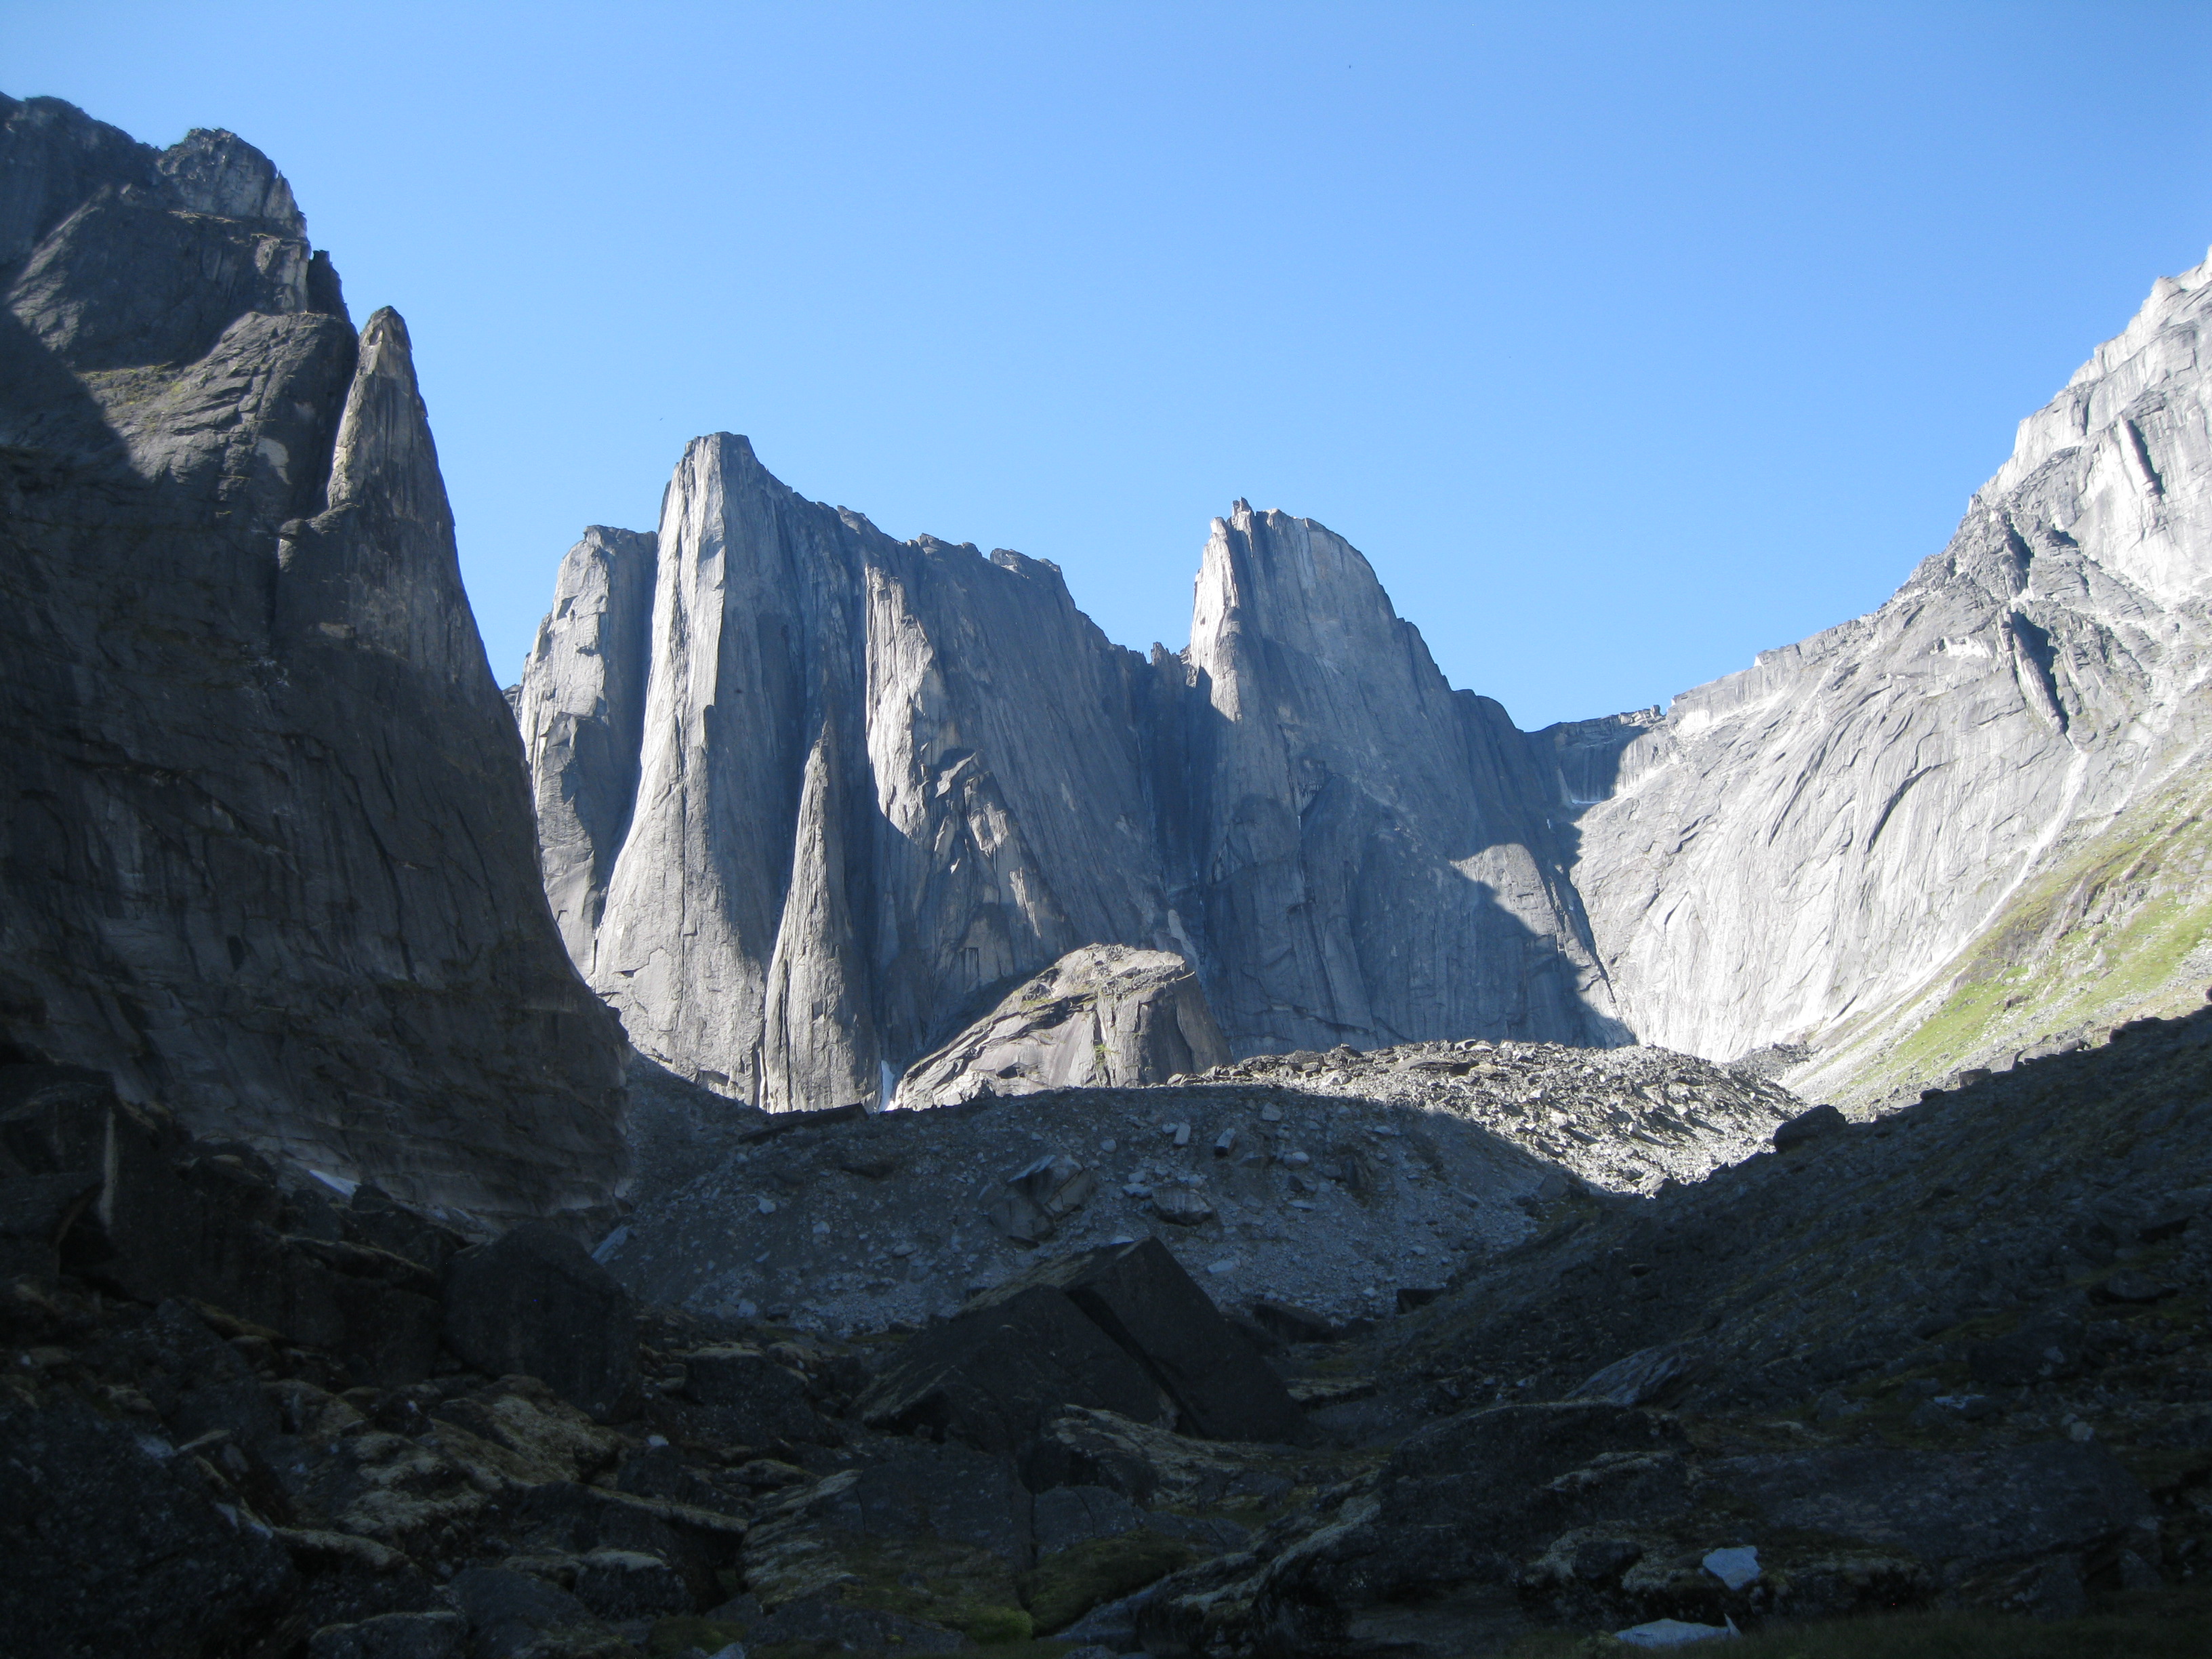
Lafferty’s Riffle is named after the brothers Jonas and Jim Lafferty. They returned home in the late spring one year in an overloaded canoe with furs and dogs and tipped over in this rapid. Jonas later became a pilot of a paddle-wheel steamboat on the Mackenzie River but he was never allowed to forget this mishap in this set of rapids.
The Kraus Hotsprings
Just beyond the end of the First Canyon, the wonderful Kraus Hotspring at locatd which is just perfect after a big challenge through Lafferty’s Riffle. This is also a perfect lunch stop to celebrate your accomplishment.
The springs are located just about 2 km (1.3 miles) after Lafferty’s Riffle and just 1 km (0.6 miles) after the end of the First Canyon on the right side of the river. Head ashore and walk up along a small cobble beach to the trail which leads to a small cabin.
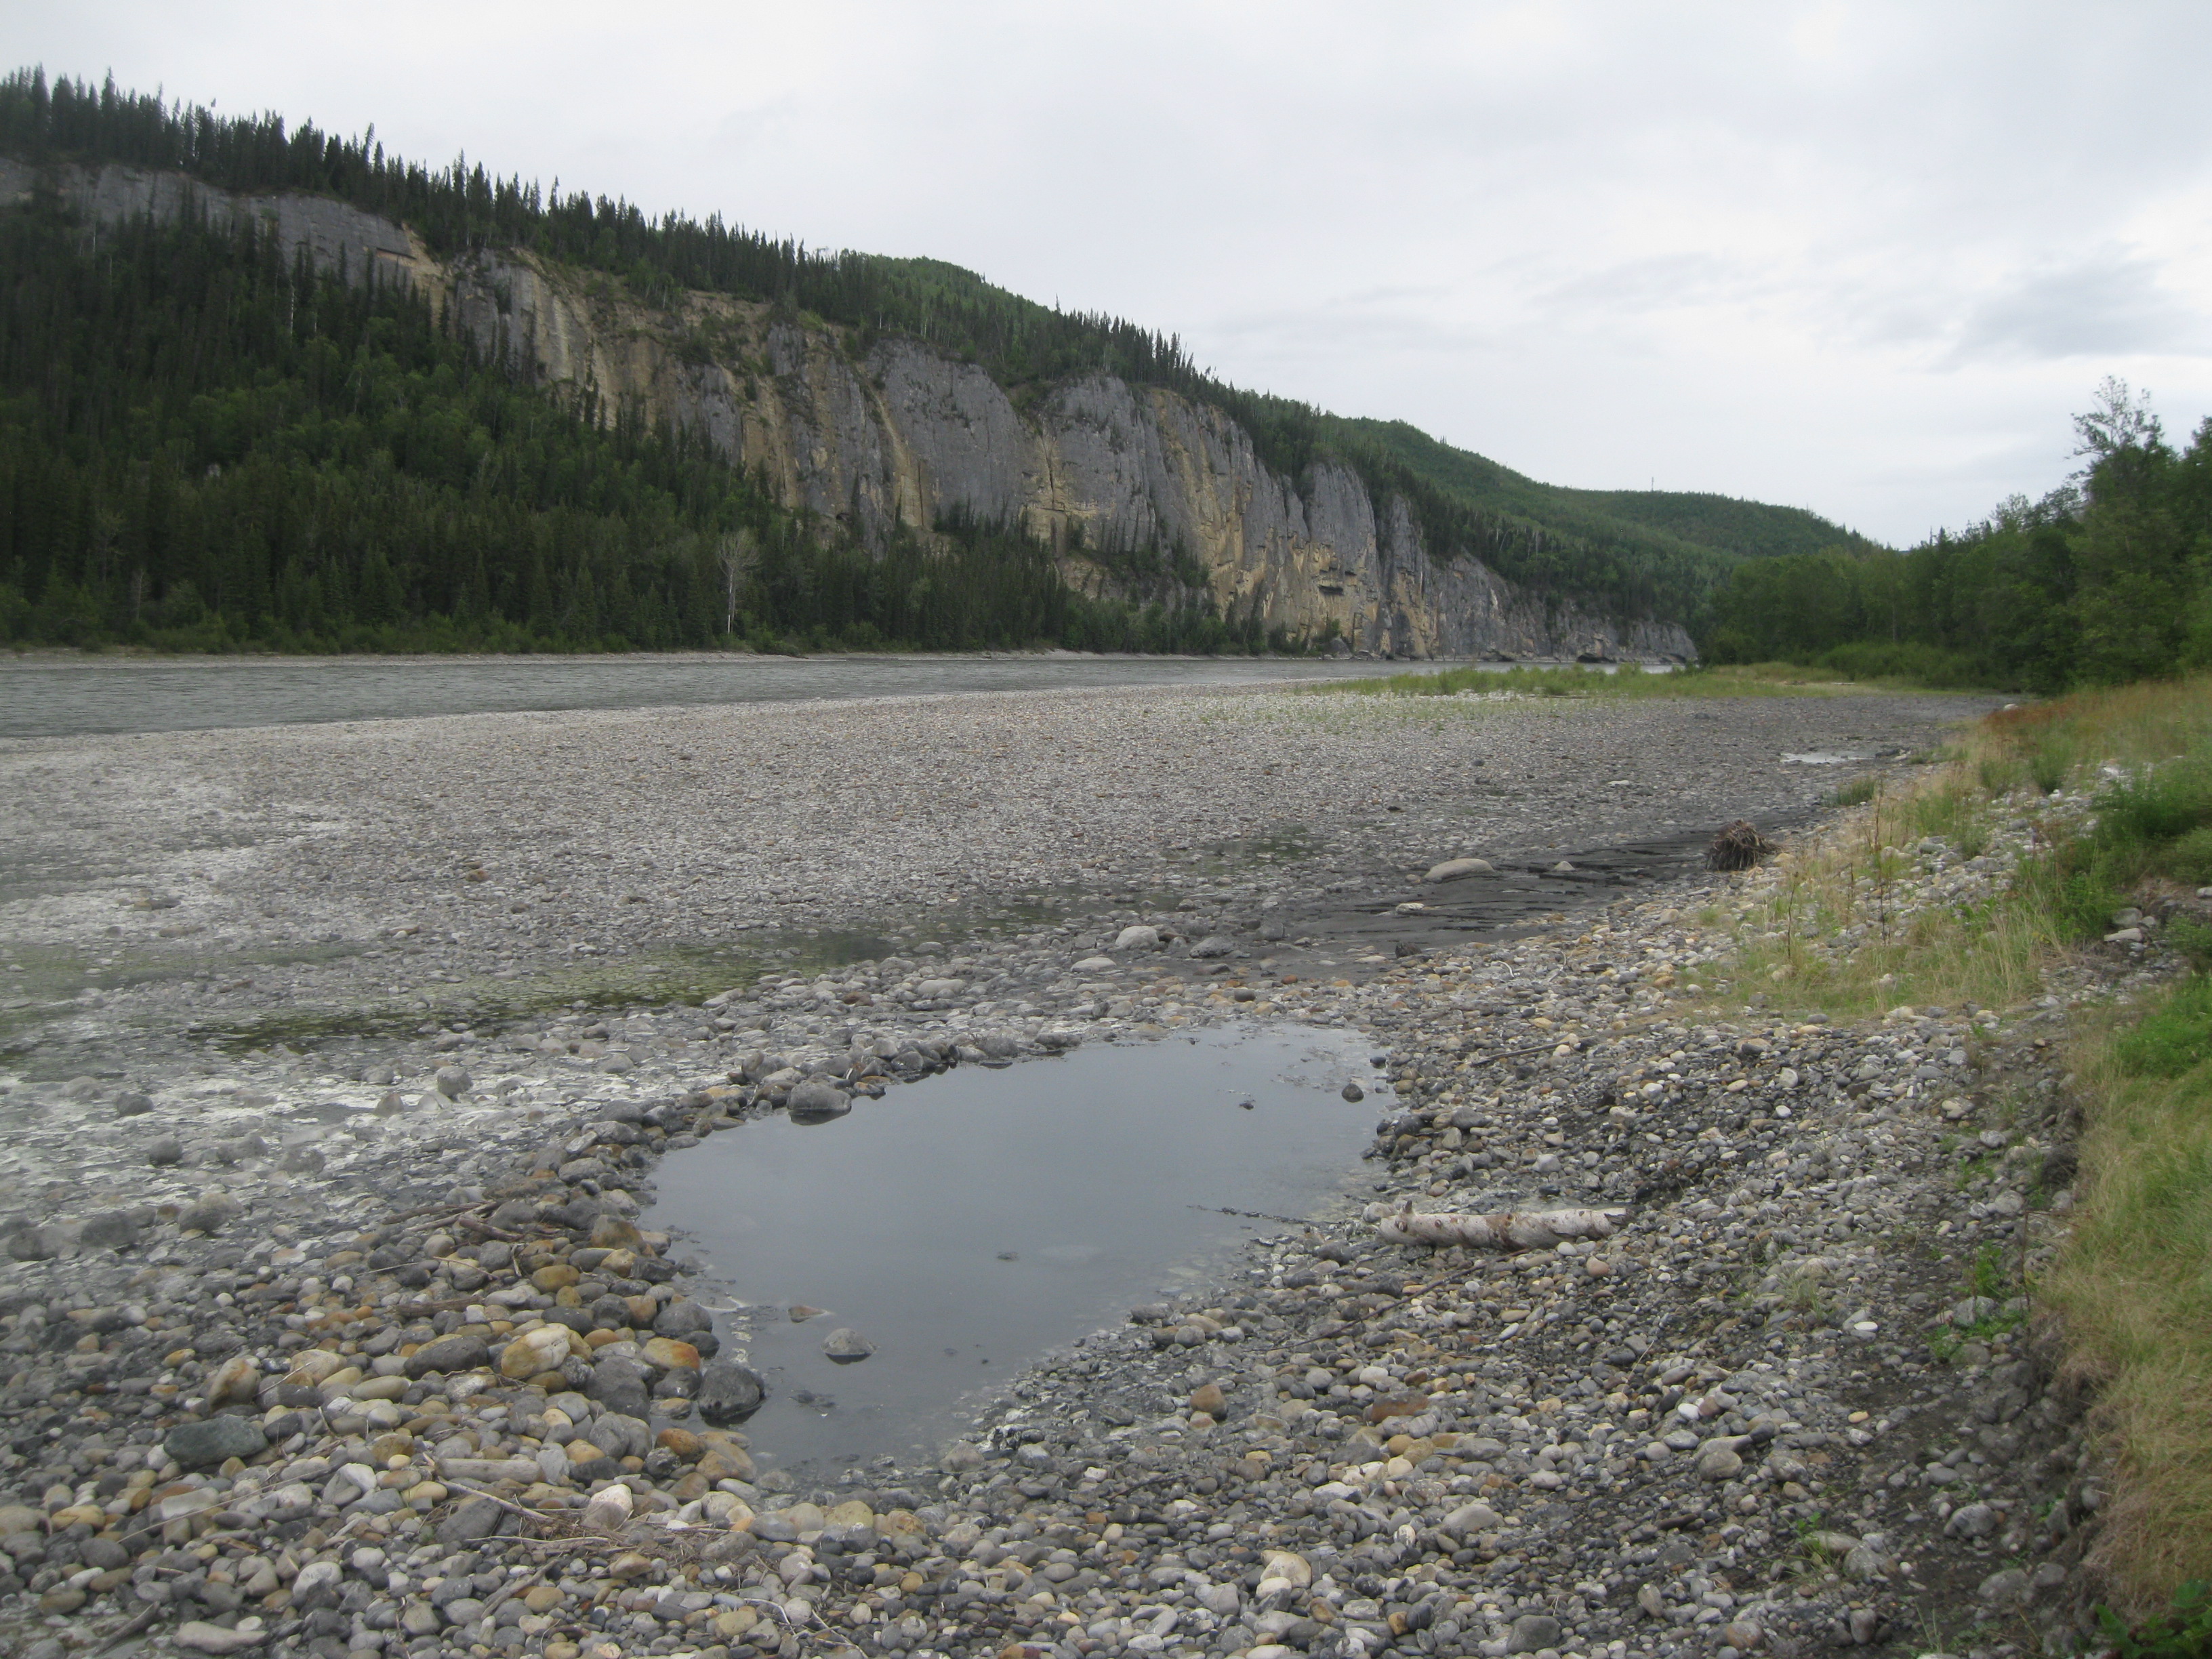
The springs are pretty small and are located a bit further ahead down a small slope towards the river. It is just a small pool but it is so nice to have a dip, especially if it’s during a day with an overcast.
The springs are fed by two hot water sources. The high level of hydrogen sulphide, which creates the smell of rotten eggs, forms sulphuric acid at water level and prevents the formation of tufa as seen at the Rabbitkettle Hotsprings and Tufa Mounds.
The Kraus Hotsprings were named after Mary and Gus Kraus who occasionally used to reside at the cabin and other structures no longer present between 1940 and 1971. The cabin used to function as an outbuilding. The extensive parsnip and other exotic plants in the area are descendants of the plants the Kraus couple introduced in their garden.
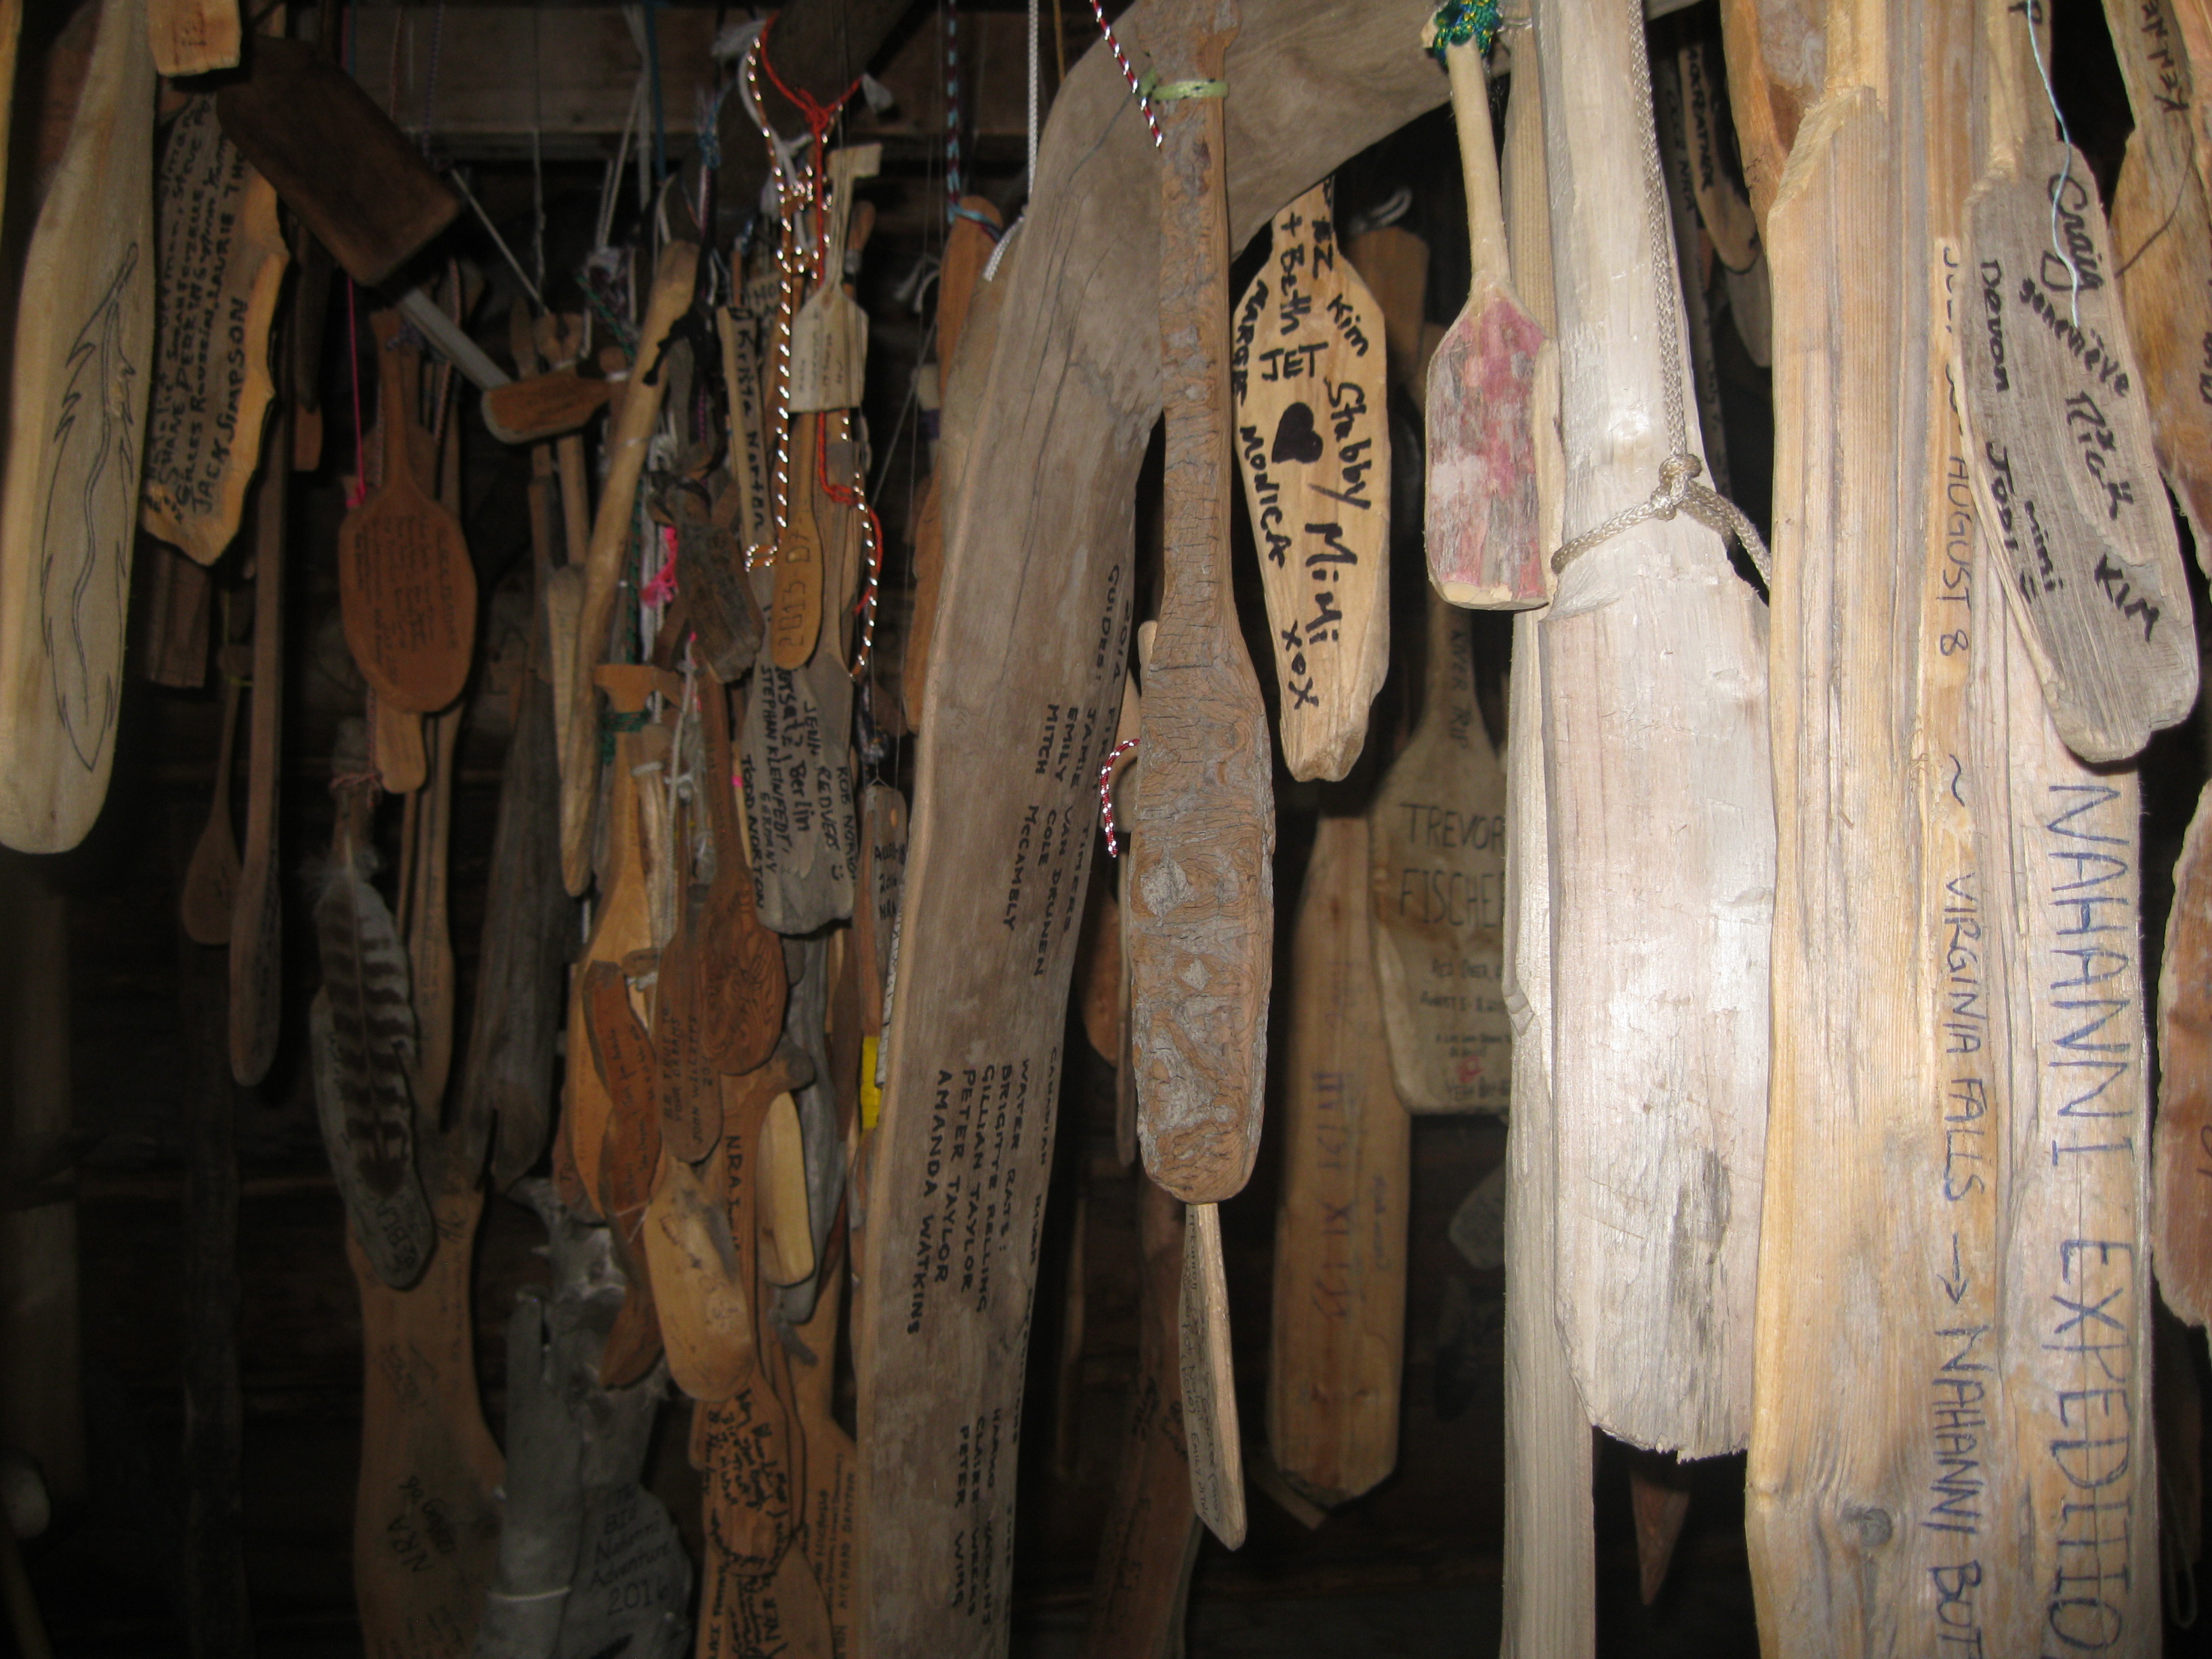
The cabin is really small but is in pretty mint condition. As you look inside you will find loads of miniature paddles hanging down from the roof where past paddlers have written the names and greetings. There are even greetings written on the inside of the door as well. Not too far from the cabin the old outhouse is located.
Padding towards the Splits
As you leave the Kraus Hotsprings and continue downstream it will be through pretty still water. It can be through some hard head winds and as the day has been pretty hard already it can be a bit tough.
Find a gravel bar just before you get to the Splits and set up camp. Some of the scenery on these gravel bars can be really impressive. You may have this huge log of tree with the roots stranded on the gravel bar. Just think of the forces that have carried this massive tree so far up the river.
The Splits
The following day the journey continues down the Splits which is the final part of the river before reaching the park boundaries and you will be leaving Nahanni National Park Reserve.
As the name suggest paddling down through the Splits can be a bit of challenge as the river splits and branches into numerous braided channels. There are no rapids but hazardous sections with sweeper and strainers.

If you are on an organised and guided tour make sure you pay attention to the direction which your guide is going and follow. The river is not too difficult but currents and whirlpools may be encountered during the day.
After paddling down the river for about 3 hours or so you arrive around the area with a perfect view of the magnificent Twisted Mountain and Blue Fish Rock. This is a great place for a lunch stop so paddle up to a gravel bar. Check out the scenery, stroll around and take some photos.
There is a really stunning escarpment to the right of Twisted Mountain with is very reminiscent of the Arnhem Land Escarpment seen in Kakadu National Park in Northern Territory, Australia. Again, when you checking out the gravel bar in this area, notice the massive souvenirs of tree logs lying around. So amazing.
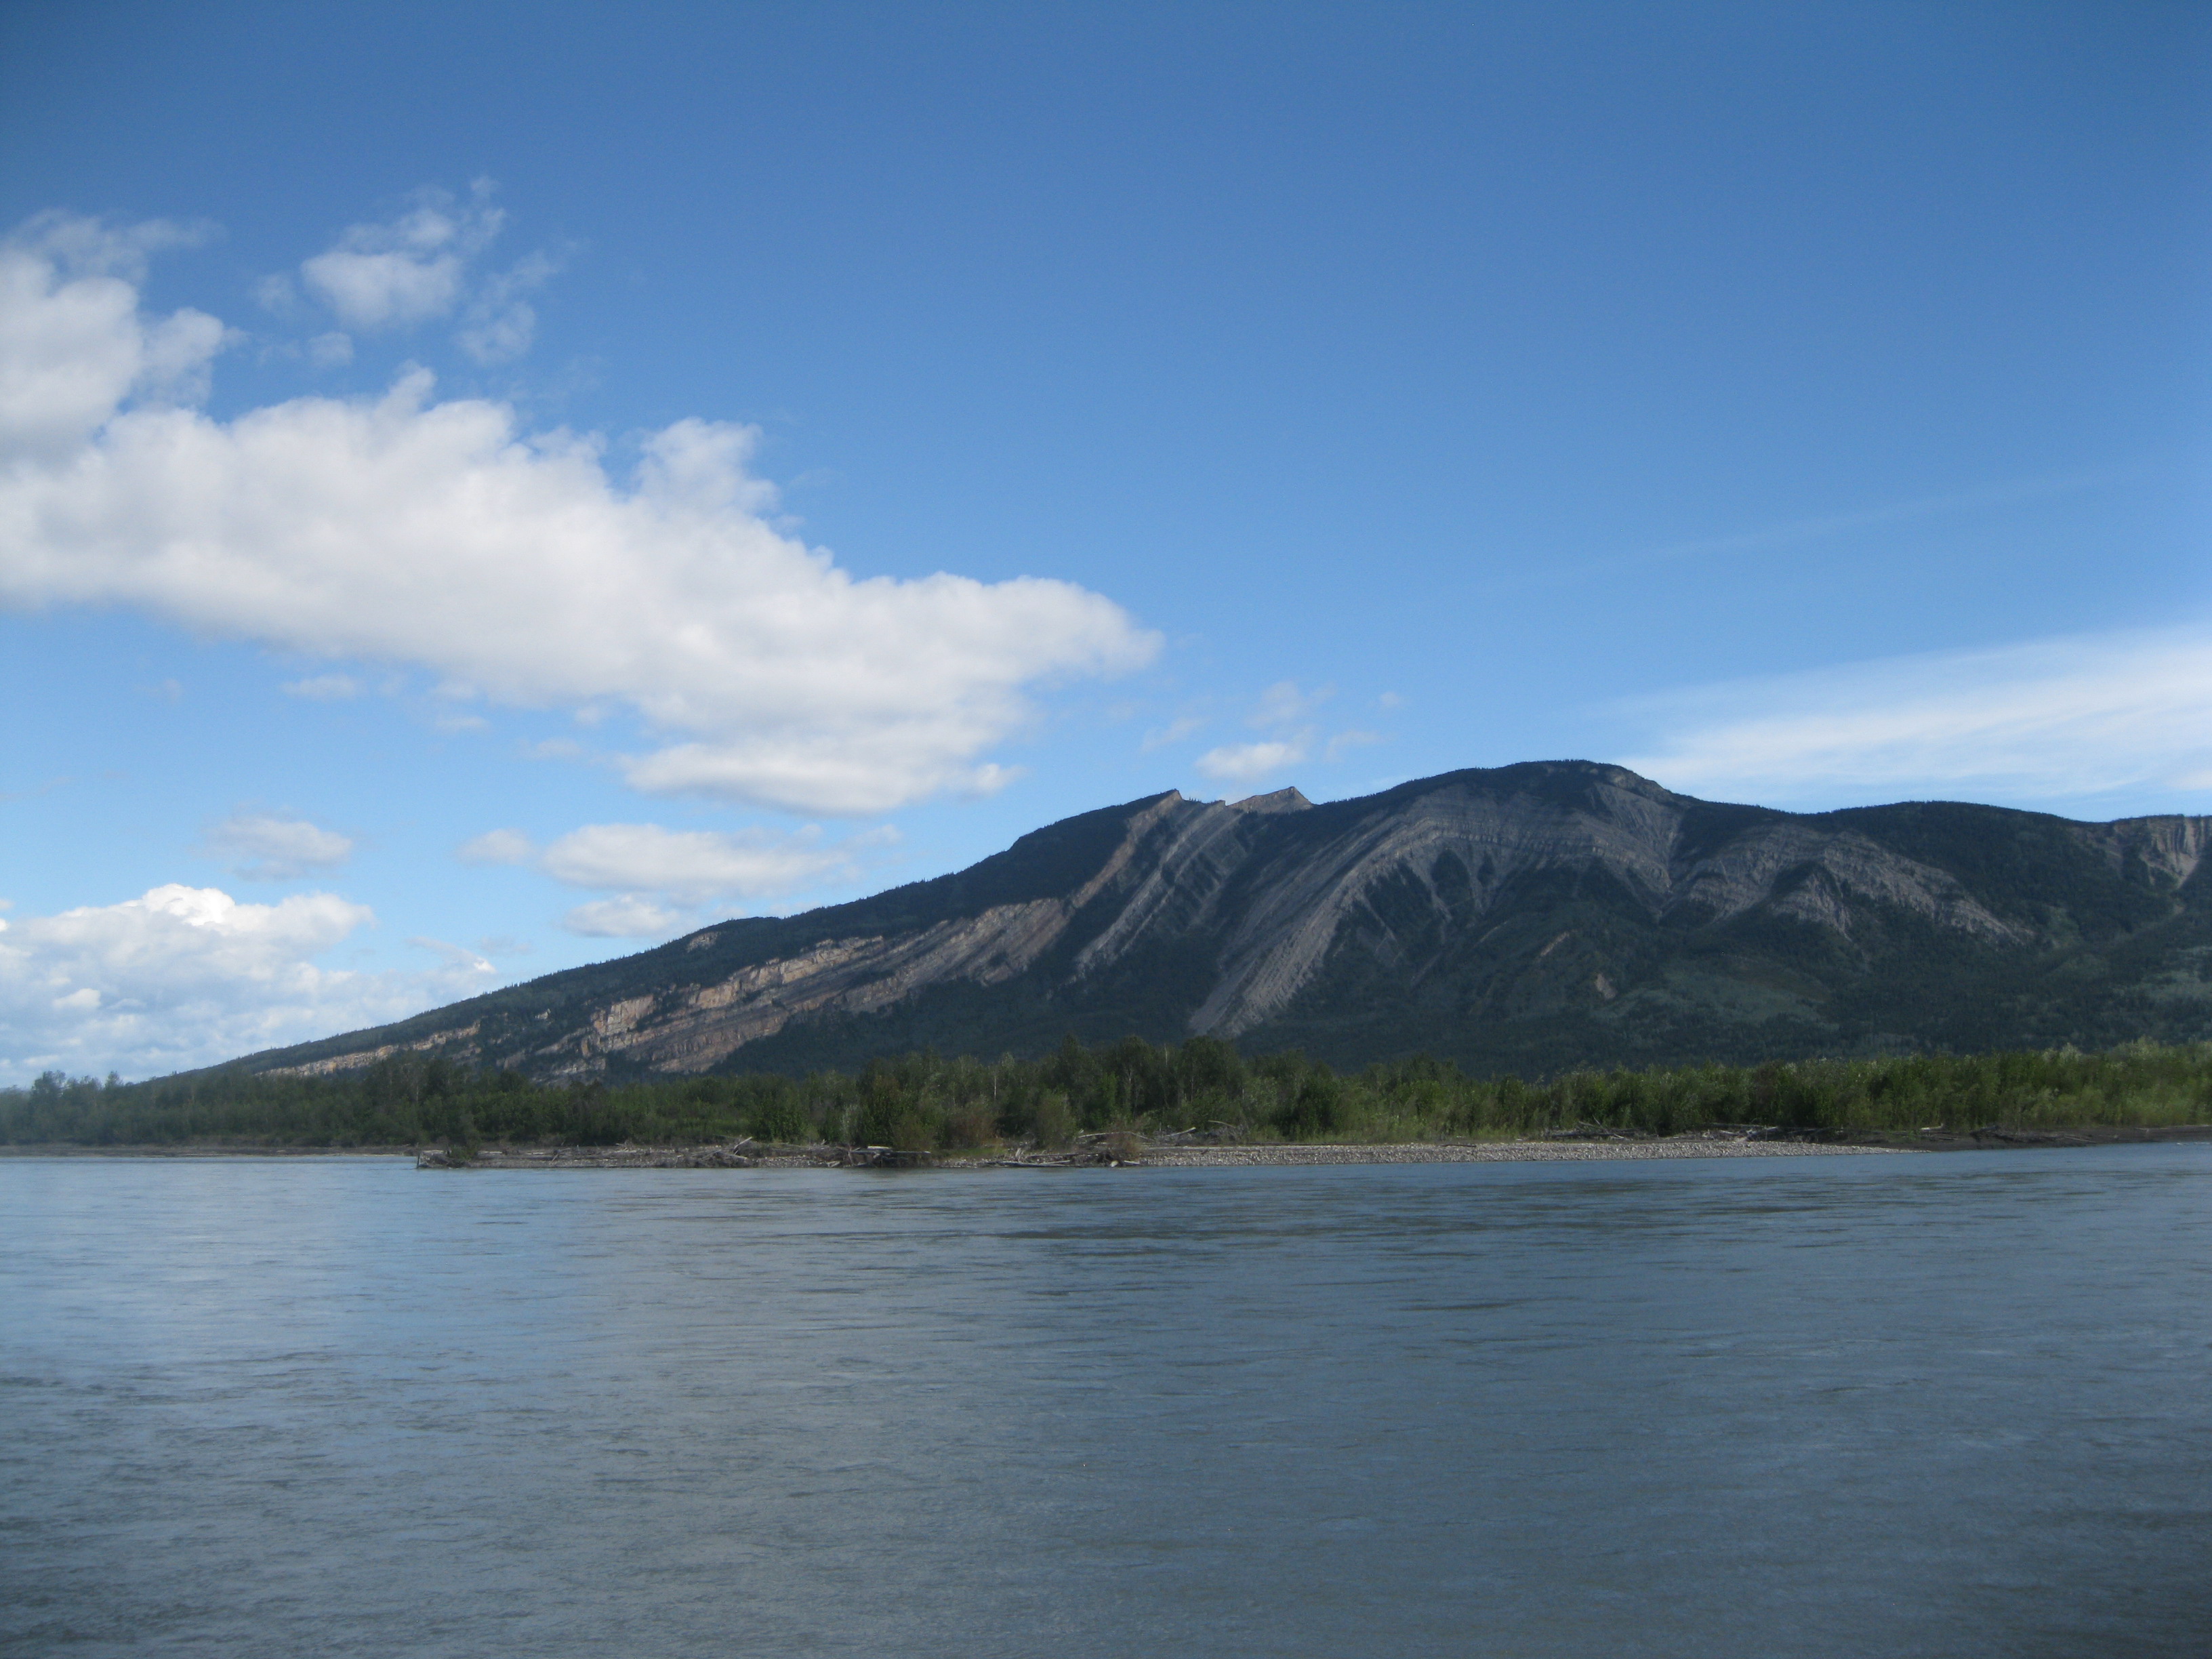
As you continue onwards the journey heads towards the park boundaries. Congratulations on completing your adventure through the Nahanni National Park Reverse. What an amazing accomplishment. There’s a very nice gravel bar just outside the park in an area called Last Chance, perfect for setting up camp. The scenery at Last Chance is really beautiful, so you can get some great shots strolling around here.
Continuing from Last Chance to Nahanni Butte
The following day, you continue down the South Nahanni River outside the park towards the Dene settlement called Nahanni Butte. Paddling down the river will be on flat water all the way, so it will be a pretty tough day. You will have the view of the mountain known as Nahanni Butte all the way, which is 1,396 meters (4,580 ft) tall. Even though it looks close you have to bear in mind that the river is going through some massive bends zig zagging all the way to the settlement.

If you depart pretty early, arrival time at Nahanni Butte will probably be a bit past midday. So it will be perfect spot for lunch. Be careful when heading ashore on the sandbar at Nahanni Butte as it can be very quicksandy and you may just sink into the sand down to your knees. This concludes you trip down the South Nahanni River. This is where the river joins the Liard River.
Nahanni Butte
Have a stroll around Nahanni Butte. It’s quite an interesting native settlement. Check out the local church, the school and there is even a big gymnasium. Walk around the gravel roads and check out the residential housing.
The population is about 80 and it offers limited services. There is a small general store, a hotel and a coffee shop.
Lindberg Landing
A water taxi can be arranged to take you from Nahanni Butte across the Liard River to the Nahanni Butte access road or down the river to Blackstone Territorial Park. There is also the option of padding down 40 km (25 miles) of flat water to Blackstone Territorial Park.
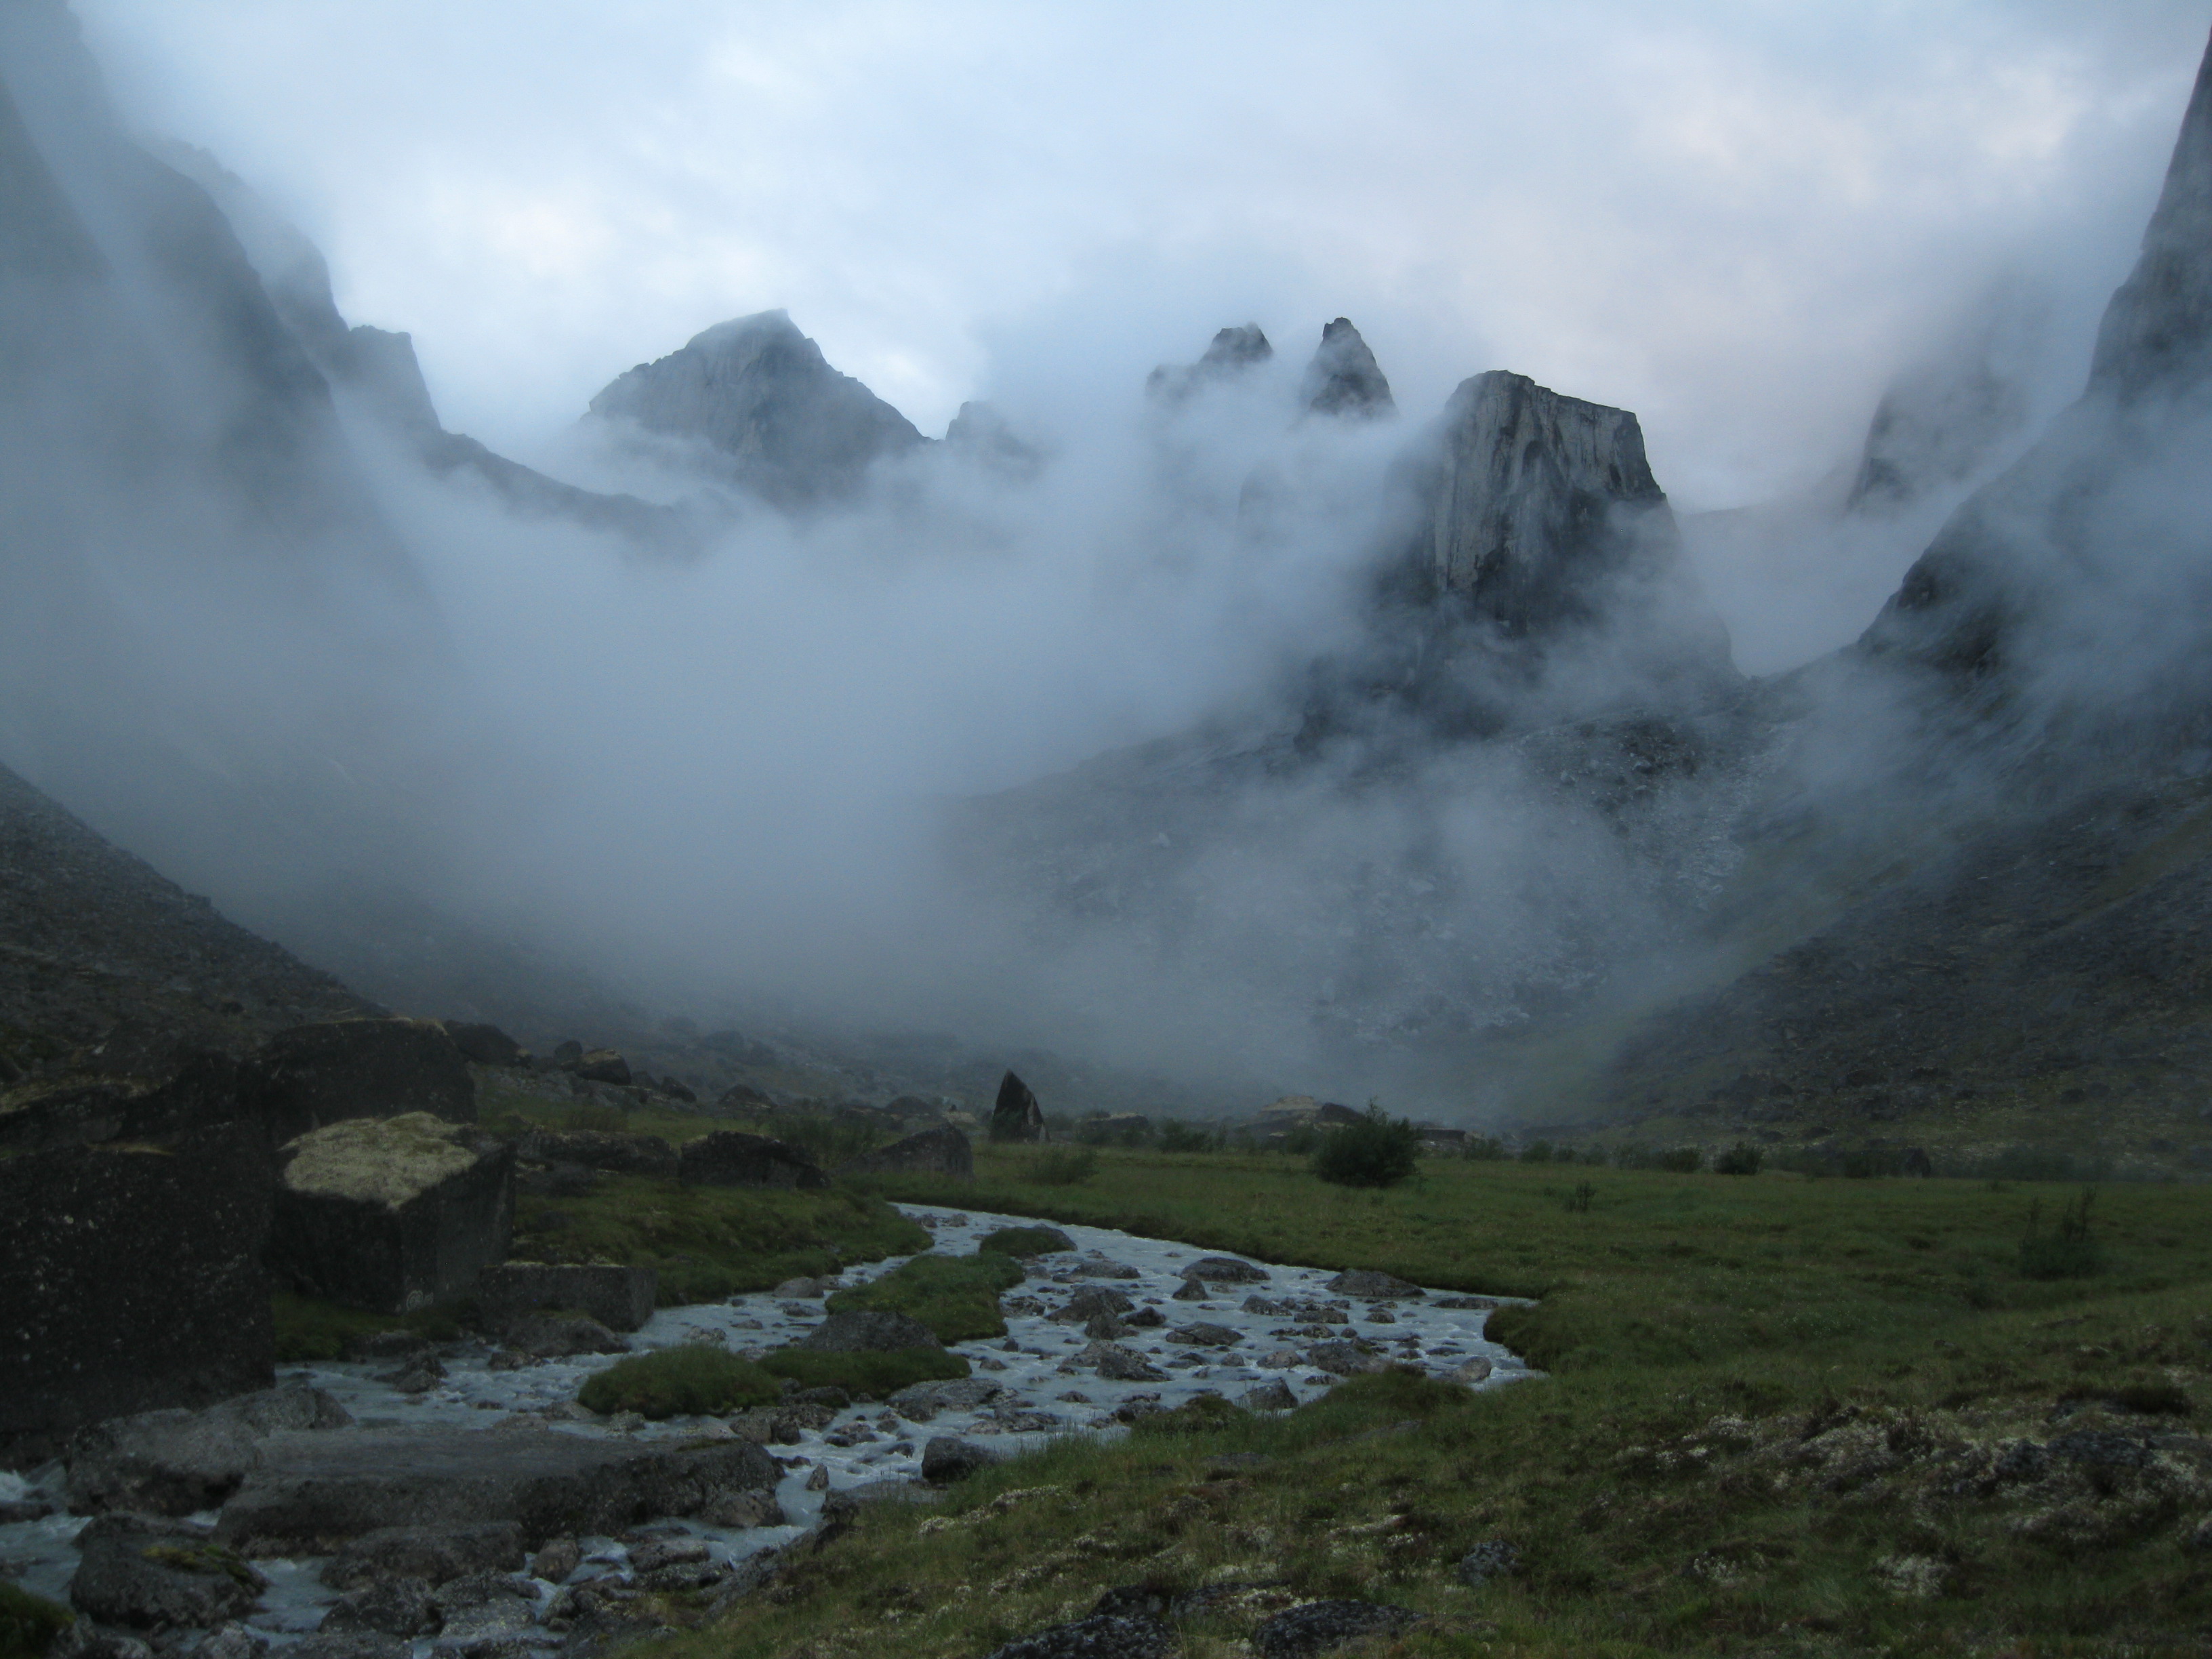
You can also head down to Lindberg Landing which is located on the shore of the Liard River. This is highly recommended and a fantastic option. It will take about an hour and a half to head down there by water taxi which is a speedboat. All your equipment and canoes have to be transported as well. At Lindberg Landing accommodation can be book in cabins, built by her late husband, and have dinner and breakfast the following morning. More importantly you can get your first shower after many days in the wilderness.
Lindberg Landing is managed by an awesome elderly lady called Sue and it is such an awesome experience. At dinner and breakfast Sue will join in and you will get to hear her amazing story. Dinner will include a fantastic salad of fresh greens from her big garden. When strolling around the garden you may just encounter some wild bison strolling around. So cool. This is just the perfect way to finish you trip.
The following morning you will be heading back by minibus to Fort Simpson which will take about 3 hours or so. Upon arrival at Fort Simpson your adventure has finished and you can either stay in town or head on the way back home.